
Today I’ll be reviewing the BeagleY-AI open-source single-board computer (SBC) developed by BeagleBoard.org for artificial intelligence applications. It is powered by a Texas Instruments AM67A quad-core Cortex-A53 processor running at 1.4 GHz along with an ARM Cortex-R5F processor running at 800 MHz for handling general tasks and low-latency I/O operations. The SoC is also equipped with two C7x DSP units and a Matrix Multiply Accelerator (MMA) to enhance AI performance and accelerate deep learning tasks. Each C7x DSP delivers 2 TOPS, offering a total of up to 4 TOPS. Additionally, it includes an Imagination BXS-4-64 graphics accelerator that provides 50 GFlops of performance for multimedia tasks such as video encoding and decoding. For more information, refer to our previous article on CNX Software or visit the manufacturer’s website.
BeagleY-AI unboxing
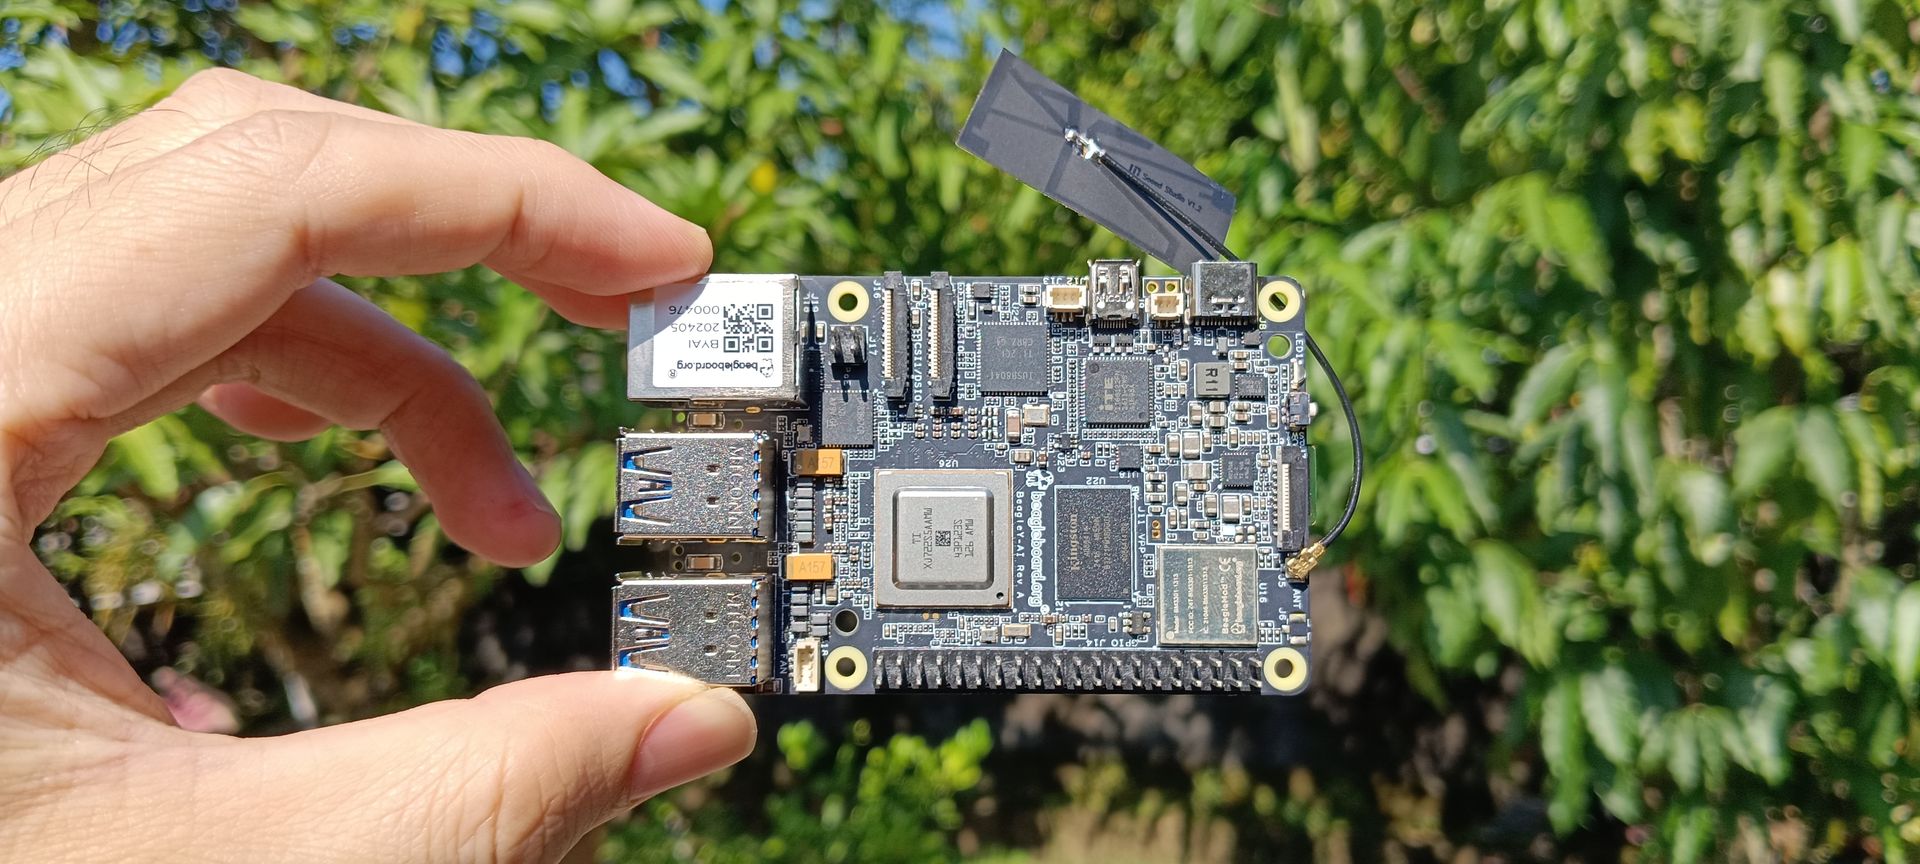
The BeagleY-AI board was shipped from India in a glossy-coated, printed corrugated cardboard box. Inside, the board is protected by foam padding for shock absorption with the BeagleY-AI placed in an additional plastic bag. The board comes with the antenna already attached, but no other accessories are included.


For comparison, I took photos of the BeagleY-AI SBC alongside other boards I have that share a similar form factor, including the Purple Pi OH and Raspberry Pi 4 Model B, as shown in the images below.
 Purple Pi OH, (center) Raspber Pi 4 Model B, and (right) BeagleY-AI.")
 BeagleY-AI, (center) Raspber Pi 4 Model B, and (right) Purple Pi OH.")
Debian 12 operating system installation
I installed the Debian 12 operating system by following the instructions in the Quick Start guide. The setup process is similar to that of a Raspberry Pi or any general SBC, requiring a microSD card to load the OS image. The manufacturer recommends a 32 GB MicroSD card, so I used a 32 GB SanDisk MicroSD card for this review.
The Quick Start guide suggests using either the bb-imager program or Balena Etcher to flash the OS. However, after downloading bb-imager, I found that the program did not run on my computer (Windows 10). I then switched to Balena Etcher, which worked without any problems.
To flash the operating system for the BeagleY-AI board, I started by downloading the OS image from the manufacturer’s website: https://www.beagleboard.org/distros/beagley-ai-debian-12-5-2024-06-19-xfce. The image file I used was approximately 1.4 GB. After downloading, I extracted the .xz file to a .img file, making it ready for flashing. Next, I opened Balena Etcher, selected the .img file, and clicked the ‘Flash!’ button. The flashing process took about 10 minutes, followed by another 10 minutes for validation, and it completed successfully.


After flashing, I needed to edit the default username and password for logging into the OS. I did this by accessing the sysconf.txt file from the BOOT partition, then modifying the user_name and user_password fields to my desired credentials. Once saved, I inserted the SD card into the BeagleY-AI board and it was ready to use.
|
1 2 3 4 |
# user_name - Set a user name for the user (1000) user_name=beagle # user_password - Set a password for user (1000) user_password=FooBar |
Accessing the BeagleY-AI board
The manufacturer recommends three ways to use the BeagleY-AI board: direct USB tethering via a USB Type-C cable, a headless connection through the UART port, and a standalone setup with a monitor, mouse, and keyboard. They also recommend using a 5V power supply capable of delivering at least 3A, especially when connecting peripherals like cooling fans or during heavy usage. Alternatively, if using a USB Type-C to Type-C cable, it should support a current of at least 1000mA. For this review, I experimented with both USB tethering and the standalone connection with my BeagleY-AI sample as detailed below.
Testing with USB tethering
I connected the BeagleY-AI board to my computer, and when it powered up, the red light initially stayed on. After a moment, the LED changed to a pattern of two slow blinks followed by two quick blinks in green, indicating that the board was operational. Once the board was ready, I was able to connect to it via SSH through the Virtual Wired interface created by the board which appeared as ‘Ethernet 2’ on my system. I then opened Windows PowerShell and connected to the BeagleY-AI using SSH with the username and password I had set earlier. The connection was established immediately. Below is an example of the htop output from the USB tethering connection.

Testing with a standalone connection
In this test, I needed to connect the BeagleY-AI to external devices. I used a micro HDMI to full-size HDMI cable to connect to a BenQ EL2870U monitor and a Logitech wireless keyboard and mouse. Additionally, I connected a LAN cable for Ethernet. For power, I used my smartphone’s power adapter, which supplies 5V at 3A. Once powered on, the system booted up and was ready to use after a short while.

For internet usage via Ethernet, the connection worked immediately. However, for Wi-Fi, I first had to enable NetworkManager and start the service. After that, I used nmtui to configure the Wi-Fi settings, which I could to do without any issues.
Checking BeagleY-AI board’s information
Check hardware with inxi
I installed inxi by running the command sudo apt install inxi. When I executed it, inxi correctly detected the CPU as a 4-core Cortex-A53, as expected. Additional system details are provided in the output below.
|
1 2 3 4 5 6 7 8 9 10 11 12 13 14 15 16 17 18 19 20 21 22 23 24 25 26 27 28 29 30 31 32 33 34 35 36 37 38 39 40 41 42 43 44 45 46 |
System: Host: BeagleBone Kernel: 6.1.80-ti-arm64-r57 arch: aarch64 bits: 64 Desktop: Xfce v: 4.18.1 Distro: Debian GNU/Linux 12 (bookworm) Machine: Type: ARM System: BeagleBoard.org BeagleY-AI details: N/A CPU: Info: quad core model: N/A variant: cortex-a53 bits: 64 type: MCP cache: L2: 512 KiB Speed: N/A min/max: N/A cores: No per core speed data found. Graphics: Device-1: hdmi-connector driver: display_connector v: N/A Device-2: am62p-pvr driver: N/A Device-3: am62p-pvr driver: N/A Display: x11 server: X.Org v: 1.21.1.7 driver: X: loaded: N/A unloaded: fbdev,modesetting dri: swrast gpu: display_connector note: X driver n/a resolution: 1920x1080~60Hz API: OpenGL v: 4.5 Mesa 24.1.1-1bbbio0~bookworm+20240610 renderer: llvmpipe (LLVM 17.0.6 128 bits) Audio: Device-1: hdmi-connector driver: display_connector Device-2: simple-audio-card driver: asoc_simple_card API: ALSA v: k6.1.80-ti-arm64-r57 status: kernel-api Server-1: PipeWire v: 1.0.5 status: active Network: Message: No ARM data found for this feature. IF-ID-1: docker0 state: down mac: 02:42:4e:4c:31:c4 IF-ID-2: dummy0 state: down mac: 52:72:fb:6c:55:41 IF-ID-3: eth0 state: down mac: c0:d6:0a:f9:cd:c2 IF-ID-4: usb0 state: down mac: 1c:ba:8c:a2:ed:6b IF-ID-5: usb1 state: down mac: 1c:ba:8c:a2:ed:6d IF-ID-6: wlan0 state: up mac: 10:ca:bf:d8:28:4e Drives: Local Storage: total: 29.72 GiB used: 6.64 GiB (22.3%) ID-1: /dev/mmcblk1 vendor: Smart Modular Tech. model: SH32G size: 29.72 GiB Partition: ID-1: / size: 24.97 GiB used: 6.59 GiB (26.4%) fs: ext4 dev: /dev/mmcblk1p3 Swap: ID-1: swap-1 type: partition size: 4 GiB used: 0 KiB (0.0%) dev: /dev/mmcblk1p2 Sensors: System Temperatures: cpu: N/A mobo: N/A Fan Speeds (RPM): cpu: 0 Info: Processes: 224 Uptime: 58m Memory: 3.7 GiB used: 1.96 GiB (52.8%) Shell: Bash inxi: 3.3.26 |
Benchmarking with sbc-bench
I tested the performance of the BeagleY-AI board by running Thomas Kaiser’s sbc-bench v0.9.67 script, and the results are detailed below. However, I encountered an issue with the temperature reporting section.
|
1 2 3 4 5 6 7 8 9 10 11 12 13 14 15 16 17 18 19 20 21 22 23 24 25 26 27 28 29 30 31 32 33 34 35 36 37 38 39 40 41 42 43 44 45 46 47 48 49 50 51 52 53 54 55 56 57 58 59 60 61 62 63 64 65 66 67 68 69 70 71 72 73 74 75 76 77 78 79 80 81 82 83 84 85 86 87 88 89 90 91 92 93 94 95 96 97 98 99 100 101 102 103 104 105 106 107 108 109 110 111 112 113 114 115 116 117 118 119 120 121 122 123 124 125 126 127 128 129 130 131 132 133 134 135 136 137 138 139 140 141 142 143 144 145 146 147 148 149 150 151 152 153 154 155 156 157 158 159 160 161 162 163 164 165 166 167 |
Starting to examine hardware/software for review purposes... Average load and/or CPU utilization too high (too much background activity). Waiting... Too busy for benchmarking: 01:10:22 up 42 min, 2 users, load average: 1.81, 1.47, 1.62, cpu: % Too busy for benchmarking: 01:10:27 up 42 min, 2 users, load average: 1.75, 1.46, 1.61, cpu: 22% Too busy for benchmarking: 01:10:32 up 42 min, 2 users, load average: 1.61, 1.44, 1.60, cpu: 1% Too busy for benchmarking: 01:10:37 up 42 min, 2 users, load average: 1.48, 1.42, 1.60, cpu: 0% Too busy for benchmarking: 01:10:42 up 42 min, 2 users, load average: 1.36, 1.39, 1.59, cpu: 0% Too busy for benchmarking: 01:10:47 up 42 min, 2 users, load average: 1.25, 1.37, 1.58, cpu: 1% Too busy for benchmarking: 01:10:52 up 42 min, 2 users, load average: 1.15, 1.35, 1.57, cpu: 1% Too busy for benchmarking: 01:10:58 up 42 min, 2 users, load average: 1.22, 1.36, 1.57, cpu: 1% sbc-bench v0.9.67 Installing needed tools: distro packages already installed. Done. Checking cpufreq OPP. Done. Executing tinymembench. Done. Executing RAM latency tester. Done. Executing OpenSSL benchmark. Done. Executing 7-zip benchmark. Done. Throttling test: heating up the device, 5 more minutes to wait. Done. Checking cpufreq OPP again. Done (18 minutes elapsed). Results validation: * No swapping * Background activity (%system) OK Full results uploaded to https://0x0.st/X3n5.bin In case this device is not already represented in official sbc-bench results list then please consider submitting it at https://github.com/ThomasKaiser/sbc-bench/issues with this line: https://0x0.st/X3n5.bin | # BeagleBoard.org BeagleY-AI Tested with sbc-bench v0.9.67 on Sat, 21 Sep 2024 01:29:10 +0000. Full info: [https://0x0.st/X3n5.bin](http://0x0.st/X3n5.bin) ### General information: J722S rev SR1.0, Kernel: aarch64, Userland: arm64 CPU sysfs topology (clusters, cpufreq members, clockspeeds) cpufreq min max CPU cluster policy speed speed core type 0 0 0 - - Cortex-A53 / r0p4 1 0 0 - - Cortex-A53 / r0p4 2 0 0 - - Cortex-A53 / r0p4 3 0 0 - - Cortex-A53 / r0p4 3792 KB available RAM ### Policies (performance vs. idle consumption): Status of performance related policies found below /sys: /sys/module/pcie_aspm/parameters/policy: [default] performance powersave powersupersave ### Clockspeeds (idle vs. heated up): Before: cpu0 (Cortex-A53): Measured: 1247 After: cpu0 (Cortex-A53): Measured: 1247 ### Performance baseline * memcpy: 1553.0 MB/s, memchr: 1419.0 MB/s, memset: 6482.4 MB/s * 16M latency: 228.6 228.8 228.2 228.7 228.4 228.4 267.9 526.0 * 128M latency: 227.9 230.3 227.9 227.7 228.0 227.9 264.3 508.4 * 7-zip MIPS (3 consecutive runs): 3166, 3188, 3188 (3180 avg), single-threaded: 932 * `aes-256-cbc 84256.63k 235248.62k 418798.25k 532320.60k 579160.75k 582576.81k` * `aes-256-cbc 83977.18k 234822.23k 418160.04k 533069.14k 579149.82k 579556.69k` ### Storage devices: * 29.7GB "SanDisk SH32G" UHS SDR104 SD card as /dev/mmcblk1: date 07/2024, manfid/oemid: 0x000003/0x5344, hw/fw rev: 0x8/0x0 ### Swap configuration: * /dev/mmcblk1p2: 4.0G (0K used) on ultra slow SD card storage ### Software versions: * Debian GNU/Linux 12 (bookworm) * Compiler: /usr/bin/gcc (Debian 12.2.0-14) 12.2.0 / aarch64-linux-gnu * OpenSSL 3.0.14, built on 4 Jun 2024 (Library: OpenSSL 3.0.14 4 Jun 2024) ### Kernel info: * `/proc/cmdline: console=ttyS2,115200n8 root=/dev/mmcblk1p3 ro rootfstype=ext4 resume=/dev/mmcblk1p2 rootwait net.ifnames=0 quiet` * Vulnerability Spectre v1: Mitigation; __user pointer sanitization * Kernel 6.1.80-ti-arm64-r57 / CONFIG_HZ=250 Kernel 6.1.80 is not latest 6.1.111 LTS that was released on 2024-09-18. See https://endoflife.date/linux for details. It is somewhat likely that some exploitable vulnerabilities exist for this kernel as well as many unfixed bugs. All known settings adjusted for performance. Device now ready for benchmarking. Once finished stop with [ctrl]-[c] to get info about throttling, frequency cap and too high background activity all potentially invalidating benchmark scores. All changes with storage and PCIe devices as well as suspicious dmesg contents will be reported too. Time CPU n/a load %cpu %sys %usr %nice %io %irq Temp 01:29:17: n/aMHz 3.16 36% 3% 33% 0% 0% 0% °C 01:30:17: n/aMHz 1.16 0% 0% 0% 0% 0% 0% °C 01:31:17: n/aMHz 0.42 0% 0% 0% 0% 0% 0% °C 01:32:17: n/aMHz 0.15 0% 0% 0% 0% 0% 0% °C 01:33:17: n/aMHz 0.06 0% 0% 0% 0% 0% 0% °C ^C Cleaning up. Done. Checking cpufreq OPP again. Done. Clockspeeds now: cpu0 (Cortex-A53): Measured: 1246 ATTENTION: lots of noise in kernel ring buffer since start of monitoring: [ 3686.263811] Deferred event dump:00000000: 00000100 000c0004 00000000 00000000 [ 3686.263836] Deferred event dump:00000010: bebe2020 00000000 00000000 00000000 [ 3686.263844] Deferred event dump:00000020: 00000000 00000000 00000000 00000000 [ 3686.263851] Deferred event dump:00000030: 00000000 00000000 00000000 00000000 [ 3716.499539] Deferred event dump:00000000: 00000100 000c0004 00000000 00000000 [ 3716.499565] Deferred event dump:00000010: bebe2020 00000100 00000000 00000000 [ 3716.499572] Deferred event dump:00000020: 00000000 00000000 00000000 00000000 [ 3716.499579] Deferred event dump:00000030: 00000000 00000000 00000000 00000000 [ 3746.781146] Deferred event dump:00000000: 00000100 000c0004 00000000 00000000 [ 3746.781172] Deferred event dump:00000010: bfbf2121 00000000 00000000 00000000 [ 3746.781179] Deferred event dump:00000020: 00000000 00000000 00000000 00000000 [ 3746.781186] Deferred event dump:00000030: 00000000 00000000 00000000 00000000 [ 3777.001646] Deferred event dump:00000000: 00000100 000c0002 00000000 00000000 [ 3777.001671] Deferred event dump:00000010: bfbf2121 00000100 00000000 00000000 [ 3777.001679] Deferred event dump:00000020: 00000000 00000000 00000000 00000000 [ 3777.001685] Deferred event dump:00000030: 00000000 00000000 00000000 00000000 [ 3807.200218] Deferred event dump:00000000: 00000100 000c0004 00000000 00000000 [ 3807.200244] Deferred event dump:00000010: c0c02222 00000000 00000000 00000000 [ 3807.200251] Deferred event dump:00000020: 00000000 00000000 00000000 00000000 [ 3807.200258] Deferred event dump:00000030: 00000000 00000000 00000000 00000000 [ 3837.499347] Deferred event dump:00000000: 00000100 000c0004 00000000 00000000 [ 3837.499371] Deferred event dump:00000010: bfbf2121 00000100 00000000 00000000 [ 3837.499379] Deferred event dump:00000020: 00000000 00000000 00000000 00000000 [ 3837.499386] Deferred event dump:00000030: 00000000 00000000 00000000 00000000 [ 3867.713361] Deferred event dump:00000000: 00000100 000c0001 00000000 00000000 [ 3867.713388] Deferred event dump:00000010: bebe2020 00000000 00000000 00000000 [ 3867.713395] Deferred event dump:00000020: 00000000 00000000 00000000 00000000 [ 3867.713402] Deferred event dump:00000030: 00000000 00000000 00000000 00000000 [ 3897.927507] Deferred event dump:00000000: 00000100 000c0002 00000000 00000000 [ 3897.927533] Deferred event dump:00000010: bfbf2121 00000100 00000000 00000000 [ 3897.927540] Deferred event dump:00000020: 00000000 00000000 00000000 00000000 [ 3897.927547] Deferred event dump:00000030: 00000000 00000000 00000000 00000000 [ 3928.232823] Deferred event dump:00000000: 00000100 000c0000 00000000 00000000 [ 3928.232851] Deferred event dump:00000010: bbbb1d1d 00000000 00000000 00000000 [ 3928.232858] Deferred event dump:00000020: 00000000 00000000 00000000 00000000 [ 3928.232865] Deferred event dump:00000030: 00000000 00000000 00000000 00000000 Results validation: * No swapping * Background activity (%system) OK |
For reference, the result for the 7-zip multi-core makes the BeagleY-Ai about equivalent to a Raspberry Pi 3B+.
Testing the network performance
During this part of the testing, I was unable to find a router that supports Gigabit Ethernet. Therefore, I used a TP-Link TL-MR100 4G LTE Router, which has a maximum Ethernet speed of 100 Mbps and a Wi-Fi 2.4 GHz communication speed of around 300 Mbps. The results of the iperf3 test are as follows.
Ethernet: send…
|
1 2 3 4 5 6 7 8 9 10 11 12 13 14 15 16 |
(base) kumpee@BeagleBone:~$ iperf3 -c 192.168.1.102 -t 60 -i 10 Connecting to host 192.168.1.102, port 5201 [ 5] local 192.168.1.100 port 45324 connected to 192.168.1.102 port 5201 [ ID] Interval Transfer Bitrate Retr Cwnd [ 5] 0.00-10.00 sec 114 MBytes 95.9 Mbits/sec 264 231 KBytes [ 5] 10.00-20.00 sec 113 MBytes 94.9 Mbits/sec 264 238 KBytes [ 5] 20.00-30.00 sec 113 MBytes 94.9 Mbits/sec 264 214 KBytes [ 5] 30.00-40.00 sec 113 MBytes 94.9 Mbits/sec 264 184 KBytes [ 5] 40.00-50.00 sec 113 MBytes 95.0 Mbits/sec 264 187 KBytes [ 5] 50.00-60.00 sec 113 MBytes 95.0 Mbits/sec 264 200 KBytes - - - - - - - - - - - - - - - - - - - - - - - - - [ ID] Interval Transfer Bitrate Retr [ 5] 0.00-60.00 sec 680 MBytes 95.1 Mbits/sec 1584 sender [ 5] 0.00-60.01 sec 679 MBytes 94.9 Mbits/sec receiver iperf Done |
Ethernet: receive…
|
1 2 3 4 5 6 7 8 9 10 11 12 13 14 15 16 17 |
(base) kumpee@BeagleBone:~$ iperf3 -c 192.168.1.102 -t 60 -i 10 -R Connecting to host 192.168.1.102, port 5201 Reverse mode, remote host 192.168.1.102 is sending [ 5] local 192.168.1.100 port 55174 connected to 192.168.1.102 port 5201 [ ID] Interval Transfer Bitrate [ 5] 0.00-10.00 sec 113 MBytes 94.8 Mbits/sec [ 5] 10.00-20.00 sec 113 MBytes 94.9 Mbits/sec [ 5] 20.00-30.00 sec 113 MBytes 94.9 Mbits/sec [ 5] 30.00-40.00 sec 113 MBytes 94.9 Mbits/sec [ 5] 40.00-50.00 sec 113 MBytes 94.9 Mbits/sec [ 5] 50.00-60.00 sec 113 MBytes 94.9 Mbits/sec - - - - - - - - - - - - - - - - - - - - - - - - - [ ID] Interval Transfer Bitrate [ 5] 0.00-60.00 sec 681 MBytes 95.2 Mbits/sec sender [ 5] 0.00-60.00 sec 679 MBytes 94.9 Mbits/sec receiver iperf Done. |
Wi-Fi 2.4GHz: send…
|
1 2 3 4 5 6 7 8 9 10 11 12 13 14 15 16 |
(base) kumpee@BeagleBone:~$ iperf3 -c 192.168.1.100 -t 60 -i 10 Connecting to host 192.168.1.100, port 5201 [ 5] local 192.168.1.103 port 52998 connected to 192.168.1.100 port 5201 [ ID] Interval Transfer Bitrate Retr Cwnd [ 5] 0.00-10.00 sec 28.1 MBytes 23.6 Mbits/sec 3 208 KBytes [ 5] 10.00-20.00 sec 30.4 MBytes 25.5 Mbits/sec 6 184 KBytes [ 5] 20.00-30.00 sec 30.8 MBytes 25.8 Mbits/sec 3 610 KBytes [ 5] 30.00-40.00 sec 30.0 MBytes 25.2 Mbits/sec 3 585 KBytes [ 5] 40.00-50.00 sec 31.2 MBytes 26.2 Mbits/sec 7 399 KBytes [ 5] 50.00-60.00 sec 31.2 MBytes 26.2 Mbits/sec 1 408 KBytes - - - - - - - - - - - - - - - - - - - - - - - - - [ ID] Interval Transfer Bitrate Retr [ 5] 0.00-60.00 sec 182 MBytes 25.4 Mbits/sec 23 sender [ 5] 0.00-60.05 sec 179 MBytes 25.0 Mbits/sec receiver iperf Done. |
Wi-Fi 2.4GHz: recevie…
|
1 2 3 4 5 6 7 8 9 10 11 12 13 14 15 16 17 |
(base) kumpee@BeagleBone:~$ iperf3 -c 192.168.1.100 -t 60 -i 10 -R Connecting to host 192.168.1.100, port 5201 Reverse mode, remote host 192.168.1.100 is sending [ 5] local 192.168.1.103 port 52566 connected to 192.168.1.100 port 5201 [ ID] Interval Transfer Bitrate [ 5] 0.00-10.00 sec 30.5 MBytes 25.6 Mbits/sec [ 5] 10.00-20.00 sec 27.5 MBytes 23.1 Mbits/sec [ 5] 20.00-30.00 sec 26.4 MBytes 22.1 Mbits/sec [ 5] 30.00-40.00 sec 27.3 MBytes 22.9 Mbits/sec [ 5] 40.00-50.00 sec 29.5 MBytes 24.8 Mbits/sec [ 5] 50.00-60.00 sec 17.3 MBytes 14.5 Mbits/sec - - - - - - - - - - - - - - - - - - - - - - - - - [ ID] Interval Transfer Bitrate [ 5] 0.00-60.13 sec 160 MBytes 22.4 Mbits/sec sender [ 5] 0.00-60.00 sec 158 MBytes 22.2 Mbits/sec receiver iperf Done. |
Testing YouTube video playback on the BeagleY-AI board
I tested video playback performance on YouTube using the web browsers included with the BeagleY-AI operating system image, which are Firefox ESR 111.15.0 (64-bit), Firefox Nightly 129.0a1 (2024-06-18) (64-bit), and Chromium 129.0.6668.58 (64-bit). I experimented with YouTube video playback in full-screen mode at various resolutions, from 144p to 2160p. The BeagleY-AI board performs best at 480p, with a dropped frame rate of about 10–15%. Lowering the resolution to 144p results in a slight increase in stuttering.
When I changed the video resolution to 1440p or 2160p, I found that it was almost impossible to play the videos smoothly possibly due to connection issues/limited speed (over 100Mbps Ethernet) as the buffer was often empty. It’s especially true in the case of 2160p videos, as they couldn’t be played at all, as shown in the screenshot examples from my tests with Chromium.
.")
.")
.")
.")
.")
.")
.")
.")
Testing web browsers with Speedometer 2.0 and 3.0
For this test, I connected to the Internet via Ethernet and tested the performance of web applications in various web browsers using Speedometer 2.0 and Speedometer 3.0. The results are shown in the images below. Chromium and Firefox Nightly produced similar scores, while Firefox ESR consistently had the lowest scores, regardless of whether it was tested with Speedometer 2.0 or 3.0.
Testing with Speedometer 2.0.


Testing with Speedometer 3.0.


Testing WebGL rendering on web browsers
When testing 3D graphics performance in web browsers using WebGL, I opened the browser in full-screen mode with one fish displayed. The results were consistent across all browsers: the processing struggled to keep up. I found that Chromium rendered at only 1 FPS, while both versions of Firefox had a rendering rate of 3 FPS, approximately.


Testing 3D graphics rendering with glmark-es2
In this test, I evaluated the performance of GLES using the glmark2-es2 command over 4–5 times. The average glmark2 score was around 32, as shown in the example of the first run below. The performance was fairly consistent, with rendering being mostly smooth and only minor, insignificant stuttering. However, during the terrain rendering test, there were significant stutters, with the frame rate dropping to just 1–2 FPS. The score is low due to the drivers for the Imagination GPU not being enabled (llvmpipe indicates software rendering):
|
1 2 3 4 5 6 7 8 9 10 11 12 13 14 15 16 17 18 19 20 21 22 23 24 25 26 27 28 29 30 31 32 33 34 35 36 37 38 39 40 41 42 43 44 45 46 47 48 |
libEGL warning: DRI2: failed to authenticate MESA: error: ZINK: vkCreateInstance failed (VK_ERROR_INCOMPATIBLE_DRIVER) libEGL warning: egl: failed to create dri2 screen ======================================================= glmark2 2023.01 ======================================================= OpenGL Information GL_VENDOR: Mesa GL_RENDERER: llvmpipe (LLVM 17.0.6, 128 bits) GL_VERSION: OpenGL ES 3.2 Mesa 24.1.1-1bbbio0~bookworm+20240610 Surface Config: buf=32 r=8 g=8 b=8 a=8 depth=32 stencil=0 samples=0 Surface Size: 800x600 windowed ======================================================= [build] use-vbo=false: FPS: 47 FrameTime: 21.595 ms [build] use-vbo=true: FPS: 49 FrameTime: 20.558 ms [texture] texture-filter=nearest: FPS: 60 FrameTime: 16.673 ms [texture] texture-filter=linear: FPS: 59 FrameTime: 16.952 ms [texture] texture-filter=mipmap: FPS: 54 FrameTime: 18.705 ms [shading] shading=gouraud: FPS: 35 FrameTime: 29.227 ms [shading] shading=blinn-phong-inf: FPS: 29 FrameTime: 34.691 ms [shading] shading=phong: FPS: 26 FrameTime: 39.425 ms [shading] shading=cel: FPS: 26 FrameTime: 39.543 ms [bump] bump-render=high-poly: FPS: 15 FrameTime: 68.842 ms [bump] bump-render=normals: FPS: 59 FrameTime: 17.110 ms [bump] bump-render=height: FPS: 57 FrameTime: 17.700 ms [effect2d] kernel=0,1,0;1,-4,1;0,1,0;: FPS: 29 FrameTime: 35.347 ms [effect2d] kernel=1,1,1,1,1;1,1,1,1,1;1,1,1,1,1;: FPS: 17 FrameTime: 62.024 ms [pulsar] light=false:quads=5:texture=false: FPS: 54 FrameTime: 18.716 ms [desktop] blur-radius=5:effect=blur:passes=1:separable=true:windows=4: FPS: 11 FrameTime: 99.286 ms [desktop] effect=shadow:windows=4: FPS: 19 FrameTime: 53.184 ms [buffer] columns=200:interleave=false:update-dispersion=0.9:update-fraction=0.5:update-method=map: FPS: 22 FrameTime: 47.161 ms [buffer] columns=200:interleave=false:update-dispersion=0.9:update-fraction=0.5:update-method=subdata: FPS: 22 FrameTime: 47.581 ms [buffer] columns=200:interleave=true:update-dispersion=0.9:update-fraction=0.5:update-method=map: FPS: 24 FrameTime: 41.949 ms [ideas] speed=duration: FPS: 31 FrameTime: 32.799 ms [jellyfish] <default>: FPS: 16 FrameTime: 63.459 ms [terrain] <default>: FPS: 2 FrameTime: 920.595 ms [shadow] <default>: FPS: 22 FrameTime: 47.507 ms [refract] <default>: FPS: 3 FrameTime: 374.035 ms [conditionals] fragment-steps=0:vertex-steps=0: FPS: 46 FrameTime: 22.173 ms [conditionals] fragment-steps=5:vertex-steps=0: FPS: 40 FrameTime: 25.637 ms [conditionals] fragment-steps=0:vertex-steps=5: FPS: 45 FrameTime: 22.312 ms [function] fragment-complexity=low:fragment-steps=5: FPS: 40 FrameTime: 25.353 ms [function] fragment-complexity=medium:fragment-steps=5: FPS: 32 FrameTime: 32.015 ms [loop] fragment-loop=false:fragment-steps=5:vertex-steps=5: FPS: 40 FrameTime: 25.430 ms [loop] fragment-steps=5:fragment-uniform=false:vertex-steps=5: FPS: 40 FrameTime: 25.459 ms [loop] fragment-steps=5:fragment-uniform=true:vertex-steps=5: FPS: 37 FrameTime: 27.729 ms ======================================================= glmark2 Score: 32 |
Object detection on the BeagleY-AI SBC with TensorFlow Lite
The next test of the review involved using artificial intelligence for object detection on the BeagleY-AI with TensorFlow Lite. I followed the sample steps provided by the manufacturer’s website, which were straightforward and easy to follow. I was able to copy, paste, and run the commands without any issues. The general steps are as follows. First, I installed the lightweight version of Conda using Miniforge/Mambaforge 24.3.0.0.
|
1 2 |
wget https://github.com/conda-forge/miniforge/releases/download/24.3.0-0/Mambaforge-24.3.0-0-Linux-aarch64.sh bash Mambaforge-24.3.0-0-Linux-aarch64.sh |
Next, I created a new virtual environment, as suggested in the manufacturer’s example, using Python version 3.9 before installing numpy and OpenCV with the following command:
|
1 2 3 4 |
conda create --name myenv python=3.9 pip install https://github.com/google-coral/pycoral/releases/download/v2.0.0/tflite_runtime-2.5.0.post1-cp39-cp39-linux_aarch64.whl pip install numpy==1.26.4 pip install opencv-python |
Next, I downloaded pre-trained models from Google. For this example, I selected the COCO SSD MobileNet model.
|
1 2 3 4 |
mkdir object-recognition cd object-recognition wget https://storage.googleapis.com/download.tensorflow.org/models/tflite/coco_ssd_mobilenet_v1_1.0_quant_2018_06_29.zip unzip coco_ssd_mobilenet_v1_1.0_quant_2018_06_29.zip -d TFLite_model |
I initially tested the functionality with still images by modifying the code provided by the manufacturer, and it worked well. To experiment with real-time operation, I connected a RAPOO C260 1080p USB webcam to the USB port of the BeagleY-AI board. I then ran the following commands to check the device and retrieve camera information. In the manufacturer’s example, they specified the device as number 3, and in my test, I obtained the same result, allowing me to proceed with the setup immediately.
|
1 2 3 4 5 6 7 8 |
ls -l /dev | grep video crw-rw---- 1 root video 29, 0 Sep 22 15:26 fb0 crw-rw----+ 1 root video 234, 0 Sep 22 15:27 media0 crw-rw----+ 1 root video 81, 0 Sep 22 15:26 video0 crw-rw----+ 1 root video 81, 1 Sep 22 15:26 video1 crw-rw----+ 1 root video 81, 2 Sep 22 15:26 video2 crw-rw----+ 1 root video 81, 3 Sep 22 15:27 video3 crw-rw----+ 1 root video 81, 4 Sep 22 15:27 video4 |
Aside from preparing the camera class, the provided Python sample includes code for loading and preparing the model:
|
1 2 3 4 5 6 7 8 9 10 11 12 13 14 15 |
... # Load labels and interpreter labels = load_labels(labelmap_path) interpreter = Interpreter(model_path=model_path) interpreter.allocate_tensors() # Get model details input_details = interpreter.get_input_details() output_details = interpreter.get_output_details() height, width = input_details[0]['shape'][1:3] floating_model = (input_details[0]['dtype'] == np.float32) outname = output_details[0]['name'] boxes_idx, classes_idx, scores_idx = (1, 3, 0) if 'StatefulPartitionedCall' in outname else (0, 1, 2) ... |
After that, it calls functions to detect objects in the image. This part of the code converts the image into a float32 format and normalizes the data range to [-1, 1] before detecting objects in the image and drawing the obtained results.
|
1 2 3 4 5 6 7 8 9 10 11 12 13 14 15 16 17 18 19 |
... input_data = np.expand_dims(frame_resized, axis=0) if floating_model: input_data = (np.float32(input_data) - 127.5) / 127.5 interpreter.set_tensor(input_details[0]['index'], input_data) interpreter.invoke() boxes = interpreter.get_tensor(output_details[boxes_idx]['index'])[0] classes = interpreter.get_tensor(output_details[classes_idx]['index'])[0] scores = interpreter.get_tensor(output_details[scores_idx]['index'])[0] for i in range(len(scores)): if min_conf_threshold < scores[i] <= 1.0: ymin, xmin, ymax, xmax = [int(coord) for coord in (boxes[i] * [resH, resW, resH, resW])] cv2.rectangle(frame, (xmin, ymin), (xmax, ymax), (10, 255, 0), 2) ... ... |
I ran the code and obtained the output shown in the image below. The BeagleY-AI displayed a frame rate of only 3 FPS, which is similar to the results reported by other users. I found that some users recommend using the Texas Instruments Deep Learning (TIDL) library for faster processing on the BeagleY-AI. However, some users have encountered issues with the TI image, which is still not fully functional, and there are no official examples from the manufacturer at this time. Therefore, I stopped my experiment at this point.
.")
.")
Additionally, I opened htop to monitor CPU usage while running the object detection code with TensorFlow Lite. From visual observation, it utilized about 50% of the CPU on average.

Image processing with MediaPipe
Since I couldn’t find other official examples from the BeagleY-AI manufacturer related to artificial intelligence or image processing, I decided to test the BeagleY-AI with MediaPipe machine learning library from Google. In this section, I will experiment with using Python for tasks such as object detection, image segmentation, face landmark detection, and gesture recognition.
To set up MediaPipe, I followed the examples in the MediaPipe Guide for each topic I was interested in. First, I installed MediaPipe using the following command. Next, I prepared to use the selected modules by properly configuring the options for the classes I wanted to use. After setting the options, I created instances of those classes before invoking them.
|
1 |
python -m pip install mediapipe |
The example below demonstrates setting up object detection, where I needed to select and download the desired model. In this case, I chose the EfficientDet-Lite0 model and configured the required options to prepare it for use.
|
1 2 3 4 5 6 7 8 9 10 11 12 13 14 15 16 17 |
import mediapipe as mp from mediapipe.tasks import python from mediapipe.tasks.python import vision ... BaseOptions = mp.tasks.BaseOptions ObjectDetector = mp.tasks.vision.ObjectDetector ObjectDetectorOptions = mp.tasks.vision.ObjectDetectorOptions VisionRunningMode = mp.tasks.vision.RunningMode ... model_path = '/home/kumpee/python/efficientdet_lite0.tflite' base_options = BaseOptions(model_asset_path=model_path) ... options = ObjectDetectorOptions( base_options=base_options, running_mode=VisionRunningMode.IMAGE, max_results=5,) detector = ObjectDetector.create_from_options(options) |
After that, the object detector can be called as needed. In my case, since I was reading video frames using OpenCV, I needed to convert the image data into a mp.Image format so that MediaPipe could process it. Then, I called the detect method to obtain the results and display them, as shown in the sample code below:
|
1 2 3 4 5 6 7 8 9 10 11 12 13 14 15 16 17 18 19 20 21 22 23 24 25 |
... mp_image = mp.Image( image_format=mp.ImageFormat.SRGB, data=frame) # Run the task detection_result = detector.detect(mp_image) for obj in detection_result.detections: x1 = int(obj.bounding_box.origin_x*sf_x) y1 = int(obj.bounding_box.origin_y*sf_y) x2 = x1 + int(obj.bounding_box.width*sf_x) y2 = y1 + int(obj.bounding_box.height*sf_y) cv2.rectangle( frame_ori, (x1, y1), (x2, y2), (255,255,0), 1) cv2.putText( frame_ori, "{:}".format(obj.categories[0].category_name), (x1, y1), cv2.FONT_HERSHEY_SIMPLEX, 0.5, (255, 255, 255), 1, cv2.LINE_AA) ... |
I found that using MediaPipe for object detection resulted in a display rate of about 1 FPS, while gesture recognition had an average display rate of around 1.5 FPS. The face landmark detector performed faster, reaching approximately 4.3 FPS. For image segmentation, I experimented with separating the person in the image from the background and slightly blurring the background. With a kernel size of 25×25 pixels for the GaussianBlur function, the rendering performance was about 7 FPS. When I reduced the kernel size to 3×3 pixels, the display rate increased to 9.5 FPS.


Testing extracting SIFT features
Another aspect I wanted to test is the Scale-Invariant Feature Transform (SIFT), an algorithm that extracts significant features from images. These features are useful for various applications, such as image matching, mosaicking, and epipolar geometry computation.
Using SIFT in modern OpenCV is straightforward, and it runs on the BeagleY-AI without any issues. In the sample code below, I used the same USB webcam and initialized the SIFT feature extractor by calling cv2.SIFT_create(). I then used it to extract features, or keypoints, from each video frame by calling the detect() method and used cv2.drawKeypoints() to visualize the detected keypoints. The program’s display rate was approximately 0.1 FPS at a video resolution of 1920×1080 pixels, around 0.5 FPS at 1280×720 pixels, and about 7.5 FPS at 320×240 pixels, as shown in the example images below.
|
1 2 3 4 5 6 7 8 9 10 11 |
import cv2 ... def main(): ... sift = cv2.SIFT_create() .... frame_gray = cv2.cvtColor(frame, cv2.COLOR_BGR2GRAY) .... kp = sift.detect(frame_gray, None) img = cv2.drawKeypoints(frame, kp, frame) .... |


Other testings
Measuring temperature
For testing the temperature of the BeagleY-AI board, I conducted experiments during the daytime when the room temperature was approximately 31°C. Using a FLIR E4 thermal camera, I measured the board’s temperature three times. First, I measured right after a fresh boot without running any programs and found that the maximum temperature of the board was around 42–45°C.
Next, I tested the board under full load by playing 4K videos on YouTube at 2160p in full-screen mode while simultaneously running object detection code using TensorFlow Lite. I let the BeagleY-AI board run in this state for about 10 minutes before measuring the temperature again. The maximum temperature reached approximately 61°C and continued to rise slowly. After that, I used a desktop fan to cool the board by directing airflow over it. I found that the temperature dropped almost immediately, taking a short while to decrease to about 51°C.


BeagleY-AI power consumption
I measured the power consumption of the BeagleY-AI board using a USB Power Meter. I found that when the BeagleY-AI board is in an idle state, it consumes approximately 4.7–4.8W. During full-screen playback of 4K YouTube videos, the board consumes about 5.5–5.8W, as shown in the example images below.


Checking other open-source files
For additional information about the BeagleY-AI board, you can visit https://openbeagle.org/beagley-ai/beagley-ai, which provides additional access to resources like 3D files, certificates, board photos, and PCB files. The 3D files are available in STP (STEP) format, which I was able to open using the Autodesk Viewer website. The schematic diagram is provided in PDF format, and the manufacturer supplies PCB information as BRD files. Since I don’t have a program to open BRD files, I used KiCad’s Gerber Viewer to open the Gerber files, as shown in the images below.
.")
.")
The following images are some of the provided Gerber files of the BeagleY-AI, viewed in KiCAD’s Gerber Viewer.


Conclusion
Overall, our review showed the BeagleY-AI is a promising SBC with CPU performance similar to the Raspberry Pi 3B+ and built-in 3D graphics, video encoder/decoder, and DSPs for AI acceleration. The problem is that more work is needed on the software side since support for all those accelerators does not seem to be fully implemented. I also found it challenging to locate official tutorials on the manufacturer’s website that cover more advanced programming and testing of the AI processing unit. At the time of writing, I only found examples using TensorFlow Lite, and the rest use software processing with the CPU only.
I would like to thank the manufacturer for providing the BeagleY-AI for review. Those interested can purchase the board for about $70 on Seeed Studio or Newark/Element14.

My main research areas are digital image/audio processing, digital photogrammetry, AI, IoT, and UAV. I am open to other subjects as well.
Support CNX Software! Donate via cryptocurrencies, become a Patron on Patreon, or purchase goods on Amazon or Aliexpress


58 celsius degree in stress. How do you reach this. My is 80 degree. Board very quick get hot. Iam using heatsing from rpi.
I had high hopes for this board, and yes I agree, its running extremely hot even when idle. Bought 3 boards for evaluation and all three are the same.
Very interesting, many thanks for your work. From your personal assessment, could be Beagle cheaper alternative to Rpi?
Well, this seems disappointing! I’m glad I didn’t buy it just yet. Seems like the actual AI/computer vision capabilities fall well-short of what’s advertised.
The problem is that the software does not seem to be fully ready. Maybe it will be (much) better in a few months.
We initially wanted to review the board with the Arducam Dual V3Link Camera Kit mentioned in the wiki, but after waiting for a few weeks it was made clear to us that support would take longer than expected. So we went ahead with the review of the board itself without a camera.