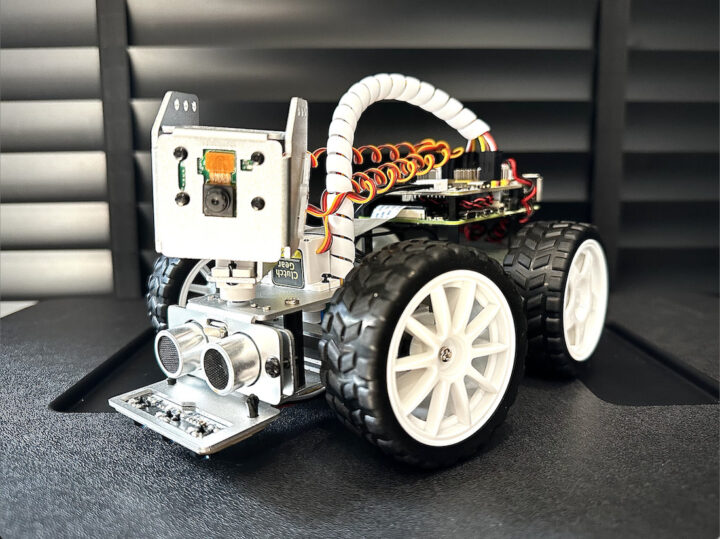
SunFounder PiCar-X 2.0 is an AI-powered self-driving robot car using the Raspberry Pi 3/4 as the main processing board. It is equipped with a camera module that can be moved by a 2-axis servo motor, allowing the camera to pan or tilt, an ultrasonic module for detecting distant objects, and a line detection module. The PiCar-X robot can also perform computer vision tasks such as color detection, face detection, traffic signs detection, automatic obstacle avoidance, and automatic line tracking.
The PiCar-X can be programmed with two computer languages: Blockly-based Ezblock Studio drag-and-drop program and Python, and the robot works with OpenCV computer vision library and TensorFlow for AI workloads. Finally, you can also control the robot through the SunFounder controller application on your mobile phone. The company sent us a sample of the Picar-X 2.0 for review, so let’s get started.
SunFounder PiCar-X 2.0 robot overview
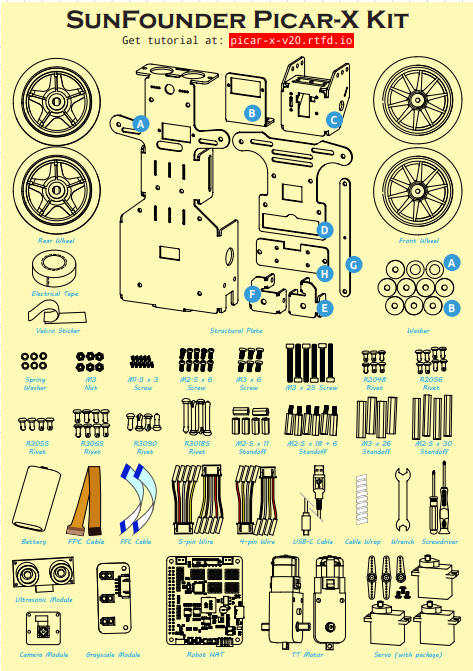
The PiCar-X robot kit comes with several parts: a structural unit, DC electric motors, robot wheels, a RoboHat expansion board, an ultrasonic sensor, a line sensor, a servo motor, a battery, and a set of nuts and screws used for assembly. Since it comes as a kit, the students will have to assemble it themselves and as a result, learn about assembling robots and how to connect the wires of this robot set. Additional details and assembly instructions can be found in the documentation. Our kit also came with a Raspberry Pi 4 with 4GB RAM.
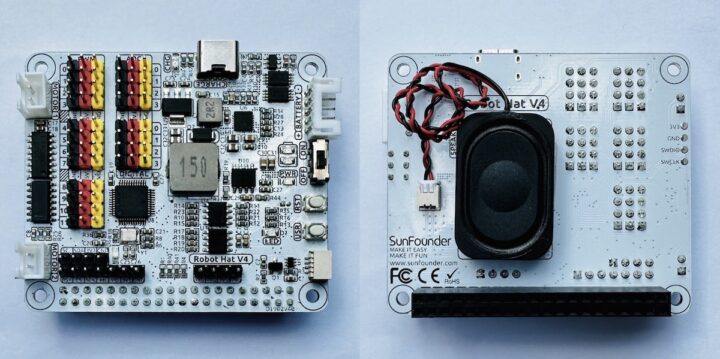
SunFounder PiCar-X Robot HAT
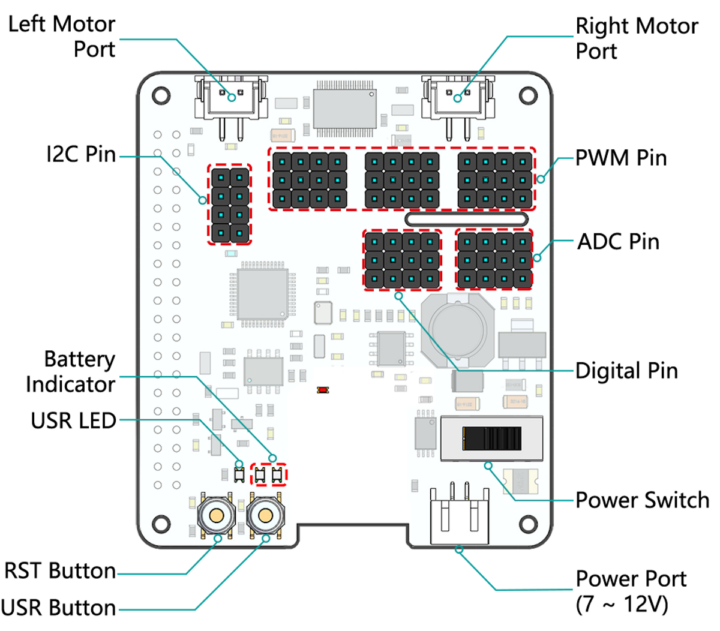
SunFounder PiCar-X Robot HAT expansion board features an on-off switch, two motor drive ports to connect left and right motors and twelve servo motor drive ports that can be used to steer the wheels of the car and control the pan-tilt of the camera. Furthermore, the Robot HAT expansion board also includes a speaker to play sound effects, language feedback, or MP3 music. Expansion ports for ADC, PWM, and I2C are available for expansion, and a 7-12 volt battery can be connected for power and charged through a USB-C port with an LED indicating the battery charging status.
PiCar-X Robot HAT specifications:
- Motor port left/right – 2-channel XH2.54 ports, one for the left motors connected to GPIO 4 and the other for the right motors connected to GPIO 5.
- 2x I2C pin from Raspberry Pi
- PWM – 12x PWM (P0-P11)
- 4x ADC pins (A0-A3)
- 4x digital pins (D0-D3)
- Battery status indicators
- LED 2 lights up when the voltage is more than 7.8 volts
- LED 1 lights up when the voltage is between 6.7 – 7.8 volts
- Both LEDs turn off when the voltage is lower than 6.7 volts
- Supply Voltage – 7 – 12V DC via a 2-pin PH2.0 connector that can be used to power the Raspberry Pi at the same time
Installing a (custom) Raspberry Pi OS
The OS for the PiCar-X 2.0 robot can be installed on a microSD card using the Raspberry Pi Imager program.
Two operating system images are available
- For Python programming simply use Raspberry Pi OS (Legacy)
- For the Ezblock Studio visual programming IDE, download RaspiOS-xxx_EzBlockOS-xxx.img that’s basically the original Raspberry Pi OS image with Ezblock Studio pre-installed. You can then click on the CHOOSE OS button and then Use Custom to select the file you’ve just downloaded. Then select the storage device, click on WRITE, and wait until the process is complete.
Booting Raspberry Pi OS on SunFounder PiCar-X 2.0
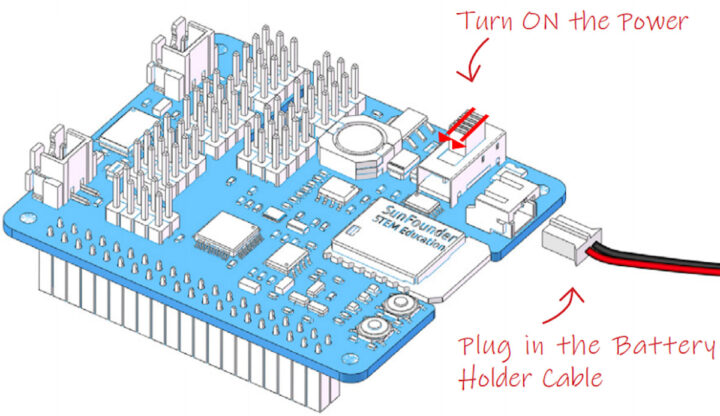
Now take the microSD card from your computer and insert it into your Raspberry Pi board. Then plug in the battery holder cable and slide the Power switch on the Robot HAT to turn on the robot.
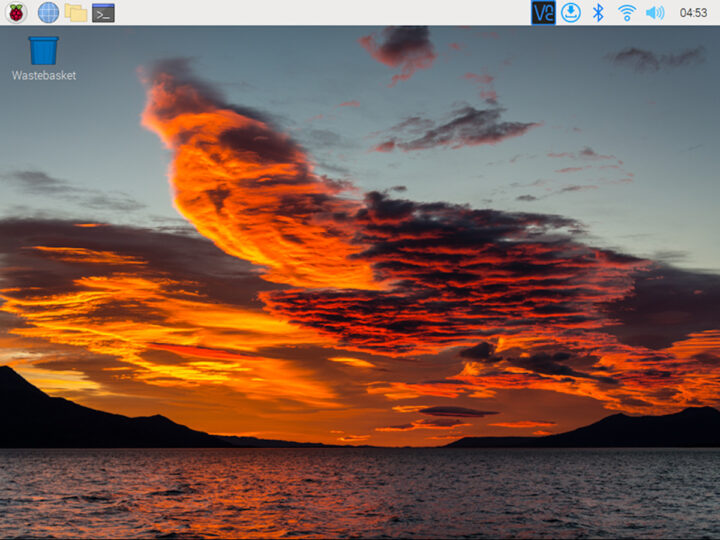
Raspberry Pi OS should now boot, and you can verify the installation by connecting a mouse, a keyboard, and an HDMI monitor to check everything is working as expected as if you simply used the Raspberry Pi as a standalone single board computer.
Getting started with EzBlock Studio for the PiCar-X 2.0 robot
EzBlock Studio is a visual programming platform developed by SunFounder for beginners in order to easily get started with programming the Raspberry Pi. It supports two programming languages, Blockly for visual programming with various blocks and the the code is then converted into a Python program which can be uploaded to the Raspberry Pi through Bluetooth or Wi-Fi.
You can either download the app on your mobile phone from the App Store (iOS) or the Google Play Store (Android) by searching for “Ezblock Studio”, or go to http://ezblock.cc/ezblock-studio to start programming from your web browser. Note: The page says EzBlock Studio V3.2 will switch to offline mode on February 28. That does not mean the website will be closed at that time, but simply that you won’t be able to save the project to the cloud, and only locally to your computer going forward.
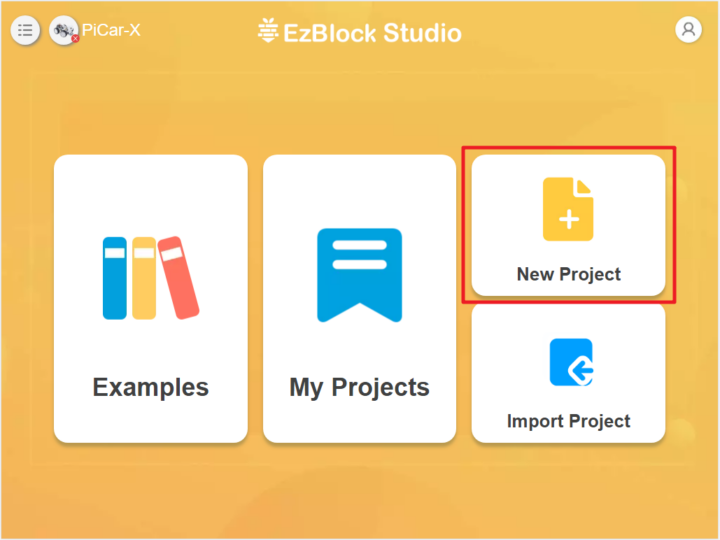
Let’s create a new project by clicking on the New Project area.
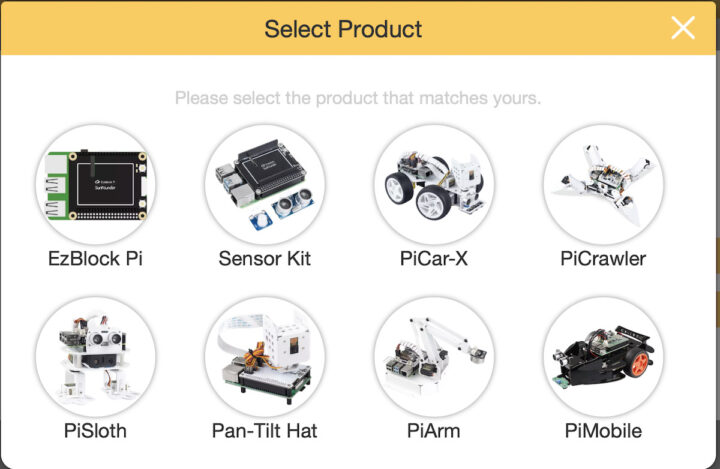
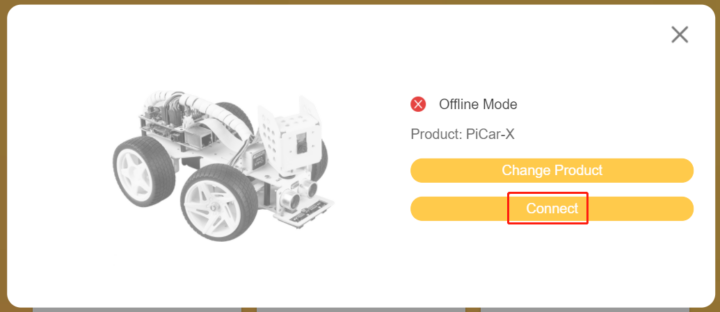
Select the PiCar-X product:
Click on the Connect button.
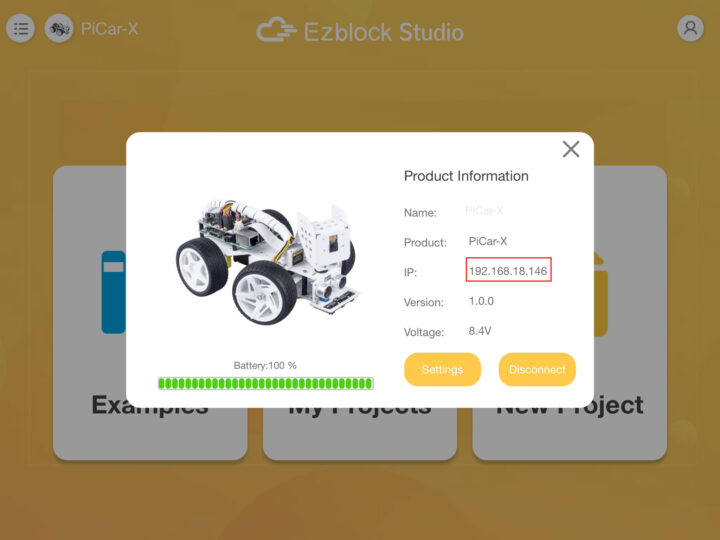
The program will display the IP address of the robot, simply click on the Confirm button.
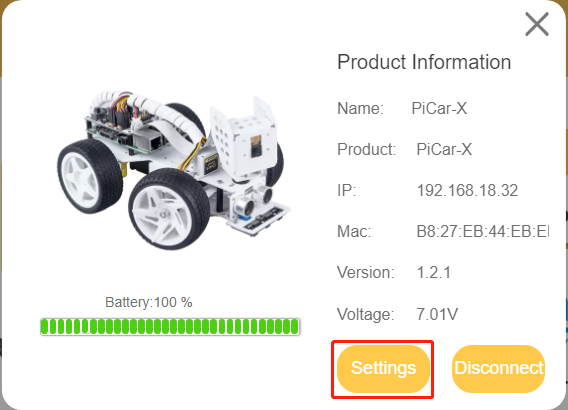
Once the connection is successful, you’ll see various information about the robot such as battery charge level, voltage, and version.
Installing Python libraries and modules
Start a terminal window in Raspberry Pi OS to upgrade the operating system to the latest version:
|
1 2 |
sudo apt update sudo apt upgrade |
Install the SunFounder PICAR-X Robot Hat library as follows:
|
1 2 3 4 |
cd ~/ git clone -b v2.0 https://github.com/sunfounder/robot-hat.git cd robot-hat sudo python3 setup.py install |
Then download and install the Vilb module:
|
1 2 3 4 |
cd ~/ git clone -b picamera2 https://github.com/sunfounder/vilib.git cd vilib sudo python3 install.py |
and do the same for the Picar-X module:
|
1 2 3 4 |
cd ~/ git clone -b v2.0 https://github.com/sunfounder/picar-x.git cd picar-x sudo python3 setup.py install |
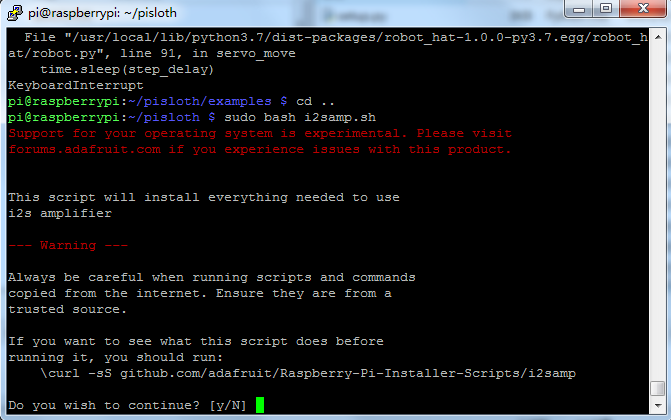
Now run the i2samp.sh script to install the driver for the I2S speaker amplifier:
|
1 2 |
cd ~/picar-x sudo bash i2samp.sh |
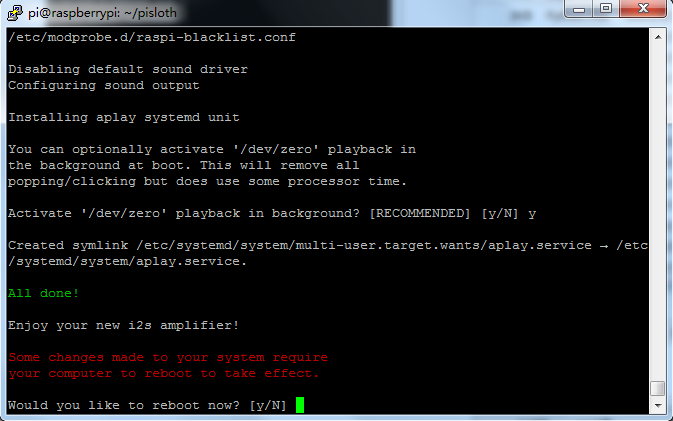
Type “y” to go forward with the installation:
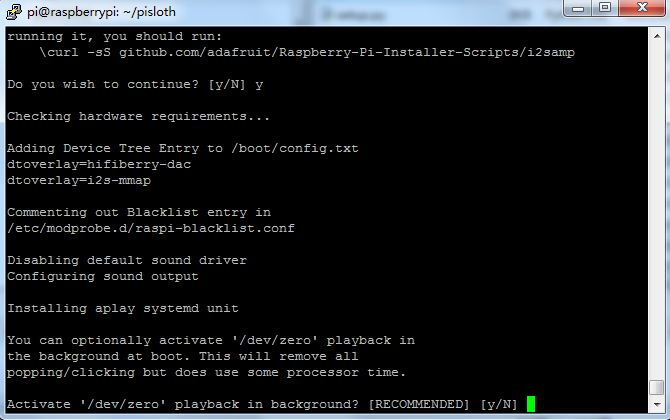
And again to activate /dev/zero playback in the background…
And reboot the system once asked.
Enable the I2C interface
Type the following command to enter the Raspberry Pi OS settings:
|
1 |
sudo raspi-config |
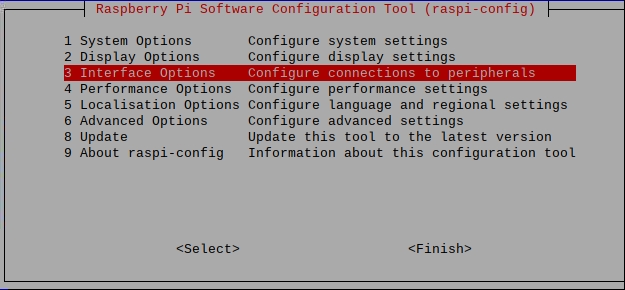
Select Interface Options…
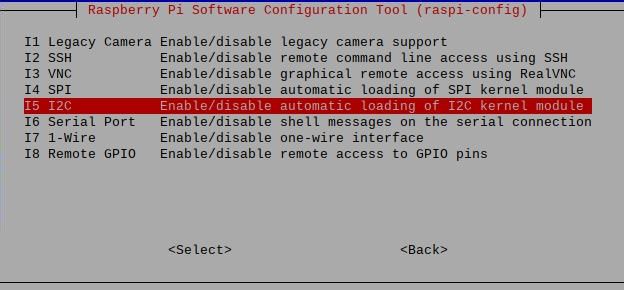
…then I2C…
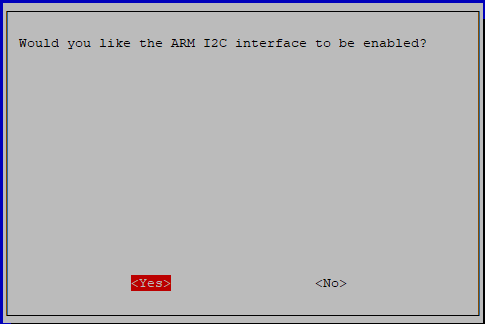
…and confirm by selecting “Yes“.
You’ll then be asked to reboot the system and do so to complete the installation.
Setting the Servo Motor to 0° degrees for easier assembly
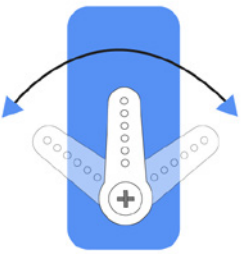
The PiCar-X robot kit’s servo angle range is -90° to 90°, but that angle is not set at the factory and will be random, maybe 0° or maybe 45°. If we assemble it at a random angle that is not zero, it may damage the servo during use. Therefore, it is necessary to first set the angle of all servos to 0° before installing them on the robot. To keep the servo centered no matter what direction it is rotated, run the command
|
1 2 |
cd ~/picar-x/example sudo python3 servo_zeroing.py |
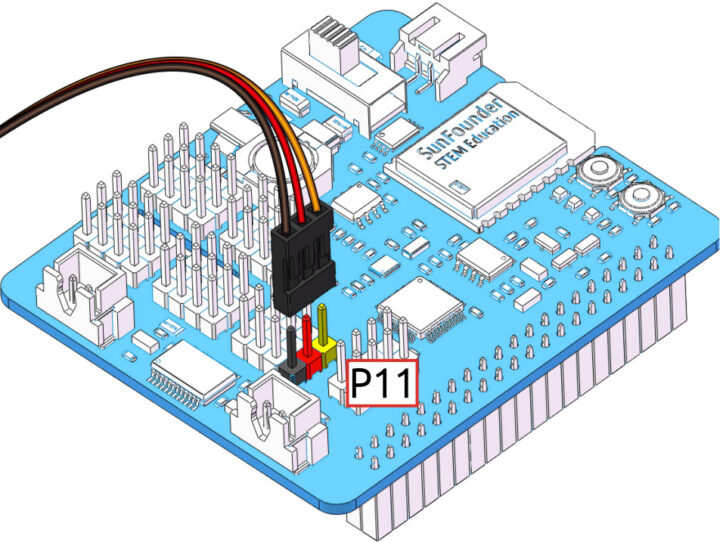
Then plug the servo cable into port P11 and you will see the servo arm rotate to position (This is the 0° position). Next, insert the servo arm as explained in the assembly manual.
Calibration of the PiCar-X 2.0 robot (Python)
Some servo angles may be slightly tilted due to possible deviations during the PiCar-X installation or servo limitations. To fix this issue, run the calibration.py program:
|
1 2 |
cd /home/pi/picar-x/example/calibration sudo python3 calibration.py |
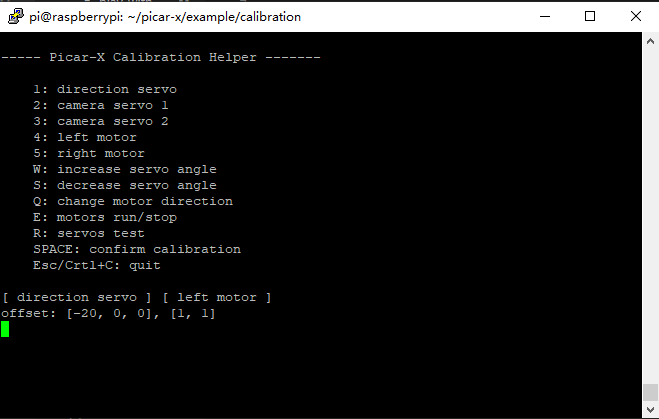
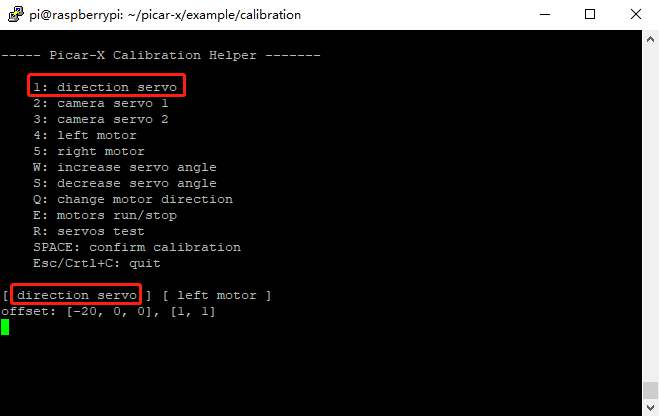
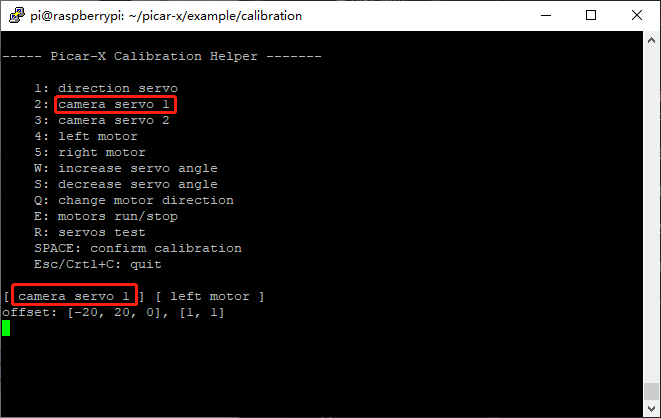
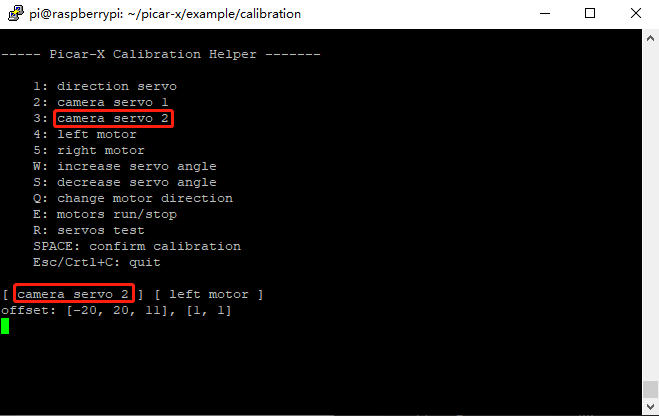
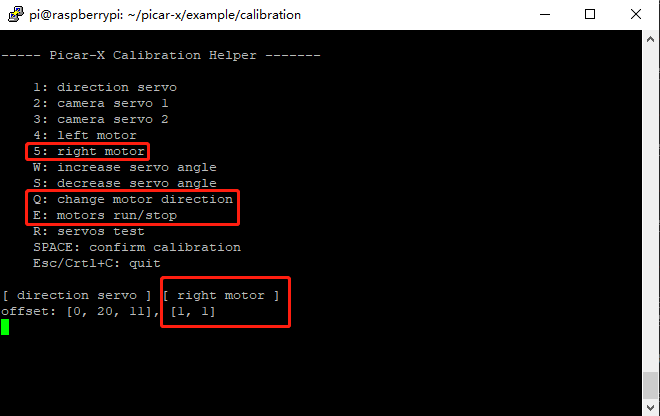
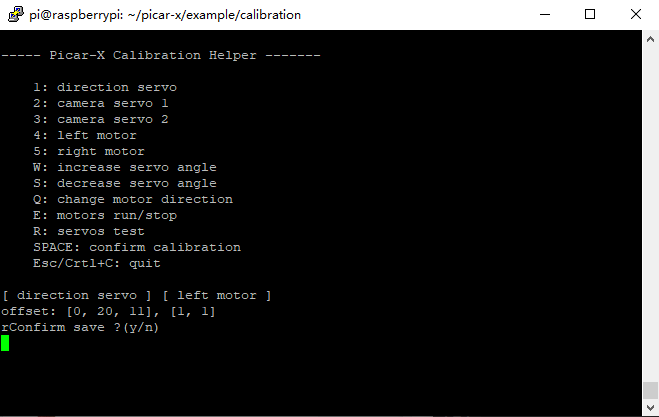
This will start the Pica-X Calibration Helper with a menu as shown below.
The R key is used to test whether the servo that controls the direction of the front wheels can work normally and is not damaged. Press 1 to select the front wheel servo, then press the W/S keys to keep the front wheels looking as forward as possible without tilting left or right.
Now press 2 to select camera servo 1 (for panning), then the W/S keys to make the pan/tilt platform look straight ahead, and not left or right.
Do the same for the camera servo 2 (tilting) by selecting 3, and pressing the W/S keys to keep the pan/tilt platform looking straight ahead and not tilting up or down.
Because the motor wiring may be reversed during installation, you can press E to test whether the vehicle can move forward normally. If not then press 4 or 5 to select the left and right motors. Once done we can calibrate the rotation direction by pressing Q.
When the calibration is complete, press the Spacebar to save the calibration parameters. You will be prompted to enter “y” to confirm, then press ESC or Ctrl+C to exit the program.
Calibration of the PiCar-X 2.0 robot (EzBlock Studio)
If you’d rather not use Python and the command line, it’s also possible to calibrate the PiCar-X 2.0 robot in the EzBlock Studio web interface. Click on the Settings button after the connection is successful.
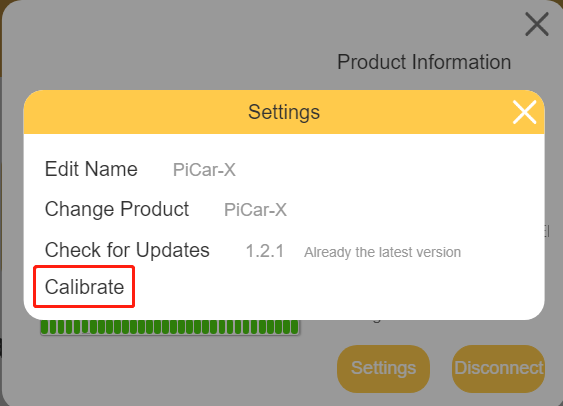
Now click on Calibrate.
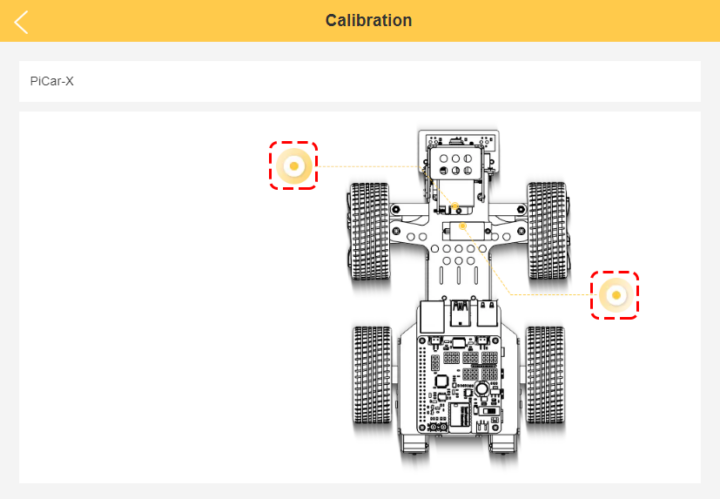
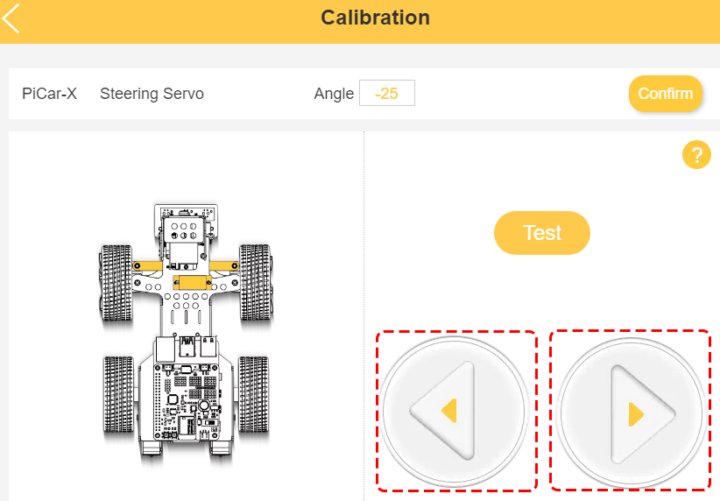
The Calibration window will pop up where you can select servo motors for calibration either for the Pan-and-Tilt camera or the steering wheels.
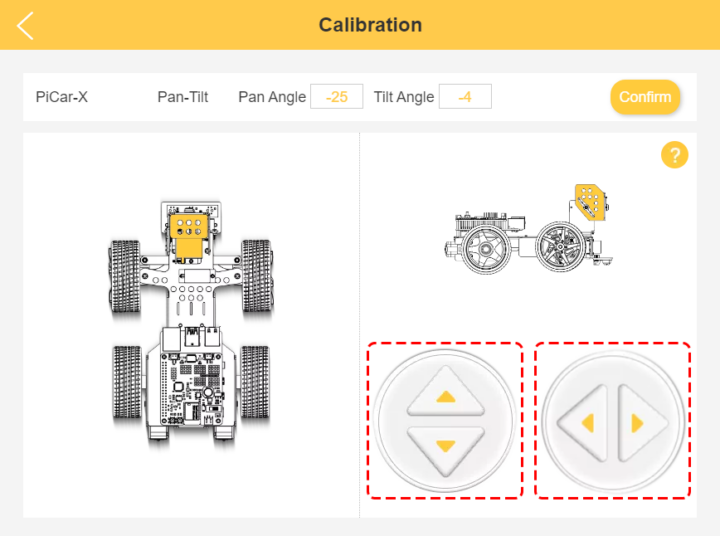
Let’s start with the PiCar-X Pan-Tilt servo motors’ calibration. Two sets of buttons allow the user to adjust the camera up or down (tilt) and left and right (pan). Once the camera looks to be adjusted straight,, click on Confirm to complete the calibration.
Let’s now do the same for the steering wheels which we can adjust to the left or the right. Once the wheels are straight click on Confirm to complete the calibration.
Testing the movement of the PiCar-X 2.0 robot
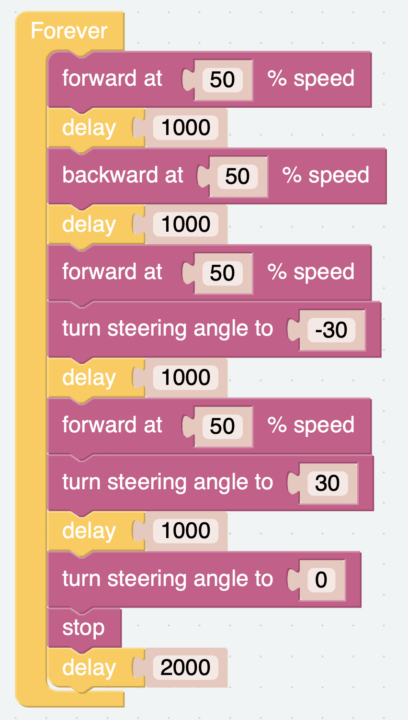
We’ll now make the PiCar-X robot move forward drawing an S-shape and stop it. You can check out the program in Python:
|
1 2 3 4 5 6 7 8 9 10 11 12 13 14 15 16 17 18 19 20 21 22 23 24 25 26 27 28 29 30 31 32 33 34 35 36 37 38 39 40 41 |
from picarx import Picarx import time if __name__ == "__main__": try: px = Picarx() px.forward(30) time.sleep(0.5) for angle in range(0,35): px.set_dir_servo_angle(angle) time.sleep(0.01) for angle in range(35,-35,-1): px.set_dir_servo_angle(angle) time.sleep(0.01) for angle in range(-35,0): px.set_dir_servo_angle(angle) time.sleep(0.01) px.forward(0) time.sleep(1) for angle in range(0,35): px.set_camera_servo1_angle(angle) time.sleep(0.01) for angle in range(35,-35,-1): px.set_camera_servo1_angle(angle) time.sleep(0.01) for angle in range(-35,0): px.set_camera_servo1_angle(angle) time.sleep(0.01) for angle in range(0,35): px.set_camera_servo2_angle(angle) time.sleep(0.01) for angle in range(35,-35,-1): px.set_camera_servo2_angle(angle) time.sleep(0.01) for angle in range(-35,0): px.set_camera_servo2_angle(angle) time.sleep(0.01) finally: px.forward(0) |
… and EzBlock Studio.
Obstacle avoidance test
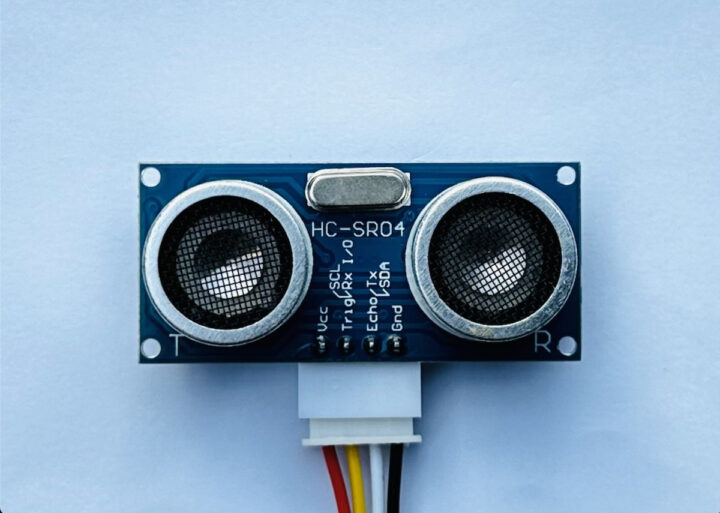
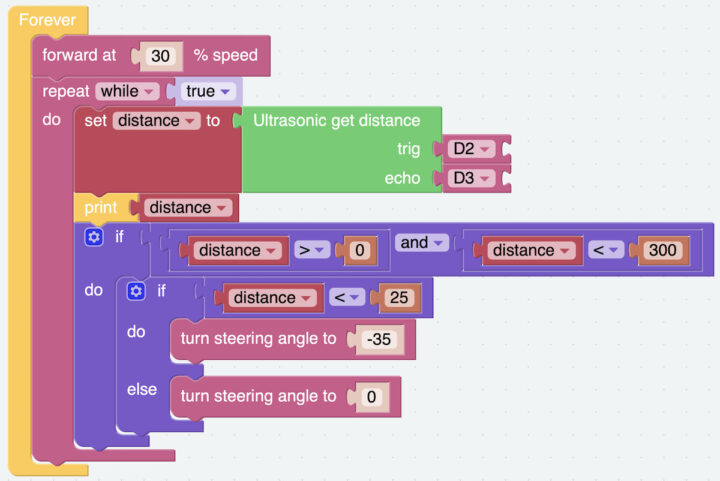
The PiCar-X 2.0 robot features an HC-SR04 ultrasonic sensor to detect objects with a distance of 0 to 400 cm. The demo program will let the servo turn the robot’s wheels by -35 degrees if an object is within the 25 cm range, and otherwise drive straight with the angle set to 0 degrees. We tested it successfully with both Python and EzBlock Studio.
Python:
|
1 2 3 4 5 6 7 8 9 10 11 12 13 14 15 16 17 18 19 20 |
from picarx import Picarx def main(): try: px = Picarx() # px = Picarx(ultrasonic_pins=['D2','D3']) # tring, echo px.forward(30) while True: distance = px.ultrasonic.read() print("distance: ",distance) if distance > 0 and distance < 300: if distance < 25: px.set_dir_servo_angle(-35) else: px.set_dir_servo_angle(0) finally: px.forward(0) if __name__ == "__main__": main() |
EzBlock Studio:
PiCar-X 2.0 robot’s line following test program
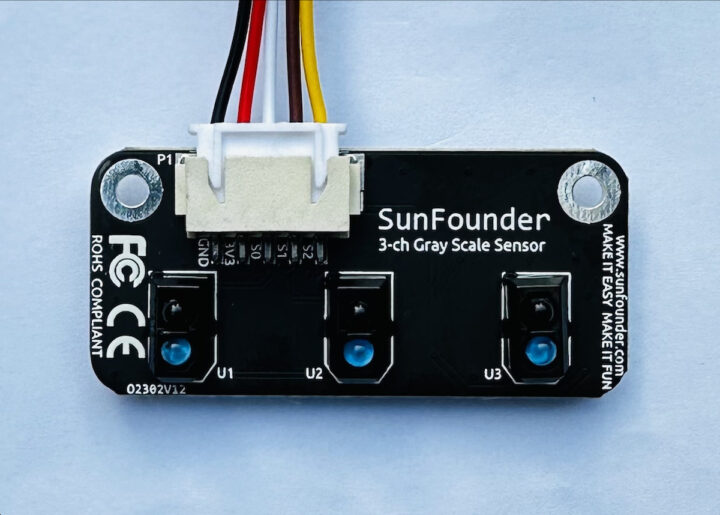
The PiCar-X 2.0 robot relies on the “SunFounder 3-ch Gray Scale Sensor” to detect lines by giving each output a separate analog value. The programming test creates three conditions for line detection:
- Run forward at 10% speed by default with the servo’s angle set to 0 degrees.
- If the left sensor detects a black line, set the wheel control servo’s angle to 12 degrees.
- If the right sensor detects a black line, set the wheel control servo’s angle to -12 degrees.
- If conditions 2 and 3 above are not met, set the servo’s angle back to 0 degrees.
Python program for the line following demo:
|
1 2 3 4 5 6 7 8 9 10 11 12 13 14 15 16 17 18 19 20 21 22 23 24 25 26 27 28 29 |
from picarx import Picarx if __name__=='__main__': try: px = Picarx() # px = Picarx(grayscale_pins=['A0', 'A1', 'A2']) px_power = 10 while True: gm_val_list = px.get_grayscale_data() print("gm_val_list:",gm_val_list) gm_status = px.get_line_status(gm_val_list) print("gm_status:",gm_status) if gm_status == 'forward': print(1) px.forward(px_power) elif gm_status == 'left': px.set_dir_servo_angle(12) px.forward(px_power) elif gm_status == 'right': px.set_dir_servo_angle(-12) px.forward(px_power) else: px.set_dir_servo_angle(0) px.stop() finally: px.stop() |
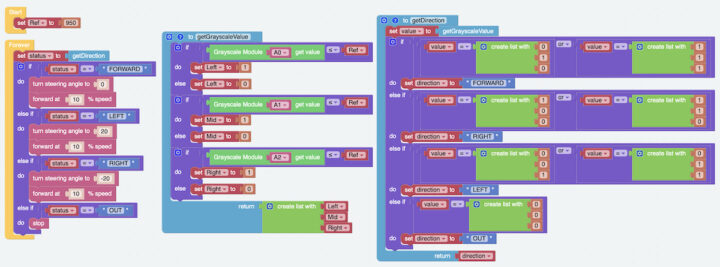
Equivalent visual programming demo design in EzBlock Studio.
Text-to-speed with the built-in speaker
We’ll now make the PiCar-X robot say “Hello!” through its speaker using Text-to-Speech(TTS). We’ve already installed the driver with i2samp.sh, so we can write a Python program as follows:
|
1 2 3 4 5 6 7 8 |
from robot_hat import TTS if __name__ == "__main__": words = ["Hello", "Hi", "Good bye", "Nice to meet you"] tts_robot = TTS() for i in words: print(i) tts_robot.say(i) |
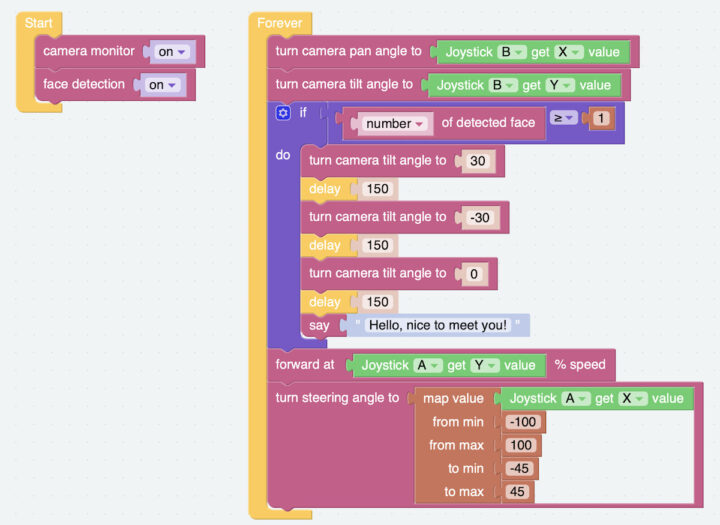
A similar example below was written in the EzBlock Studio, but it uses face detection through the built-in camera because saying “Hello, nice to meet you!”
Computer vision with the Raspberry Pi 4
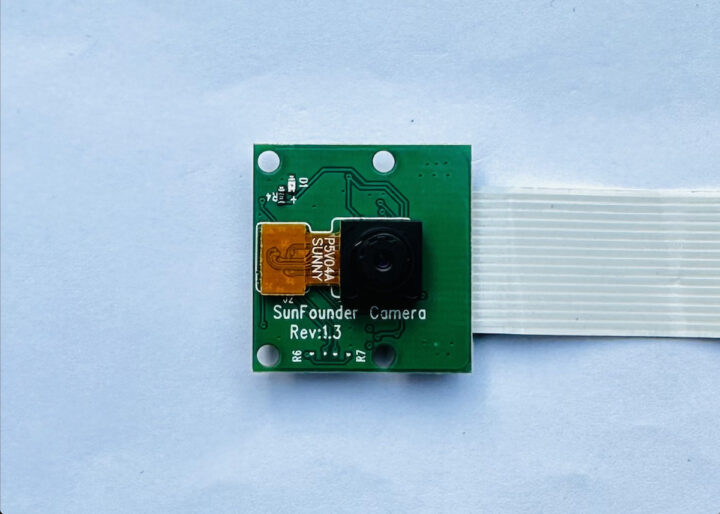
Face detection is just one of the computer vision workloads that can be handled by the Raspberry Pi 4 through the 5MP SunFounder camera based on an OV5647 Full HD sensor. So let’s try a few more machine vision examples.
Color detection
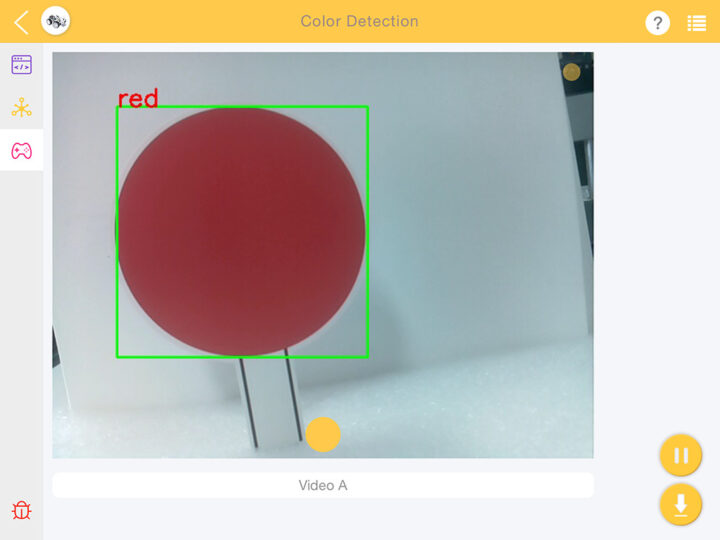
We will use colored circles for the test. You can download this PDF file to print your own.
The test program will detect the color of a circular sign, draw a green rectangle around it, and write the name on the color on the top left side.
Python code for color detection:
|
1 2 3 4 5 6 7 8 9 10 11 12 13 14 15 16 17 18 19 20 21 22 23 24 25 26 27 28 29 30 31 32 33 34 35 36 37 38 39 40 41 42 43 44 45 46 47 48 49 50 51 52 53 54 55 56 57 58 59 60 61 62 63 64 65 66 67 68 69 70 71 72 |
import cv2 from picamera.array import PiRGBArray from picamera import PiCamera import numpy as np import time color_dict = {'red':[0,4],'orange':[5,18],'yellow':[22,37],'green':[42,85],'blue':[92,110],'purple':[115,165],'red_2':[165,180]} #Here is the range of H in the HSV color space represented by the color kernel_5 = np.ones((5,5),np.uint8) #Define a 5×5 convolution kernel with element values of all 1. def color_detect(img,color_name): # The blue range will be different under different lighting conditions and can be adjusted flexibly. H: chroma, S: saturation v: lightness resize_img = cv2.resize(img, (160,120), interpolation=cv2.INTER_LINEAR) # In order to reduce the amount of calculation, the size of the picture is reduced to (160,120) hsv = cv2.cvtColor(resize_img, cv2.COLOR_BGR2HSV) # Convert from BGR to HSV color_type = color_name mask = cv2.inRange(hsv,np.array([min(color_dict[color_type]), 60, 60]), np.array([max(color_dict[color_type]), 255, 255]) ) # inRange():Make the ones between lower/upper white, and the rest black if color_type == 'red': mask_2 = cv2.inRange(hsv, (color_dict['red_2'][0],0,0), (color_dict['red_2'][1],255,255)) mask = cv2.bitwise_or(mask, mask_2) morphologyEx_img = cv2.morphologyEx(mask, cv2.MORPH_OPEN, kernel_5,iterations=1) # Perform an open operation on the image # Find the contour in morphologyEx_img, and the contours are arranged according to the area from small to large. _tuple = cv2.findContours(morphologyEx_img,cv2.RETR_EXTERNAL,cv2.CHAIN_APPROX_SIMPLE) # compatible with opencv3.x and openc4.x if len(_tuple) == 3: _, contours, hierarchy = _tuple else: contours, hierarchy = _tuple color_area_num = len(contours) # Count the number of contours if color_area_num > 0: for i in contours: # Traverse all contours x,y,w,h = cv2.boundingRect(i) # Decompose the contour into the coordinates of the upper left corner and the width and height of the recognition object # Draw a rectangle on the image (picture, upper left corner coordinate, lower right corner coordinate, color, line width) if w >= 8 and h >= 8: # Because the picture is reduced to a quarter of the original size, if you want to draw a rectangle on the original picture to circle the target, you have to multiply x, y, w, h by 4. x = x * 4 y = y * 4 w = w * 4 h = h * 4 cv2.rectangle(img,(x,y),(x+w,y+h),(0,255,0),2) # Draw a rectangular frame cv2.putText(img,color_type,(x,y), cv2.FONT_HERSHEY_SIMPLEX, 1,(0,0,255),2)# Add character description return img,mask,morphologyEx_img with PiCamera() as camera: print("start color detect") camera.resolution = (640,480) camera.framerate = 24 rawCapture = PiRGBArray(camera, size=camera.resolution) time.sleep(2) for frame in camera.capture_continuous(rawCapture, format="bgr",use_video_port=True):# use_video_port=True img = frame.array img,img_2,img_3 = color_detect(img,'red') # Color detection function cv2.imshow("video", img) # OpenCV image show cv2.imshow("mask", img_2) # OpenCV image show cv2.imshow("morphologyEx_img", img_3) # OpenCV image show rawCapture.truncate(0) # Release cache k = cv2.waitKey(1) & 0xFF # 27 is the ESC key, which means that if you press the ESC key to exit if k == 27: break print('quit ...') cv2.destroyAllWindows() camera.close() |
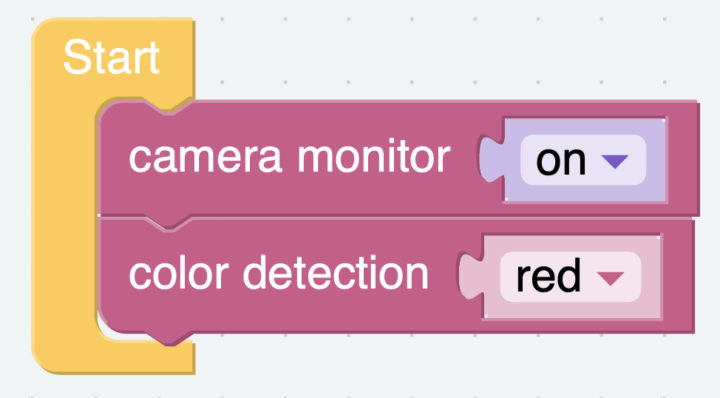
It’s much simpler in EzBlock Studio with just two blocks needed
Face detection function
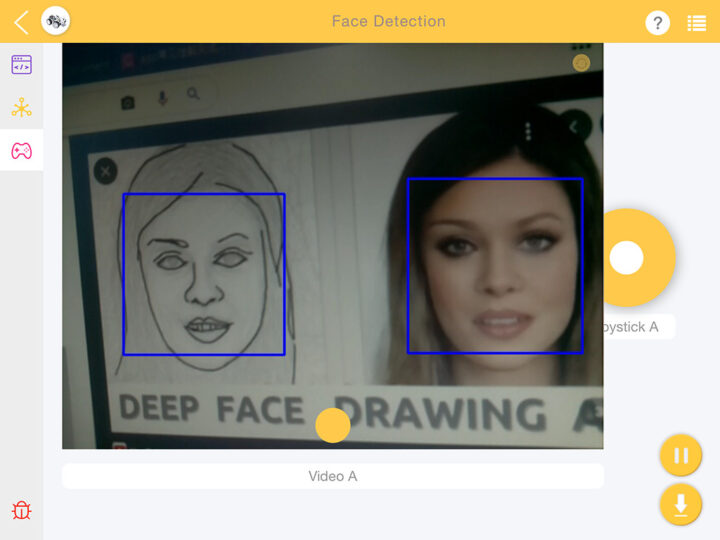
We’ve already quickly tested face detection in the speaker test, but let’s have a closer look. The implementation relies on object detection using Haar Cascade Classifiers. It’s a powerful object detection method developed by Paul Viola and Michael Jones and documented in their research paper entitled “Rapid Object Detection using a Boosted Cascade of Simple Features”, published in 2001, and still popular today.
We will test this by analyzing camera images using Model Haar Cascade Classifiers, first by converting the image to grayscale, then drawing a rectangle around a human face if detected on the grayscale image, and finally on the original image.
Python code:
|
1 2 3 4 5 6 7 8 9 10 11 12 13 14 15 16 17 18 19 20 21 22 23 24 25 26 27 28 29 30 31 32 33 34 35 36 37 38 39 40 41 42 43 |
import cv2 from picamera.array import PiRGBArray from picamera import PiCamera import time def human_face_detect(img): resize_img = cv2.resize(img, (320,240), interpolation=cv2.INTER_LINEAR) # In order to reduce the amount of calculation, resize the image to 320 x 240 size gray = cv2.cvtColor(resize_img, cv2.COLOR_BGR2GRAY) # Convert to grayscale faces = face_cascade.detectMultiScale(gray, 1.3, 2) # Detect faces on grayscale images face_num = len(faces) # Number of detected faces if face_num > 0: for (x,y,w,h) in faces: x = x*2 # Because the image is reduced to one-half of the original size, the x, y, w, and h must be multiplied by 2. y = y*2 w = w*2 h = h*2 cv2.rectangle(img,(x,y),(x+w,y+h),(255,0,0),2) # Draw a rectangle on the face return img with PiCamera() as camera: print("start human face detect") camera.resolution = (640,480) camera.framerate = 24 rawCapture = PiRGBArray(camera, size=camera.resolution) time.sleep(2) for frame in camera.capture_continuous(rawCapture, format="bgr",use_video_port=True): # use_video_port=True img = frame.array img = human_face_detect(img) cv2.imshow("video", img) #OpenCV image show rawCapture.truncate(0) # Release cache k = cv2.waitKey(1) & 0xFF # 27 is the ESC key, which means that if you press the ESC key to exit if k == 27: break print('quit ...') cv2.destroyAllWindows() camera.close() |
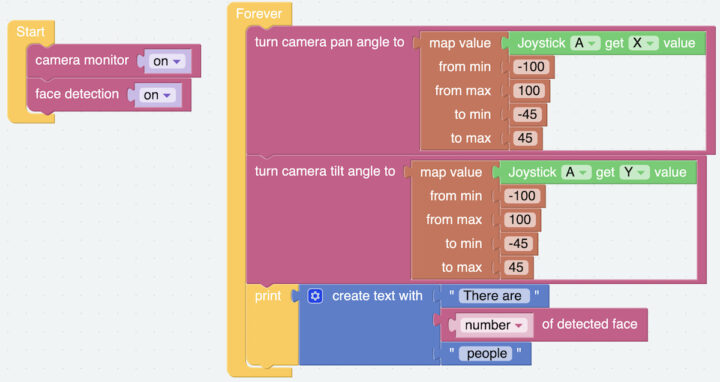
Equivalent EzBlock Studio example.
PiCar-X 2.0 video review
Conclusion
SunFounder PiCar-X 2.0 is a self-driving robot car powered by AI that is suitable for those interested in learning about the Raspberry Pi board, computer vision, and robotics. The robot can be programmed to avoid obstacles, follow lines, or even drive autonomously through computer vision with features like face detection or color detection.
This robot kit is suitable for schools, other educational institutions, and those interested in robots and technology in general. We haven’t covered all the features and tutorials for this robot in this review, and you’ll find more in the documentation such as QR code detection, face tracking, “Bull Fight” where the robot “chases” after red-colored items, among other demos.
We would like to thank SunFounder for sending me the PiCar-x 2.0 robot kit for now. The PiCar-X 2.0 robot kit with battery and charger is sold for $81.99 (or $154.99 with a Raspberry Pi 4 with 4GB RAM on the company’s online store, and you’ll also find these for respectively $74.99 and $145.10 on Amazon after clicking on the $15 discount code checkmark.
CNXSoft: This review is a translation of the original post on CNX Software Thailand by Kajornsak Janjam and edited by Suthinee Kerdkaew.

Jean-Luc started CNX Software in 2010 as a part-time endeavor, before quitting his job as a software engineering manager, and starting to write daily news, and reviews full time later in 2011.
Support CNX Software! Donate via cryptocurrencies, become a Patron on Patreon, or purchase goods on Amazon or Aliexpress


