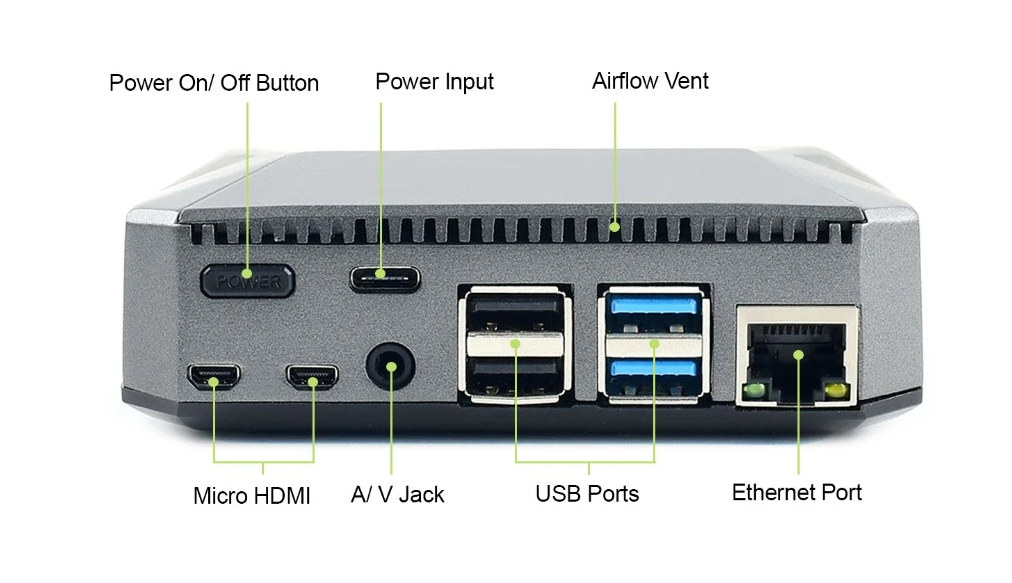
Due to its small size, the Raspberry Pi 4 board has Ethernet and USB ports on one side, and micro HDMI ports, AV port, and USB-C port on another side. This may not be an issue for most people, but having all ports on one side may make cable management easier.
Argon One case for Raspberry Pi 4 makes that feat possible thanks to an adapter board that brings HDMI and AV ports on the left side of the USB ports, and an extra power expansion board does the same for the USB-C port plus adds a power button.

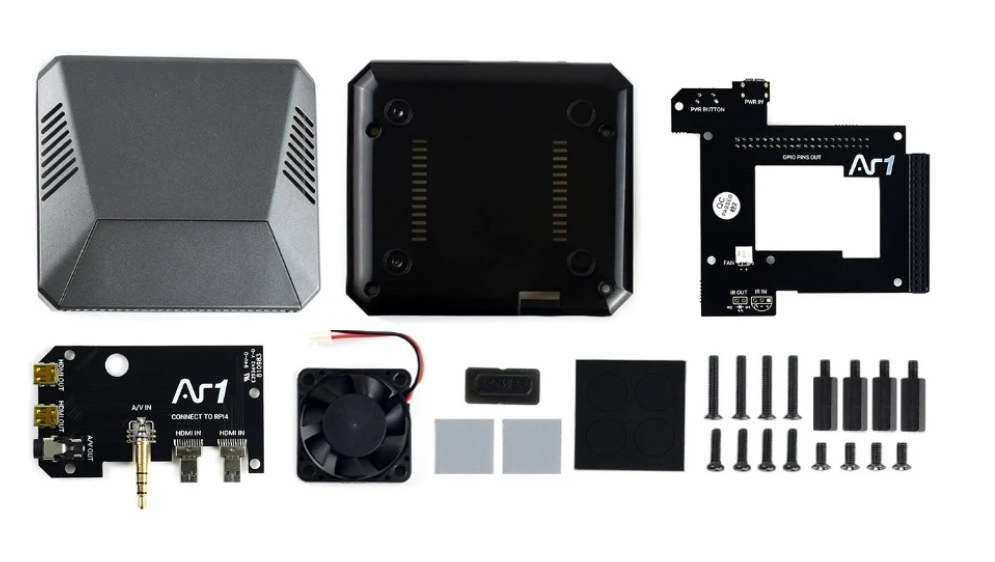
Argon One comes in a kit with the following components:
- Aluminum top cover, black bottom
- AR1 power board
- AR1 AV board with micro HDMI inputs and outputs, AV port input and output
- Fan
- Power button
- Thermal pads for the processor and memory chip for passive cooling via internal heatsinks built into the top cover.
- Four rubber pads, and screw set.

Note that since the aluminum case will cool the board, the fan may be optional depending on your application load and environment (ambient temperature). If you do connect the fan, the rotating speed will depend on CPU temperature with 10% speed at 55°C, 55% speed at 60°C, and full speed when the processor temperature is over 65°C as explained in the Wiki.
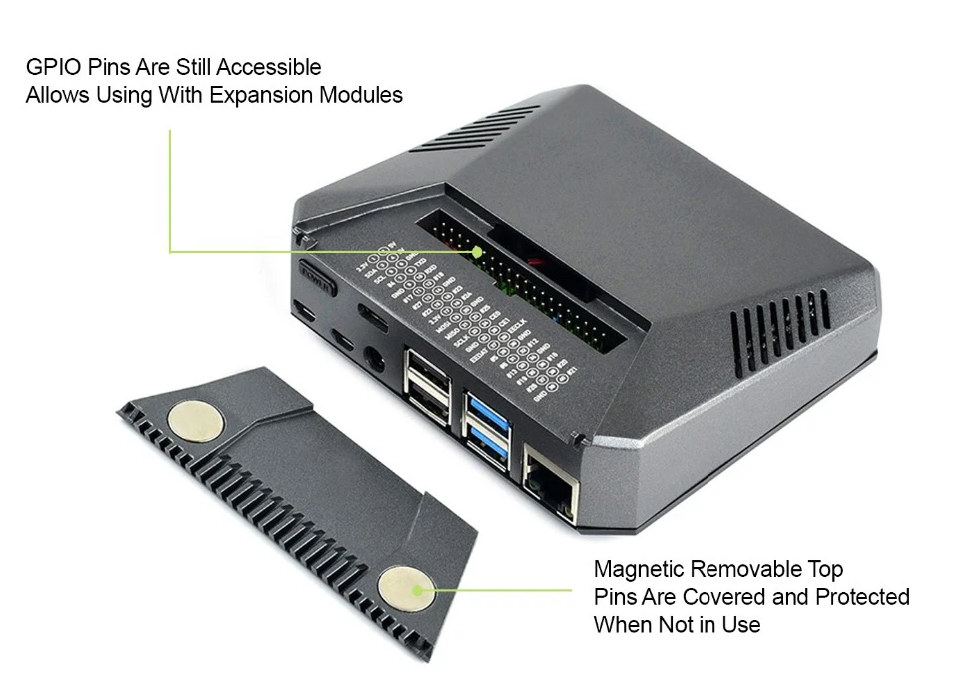
IMHO, it would have been nicer to have the power button on the front, but at least it allows for a clean, software-controlled power off of the board. Another nice touch is that you can lift a magnetic cover on the top part of the enclosure to access the GPIO header.

I first found out about Argon One enclosure on Banggood’s new arrival feed where it is sold for $29.99, but the Raspberry Pi case has been around for several months already and can be purchased from other sources including Amazon or Waveshare directly.

Jean-Luc started CNX Software in 2010 as a part-time endeavor, before quitting his job as a software engineering manager, and starting to write daily news, and reviews full time later in 2011.
Support CNX Software! Donate via cryptocurrencies, become a Patron on Patreon, or purchase goods on Amazon or Aliexpress


This looks nice. The uSD card is exposed through a little slot on the bottom of the enclosure, this is shown in a picture on the Wiki. The magnetic lid on the GPIO area seems like a clever idea.
But – does this case suffer from this potential new problem?…
“New” Raspberry Pi 3B v1.2/v1.3 May be Incompatible with Cases with Embedded Heatsink
https://www.cnx-software.com/2020/04/30/new-raspberry-pi-3b-v1-2-v1-3-may-be-incompatible-with-cases-with-embedded-heatsink/
I think the Argon One case only work with RPi 4 board anyway since it relies on the two micro HDMI ports.
> does this case suffer from this potential new problem?
You mean the old problem of such cases using a thermal pad way too thick which makes heat transfer inefficient? Please note that this case is for RPi 4 only.
Yes – Argon One have had other cases using the same concept for older Pi models like the 3B and3B+. They’ve been around on the marker for a little while now.
On the Explaining Computer YT channel one can see that the thermal pads actually aren’t that thick and passive thermal performance is quite good (though the comparison table with other enclosures is flawed as usual since not accounting ambient temperature at all).
But I still wonder how the fan should help with heat dissipation (and I also wonder why all these crappy reviews on Youtube rely on BS like sysbench instead of really demanding tasks/tools)
I wonder what the purpose of the fan is other than generating noise at higher temperatures? It swirls air around over the Micro HDMI ports but what about air flow able to cool down heated parts?
Overclocking? Things get toasty when you push up the RPi’s system clock speed. So to keep noise down, the software that comes with the case turns the fan on at three various rates depending on the SoC temperature reading. See the Wiki.
> Things get toasty when you push up the RPi’s system clock speed
I was solely talking about how the fan operates and how it could possibly help with cooling anything. It just swirls air around inside the case. It does not blow air over a heatsink, it doesn’t suck in cool air to blow out warm air. It’s just using energy to make some noise (which is something a lot of SBC users seem to like, same with leds blinking).
According to some reviews fortunately the ability to passively dissipate heat (through the enclosure’s aluminium surface) seems to be rather high.
The detailed description on the Amazon page for this case says this:
“The Argon One itself acts as the Raspberry Pi’s heatsink for passive cooling. A proprietary software controls the fan inside the case for an active and improved temperature management.”
“…proprietary software…”
Yeah, that’s a deal killer. But is it really “proprietary”? Probably not…
The very brief Wiki page says: “Open terminal of Raspberry Pi, install the driver by the following command”
This automatically grabs the argon1.sh script from the manufacturer’s web site with a dumb curl call and pipes the downloaded script directly to the shell for auto-execution. I don’t like stuff like this. Without reverse engineering, who knows what you will end up with?
Of-course you can just download the argon1.sh script directly using a Web browser or wget etc. and look at it. I did this and didn’t see anything too frightening. Basically post-install you end up a Python daemon script, some other helper shell scripts, and a .conf file which are generated by the argon1.sh script, and some systemd hooks. No further downloads from scary stuff like encrypted links and/or encrypted files seem to occur.
If you want to customize/sanitize the install, it doesn’t look like there’s anything stopping you from manipulating the install process to put things in a bastioned location for further inspection and modification. But that’s a pain in the neck without decent manufacturer documentation.
So at first-glance, it looks like there’s nothing “Proprietary” going on here with the supporting software for this otherwise attractive RPi case product. Is the software safe? At first-glance it probably is, but I don’t like stuff like this that shoves a system install down your throat with a one-liner. The Wiki should be expanded to explain what’s going on in-detail which builds customer trust.
IMO, the manufacturer should expand the Wiki to explain in detail what’s going on with the scripts and/or any peripherals (component type, interface, address e.g., I2C), copyright the script, and release it under a liberal license (e.g., BSD or MIT). Then to increase sales they should change the wording on their web pages to say the supporting software is “Open Source” instead of “Proprietary”. Also, a copyrighted schematic would be an added bonus. But I don’t hold out much hope for a schematic. Rampant lawless cloning/copying in China hurts the Chinese themselves as much as the rest of the world.
> Without reverse engineering, who knows what you will end up with?
You should keep in mind that the very same applies to every SBC manufacturer provided OS image on this earth. And literally nobody gives a sh*t in this situation except a small minority who prefer OS images they do not need to reverse engineer since they can be created from scratch (talking about Armbian for example).
So silly… They have plenty of space, yet the hdmi connectors, instead of using two normal ones, remain micro…
I think that certain things need to be improved, like placing the power button on the front, trying to have at least one USB port and the headphone jack on the front, using normal-sized HDMI connectors, but quite frankly, for a version 1 of a product, it’s overall well thought, and not that expensive! I think they took the risk to ship early and that at this price tag they can expect quite some feedback from their users and maybe come up with a v2 in 6 months.
Another idea, since they already have to make their own PCB, would be to support a real power supply input, either via a true USB-C PD converter, or using a barrel jack with 7-20V input, which would immediately turn the device into something way more stable for most users.
Yes, and then using a real PSU have a powered USB3 hub in there.
> using a barrel jack with 7-20V input, which would immediately turn the device into something way more stable
I don’t think so at least if users are buying the official RPi 4 PSU at the same time which is a really solid choice for the task (5.1V/3A, 18AWG wiring between PSU and USB-C jack). This isn’t the Micro USB sh*t show as in the past any more 🙂
I partially agree. I have it as well and it’s OK for general use. The problem remains that the voltage is regulated one meter away from where it’s consumed and that as soon as you’ll start pulling a lot from the USB ports or the internal 40-pin connector, you’re taking risks again, not because of the connector but because of the long cable. I have no problem with losing 10% of the voltage over a long cable as long as no component on board is sensitive to these 10%. This is the main problem when using 5V input, there’s no margin.
> the voltage is regulated one meter away from where it’s consumed
1.5m in fact. But the USB ports have a current limit of 1.2A and the board itself won’t exceed 1A so we’re talking about 18AWG wires and a maximum consumption of 2.2A which still should be fine. But thinking a bit more about it that would allow already for a 0.4V drop and maybe with the enclosure we’re talking here about even more due to additional receptacle and circuitry on the connector PCB. OK, I got your point. 🙂
Some of the power supplies of the early “laptops” of the 90s, which were employing 4 to 6 pins for the various voltages, used to have a distinct voltage feedback wire connected to the connector’s pin instead of measuring it on the PCB. This resulted in making sure the voltage drop caused by power losses over the long cable length were properly addressed.
Nowadays this practice seems to have disappeared because the real voltage regulation is performed inside the device itself. But with 5V supplies it would still remain better to continue to proceed this way. Most of the time it’s not possible because there’s only a USB-A in the adapter block. Ideally we should loop the + to one of the pins (like the micro-USB ID pin) and use this one to measure the voltage at the extremity of the cable, but this pin doesn’t exist on USB-A so that’s not possible. And the measurement of the expected 3.3V on the data lines doesn’t bring accurate enough info about possible losses at all over the cable.
At least when the cable is part of the adapter it remains possible to do it . I just don’t know if the RPi’s adapter uses this technique or not. But for sure many adapters don’t use it, especially those with a coaxial power cable.
But how many actually purchase the needed power supply, the whole point of using Type-C is so one can use a supply lying around the house already.
> the whole point of using Type-C is so one can use a supply lying around the house already
Isn’t this just the usual ‘chicken or the egg’ dilemma?
IMO we need to keep also in mind that a (single-board) computer is not a cell phone that only needs to be charged for a few hours a day independently of its use. With a computer it’s not the ‘one USB-C charger serves several phones and tablets’ situation. A computer needs a permanent power supply and I doubt a lot of people will dedicate an expensive ‘real’ USB-C PSU capable of USB power delivery to power something as inexpensive as an SBC.
For me personally those few RPi 4 USB-C PSUs I bought for several SBC with ‘dumb USB-C’ will serve the purpose of ‘supply lying around the house already’ in the future if it’s about low-power USB-C consumers.
And of course I agree that a wide range voltage input capable of generating stable 5V on the SBC itself is the better solution. That’s one thing not just me is trying to convince board makers of for a long time. But if it’s about ‘dumb USB-C’ without USB PD then the RPi PSU is actually a pretty solid choice. Magnitudes better compared to some USB charger combined with an USB-A to USB-C cable.
I didn’t see any provision for running the camera cable. Would be a nice desktop teleconference system if it had a long run for the pi camera, and provided a mic input provision. But I’d like to have something like this for a couple of systems I have around, but both have cameras. One is the usual pi cam and lens, and the other one is a modified IR version with an illumination system and wide angle lens.
Why are we still seeing micro HDMI? The point of an adapter… Isn’t it to make sure you get it connected easily instead of needing another adapter?
And where I put my SSD + Controller?
Looks almost perfect. If, in using an adapter board to move the HDMI from the side to the back of the case, they also went from micro to standard HDMI jacks, I would buy it today.
IMO they really lost an opportunity with the AR1 AV board having mini HDMI outputs. There is no reason they could not have made it output to regular HDMI which would prevent the need to buy two mini HDMI cables and automatically reduce the cost of ownership for anyone considering buying this case and a pi 4.
The case is great. It’s very well-made. Unfortunately the board doesn’t sit just right in it for me. Sometimes I don’t get video. I have to unplug and plug back in. It would be amazing if it fit just right.
I am not completely certain if it is related, but I am able to use a USB-C cable with this case that I was not able to use without it.
That’s because the first Raspberry Pi 4 missed a resistor causing troubles with some USB-C cable.
It’s been fixed in Raspberry Pi 4 v1.2 -> https://www.cnx-software.com/2020/02/24/raspberry-pi-4-rev-1-2-fixes-usb-c-power-issues-improves-sd-card-resilience/
And it’s likely the adapter board provided with the Argon One case also that resistor, so that’s why yours can work.
Looks like the Amazon store re-listed the case…
https://amzn.to/2YOgUHN