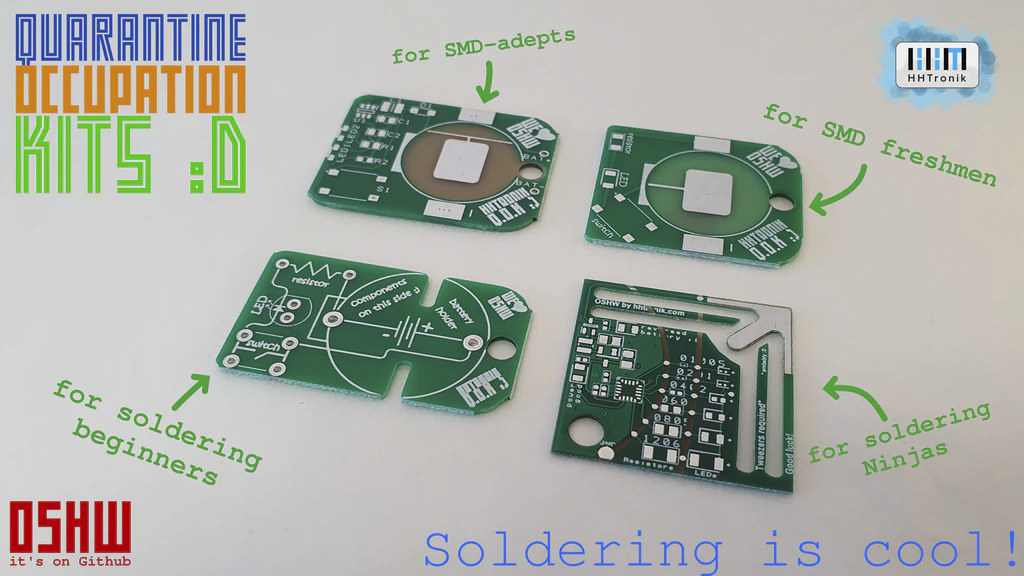
 I’ve heard some of you are forced to stay at home for some reason… HHTronik has decided to design what they call “Quarantine Occupation Kits” which are actually open-source hardware soldering kits of varying complexity.
Five soldering kits are available:
-
I learn soldering TH (Super Easy) – Ten solder joints with one LED, one resistor, one switch and a CR2032 coin cell holder using through-hole components. The end results is a flashlight board
-
I learn soldering SMD (Easy) – Same as above but with SMD (surface mount) components, and a more compact PCB.
-
I learn soldering Boost Edition (Moderate) – More complex board with a bigger variety of parts and footprints including some slightly smaller and unusual parts (side view white LEDs, SOT23-6, SOT23-3, and 0805 passives). The assembled board is a step up” or “boost” converter taking 3V from the battery and bring it up to 6V to light up the LEDs.
-
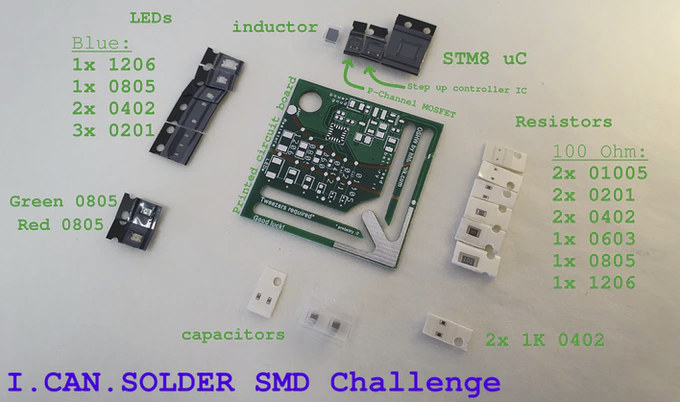
I.CAN.SOLDER SMD Challenge (Hard) – Some components of the board are pre-soldered, but you’ll still have to solder resistors and LEDs whose size varies between 3.20×1.6mm (easy) to 0.4×0.2mm (good luck!). The final board blinks LEDs, and since it comes with an STM8 MCU it can also be reprogrammed.
-
I.CAN.SOLDER SMD PITA (Really hard, previous experience with soldering needed) – Same as above without the pre-soldered components so you’ll also have to solder an SC-70 MOSFET, a few more passives (0805, 0402), an SMD inductor, a SOT23-3 boost converter IC, a few LEDs, and the hardest part is a UFQFPN-20 packaged STM8 microcontroller.
All four boards require a soldering iron and some solders, but while it’s possible to solder the first two boards with the cheapest soldering iron you can find, you’ll need to have better equipment for the other boards. Some tweezers will also be needed for all SMD components, a multimeter is a good addition to make sure there aren’t any short-circuits, and some boards will need solder flux as well.
HHTronik launched the project on Kickstarter with a 2,000 Euros target. Rewards range from 3 Euros for the first two kits, up to 11 Euros for the I.CAN.SOLDER SMD kits. There are also variants with tweezers and an ST-Link programmer and bundles with multiple boards and accessories. Shipping does add 5 Euros to 15 Euros, and you may be out of quarantine by the time you receive your reward since shipping is scheduled for sometimes in May.
Here in Thailand, kids would still be able to play with those as the government pushed back the new school semester from the end of April to July, and in any case, it’s never too early to prepare for the (potential) second wave of the COVID-19 pandemic and associated lockdowns…
All kits are open-source and available on Github, so you could also try to get them manufactured by yourself if you can’t wait and want to try something new. Soldering practice kits have been around for a while, and you may be able to find some locally as well including on Amazon US.


Jean-Luc started CNX Software in 2010 as a part-time endeavor, before quitting his job as a software engineering manager, and starting to write daily news, and reviews full time later in 2011.
Support CNX Software! Donate via cryptocurrencies, become a Patron on Patreon, or purchase goods on Amazon or Aliexpress


More spares of the really small SMD passives would be a good idea. Two in a cut off like that is going to disappear somewhere on your desk,floor or clothing never to be seen again just from looking them.
Spares are nice. Same thing with kits using small screws. I really appreciate when companies include one or two extra screws.
Sometimes they can also get stuck at the tip of your soldering iron, surrounded with tin until you figure they were there while trying to clean it. That’s especially true with sub-millimeter resistors.
ah, reminds me of all of the times of soldering to something with 0201 passives right next to the thing I’m working and having the soldering iron hoover up a bunch of them. There needs to be a catchy rule of thumb about if there’s anything smaller than 0603 you don’t touch it unless you have a schematic with component values.
See also my workshop for soldering for kids and adults:
http://www.zoobab.com/soldering-workshop-for-kids-and-adults
I would probably find the idea of these kits fun if I hadn’t just replaced a TQFP-100 on a 3D printer controller board. So, as far as soldering challenges go for now I’m good.
TQFP are doable but take a long time and often require to carefully remove a few shorts. But with some flux it becomes a bit easier. However I still absolutely hate dealing with DFN/QFN! Even with a hot air gun it’s generally difficult to replace them because the very small amount of tin that remains on the board often makes it not flat enough to properly reposition them :-/
IMHO the biggest issue with hand soldering bigger TQFPs is the positioning. Getting all four sides in position is difficult and it’s very easy to move the part without noticing until you’ve soldered a whole edge and made it almost impossible to correct.
DFN/QFN are better than QFP simply because you can’t damage the pins but you basically have to use hot air.
I stick a bunch of paste on the footprint, dump the component on top, heat everything up, smoosh the part to push out the excess solder and tap it until it pings into place. Then I use a knife tip or wick to clean up the little balls of solder that got squeezed out. And if you do mess it up you can pull it back off and clean it up without mushing all the pins together and making the part useless in the process.
I didn’t have much trouble with it–I expected it to be much harder than it turned out to be. Those leadless cases are the ones that kill me, too. You pretty much have to use hot air on them. I did an LPC ARM board years ago with one. It was a complete pain with an iron. Fortunately, the board had been made with external pads so I had some way to heat them up. If one had just gone under the package and into a via, I have no idea how I would have soldered it. Even with a sharp pointed tip, you just can’t get in there to heat them up.
But, for those who haven’t done any SMT soldering, the secret is flux, flux, and more flux. The surface tension enhancements it brings are what keep those finely spaced wires from shorting together into one big old blob. The thing to keep in mind with SMT soldering is that you don’t solder leads, you solder *whole packages*.
>The thing to keep in mind with SMT soldering is that you don’t solder leads, you solder *whole packages*.
I think half of the problem is hakko etc still insist on selling those tips with a pin sharp point on them for “fine pitch work” when everyone that’s ever tried to use one of those knows they are totally useless.
Well, my soldering iron (weller) uses a 0.2mm tip which I really love, precisely because it’s easy to do fine-pitched work with it. I cannot use it to “wave-solder” a row of pins with it however. I’m using 0.5mm solder. I used to have a small length of 0.2mm but don’t anymore. The 0.5mm exists in various flavors. My observation is that the one with some silver in it is more fluid, and that if you have enough flux inside it avoids making large balls when it melts, balls which are always responsible for shorts on TQFP packages. With this it takes a very long time to solder a TQFP but every time I did, the result was good.
>Well, my soldering iron (weller) uses a 0.2mm tip which I really love,
That sounds like the one almost every hakko iron comes with. Maybe the weller one is better but the hakko ones have almost no heat transfer.
>I cannot use it to “wave-solder” a row of pins with it however.
I think you mean drag solder? If so either a knife shape or one of the hoof shaped ones is the way to go. You can easily pull along a ball of solder to get all of the pins and if you’re lucky the ball of solder doesn’t end up on the last set of pins. Knife shape is really good for QFNs… I use a hakko T18-K tip for everything.
>My observation is that the one with some silver in it is more fluid,
If you’re using solder with lead then almost anything even the cheap stuff of off banggood will give a good finish. For lead-free you really need a good brand.
>and that if you have enough flux inside
Try getting some paste. It’s literally tiny balls of solder suspended in flux. Chip quik has some long shelf life stuff that comes in little packs like the heat sink paste you get with a CPU fan.
For a novice what is a good soldering iron or irons to purchase for use with these kits?
I really like the TS100. You’ll want to pick up a power supply with it–preferably 24V. You might also want to look into the open firmware replacement for it as well–but that’s a matter of taste.
Yes the TS100 is great, however you really want to have a very soft and thin power cable (which is another reason for using a higher input voltage). Too rigid a cable like those out of most power adapters can make it a real pain for precision work.
Yes, I forgot to mention that, for such a light iron, the weight and drag of the power cable effect the feel of the iron a lot. Willy is right, get a nice lightweight and flexable power cable.
as someone who solders very rarely, I find the USB powered ones sufficient. they’re incredibly cheap, take up no space, and work instantly with any USB port
I’d just start with that and if you get into it more hardcore, then buy something nicer. It’s like 3 bucks and you can explore the hobby
I use those cheap USB soldering guns to teach soldering, but they suck 1.5A, so you need a 2A PSU, a standard USB port won’t work.
Hi Ray,
for the two easier kits you’ll be fine with any soldering iron really (as long as it’s not one for pipe-work at least :). Starting from the Boost-edition kit I’d recommend getting a chisel-tipped iron (though that’s just my preference) ideally with temperature adjustment.
If you consider doing this more often, definitely spend a bit of money on a nice iron. The TS100 (or TS80 for that matter) the others recommended are awesome.
If your main goal is “just” having a first go at it, i’d recommend you get one of the super cheap (<10USD from Amazon) 8W USB soldering irons, which should be fine for the three simple kits 😉
P.S.: full disclosure, I'm the designer of the kits above
I have not tried to solder 01005 before, but probably same procedure as with 0201 works, except as an addition don’t breathe towards loose 01005 or they disappear to 6th dimension.
Is 01005 doable with hot-airgun station with low airflow, or only with soldering or oven?
hot plate works well for small parts like 01005 but it’s only really an option if you’re mounting all of the parts at the same time and not doing a staged bring up i.e. building up the power supplies first and only connecting your expensive components once you know those work.
Hi, I’m the actual designer of the PCBs in that article. The 01005 are barely doable when using a soldering iron. The biggest problem being that you can’t really hold them properly with the tweezers. What worked for me was pushing it in place then holding it down with *one* tip of the tweezer while touching up one of the solder joints. Then the other.
Lots of guesswork on where the part is. Had a hard time on the first try because I accidentally tombstoned that resistor. _/\o/\_ but hey, that board is designed to be challenging!
I did manage to assemble the whole board (“PITA edition”) in about 3h (including 30minutes of scratching my head over a missing VDD track to the programming pins) using a hobby grade soldering iron (ATTEN AT80D I bought when I was at Uni) and a pair of cheap tweezers. No magnification during the soldering, just after the fact to see the joints.
Too easy
“I’ve heard some of you are forced to stay at home for some reason…”
Where have you been the last few months? On an alien planet?