ITEAD Studio’s Sonoff is a family of cheap home automation products based on ESP8266 WiSoC, and I’ve already tested Sonoff TH16 wireless switch with a humidity and temperature sensor using the stock firmware and eWelink app for Android or iOS. It works, but up to recently it required a registration to a cloud service (the company will now allow use from the local network), and the source code is closed. So for the second device under review, namely Sonoff POW wireless switch with a power consumption monitor, I decided to install ESPurna firmware working on ESP8266 Sonoff devices and NodeMCU, as it’s open source, supports Sonoff POW natively, includes a web interface to control the device from the LAN, and includes an MQTT client.
MQTT (Message Queuing Telemetry Transport) is a lightweight publish/subscribe messaging protocol used to control IoT sensors and devices, and it’s a popular method to gather data from client to a MQTT broker to push the data to the cloud or a local database.
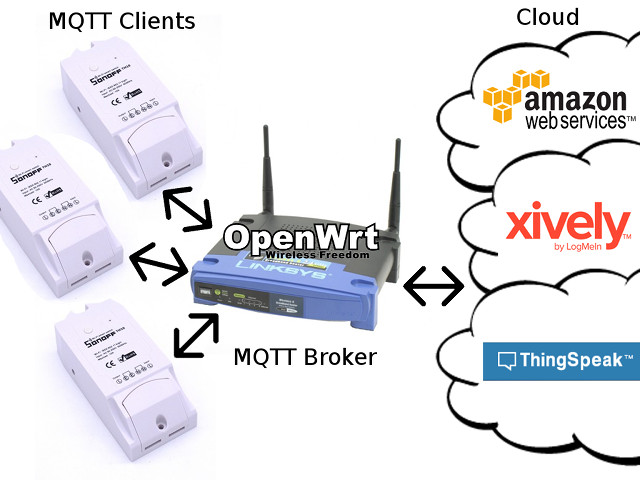
So typically, you’d have a bunch of sensor nodes (like Sonoff devices) communicating over MQTT to an MQTT Broker in your local network, which could be an OpenWrt router or a Linux development board like a Raspberry Pi, which in turns gets the data the the cloud to services like AWS IoT, Xively, or ThingSpeak. It’s also possible to use Cloud services to control MQTT devices remotely through the MQTT broker.
I eventually plan to use NanoPi NEO board to run both MQTT and ThingSpeak locally (not connected to the cloud) in order to monitor the power consumption of my small office, but since I’m all new to this, I’ve started experimenting by connecting a 30W light to Sonoff POW, and use a desktop computer running Ubuntu 16.04 for MQTT and ThingSpeak.
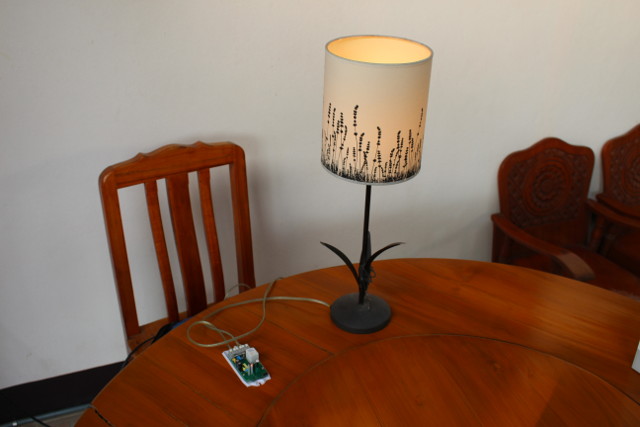
Since I’ve already installed ESPurna firmware to the device, I disconnected the USB to serial board (important since Sonoff POW board has a hot ground), and connected it to the mains (220V in my location). That means we already have an MQTT client which first I had to configure.
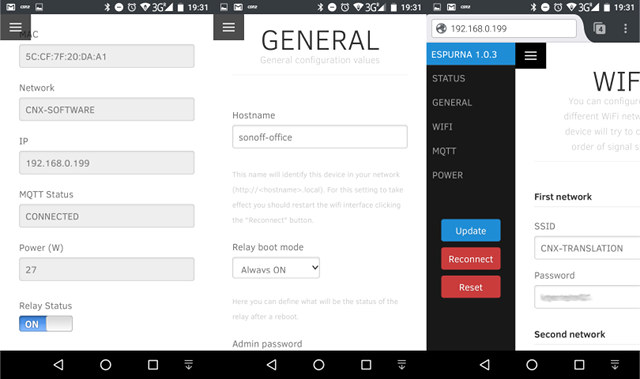
Since it was the first time I connected a load to the device, I went to ESPurna’s status menu to check power usage was reported, and my 30 Watts light bulb was drawing 27 Watts. Close enough. I changed the hostname to sonoff-office, and setup two SSID in order to connect Sonoff POW to my local network in client mode, instead of using it in Access Point mode by default. You’ll need to tap on Update each time you modify the settings. Since the SSID must be entered manually, please note that SSID are case sensitive, e.g. CNX-SOFTWARE is different from cnx-software.
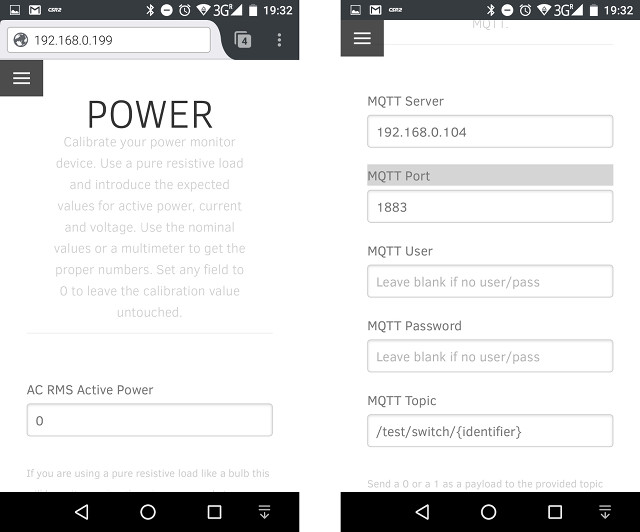
I wanted to calibrate the power using the 30W light bulb, so I entered 30W in AC RMS Active Power field, and tapped on Update, but the web interface reported “no changes”. I’m not sure how to use that part. Finally the most important part for this tutorial is to set the MQTT settings with MQTT IP address, and leaving other fields unchanged. However, you can change MQTT Topic field for example replacing /test/switch/{identifier} by /myiotstuff/{identifier}.
Now that our MQTT client is configured, I need to install mosquitto MQTT broker in Ubuntu:
|
1 |
sudo apt install mosquitto mosquitto-clients |
mosquitto-clients is not really needed, but I’ll use it to test the MQTT broker a little later. Once you installed it, the MQTT Broker should already run automatically.
|
1 2 3 4 5 6 7 8 9 10 11 |
tail -f /var/log/mosquitto/mosquitto.log 1481340837: Saving in-memory database to /var/lib/mosquitto/mosquitto.db. 1481342637: Saving in-memory database to /var/lib/mosquitto/mosquitto.db. 1481344439: Saving in-memory database to /var/lib/mosquitto/mosquitto.db. 1481346240: Saving in-memory database to /var/lib/mosquitto/mosquitto.db. 1481348041: Saving in-memory database to /var/lib/mosquitto/mosquitto.db. 1481349842: Saving in-memory database to /var/lib/mosquitto/mosquitto.db. 1481351643: Saving in-memory database to /var/lib/mosquitto/mosquitto.db. 1481353443: Saving in-memory database to /var/lib/mosquitto/mosquitto.db. 1481355244: Saving in-memory database to /var/lib/mosquitto/mosquitto.db. 1481356155: New connection from 192.168.0.199 on port 1883. |
The last line of the log above shows a client connection from Sonoff POW. Now, we need to check the topic, and since ESPurna documentation is still work in progress, you could either check out the source code, or IMHO more fun, capture MQTT packet with tcpdump or Wireshark as I’ve done below.
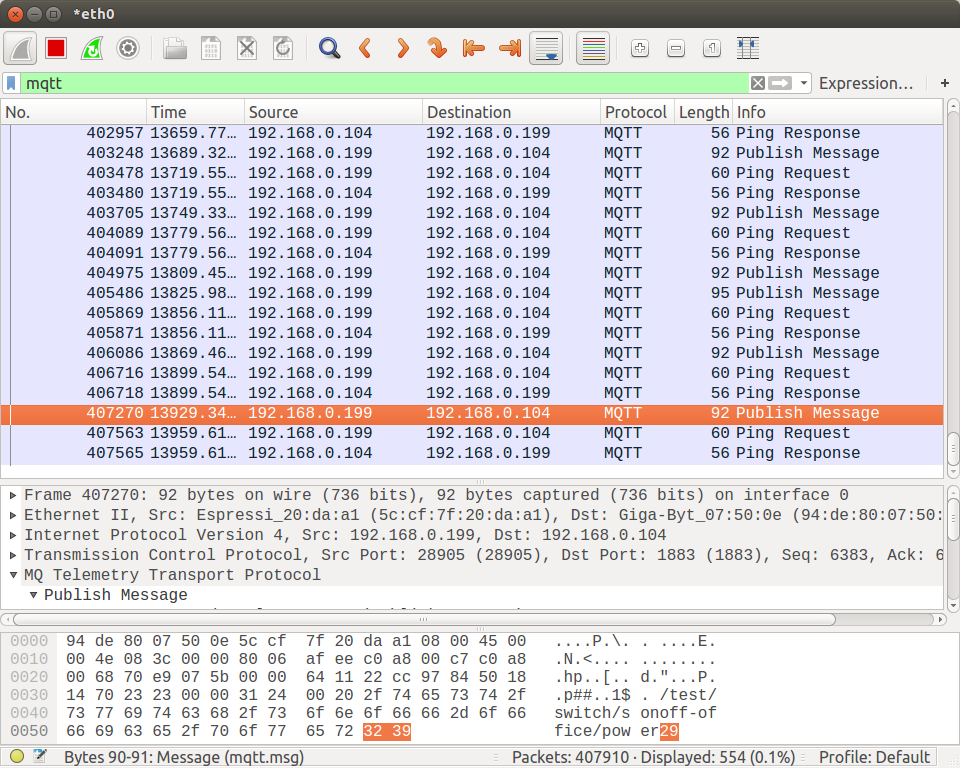
Here we can see that Sonoff POW will send a Publich Message with the power level using the topic “/test/switch/sonoff-office/power29”. “/test/switch” is the string we’ve defined in the web interface, “sonoff-office” the hostname we’ve given to Sonoff Pow, and “power29” indicates 29 Watts of power is currently used.
We can also start a client in Ubuntu 16.04 terminal window to check more MQTT topics with # wildcard for sonoff-office host:
|
1 2 3 4 5 6 7 |
mosquitto_sub -v -h localhost -t /test/switch/sonoff-office/# /test/switch/sonoff-office/ip 192.168.0.199 /test/switch/sonoff-office/version 1.0.3 /test/switch/sonoff-office/fsversion 1.0.3 /test/switch/sonoff-office/heartbeat 1 /test/switch/sonoff-office/power 29 /test/switch/sonoff-office 1 |
We can use MQTT to get the IP address, firmware and file system version, hearbeat message, power use, and relay status (on or off).
It’s all good, but now we need to do something to draw the data, and possibly analyze it. I selected ThingSpeak for this purpose since it can be installed in the local network, or through their service in the cloud. By the end of my testing, I’ve noticed ThingSpeak has a new MQTT API, meaning it should be possible to connect your MQTT broker directly to it, but for this guide I use mqspeak instead as a bridge between MQTT and ThingSpeak. It may still be useful, as the open source version of ThingSpeak is not updated anymore, and lacks the MQTT API.
You’ll need Python 3 and pip3 to install mqspeak:
|
1 2 3 |
sudo apt install python3-pip sudo pip3 install --upgrade pip sudo pip3 install mqspeak |
Once it’s done, we’ll need to create a config files as explained on mqspeak’s github repo, and I created /etc/mqspeak.conf with the following content:
|
1 2 3 4 5 6 7 8 9 10 11 12 13 14 15 16 17 18 19 20 21 22 23 24 25 26 27 |
[Brokers] Enabled = power-consumption-broker relay-broker [power-consumption-broker] Host = localhost Port = 1883 Topic = /test/switch/sonoff-office/power [relay-broker] Host = localhost Port = 1883 Topic = /test/switch/sonoff-office [Channels] Enabled = channel1 [channel1] Id = <thingspeak-id> Key = <thingspeak-writekey> Type = thingspeak UpdateRate = 15 UpdateType = blackout UpdateFields = power-consumption-data [power-consumption-data] field1 = power-consumption-broker /test/switch/sonoff-office/power #field2 = relay-broker /test/switch/sonoff-office |
Brokers are used to configure MQTT broker IP address and port, as well as the topic(s) to subscribe to, while Channels take care of ThingSpeak configuration with the channel’s Id and write API key, update rate in seconds (15s minimum), update type (see github for details), and fields defined in your ThingSpeak’s channel(s), which will create later on. I wrote one broker for the power consumption topic, and other for the relay status. However, I eventually ignored the relay status, as it’s not updated often enough and cause ThingSpeak’s channel to only be updated when the relay changes status, even if there are power updates in the meantime. A workaround is to use two different channels for ThingSpeak.
mqspeak connects directly to api.thingspeak.com, so if you are using ThingSpeak cloud services, the next step is to register an account and setup one or more channels.
Extra Instructions for a local installation of ThingSpeak
However, if you’ve installed ThingSpeak in Ubuntu 16.04 or other Linux operating systems locally or on your own server, you’ll need to change the server in the source code, and reinstall mqspeak.
- Get the source code:
12git clone https://github.com/mqopen/mqspeakcd mqspeak - Modify mqspeak/sending.py to replace api.thingspeak.com using HTTPS with localhost (or other IP address/URL where you’ve installed ThingSpeak) with HTTP:
1234bodyEncoded = urllib.parse.urlencode(body)# conn = http.client.HTTPSConnection("api.thingspeak.com", timeout = 30)conn = http.client.HTTPConnection("localhost:3000", timeout = 30)conn.request("POST", "/update", bodyEncoded) - Install mqspeak
1sudo python3 setup.py install
An improvement would be to install a signed SSL certificate, like the one offered by LetsEncrypt and configure the rails server to use https instead. I have not setup ThingSpeak server to start automatically yet, so I have to start it manually for now:
|
1 2 3 |
cd <thingspeak-source-directory> source ~/.rvm/scripts/rvm rails server webrick |
End of instructions specific to local installation.
The instructions specific for the local installation of ThingSpeak are now done, and all instructions below are valid for both the local installation and cloud service. Now open a web browser, go ThingSpeak (cloud or local), and click on “Get Started Now” in order to register an account.
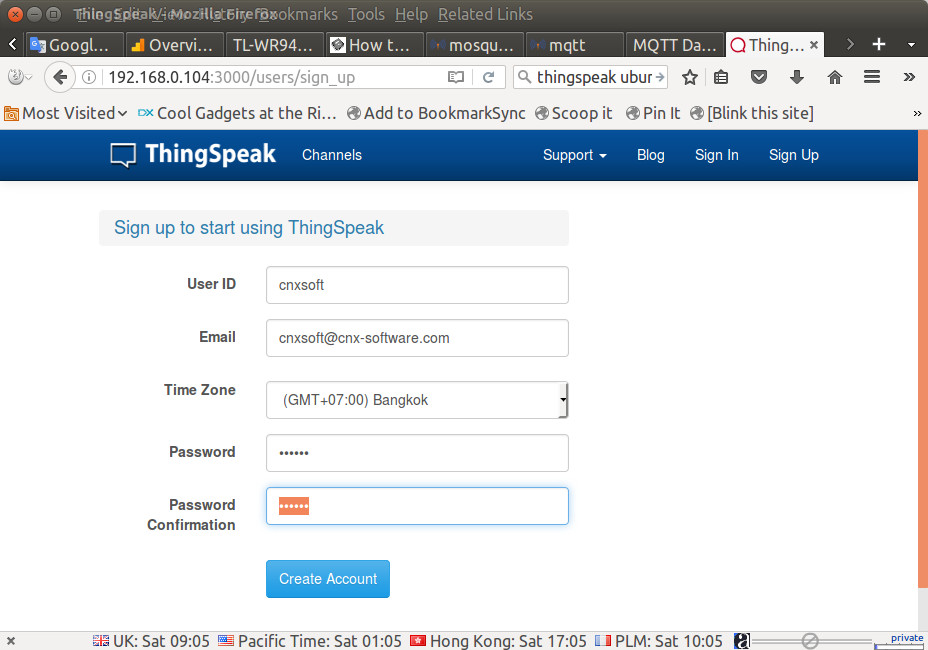
Once it is done, login and click on “New Channel”.
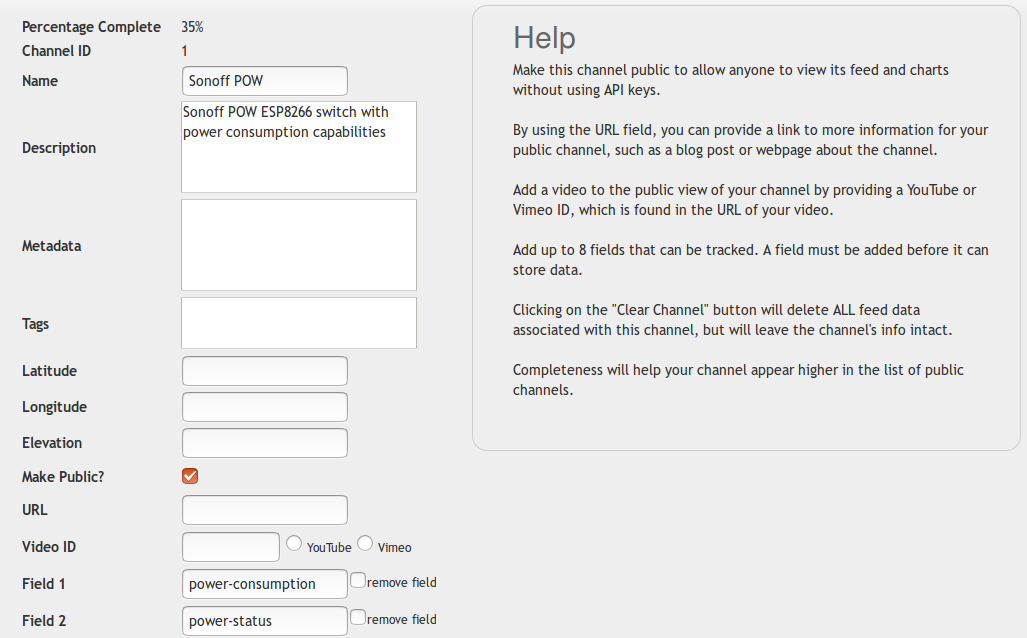
Give it a name, a description, create fields as needed, for example power-consumption and power-status, and click on Save Channel. Update /etc/mqspeak.conf accordingly with the fields’ name, and channel Id.
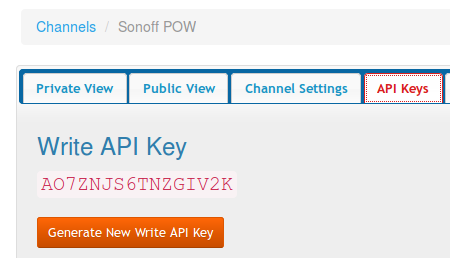 Now select API Keys tab to copy and paste the write API key into mqspeak.conf.
Now we can start mqspeak:
|
1 2 3 4 5 |
mqspeak -v --log-stdout Sending data to channel channel1 [Id: 1, Key: AO7ZNJS6TNZGIV2K]: [2016-12-11 12:13:45.094850] {<power-consumption-broker - localhost:1883: /test/switch/sonoff-office/power>: '0'}... Channel channel1 [Id: 1, Key: AO7ZNJS6TNZGIV2K] response: 200 OK: 1 Sending data to channel channel1 [Id: 1, Key: AO7ZNJS6TNZGIV2K]: [2016-12-11 12:14:28.518688] {<power-consumption-broker - localhost:1883: /test/switch/sonoff-office/power>: '0'}... Channel channel1 [Id: 1, Key: AO7ZNJS6TNZGIV2K] response: 200 OK: 2 |
ESPurna firmware will send a power update every 60 seconds (this can be changed in code/src/pow.ino), so you’ll see a new message pop-up every 60 seconds with your channels Id and write API key. I’ve let it run for about one hour, and got the follow chart in ThingSpeak after turning on and off the lights from time to time.
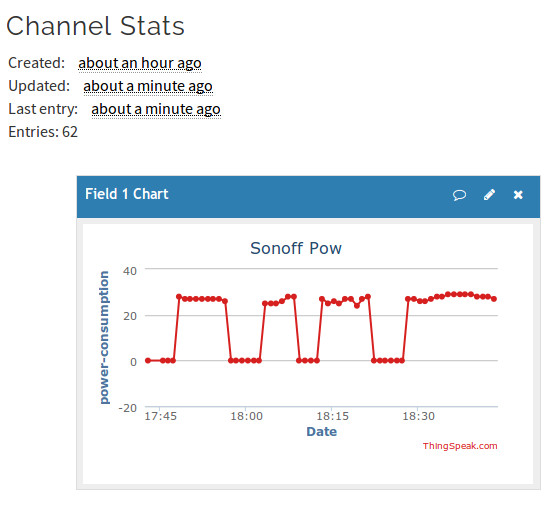 That’s pretty cool, so it only shows the current power in watt, and we’d probably want to get power consumption in kW/h per day, week and month at some time, and I have yet to study how to do that, Exporting the data to excel would be a workaround if this can not be handled in ThingSpeak. ThingSpeak.com (but not the open source version) offers some Matlab processing of the data, so that’d be another options.
The next steps would be to install MQTT and ThingSpeak in NanoPi NEO board, enable HTTPS in ThingSpeak, autostart rails server and mqspeak at boot time, make ESPurna firmware publish the “Power” topic more often than every 6 second, and find some way to generate useful kW/h consumption charts from the data stored in ThingSpeak within ThingSpeak, or but exporting the data.

Jean-Luc started CNX Software in 2010 as a part-time endeavor, before quitting his job as a software engineering manager, and starting to write daily news, and reviews full time later in 2011.
Support CNX Software! Donate via cryptocurrencies, become a Patron on Patreon, or purchase goods on Amazon or Aliexpress




I wish ITEAD or any of the vendors would do a pre-installed mqtt firmware rather this pain of having to solder a header on and flash it with ftdi yourself. Not that I am anti-doing it, but if they did…I would spend the extra few $$ for saving me the hassle and I could get on with configuring. So far the one Sonoff I’ve bought is still to one side with just the 433mhz remote and will probably stay there…
Nice blog post. Just a small remark
MQTT is not pronounced Mosquitto. MQTT is an abbrevation for Message Queuing Telemetry Transport. Mosquitto is a MQTT broker https://mosquitto.org
BR,
Jovan
Is it possibel to log the mqtt data straight into a spreadsheet or data log that can be converted to a spreadsheet without thingspeak (or equivalent). I really like the idea of logging the current, temperature and humidity with the sensors, but I don’t need those graphical charts. I only need the data to put in a spreadsheet.
Jean-Luc, I love these kind of DIY posts. It’s always nice to learn some new stuff together with a howto to get you started.
You can download your thingspeak data from your account.
How about running an MQTT broker with bridging and websocket on a $2 esp8266 ?
Details in here: https://myesp8266.blogspot.nl/2016/11/mqtt-broker-on-esp8266-5.html
@BCatalin
I can see it can support 20 nodes, It’s nice. Have you published the firmware or/and source code somewhere?
@roel
mqttwarn can store the data into Google Docs -> https://github.com/jpmens/mqttwarn#gss2
If you want something that purely works on your local network, you could check mosquitto_sub client source code, and modify it to save the data to a log file (csv) or database.
@Jovan
Thanks for the correction.
@cnxsoft
Need to finish the SSL part so the bridging connection will be secured and I will publish it and I will let you know.
@boudyka
+1
I’ve installed armbian, Domoticz, MQTT and mqspeak in NanoPi NEO board @ http://www.cnx-software.com/2017/01/19/how-to-install-domoticz-home-automation-system-in-nanopi-neo-and-other-arm-linux-boards/
I used systemd to autostart mqspeak:
sudo vi /etc/systemd/system/mqspeak.service
Enabled and started it manually:
It’s running fine, and data is update to ThingSpeak.com: