NanoPi NEO is an exciting ARM Linux board due to the power it packs into its small size, and its low price starting at $7.99. It’s made by FriendlyARM, and since I’ve read some people had never heard about the company before, I’d like to point out it has been providing development boards well before the Raspberry Pi board was launched, with products such mini2440 based on a Samsung ARM9 processor introduced around year 2010. Anyway, I asked the company if they were willing to send 2 samples for review, as I plan to remove the USB & Ethernet port on one of them. Instead I got a 4 boards and accessories, so I’m going to start reviewing the board by writing a quick start guide, showing how to setup it, and check out the Ubuntu core provided by the company. If you are a fan of armbian made Debian distribution, NanoPi NEO will soon be supported too.
NanoPi NEO Pictures
So company send the parcel by DHL, and for some reasons declared an $11 value for 6 boards in the invoice, despite the board selling for respectively $7.99 and $9.99, and the two PSU-ONECOM debug boards going for $4 each… This resulted in higher custom duties than expected…
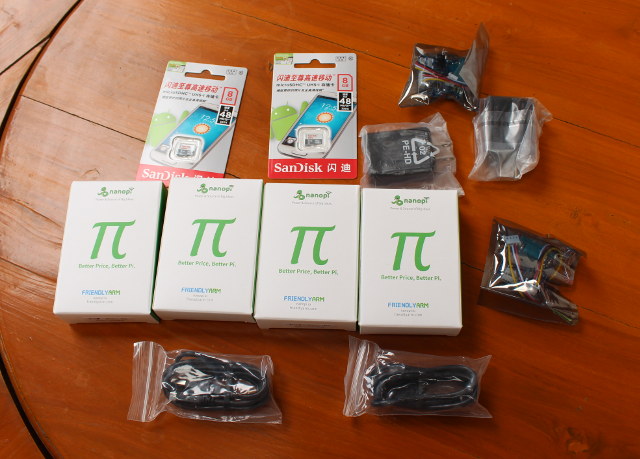
I opened all packages, with the board stored in anti-static bags as they should.
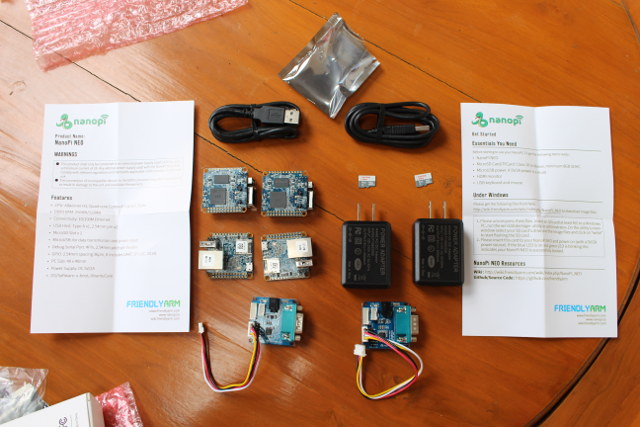
The complete package content include two NanoPi NEO 512MB RAM, two NanoPi NEO with 256MB RAM, two PSU-ONECOM debug board (which I don’t recommend, more details below), two 5V/2A power adapter and corresponding USB cables, as well as two blank 8GB micro SD cards. Each NEO board package also features a piece of paper with the specifications, and a getting started guide partially written for NanoPi-T3 (no you can’t use HDMI with NanoPi NEO), but still two useful links pointing the NEO Wiki, and Friendlyarm github account.
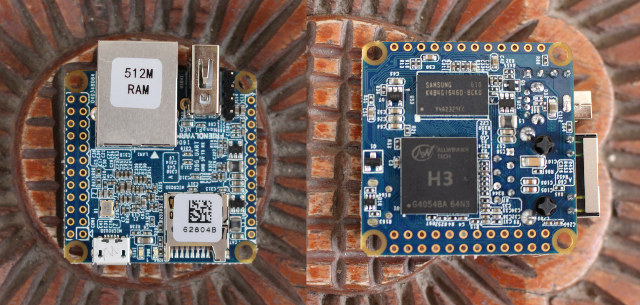
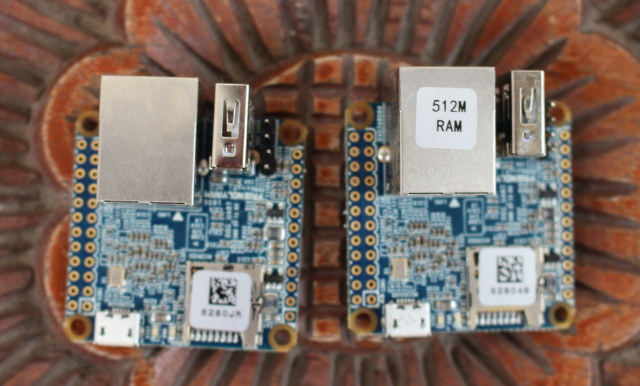
The top of the board features Ethernet, USB host, and micro USB (power) ports, as well as the micro SD slot, and I/O headers, while we’ll find the only two main ICs on the back with Allwinner H3 quad core Cortex A7 processor, and a Samsung RAM chip.
In case you wonder how to differentiate between the 512MB and 256MB version in case you buy both model, there’s a 512M RAM sticker on the former, and no sticker on the latter.
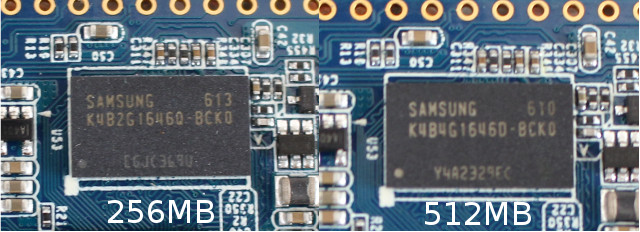
If for some reasons, the sticker is detached, or remove, just check the back of the board for the Samsung memory part number: 2G (2 Gbit) = 256 MB, and 4G (4Gbit) = 512MB. Easy enough.
 NanoPi NEO can be considered a competitor of several other small ARM or MIPS Linux boards including Raspberry Pi Zero, Orange Pi One, Next Thing CHIP, and Mediatek LinkIt 7688, so I’ve taken a “family pictures” to show the respective size of the boards, and NanoPi NEO is clearly one of the smallest, and more powerful than most other board save for Orange Pi One.
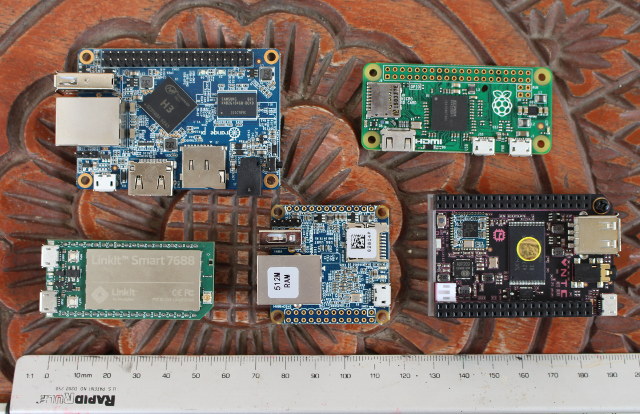
However, it’s also much thicker than most because of its RJ45 jack, and vertical USB port.
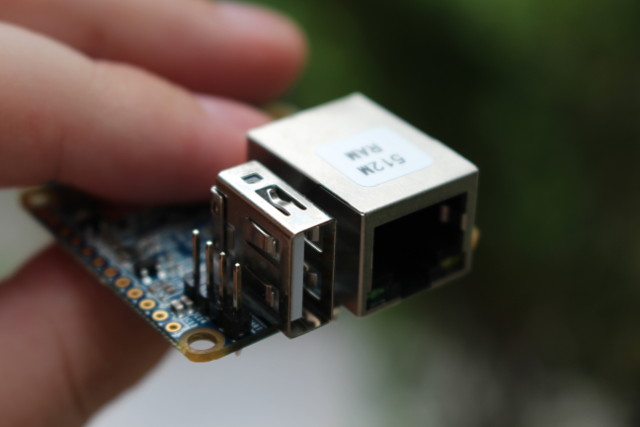 I had planned to shoot a video showing how to remove the Ethernet and USB port (and possibly serial header), but I’ll probably skip it, because the company has now decided to also sell NanoPi NEO 512MB without Ethernet nor USB for $9.98 + shipping.
Getting Started with Ubuntu Core image for NanoPi NEO
So now, that we’ve checked out the hardware, it’s time to play with the board. Eventually, armbian will release an image, and it may become the preferred option, because of community support, but in the meantime, I’ll use the “Ubuntu Core + Qt Embedded” image released by the company. The instructions below are to be follow in a terminal windows in Debian, Ubuntu, or Mint operating system, but if you use Windows 10 you can flash the image with Win32DiskImager just like with a Raspberry Pi, or install Windows Subsystem for Linux, and follow the exact same procedure as in Linux.
First, you’ll need to download the image (currently nanopi-neo-core-qte-sd4g-20160704.img.zip) through mediafire, and uncompress it:
|
1 |
unzip nanopi-neo-core-qte-sd4g-20160704.img.zip |
Now insert a micro SD card into your computer, and check the device name (/dev/sdX, or /dev/mmcblkpX) with lsblk command:
|
1 2 3 4 5 6 7 8 9 |
lsblk NAME MAJ:MIN RM SIZE RO TYPE MOUNTPOINT sda 8:0 0 465.8G 0 disk ├─sda1 8:1 0 512M 0 part /boot/efi ├─sda2 8:2 0 461.8G 0 part / └─sda3 8:3 0 3.5G 0 part [SWAP] sdb 8:16 1 7.4G 0 disk └─sdb1 8:17 1 7.4G 0 part /media/jaufranc/3239-6431 sr0 11:0 1 1024M 0 rom |
That step is very important. In my case, my 8GB SD card (the 3.7GB image should also work on 4GB micro SD cards) is /dev/sdb, so that’s what I’ll use. If I used /dev/sda instead, the instructions would completely wipe out my hard drive, and I’d lose all my data and OS. Anyway, let’s go ahead, and umount the SD card, and flash the image, checking the progress with pv:
|
1 2 3 4 |
sudo apt install pv sudo umount /dev/sdX* sudo dd if=nanopi-neo-core-qte-sd4g-20160704.img | pv | sudo dd of=/dev/sdX bs=16M sync |
The third step should take a few minutes to complete. Now we can take the micro SD card out, and insert it into the board, connect an Ethernet cable and the power, and after a few seconds (about 5 to 10 seconds). you should be able to ssh to the board with its IP address, which you can get from your router DHCP list.:
|
1 2 3 4 5 6 7 |
ssh root@192.168.0.109 root@192.168.0.109's password: Welcome to Ubuntu 15.10 (GNU/Linux 3.4.39-h3 armv7l) * Documentation: https://help.ubuntu.com/ Last login: Wed Jul 20 09:41:53 2016 root@FriendlyARM:~# |
All good that was easy, and the board works out of the box. What’s not so nice is that the image is based on Ubuntu 15.10, an unsupported version of Ubuntu at this time.
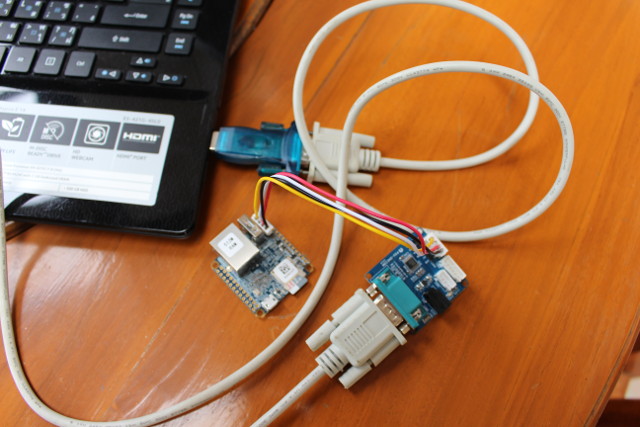
Another way to connect to the board, especially if you don’t plan to use Ethernet is through the serial console. I’ve first done so using the company’s PSU-ONECOM debug board, plus a NULL modem cable, and an RS232 to USB adapter, since my computer does not have a DB9 connector.
That’s fun, and it works, but that’s what I’d consider the old way of doing things simply because most recent computers or laptop don’t have a COM port. So instead, I’d recommend to use a standard USB to TTL, which normally cost $1 shipped, to connect to your computer, as it’s just more convenient to most people.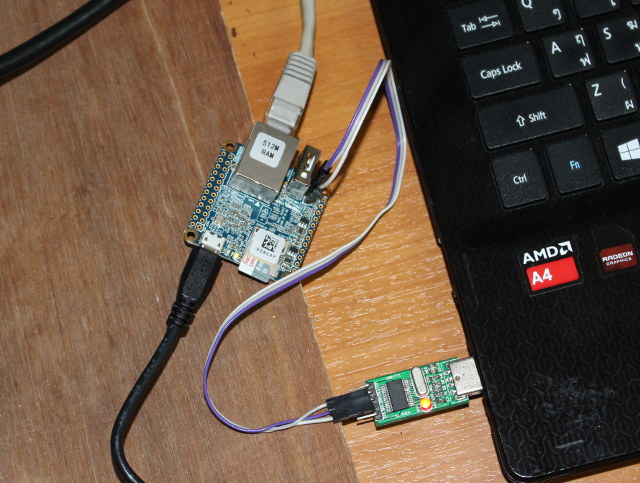 Simply connect GND, Rx, and Tx to GND, Tx and Rx pins on the serial header of the board as shown below.
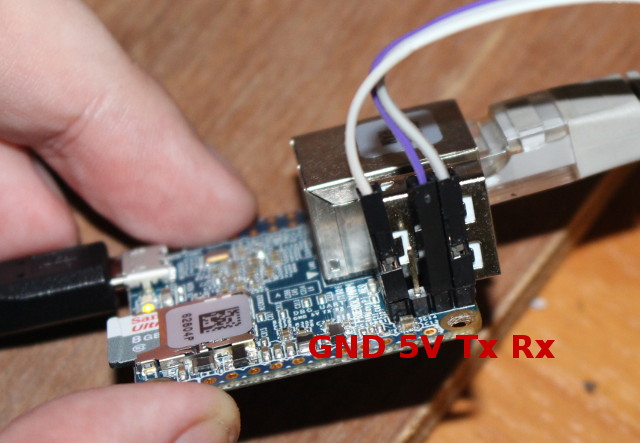
That’s the board output in minicom connected to /dev/ttyUSB0 with 115200 8N1 settings. In Windows, you may want to use Putty.
|
1 2 3 4 5 6 7 8 9 10 11 12 13 14 15 16 17 18 19 20 21 22 23 24 25 26 27 28 29 30 31 32 33 34 35 36 37 38 39 40 41 42 43 44 45 46 47 48 49 50 51 52 53 54 55 56 57 58 59 60 61 62 63 64 65 66 67 68 69 70 71 72 73 74 75 76 77 78 79 80 81 82 83 84 85 86 87 88 89 90 91 92 93 94 95 96 97 98 99 100 101 102 103 104 105 106 107 108 109 110 111 112 113 114 115 116 117 118 119 120 121 122 123 124 125 126 127 128 129 130 131 132 133 134 135 136 137 138 139 140 141 142 143 144 145 146 147 148 149 150 151 152 153 154 155 156 157 158 159 160 161 162 163 164 165 166 167 168 169 170 171 172 173 174 175 176 177 178 179 180 181 182 183 184 185 186 187 188 189 190 191 192 193 194 195 196 197 198 199 200 201 202 203 204 205 206 207 208 209 210 211 212 213 214 215 216 217 218 219 220 221 222 223 224 225 226 227 228 229 230 231 232 233 234 235 236 237 238 239 240 241 242 243 244 245 246 247 248 249 250 251 252 253 254 255 256 257 258 259 260 261 262 263 264 265 266 267 268 269 270 271 272 273 274 275 276 277 278 279 280 281 282 283 284 285 286 287 288 289 290 291 292 293 294 295 296 297 298 299 300 301 302 303 304 305 306 307 308 309 310 311 312 313 314 315 316 317 318 319 320 321 322 323 324 325 326 327 328 329 330 331 332 333 334 335 336 337 338 339 340 341 342 343 344 345 346 347 348 349 350 351 352 353 354 355 356 357 358 359 360 361 362 363 364 365 366 367 368 369 370 371 372 373 374 375 376 377 378 379 380 381 382 383 384 385 386 387 388 389 390 391 392 393 394 395 396 397 398 399 400 401 402 403 404 405 406 407 408 409 410 411 412 413 414 415 416 417 418 419 420 421 422 423 424 425 426 427 428 429 430 431 432 433 434 435 436 437 438 439 440 441 442 443 444 445 446 447 448 449 450 451 452 453 454 455 456 457 458 459 460 461 462 463 464 465 466 467 468 469 470 471 472 473 474 475 476 477 478 479 480 481 482 483 484 485 486 487 |
boot0 version : 4.0.0���������������������������������������������������������v boot0 commit : 182eb92ae6fac135787d4fc7bfd0e02aa445155c fel_flag = 0x00000000 rtc[0] value = 0x00000000 rtc[1] value = 0x00000000 rtc[2] value = 0x00000000 rtc[3] value = 0x00000000 rtc[4] value = 0x00000000 rtc[5] value = 0x00000000 rtc[6] value = 0x00000000 rtc[7] value = 0x00000000 DRAM DRIVE INFO: V1.3 the chip id is 0x00000081 the chip id is 0x00000081 the chip id is 0x00000081 the chip id is 0x00000081 the chip id is 0x00000081 READ DQS LCDL = 002d2d2d DRAM Type = 3 (2:DDR2,3:DDR3,6:LPDDR2,7:LPDDR3) DRAM CLK = 432 MHz DRAM zq value: 003b3bfb DRAM dram para1: 10f20200 DRAM dram para2: 00000001 DRAM workmode1: 000009f4 DRAM SIZE =512 M odt delay dram size =512 card boot number = 0 card no is 0 sdcard 0 line count 4 [mmc]: mmc driver ver 2015-04-13 16:07:39 [mmc]: ***Try SD card 0*** [mmc]: SD/MMC Card: 4bit, capacity: 7580MB [mmc]: vendor: Man 00035344 Snr 49731d92 [mmc]: product: SL08G [mmc]: revision: 8.0 [mmc]: ***SD/MMC 0 init OK!!!*** sdcard 0 init ok The size of uboot is 000e4000. sum=2a2e0058 src_sum=2a2e0058 Succeed in loading uboot from sdmmc flash. Ready to disable icache. Jump to secend Boot. SUNXI_NORMAL_MODE [ 0.415]e mode U-Boot 2011.09-rc1-00000-g182eb92 (Jul 04 2016 - 10:10:53) Allwinner Technology [ 0.424]version: 1.1.0 [ 0.426]uboot commit : 182eb92ae6fac135787d4fc7bfd0e02aa445155c normal mode [ 0.437]pmbus: ready not set main pmu id axp_probe error [board_vendor] vid_used not used [ 0.477]PMU: pll1 1008 Mhz,PLL6=600 Mhz AXI=336 Mhz,AHB=200 Mhz, APB1=100 Mhz sid read already fel key new mode run key detect no key found no key input dram_para_set start dram_para_set end normal mode [ 0.508]DRAM: 512 MiB relocation Offset is: 15af2000 [box standby] read rtc = 0x0 [box_start_os] mag be start_type no use user_gpio config user_gpio ok gic: normal or no secure os mode workmode = 0 MMC: 0 [ 0.592][mmc]: mmc driver ver 2015-04-13 14:50:00 [ 0.597][mmc]: get sdc_phy_wipe fail. [ 0.601][mmc]: get sdc0 sdc_erase fail. [ 0.605][mmc]: get sdc_f_max fail,use default 50000000Hz [ 0.610][mmc]: get sdc_ex_dly_used fail,use default dly [ 0.616][mmc]: SUNXI SD/MMC: 0 [ 0.629][mmc]: *Try SD card 0* [ 0.678][mmc]: CID 0x3534453 0x4c303847 0x8049731d 0x9201063d [ 0.683][mmc]: mmc clk 50000000 [ 0.687][mmc]: SD/MMC Card: 4bit, capacity: 7580MB [ 0.691][mmc]: boot0 capacity: 0KB,boot1 capacity: 0KB [ 0.697][mmc]: ***SD/MMC 0 init OK!!!*** [ 0.701][mmc]: erase_grp_size:0x1WrBlk * 0x200 = 0x200 Byte [ 0.707][mmc]: secure_feature 0x0 [ 0.710][mmc]: secure_removal_type 0x0 [ 0.714]sunxi flash init ok script config pll_de to 864 Mhz Not Found clk pll_video1 in script script config pll_video to 297 Mhz script config pll_periph0 to 600 Mhz DRV_DISP_Init end [disk_read_fs] no the partition error: open tv_vdid.fex, maybe it is not exist [disk_read_fs] no the partition error: open disp_rsl.fex, maybe it is not exist [disk_read_fs] no the partition error: open disp_rsl.fex, maybe it is not exist boot_disp.auto_hpd=1 auto hpd check has 100 times! auto check no any connected, the output_type is 4 [ 1.861]finally, output_type=0x4, output_mode=0x4, screen_id=0x0, disp_par0 try to read logic blk 0 without env partition *** Warning - bad CRC, using default environment In: serial Out: serial Err: serial --------fastboot partitions-------- mbr not exist base bootcmd=run setargs_mmc boot_normal bootcmd set setargs_mmc key 0 cant find rcvy value cant find fstbt value no misc partition is found to be run cmd=run setargs_mmc boot_normal [ 1.909][mmc]: MMC Device 2 not found [ 1.913][mmc]: Can not find mmc dev [ 1.916][mmc]: read first backup failed in fun sdmmc_secure_storage_read l4 sunxi_secstorage_read fail get secure storage map err check user data form private the private part isn't exist WORK_MODE_BOOT adver not need show sunxi_bmp_logo_display [disk_read_fs] no the partition error: open bootlogo.bmp, maybe it is not exist sunxi bmp info error : unable to open logo file bootlogo.bmp [ 1.952]Hit any key to stop autoboot: 0 ## Booting kernel from Legacy Image at 40007800 ... Image Name: Linux-3.4.39-h3 Image Type: ARM Linux Kernel Image (uncompressed) Data Size: 4511456 Bytes = 4.3 MiB Load Address: 40008000 Entry Point: 40008000 Verifying Checksum ... OK Loading Kernel Image ... OK OK [ 4.424][mmc]: MMC Device 2 not found [ 4.428][mmc]: mmc not find,so not exit [ 4.432] Starting kernel ... [sun8i_fixup]: From boot, get meminfo: Start: 0x40000000 Size: 512MB ion_carveout reserve: 160m@0 256m@0 130m@1 200m@1 ion_reserve_select: ion chipid [0x2c00081! ion_reserve_common: ion reserve: [0x56000000, 0x60000000]! [ 0.000000] Booting Linux on physical CPU 0 [ 0.000000] Initializing cgroup subsys cpuset [ 0.000000] Initializing cgroup subsys cpu [ 0.000000] Linux version 3.4.39-h3 (root@wwd-ubuntu) (gcc version 4.6.3 2016 [ 0.000000] cma: CMA: reserved 160 MiB at 56000000 [ 0.000000] PERCPU: Embedded 8 pages/cpu @c0eca000 s11840 r8192 d12736 u32768 [ 0.000000] Kernel command line: console=ttyS0,115200 console=tty0 root=/devt [ 0.000000] PID hash table entries: 2048 (order: 1, 8192 bytes) [ 0.000000] Dentry cache hash table entries: 65536 (order: 6, 262144 bytes) [ 0.000000] Inode-cache hash table entries: 32768 (order: 5, 131072 bytes) [ 0.000000] allocated 1048576 bytes of page_cgroup [ 0.000000] please try 'cgroup_disable=memory' option if you don't want memos [ 0.000000] Memory: 512MB = 512MB total [ 0.000000] Memory: 343172k/343172k available, 181116k reserved, 0K highmem [ 0.000000] Virtual kernel memory layout: [ 0.000000] vector : 0xffff0000 - 0xffff1000 ( 4 kB) [ 0.000000] fixmap : 0xfff00000 - 0xfffe0000 ( 896 kB) [ 0.000000] vmalloc : 0xe0800000 - 0xff000000 ( 488 MB) [ 0.000000] lowmem : 0xc0000000 - 0xe0000000 ( 512 MB) [ 0.000000] pkmap : 0xbfe00000 - 0xc0000000 ( 2 MB) [ 0.000000] modules : 0xbf000000 - 0xbfe00000 ( 14 MB) [ 0.000000] .text : 0xc0008000 - 0xc0897764 (8766 kB) [ 0.000000] .init : 0xc0898000 - 0xc08e7e40 ( 320 kB) [ 0.000000] .data : 0xc08e8000 - 0xc09622b8 ( 489 kB) [ 0.000000] .bss : 0xc0962a6c - 0xc0a37630 ( 851 kB) [ 0.000000] Preemptible hierarchical RCU implementation. [ 0.000000] Additional per-CPU info printed with stalls. [ 0.000000] NR_IRQS:544 [ 0.000000] Architected local timer running at 24.00MHz. [ 0.000000] Switching to timer-based delay loop [ 0.000000] sched_clock: 32 bits at 24MHz, resolution 41ns, wraps every 1789s [ 0.000000] Console: colour dummy device 80x30 [ 0.000000] console [tty0] enabled [ 0.001002] Calibrating delay loop (skipped), value calculated using timer f) [ 0.001072] pid_max: default: 32768 minimum: 301 [ 0.001455] Mount-cache hash table entries: 512 [ 0.002570] Initializing cgroup subsys cpuacct [ 0.002615] Initializing cgroup subsys memory [ 0.002688] Initializing cgroup subsys devices [ 0.002720] Initializing cgroup subsys freezer [ 0.002750] Initializing cgroup subsys blkio [ 0.002794] Initializing cgroup subsys perf_event [ 0.002877] CPU: Testing write buffer coherency: ok [ 0.002959] ftrace: allocating 24050 entries in 71 pages [ 0.030362] CPU0: thread -1, cpu 0, socket 0, mpidr 80000000 [ 0.030417] [sunxi_smp_prepare_cpus] enter [ 0.030478] Setting up static identity map for 0x4061b9a0 - 0x4061b9f8 [ 0.031604] CPU1: thread -1, cpu 1, socket 0, mpidr 80000001 [ 0.031743] CPU2: thread -1, cpu 2, socket 0, mpidr 80000002 [ 0.040264] CPU3: thread -1, cpu 3, socket 0, mpidr 80000003 [ 0.040387] Brought up 4 CPUs [ 0.040387] SMP: Total of 4 processors activated (19200.00 BogoMIPS). [ 0.041102] devtmpfs: initialized [ 0.043889] wakeup src cnt is : 2. [ 0.043988] sunxi pm init [ 0.044143] pinctrl core: initialized pinctrl subsystem [ 0.056423] NET: Registered protocol family 16 [ 0.057275] DMA: preallocated 2048 KiB pool for atomic coherent allocations [ 0.057275] script_sysfs_init success [ 0.057275] gpiochip_add: registered GPIOs 0 to 383 on device: sunxi-pinctrl [ 0.057275] sunxi-pinctrl sunxi-pinctrl: initialized sunXi PIO driver [ 0.057275] hw-breakpoint: found 5 (+1 reserved) breakpoint and 4 watchpoint. [ 0.057275] hw-breakpoint: maximum watchpoint size is 8 bytes. [ 0.057275] script config pll_video to 297 Mhz [ 0.057275] script config pll_de to 864 Mhz [ 0.057275] script config pll_ve to 402 Mhz [ 0.064130] bio: create slab <bio-0> at 0 [ 0.070083] [ARISC] :sunxi-arisc driver v1.04 [ 0.080315] [ARISC] :arisc version: [v0.1.58] [ 0.178051] [ARISC] :sunxi-arisc driver v1.04 startup succeeded [ 0.178187] pwm module init! [ 0.180481] SCSI subsystem initialized [ 0.180711] usbcore: registered new interface driver usbfs [ 0.180805] usbcore: registered new interface driver hub [ 0.190048] usbcore: registered new device driver usb [ 0.190188] twi_chan_cfg()340 - [twi0] has no twi_regulator. [ 0.190218] twi_chan_cfg()340 - [twi1] has no twi_regulator. [ 0.190244] twi_chan_cfg()340 - [twi2] has no twi_regulator. [ 0.191483] Linux video capture interface: v2.00 [ 0.191781] Advanced Linux Sound Architecture Driver Version 1.0.25. [ 0.192397] Bluetooth: Core ver 2.16 [ 0.192466] NET: Registered protocol family 31 [ 0.192492] Bluetooth: HCI device and connection manager initialized [ 0.192521] Bluetooth: HCI socket layer initialized [ 0.192544] Bluetooth: L2CAP socket layer initialized [ 0.192580] Bluetooth: SCO socket layer initialized [ 0.192838] Switching to clocksource arch_sys_counter [ 0.204285] FS-Cache: Loaded [ 0.204663] CacheFiles: Loaded [ 0.216765] NET: Registered protocol family 2 [ 0.217101] IP route cache hash table entries: 4096 (order: 2, 16384 bytes) [ 0.217711] TCP established hash table entries: 16384 (order: 5, 131072 byte) [ 0.218005] TCP bind hash table entries: 16384 (order: 5, 196608 bytes) [ 0.218267] TCP: Hash tables configured (established 16384 bind 16384) [ 0.218295] TCP: reno registered [ 0.218319] UDP hash table entries: 256 (order: 1, 8192 bytes) [ 0.218361] UDP-Lite hash table entries: 256 (order: 1, 8192 bytes) [ 0.218681] NET: Registered protocol family 1 [ 0.219108] RPC: Registered named UNIX socket transport module. [ 0.219139] RPC: Registered udp transport module. [ 0.219161] RPC: Registered tcp transport module. [ 0.219182] RPC: Registered tcp NFSv4.1 backchannel transport module. [ 0.219693] hw perfevents: enabled with ARMv7 Cortex_A7 PMU driver, 5 countee [ 0.219834] sunxi_reg_init enter [ 0.220664] audit: initializing netlink socket (disabled) [ 0.220733] type=2000 audit(0.220:1): initialized [ 0.223217] NTFS driver 2.1.30 [Flags: R/W]. [ 0.223546] fuse init (API version 7.18) [ 0.223909] msgmni has been set to 990 [ 0.225401] Block layer SCSI generic (bsg) driver version 0.4 loaded (major ) [ 0.225456] io scheduler noop registered [ 0.225476] io scheduler deadline registered [ 0.225553] io scheduler cfq registered (default) [ 0.226044] [DISP]disp_module_init [ 0.226376] cmdline,init_disp= [ 0.226421] cmdline,disp= [ 0.239068] [DISP] Fb_map_kernel_logo,line:926:Fb_map_kernel_logo failed! [ 0.254339] Console: switching to colour frame buffer device 160x45 [ 0.270814] [DISP]disp_module_init finish [ 0.271166] sw_uart_get_devinfo()1503 - uart0 has no uart_regulator. [ 0.271345] sw_uart_get_devinfo()1503 - uart1 has no uart_regulator. [ 0.271519] sw_uart_get_devinfo()1503 - uart2 has no uart_regulator. [ 0.271693] sw_uart_get_devinfo()1503 - uart3 has no uart_regulator. [ 0.272473] uart0: ttyS0 at MMIO 0x1c28000 (irq = 32) is a SUNXI [ 0.272645] sw_uart_pm()890 - uart0 clk is already enable [ 0.272801] sw_console_setup()1233 - console setup baud 115200 parity n bitsn [ 0.383750] console [ttyS0] enabled [ 1.315415] uart1: ttyS1 at MMIO 0x1c28400 (irq = 33) is a SUNXI [ 1.474688] uart2: ttyS2 at MMIO 0x1c28800 (irq = 34) is a SUNXI [ 1.486102] uart3: ttyS3 at MMIO 0x1c28c00 (irq = 35) is a SUNXI [ 1.498070] [drm] Initialized drm 1.1.0 20060810 [ 1.511839] loop: module loaded [ 1.519960] sunxi_spi_chan_cfg()1383 - [spi-0] has no spi_regulator. [ 1.531531] sunxi_spi_chan_cfg()1383 - [spi-1] has no spi_regulator. [ 1.543634] spi spi0: master is unqueued, this is deprecated [ 1.554689] tun: Universal TUN/TAP device driver, 1.6 [ 1.564669] tun: (C) 1999-2004 Max Krasnyansky <maxk@qualcomm.com> [ 1.576883] PPP generic driver version 2.4.2 [ 1.586170] PPP BSD Compression module registered [ 1.595694] PPP Deflate Compression module registered [ 1.606516] PPP MPPE Compression module registered [ 1.616137] NET: Registered protocol family 24 [ 1.625330] PPTP driver version 0.8.5 [ 1.633861] ehci_hcd: USB 2.0 'Enhanced' Host Controller (EHCI) Driver [ 1.665586] sunxi-ehci sunxi-ehci.1: SW USB2.0 'Enhanced' Host Controller (Er [ 1.679018] sunxi-ehci sunxi-ehci.1: new USB bus registered, assigned bus nu1 [ 1.692631] sunxi-ehci sunxi-ehci.1: irq 104, io mem 0xf1c1a000 [ 1.720040] sunxi-ehci sunxi-ehci.1: USB 0.0 started, EHCI 1.00 [ 1.731689] hub 1-0:1.0: USB hub found [ 1.740174] hub 1-0:1.0: 1 port detected [ 1.769197] sunxi-ehci sunxi-ehci.2: SW USB2.0 'Enhanced' Host Controller (Er [ 1.782526] sunxi-ehci sunxi-ehci.2: new USB bus registered, assigned bus nu2 [ 1.795882] sunxi-ehci sunxi-ehci.2: irq 106, io mem 0xf1c1b000 [ 1.820036] sunxi-ehci sunxi-ehci.2: USB 0.0 started, EHCI 1.00 [ 1.831581] hub 2-0:1.0: USB hub found [ 1.840104] hub 2-0:1.0: 1 port detected [ 1.869145] sunxi-ehci sunxi-ehci.3: SW USB2.0 'Enhanced' Host Controller (Er [ 1.882546] sunxi-ehci sunxi-ehci.3: new USB bus registered, assigned bus nu3 [ 1.895964] sunxi-ehci sunxi-ehci.3: irq 108, io mem 0xf1c1c000 [ 1.920045] sunxi-ehci sunxi-ehci.3: USB 0.0 started, EHCI 1.00 [ 1.931743] hub 3-0:1.0: USB hub found [ 1.940430] hub 3-0:1.0: 1 port detected [ 1.969506] sunxi-ehci sunxi-ehci.4: SW USB2.0 'Enhanced' Host Controller (Er [ 1.982926] sunxi-ehci sunxi-ehci.4: new USB bus registered, assigned bus nu4 [ 1.996312] sunxi-ehci sunxi-ehci.4: irq 110, io mem 0xf1c1d000 [ 2.020042] sunxi-ehci sunxi-ehci.4: USB 0.0 started, EHCI 1.00 [ 2.031715] hub 4-0:1.0: USB hub found [ 2.040573] hub 4-0:1.0: 1 port detected [ 2.049844] ohci_hcd: USB 1.1 'Open' Host Controller (OHCI) Driver [ 2.081391] sunxi-ohci sunxi-ohci.1: SW USB2.0 'Open' Host Controller (OHCI)r [ 2.094575] sunxi-ohci sunxi-ohci.1: new USB bus registered, assigned bus nu5 [ 2.107611] sunxi-ohci sunxi-ohci.1: irq 105, io mem 0xf1c1a400 [ 2.174566] hub 5-0:1.0: USB hub found [ 2.183332] hub 5-0:1.0: 1 port detected [ 2.212691] sunxi-ohci sunxi-ohci.2: SW USB2.0 'Open' Host Controller (OHCI)r [ 2.225947] sunxi-ohci sunxi-ohci.2: new USB bus registered, assigned bus nu6 [ 2.239127] sunxi-ohci sunxi-ohci.2: irq 107, io mem 0xf1c1b400 [ 2.314578] hub 6-0:1.0: USB hub found [ 2.323489] hub 6-0:1.0: 1 port detected [ 2.352873] sunxi-ohci sunxi-ohci.3: SW USB2.0 'Open' Host Controller (OHCI)r [ 2.366187] sunxi-ohci sunxi-ohci.3: new USB bus registered, assigned bus nu7 [ 2.379403] sunxi-ohci sunxi-ohci.3: irq 109, io mem 0xf1c1c400 [ 2.454581] hub 7-0:1.0: USB hub found [ 2.463472] hub 7-0:1.0: 1 port detected [ 2.492879] sunxi-ohci sunxi-ohci.4: SW USB2.0 'Open' Host Controller (OHCI)r [ 2.506221] sunxi-ohci sunxi-ohci.4: new USB bus registered, assigned bus nu8 [ 2.519492] sunxi-ohci sunxi-ohci.4: irq 111, io mem 0xf1c1d400 [ 2.594576] hub 8-0:1.0: USB hub found [ 2.603502] hub 8-0:1.0: 1 port detected [ 2.612892] Initializing USB Mass Storage driver... [ 2.623184] usbcore: registered new interface driver usb-storage [ 2.634532] USB Mass Storage support registered. [ 2.644412] usbcore: registered new interface driver ums-alauda [ 2.655762] usbcore: registered new interface driver ums-cypress [ 2.667193] usbcore: registered new interface driver ums-datafab [ 2.678492] usbcore: registered new interface driver ums_eneub6250 [ 2.689914] usbcore: registered new interface driver ums-freecom [ 2.701074] usbcore: registered new interface driver ums-isd200 [ 2.712153] usbcore: registered new interface driver ums-jumpshot [ 2.723300] usbcore: registered new interface driver ums-karma [ 2.734141] usbcore: registered new interface driver ums-onetouch [ 2.745161] usbcore: registered new interface driver ums-realtek [ 2.755982] usbcore: registered new interface driver ums-sddr09 [ 2.766635] usbcore: registered new interface driver ums-sddr55 [ 2.777251] usbcore: registered new interface driver ums-usbat [ 2.787763] usbcore: registered new interface driver usbserial [ 2.798133] usbserial: USB Serial Driver core [ 2.806813] usbcore: registered new interface driver option [ 2.816853] USB Serial support registered for GSM modem (1-port) [ 2.828034] file system registered [ 2.837371] android_usb gadget: Mass Storage Function, version: 2009/09/11 [ 2.848974] android_usb gadget: Number of LUNs=3 [ 2.858019] lun0: LUN: removable file: (no medium) [ 2.867330] lun1: LUN: removable file: (no medium) [ 2.876504] lun2: LUN: removable file: (no medium) [ 2.885928] android_usb gadget: android_usb ready [ 2.895711] mousedev: PS/2 mouse device common for all mice [ 2.906659] ls_fetch_sysconfig_para: ls_unused. [ 2.915845] [RTC] WARNING: Rtc time will be wrong!! [ 2.924927] [RTC] WARNING: use *internal OSC* as clock source [ 2.935232] sunxi-rtc sunxi-rtc: rtc core: registered sunxi-rtc as rtc0 [ 2.946335] i2c /dev entries driver [ 2.954416] IR RC5(x) protocol handler initialized [ 2.963665] tscdev_init: tsc driver is disabled [ 2.972781] Driver for 1-wire Dallas network protocol. [ 2.982265] sunxi_wdt_init_module: sunxi WatchDog Timer Driver v1.0 [ 2.993101] sunxi_wdt_probe: devm_ioremap return wdt_reg 0xf1c20ca0, res->stf [ 3.004544] sunxi_wdt_probe: initialized (g_timeout=16s, g_nowayout=0) [ 3.019533] wdt_enable, write reg 0xf1c20cb8 val 0x00000000 [ 3.029598] timeout_to_interv, line 167 [ 3.037695] interv_to_timeout, line 189 [ 3.045779] wdt_set_tmout, write 0x000000b0 to mode reg 0xf1c20cb8, actual tc [ 3.059001] device-mapper: uevent: version 1.0.3 [ 3.068375] device-mapper: ioctl: 4.22.0-ioctl (2011-10-19) initialised: dm-m [ 3.081924] Bluetooth: HCI UART driver ver 2.2 [ 3.091009] [cpu_freq] ERR:get cpu extremity frequency from sysconfig failedq [ 3.107010] no red_led, ignore it! [ 3.117104] usbcore: registered new interface driver usbhid [ 3.127606] usbhid: USB HID core driver [ 3.137590] script_get_item audio_pa_ctrl not found [ 3.152286] asoc: sndcodec <-> sunxi-codec mapping ok [ 3.167832] asoc: sndhdmi <-> sunxi-hdmiaudio.0 mapping ok [ 3.179765] oprofile: using arm/armv7-ca7 [ 3.189030] u32 classifier [ 3.196637] Actions configured [ 3.205076] Netfilter messages via NETLINK v0.30. [ 3.214709] nf_conntrack version 0.5.0 (7922 buckets, 31688 max) [ 3.226251] ctnetlink v0.93: registering with nfnetlink. [ 3.236698] NF_TPROXY: Transparent proxy support initialized, version 4.1.0 [ 3.249054] NF_TPROXY: Copyright (c) 2006-2007 BalaBit IT Ltd. [ 3.260572] xt_time: kernel timezone is -0000 [ 3.269851] IPv4 over IPv4 tunneling driver [ 3.279289] gre: GRE over IPv4 demultiplexor driver [ 3.288992] ip_gre: GRE over IPv4 tunneling driver [ 3.299247] ip_tables: (C) 2000-2006 Netfilter Core Team [ 3.309581] arp_tables: (C) 2002 David S. Miller [ 3.319009] TCP: cubic registered [ 3.326878] Initializing XFRM netlink socket [ 3.336138] NET: Registered protocol family 10 [ 3.345475] mmc0: new high speed SDHC card at address aaaa [ 3.355905] Mobile IPv6 [ 3.363030] ip6_tables: (C) 2000-2006 Netfilter Core Team [ 3.363062] mmcblk0: mmc0:aaaa SL08G 7.40 GiB [ 3.382689] mmcblk0: p1 p2 [ 3.382835] IPv6 over IPv4 tunneling driver [ 3.384038] NET: Registered protocol family 17 [ 3.384083] NET: Registered protocol family 15 [ 3.384311] Bluetooth: RFCOMM TTY layer initialized [ 3.384328] Bluetooth: RFCOMM socket layer initialized [ 3.384335] Bluetooth: RFCOMM ver 1.11 [ 3.384343] Bluetooth: BNEP (Ethernet Emulation) ver 1.3 [ 3.384350] Bluetooth: BNEP filters: protocol multicast [ 3.384359] Bluetooth: HIDP (Human Interface Emulation) ver 1.2 [ 3.384481] L2TP core driver, V2.0 [ 3.384505] PPPoL2TP kernel driver, V2.0 [ 3.384511] L2TP IP encapsulation support (L2TPv3) [ 3.499135] L2TP netlink interface [ 3.500054] *******************sd init ok******************* [ 3.516605] L2TP ethernet pseudowire support (L2TPv3) [ 3.526037] VFP support v0.3: implementor 41 architecture 2 part 30 variant 5 [ 3.538225] ThumbEE CPU extension supported. [ 3.546572] Registering SWP/SWPB emulation handler [ 3.556940] sunxi-rtc sunxi-rtc: setting system clock to 1970-01-01 00:00:08) [ 3.569263] ths_fetch_sysconfig_para: type err device_used = 1. [ 3.581076] CPU Budget:Register notifier [ 3.589130] CPU Budget:register Success [ 3.597047] sunxi-budget-cooling sunxi-budget-cooling: Cooling device regist0 [ 3.613963] ALSA device list: [ 3.621093] #0: audiocodec [ 3.628038] #1: sndhdmi [ 3.669665] EXT4-fs (mmcblk0p2): mounted filesystem with ordered data mode. ) [ 3.682674] VFS: Mounted root (ext4 filesystem) on device 179:2. [ 3.693520] Freeing init memory: 316K [ 3.929911] systemd[1]: Failed to insert module 'kdbus': Function not implemd [ 4.460446] systemd[1]: systemd 225 running in system mode. (+PAM +AUDIT +SE) [ 4.502165] systemd[1]: Detected architecture arm. [ 4.552618] systemd[1]: Set hostname to <FriendlyARM>. [ 4.807091] systemd[1]: display-manager.service: Cannot add dependency job, . [ 4.829365] systemd[1]: Reached target Encrypted Volumes. [ 4.845042] systemd[1]: Reached target Swap. [ 4.859310] systemd[1]: Started Dispatch Password Requests to Console Direct. [ 4.877891] systemd[1]: Created slice Root Slice. [ 4.892959] systemd[1]: Listening on udev Kernel Socket. [ 4.908947] systemd[1]: Listening on Journal Socket. [ 4.924633] systemd[1]: Listening on /dev/initctl Compatibility Named Pipe. [ 4.942931] systemd[1]: Started Forward Password Requests to Wall Directory . [ 4.962308] systemd[1]: Reached target Paths. [ 4.978340] systemd[1]: Created slice System Slice. [ 4.995081] systemd[1]: Created slice system-getty.slice. [ 5.012422] systemd[1]: Created slice system-serial\x2dgetty.slice. [ 5.100571] systemd[1]: Mounting Debug File System... [ 5.261128] systemd[1]: Starting Load Kernel Modules... [ 5.381053] systemd[1]: Starting Remount Root and Kernel File Systems... [ 5.470500] systemd[1]: Created slice User and Session Slice. [ 5.490350] systemd[1]: Reached target Slices. [ 5.508606] systemd[1]: Listening on Journal Audit Socket. [ 5.536063] systemd[1]: Listening on Journal Socket (/dev/log). [ 5.650633] systemd[1]: Starting Journal Service... [ 5.668334] systemd[1]: Reached target Remote File Systems (Pre). [ 5.740888] systemd[1]: Starting Create list of required static device nodes. [ 5.765081] systemd[1]: Listening on udev Control Socket. [ 5.880752] systemd[1]: Starting udev Coldplug all Devices... [ 5.974433] systemd[1]: Mounted Debug File System. [ 5.996267] systemd[1]: Started Journal Service. Ubuntu 15.10 FriendlyARM ttyS0 FriendlyARM login: root Password: root@FriendlyARM:~# |
Let’s type some other command to find out more:
|
1 2 3 4 5 6 7 8 9 10 11 12 13 14 15 16 17 18 19 20 21 22 23 24 25 26 27 28 29 30 31 32 33 34 35 36 37 38 39 40 41 42 43 44 45 46 47 48 49 50 51 52 53 54 55 |
root@FriendlyARM:~# uname -a Linux FriendlyARM 3.4.39-h3 #14 SMP PREEMPT Mon Jul 4 10:10:33 CST 2016 armv7l x root@FriendlyARM:~# df -h Filesystem Size Used Avail Use% Mounted on /dev/root 3.6G 603M 3.0G 17% / devtmpfs 168M 0 168M 0% /dev tmpfs 248M 0 248M 0% /dev/shm tmpfs 248M 13M 236M 5% /run tmpfs 5.0M 4.0K 5.0M 1% /run/lock tmpfs 248M 0 248M 0% /sys/fs/cgroup root@FriendlyARM:~# free -m total used free shared buffers cached Mem: 495 94 401 12 4 47 -/+ buffers/cache: 41 453 Swap: 0 0 0 root@FriendlyARM:~# cat /proc/cpuinfo Processor : ARMv7 Processor rev 5 (v7l) processor : 0 BogoMIPS : 2285.71 processor : 1 BogoMIPS : 2285.71 processor : 2 BogoMIPS : 2285.71 processor : 3 BogoMIPS : 2285.71 Features : swp half thumb fastmult vfp edsp thumbee neon vfpv3 tls vfpv4 CPU implementer : 0x41 CPU architecture: 7 CPU variant : 0x0 CPU part : 0xc07 CPU revision : 5 Hardware : sun8i Revision : 0000 Serial : 5400503583203c3c040e root@FriendlyARM:~# cat /sys/devices/system/cpu/cpu0/cpufreq/cpuinfo_max_freq 1200000 root@FriendlyARM:~# modprobe gpio-sunxi [ 427.931040] this module is used not! root@FriendlyARM:~# lsmod Module Size Used by gpio_sunxi 8253 0 root@FriendlyARM:~# ls -l /sys/class/gpio gpio/ gpio_sw/ root@FriendlyARM:~# ls -l /sys/class/gpio_sw/ total 0 root@FriendlyARM:~# ls -l /sys/class/gpio/ total 0 --w------- 1 root root 4096 Jan 1 1970 export lrwxrwxrwx 1 root root 0 Jan 1 1970 gpiochip0 -> ../../devices/platform/su0 --w------- 1 root root 4096 Jan 1 1970 unexport |
So the image is using a Linux 3.4.39 legacy kernel (mainline support should be a few weeks or months away), the rootfs size is 3.6GB with 3.0GB free (You’ll want to resize it with parted + resize2fs), and the quad core Cortex A7 processor has a maximum frequency of 1.2 GHz, instead of 1.29 GHz for boards with a different voltage regulation, but that’s OK, as the board has been mostly designed for IoT applications, and not necessarily for maximum performance. The GPIO module is compiled, but an error is generated after I load it, and now GPIOs are exported, which differs from my experience with the images I used with Orange Pi Allwinner H3 boards, where GPIOs are listed and ready to use.
Power consumption on this type of board is a topic that will require a separate post, but since I’ve been asked I’ve taken some quick measurements using a “kill-a-watt” power meter, and power consumption at idle is around 2.0 watts. Since the platform should also support standby/sleep mode, I tried it with pm-suspend:
|
1 2 |
apt install pm-utils pm-suspend |
Power consumption only dropped to 1.4 watts, and I was not able to resume by connecting a USB keyboard. So either the method I used is not correct, and suspend is not fully supported in the kernel. I’ll have to study a bit more, but obviously tips or links that could help me are welcome in comments.
Finally, I also checked whether it would be feasible to install an heatsink for people who may want to push the board to its limits.
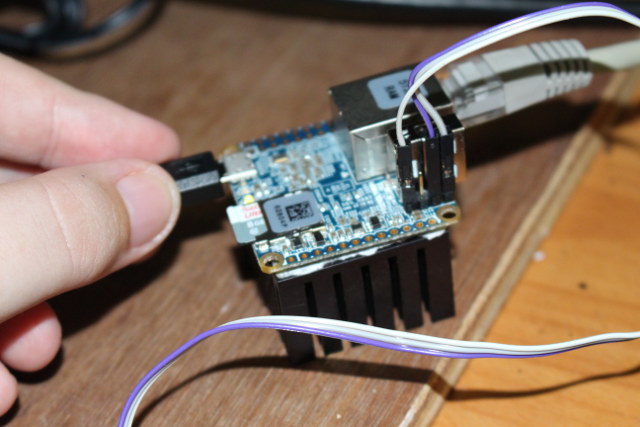 The Ethernet jack pins prevents to simply put some thermal paste on the processor and RAM, so you’d have to add some thermal pads on both ICs before fitting a heatsink, unless you use a smaller heatsink that does not cover the area under the RJ45 connector. There’s also no obvious way to keep the heatsink in place.
If you are interested in the board, it sells for $7.99 with 256MB RAM, and $9.98/$9.99 with 512MB RAM without/with Ethernet and USB host ports, plus shipping which normally amounts to $4 to $5 by airmail.

Jean-Luc started CNX Software in 2010 as a part-time endeavor, before quitting his job as a software engineering manager, and starting to write daily news, and reviews full time later in 2011.
Support CNX Software! Donate via cryptocurrencies, become a Patron on Patreon, or purchase goods on Amazon or Aliexpress




Great article! …. but do you know whats about CE Mark happens? I try to get information since your last article… but get no precise answer. “it is sent for CE Verification…” – for real?, how long does this take? Expectations? … Will they get CE Mark for sure? Do you have contact with FriendlyARM? It’s not possible to import them into EU a legal way without CE Mark… Are you able to get more information about that?
Hey Chris, no makings on the board for CE but the box does have the logo. I can take pictures if you like?
@Chris
Yes, @Brendan is right. I can see both CE and FCC logo on the other side of the box.
@Brendan
Thank you!
@cnxsoft
Ok, that are really great news!!!!
Armbian will support the boards soon (FA’s tech support said they shipped today dev samples to Igor and me). If anyone wants to play he can take the Armbian image for NanoPi M1 and use this fex file: https://github.com/igorpecovnik/lib/blob/master/config/fex/nanopineo.fex
Use fex2bin to convert/save it as /boot/bin/nanopineo.bin, then do as root a
Also in /etc/defaults/cpufreq-utils the 240MHz value has to be adjusted to 480MHz (I made a mistake when preparing NanoPi M1 support, now FA will send this board too so we’ll provide updates next week) and a reboot is necessary.
Regarding suspend from sleep you need sources configured for legacy kernel in the fex file. Currently that’s the — non existing — power key bound to pin PL03.
@Chris
As it doesn’t have Wi-Fi, why does it need CE or FCC? The power adapter does (well CE/UL), but you only have to pass EMI certification otherwise afaik.
@TLS
I am not responsible for Laws themselfs or if they make sense but: it has to have a CE Mark and a CE Certification if you want it to import to the whole European Union… which are some small countries which may be interessted in buying…
kernel 3.4.39? any mainline kernel for the h3 yet?
Ethernet and USB ports only worth half a penny each these days, eh?
@Deets
the descriptions says “With USB-A Port & Ehternet Port Unsoldered” so maybe the parts are included in the package, just not soldered? I don’t know.
The Ubuntu core image will run /opt/QtE-Demo/run.sh by default.
It’s completely useless since there’s no display, and it can be disabled in /etc/rc.local.
(second try):
“its IP address, which you can get from your router DHCP list.:”
On Linux and MacOS you can use:
I will post an oneliner on a next, separate post.
The one-liner (I wish I knew how I could put in a code-block):
@Sander
Thanks. Useful!
You need to use <-pre-> something here <-/pre-> without the dash. I’ve done it for you.
@Sander
On OS X there’s no need for arp-scan (also not included). The following works there:
No idea about FA’s OS image but at least with Armbian and a DHCP server with dynamic DNS updates simply pinging the deivce’s host name should also work directly afterwards (‘ping nanopineo’ in this case)
@tkaiser
I can confirm that “ping FriendlyARM” does not work with their image.
I can also confirm it’s not designed to run high loads, at least not without heatsink, unless the image as some issues.
I’ve been running the “LoveRPi” Phoronix test for over 4 hours, and the CPU temperature is @ 80 C with the IR thermometer, and each of the test iteration take longer than the other.
All good news and while Friendlyarm, OrangePi have got better at communicating, supplying hardware to the likes of Armbian, more board and soc makers need to up their game and join in.
Armbian has the potential to be a gathering of developers, makers with a resulting blooming of a vibrant strong healthy eco system of products.
What the NanoPi Neo needs next is a version where all USB ports are brought out to separate micro USB ( lower weight, packet size for postage ) Ethernet and HDMI header not fitted but brought out to a second GPIO bank , 1GB to 2GB ram (Why! Because build it they will come. Give makers the space and let them developed, explore the need )
Think a Allwinner H3 Arduino similar style board but more oomph, grunt, speed etc.
@cnxsoft
Using Phoronix test suite to compare different boards with same SoC is pretty much a waste of time. DRAM might make a difference with some workloads (NanoPi NEO has a single bank configuration and a very conservative DRAM clockspeed — to save on energy is still my assumption) but everything else is just settings (that’s why the first Orange Pi measurements done by Michael Larabel looked so horrible) and PCB design (copper layers to spread the heat for example).
My usual quick test is installing Armbian (see above for the minimal NEO adoptions currently needed), then taking the 20 seconds to install cpuburn-a7 and then install RPi-Monitor using
Then execute cpuburn-a7, check temperature / clockspeed 3 minutes later and compare with https://github.com/igorpecovnik/lib/issues/298#issuecomment-220017171 (the three graphs here and below for Orange Pi One, PC and Plus 2E)
@tkaiser
Cool!
This works on Linux:
“the company has now decided to also sell NanoPi NEO 512MB without Ethernet nor USB for $9.98”
well that’s better.
wait.. you mean the same board with missing connectors ? not even a microsub in place of the usb port ?
i give up, someone send them an rpi zero..
At least the 1 cent price difference made me laugh a bit (and the massive heatsink too).
80c at full load with that kind of cooling is respectable but still would not make the device safe for mobile use, i’ll try to heat my lipo batteries at that temp, see what happens.
I think it’s safe to assume that the stock 1.2GHz is not realistic for mobile use, you’ll have to limit power draw significantly.
@mdel
Actually I can understand the point of removing the full USB port and leaving the pins to integrated your own low profile USB device, like a WiFI dongle, but I don’t see the benefit of replace the USB port with a micro USB port.
@cnxsoft
well there’s not much to it, ease of use.
I look at the rpi zero or arducam and i see something i can recognize, low profile board with only low profile connectors (microusb, dsi connector, unpopulated gpios).
And considering the minimal form factor of the arducam, i would say it would have been understandable if they didn’t include microusb but they did and it probably didn’t made much difference in the final board size.
Granted usb is only 4 wires so it’s not that hard to solder a cable to it, although if they only leave the footprint of vertical usb connector, it won’t be that easy.
It would also be better to chose a soc that can operate without heatsink but that’s probably asking too much and at that point the soc power draw will be limited so will be it’s nominal performance and that should be fine for your project.
@cnxsoft
Currently testing FA’s OS image. If DHCP/DNS is setup correclty simply accessing ‘friendlyarm’ after initial boot should suffice to login remotely via SSH for example:
@tkaiser
Not setup in the image:
I’m confused… Is yours the output from an actual NanoPi board? Why haven’t our MAC addresses the same prefix?
@cnxsoft
Nope, this is an Orange Pi PC. Agreed, I should wait for the hardware to arrive and then check again 🙂
BTW: Wasted an hour to get RPi-Monitor with all tweaks up and running with this OS images. This is way more time than adding support for a new H3 board to Armbian 🙁
@tkaiser
I did try to set it up with armbianmonitor -r, but then I realized the script expects rpi-monitor to be in the package repo…. so I gave up. I’m now happy I did, as if it took you nearly one hour, it may have taken me one day…
@cnxsoft
If you already copied armbianmonitor you can use the script for CLI based monitoring too. On other OS images than Armbian just a symlink is needed (will be created automagically when running Armbian, we try to choose the correct thermal source on all the +40 SBC we currently support):
wget -O /usr/local/bin/armbianmonitor “https://raw.githubusercontent.com/igorpecovnik/lib/master/scripts/armbianmonitor/armbianmonitor”
mkdir -p -m 755 /etc/armbianmonitor/datasources/
ln -s /sys/class/thermal/thermal_zone1/temp /etc/armbianmonitor/datasources/soctemp
chmod 755 /usr/local/bin/armbianmonitor
Looks then like this:
root@FriendlyARM:~# armbianmonitor -m
Stop monitoring using [ctrl]-[c]
Time CPU load %cpu %sys %usr %nice %io %irq CPU
10:11:42: 1008MHz 1.02 1% 0% 0% 0% 0% 0% 43°C
10:11:47: 480MHz 1.02 1% 0% 0% 0% 0% 0% 43°C
10:11:52: 480MHz 1.01 1% 0% 0% 0% 0% 0% 43°C
10:11:57: 480MHz 1.09 1% 0% 0% 0% 0% 0% 42°C
10:12:02: 480MHz 1.08 1% 0% 0% 0% 0% 0% 43°C^C
(the ‘high’ load is nothing to worry about, it’s just FriendlyARM using Allwinner’s defaults and can be lowered by grabbing NanoPi’s fex file and setting the value of line 499 to 0. Afterwards average load drops towards 0 and the role of the Micro USB port can be switched between host and OTG through sysfs as explained here for example. Armbian contains all of these changes already of course)
@tkaiser
That option is quite nice.
Since people may ask, the CPU is at 45C at idle (with heatsink).
@mdel
Check this thread here how easy it is to get a H3 device that idles at RPi Zero level (being as slow as an RPi Zero) and jump to RPi 2 performance within milliseconds: http://forum.armbian.com/index.php/topic/1614-running-h3-boards-with-minimal-consumption/
Then even the unsoldered variant provides a Micro USB port (that can be used to both power the board and be used at the same time — for example to be used as g_ether network connection) and 2 more USB ports are available for easy soldering on the 12 pin header at the side (H3 has 4 real USB ports + 1 real Ethernet PHY unlike RPi SoCs that have just one single USB2 port).
And H3 has a fifth CPU core called AR100 or ARISC: http://linux-sunxi.org/AR100 (when sent to deep sleep the AR100 has taken over, consumption drops below 0.4W and ARM cores can be woken up when needed. Some linux-sunxi devs already started to explore how to run code on AR100 independently from Linux running on the ARM cores so maybe just by software changes we get H3 boards that consume 0.3W while doing some useful stuff, waking up the ARM cores just from time to time to sent data over the wires or something like that)
@Sander
That command does not work for me:
arp-scan works, but it does not return the client name like in the router DHCP list.
For example I have Raspberry Pi Connected.
arp-scan command line: 192.168.0.109 b8:27:eb:97:d6:23 (Unknown)
Router page: raspberrypi B8-27-EB-97-D6-23 192.168.0.109
Hi. I have loaded this onto my SD card, but I can’t figure out how to make my TPlink TL-WN722N to work. I can see it in LSUSB but it does not load.
Can anyone point me in the right direction?
Thanks,
@Tony
Use Armbian, the TL-WN722N should work out of the box. Only minor modifications are needed as outlined here: http://forum.armbian.com/index.php/topic/1580-nanopi-neo/?view=getlastpost
As soon as NEO developer samples arrive here we will support the board officially (maybe with 2 images, one optimized for minimal consumption and a multi-purpose image for normal/most use cases)
Thanks @tkaiser – got it going – looking forward to a minimal armbian release for the neo.
FYI: Armbian released 2nd preview images for NEO: http://www.armbian.com/nanopi-neo/
We did a lot of testing and came to the conclusion to focus on low consumption. With new NEO settings the board does not exceed 2W consumption even in worst case conditions since we currently limit CPU clockspeed to 912 MHz to let the voltage regulator remain at the lower level which helps a lot with lowering consumption. In real world applications the performance drop is around 20-25% compared to 1200 MHz cpufreq which is negligible unless one wants to do HPC with the NEO. But then he chose the wrong device anyway: With benchmarking it’s pretty easy to deadlock the board when running heavy stuff without heatsink+fan. Only heatsink is not enough, maybe different components and not the SoC overheat then. No idea, the NEO is made for IoT stuff and not HPC and should be used like this.
Feedback welcome (use the link on download page)!
As a result of finding optimal settings for the NEO and all the consumption/performance testing the last weeks we finally figured out which settings provide which savings (eg. disable Ethernet PHY in H3 –> 200 mW less, disable HDMI/GPU –> 210 mW less and so on).
We added a new tool to Armbian called h3consumption that allows to adjust this stuff. On NEO not that useful since there Armbian settings are already optimized for lowest consumption possible (unfortunately NEO needs more than the other small H3 devices) but on other H3 boards huge savings are possible based on use case: http://forum.armbian.com/index.php/topic/1614-running-h3-boards-with-minimal-consumption/?view=getlastpost
Thanks for the baud rate info , 115200 8n1, no hardware flow control. I am planning to use this as flight controller of a micro helicopter. All other boards are too heavy. After desoldering the ethernet and usb , this nano board is half the weight of Raspberry Pi Zero. Finally it fits my weight budget for the heli.
Has anyone seen a Hilsch Ranques vortex tube being used for cooling these? The cold air would be quite free of any moisture, so I figured that this moving gas, being that it is a decent insulator, could be a possible static charge builder . Does anybody know of any reasons that using this type of cooling might be or is not a good idea ?
The NanoPi Neo Core and Core 2 and a mini shield are now available to buy on Friendlyarm store.
Does anybody did power suspend/standby/hibernate NanoPi NEO or NanoPi AIR ?