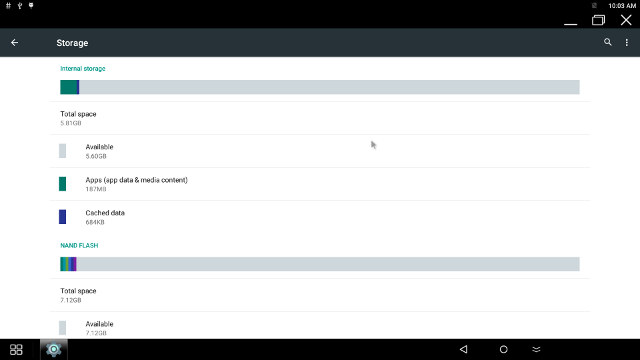
I installed Light Biz OS firmware on GeekBox yesterday, but I’ve quickly realized many applications such as Gimp Inkscape would not install due to the small 1.94GB “internal partition”, so I asked how to increase the partition size in GeekBox forums last evening, and got an answer overnight from “dewet”.
The good news is that it worked so I’ll share the steps I followed in a computer running Ubuntu 14.04. It might also be possible to perform the same tasks within a Windows machine with Rorkchip’s Factory tools
- First let’s download the utils with relevant scripts and binaries:
12git clone https://github.com/geekboxzone/utilscd utils/rockdev - Now copy your device or board’s firmware file “update.img” to the working directory, and unpack it:
1./unpack.sh update.img
The output should look like:
1234567891011121314151617181920212223242526start to unpack update.img...********RKImageMaker ver 1.61********Unpacking image, please wait...Exporting boot.binExporting firmware.imgUnpacking image success.Android Firmware Package Tool v1.0Check file... OK------- UNPACK ------package-file 0x00000800 0x000002A6Loader.bin 0x00001000 0x0003594Eparameter 0x00037000 0x000003BFImage/trust.img 0x00037800 0x00400000Image/uboot.img 0x00437800 0x00400000Image/resource.img 0x00837800 0x00606400Image/misc.img 0x00E3E000 0x0000C000Image/kernel.img 0x00E4A000 0x00D08C4CImage/boot.img 0x01B53000 0x001354E8Image/recovery.img 0x01C88800 0x00FB4000Image/system.img 0x02C3C800 0x28D29000update-script 0x2B965800 0x000003A5recover-script 0x2B966000 0x0000010AUnpack firmware OK!------ OK ------Unpacking update.img OK.Press any key to quit:
The files will be in the “output” directory. - For our purpose “parameter” file, and especially the last line (CMDLINE) where we will want to adjust the userdata partition size:
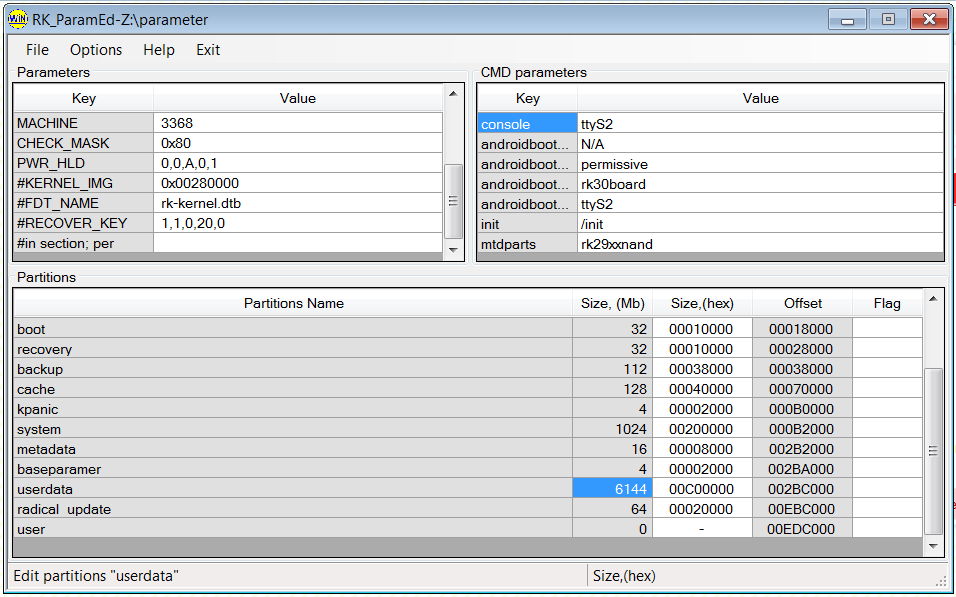
1234567891011121314FIRMWARE_VER: 5.1.0MACHINE_MODEL: GeekboxMACHINE_ID: 007MANUFACTURER: RK3368MAGIC: 0x5041524BATAG: 0x00200800MACHINE: 3368CHECK_MASK: 0x80PWR_HLD: 0,0,A,0,1#KERNEL_IMG: 0x00280000#FDT_NAME: rk-kernel.dtb#RECOVER_KEY: 1,1,0,20,0#in section; per section 512(0x200) bytesCMDLINE: console=ttyS2 androidboot.baseband=N/A androidboot.selinux=permissive androidboot.hardware=rk30board androidboot.console=ttyS2 init=/init mtdparts=rk29xxnand:0x00002000@0x00002000(uboot),0x00002000@0x00004000(trust),0x00002000@0x00006000(misc),0x00008000@0x00008000(resource),0x00008000@0x00010000(kernel),0x00010000@0x00018000(boot),0x00010000@0x00028000(recovery),0x00038000@0x00038000(backup),0x00040000@0x00070000(cache),0x00002000@0x000B0000(kpanic),0x00200000@0x000B2000(system),0x00008000@0x002B2000(metadata),0x00002000@0x002BA000(baseparamer),0x00400000@0x002BC000(userdata),0x00020000@0x006BC000(radical_update),-@0x006DC000(user) - The partitions are defined with size@start_address, so we’ll want to change userdata size, and shift the start_address of the remaining partitions with the extra size added to userdata. This can be done manually in a Linux editor, but I played it safe and instead downloaded and installed RK_ParamEd.exe for windows, and change the 2048 MB set for userdata partition to 6144MB (6 GB).
 Save, and we can see how the end of CMDLINE changed:
10x00C00000@0x002BC000(userdata),0x00020000@0x00EBC000(radical_update),-@0x00EDC000(user) - Now we can repack the image, after moving the content from the output directory to rockdev directory.
12mv output/* ../mkupdate.sh
A successful repacking should look as follows:
12345678910111213141516171819202122232425262728start to make update.img...Android Firmware Package Tool v1.0------ PACKAGE ------Add file: ./package-fileAdd file: ./Loader.binAdd file: ./parameterAdd file: ./Image/trust.imgAdd file: ./Image/uboot.imgAdd file: ./Image/resource.imgAdd file: ./Image/misc.imgAdd file: ./Image/kernel.imgAdd file: ./Image/boot.imgAdd file: ./Image/recovery.imgAdd file: ./Image/system.imgAdd file: ./update-scriptAdd file: ./recover-scriptAdd CRC...Make firmware OK!------ OK ------********RKImageMaker ver 1.61********Generating new image, please wait...Writing head info...Writing boot file...Writing firmware...Generating MD5 data...MD5 data generated successfully!New image generated successfully!Making update.img OK. - Now flash update.img firmware back to your Rockchip device in Linux or Windows.
- Done! I now have a 6GB internal storage partition in Android 5.1 based Light Biz OS operating system.


Jean-Luc started CNX Software in 2010 as a part-time endeavor, before quitting his job as a software engineering manager, and starting to write daily news, and reviews full time later in 2011.
Support CNX Software! Donate via cryptocurrencies, become a Patron on Patreon, or purchase goods on Amazon or Aliexpress


You can do it in Windows too: http://forum.geekbox.tv/viewtopic.php?f=2&t=172
I Was trying to resize partition for internal storage on my android image and found a trouble
start to unpack update.img…
********RKImageMaker ver 1.63********
Unpacking image, please wait…
Error:Check update.img failed!
Press any key to quit:
Do you have any advice?
Here is a much simpler way.
Step one use rkflashtool to back up the raw image and change the partition.txt to the size your want it and reflash it and back up the new image thats bigger.
Step two mount both the images as loop devices. Like so:
losetup -f User1gig.img
losetup -f User2gig.img
Step three sinces they are raw ext3 or ext4 images your can just use dd to clone them.
dd if=/dev/loop1 of=/dev/loop0
Now just resize /dev/loop0 with gparted.
loop -d /dev/loop0 / 1
Now you just reflash back your new image resized to whatever you want it 🙂
small comment, command to clone needs “.git”
git clone https://github.com/geekboxzone/utils.git
hello
its possible increase partition recovery android ?
use program RK PARAM???
you suggestions step by step examples, to recovery???
tankyou…