I’ve already spent some time to test MeLE PCG03 Bay Trail-T mini PC in Windows 8.1, including a detailed video and audio review in Kodi 14.1. Since I don’t have anything else to do with Windows on the machine, I’ve decided to install Ubuntu instead, completely wiping out Windows 8.1. Since you pay around $30 for the Windows license, MeLE PCG03 is not the ideal platform computer for this little exercise due to the extra cost, but it should also work with other Intel Atom Z3735F based computer that may not come with a license.
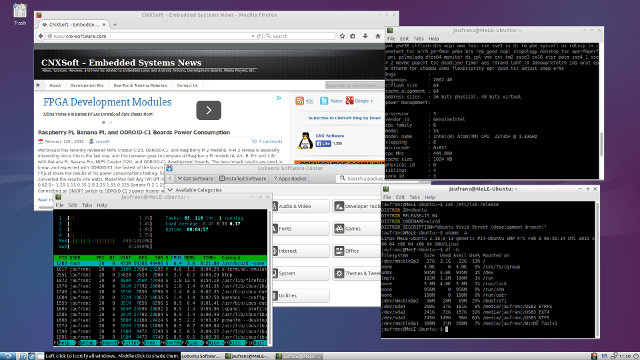
At first I planed to go with Ubuntu 14.10 Mate ISO image, and it boots fine, but was curious to try from “scratch” with another ISO, so I went with Ubuntu 15.04 Alpha 2 (64-bit) image. I just went to the first link Google Search provided me and did not pay attention enough, and ended-up install Lubuntu instead, but you should be able to use any Linux AMD64 ISO with the instructions below.
The first step is to create a bootable USB flash drive.
So after downloading vivid-desktop-amd64.iso with BitTorrent, I started a Windows 7 virtual machine (but I could have done it directly in MeLE PCG03 instead), downloaded and install Rufus (Rufus 1.4.22), and create a bootable USB flash drive with the following options:
- GPT partition scheme for UEFI computer
- FAT32 with 32KB cluster (Other insructions recommend 64KB, but it was not available in the drop list).
- LIVECD label (maybe not important) and vivid-desktop-amd64.iso image
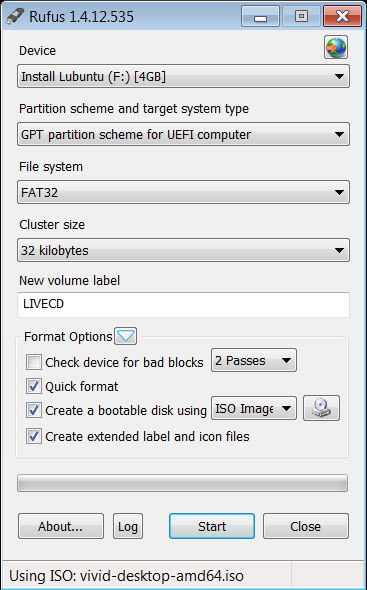 Make sure Rufus has selected the right Device, and click on “Start”.
Once this is done, you’ll need to download bootia32.efi, and copy it in /EFI/BOOT folder in the USB flash drive.
Now connect the USB flash to your MeLE PCG03 or other Intel Bay Trail-T device, power the device, press F7 to get to the UEFI menu, and select your USB flash drive in order to boot into Ubuntu 15.04.
If all you want to do is try Ubuntu (or the other Linux 64-bit ISO image you’ve selected), you are done.
But let’s install it instead. MeLE provided instructions to re-install Windows on PCG03, but when I asked for the firmware files, they kept quiet…, so you may want to backup your Windows installation first.
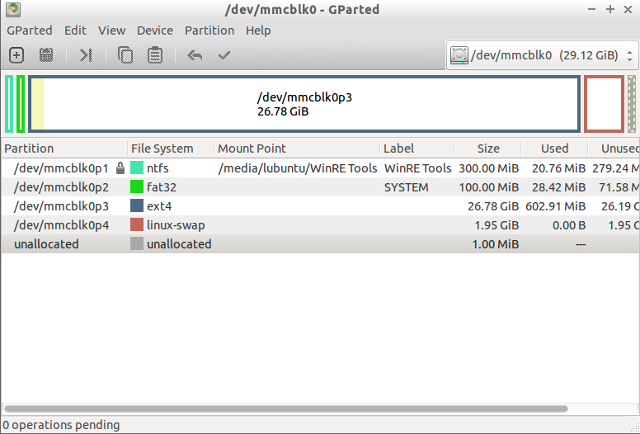
There are three partitions:
|
1 2 3 4 5 6 7 8 9 10 11 12 |
sudo fdisk -l /dev/mmcblk0 Disk /dev/mmcblk0: 29.1 GiB, 31268536320 bytes, 61071360 sectors Units: sectors of 1 * 512 = 512 bytes Sector size (logical/physical): 512 bytes / 512 bytes I/O size (minimum/optimal): 512 bytes / 512 bytes Disklabel type: gpt Disk identifier: 8665F60E-4024-4C68-9E4E-57DCF3C2278F Device Start End Sectors Size Type /dev/mmcblk0p1 2048 616447 614400 300M Microsoft basic data /dev/mmcblk0p2 616448 821247 204800 100M EFI System /dev/mmcblk0p3 821248 61069311 60248064 28.7G Microsoft basic data |
Which I backed up as follows:
|
1 2 3 4 |
sudo apt-get install pv sudo dd if=/dev/mmcblk0p1 | pv | dd of=WIN_P1.img bs=16M sudo dd if=/dev/mmcblk0p2 | pv | dd of=WIN_P2.img bs=16M sudo dd if=/dev/mmcblk0p3 | pv | dd of=WIN_P3.img bs=16M |
But it might be a better idea to just get a single file:
|
1 |
sudo dd if=/dev/mmcblk0 | pv | dd of=WIN_MELEPCG03.img bs=16M |
That way in case you want to re-flash Windows, start Linux from the USB flash drive, and re-install it with:
|
1 |
sudo dd if=WIN_MELEPCG03.img | pv | sudo dd of=/dev/mmcblk0 bs=16M |
So you won’t need to potentially have to re-partition the eMMC flash with gparted, as would be the case for a separate backup file for each partition.
I’ve then re-partitioned the eMMC flash to format p3 as ext-4 and add a fourth partition for a 2GB swap, which may not be ideal on flash based device due to wear and tear:
|
1 |
sudo gparted /dev/mmcblk0 |
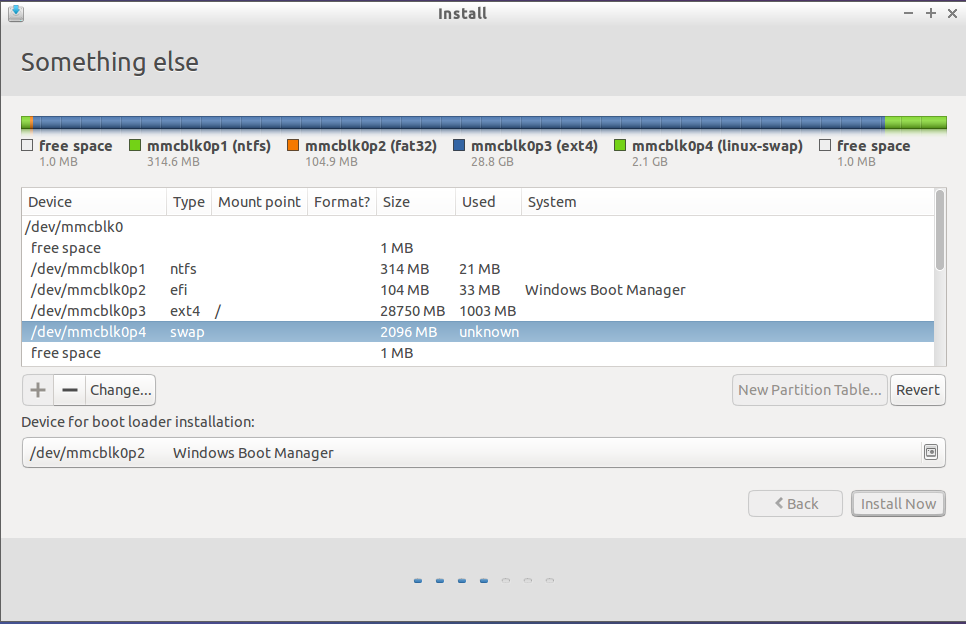
 Now click on Install Lubuntu 15.04, and follow the instructions until they ask about the installation type (erase everything, install side-by-side..), where you need to select “Something Else”, and set:
- /dev/mmcblk0p3 to ext4 mount to /
- /dev/mmcblk0p4 to swap
- I’ve also changed “Device for boot loader installation” to /dev/mmcblk0p2, but it might not be necessary to change that part.
Carry on with the installation. Once it’s complete, you’ll still need to boot from USB one more time in order to install the 32-bit version of grub. Reboot, press F7, select your USB drive, and once you are in Grub (showing Ubuntu, Advanced options for Ubuntu, Windows Boot Manager, System setup), press ‘c’ to enter the grub terminal, and type the following commands in order to load the kernel and initramfs, and boot from the internal flash:
|
1 2 3 |
linux <span class="o">(</span>hd1,gpt3<span class="o">)</span>/boot/vmlinuz-3.18.0-13-generic <span class="nv">root</span><span class="o">=</span>/dev/mmcblk0p3 initrd <span class="o">(</span>hd1,gpt3<span class="o">)</span>/boot/initrd-3.18.0-13-generic boot |
The exact command will depend on your device and chosen linux distribution, but since grub support auto-completion it’s quite easy. For type “linux (hd”, and press tab to select the right drive and partition, then “/boot/vm”, and press tab again to select the right kernel, and so on.
Login into Ubuntu with the username / password you selected during installation, make sure you’ve connected an Ethernet cable,. and install 32-bit grub with efi support:
|
1 2 3 |
sudo apt-get install grub-efi-ia32 grub-efi-ia32-bin sudo cp /boot/efi/EFI/ubuntu/grubia32.efi /boot/efi/EFI/ubuntu/grubx64.efi sudo update-grub2 |
And now you’re done… Depending on your platform, you may also need to check your BIOS settings to make sure Secure Boot is disabled, and in my case at the beginning I had either a black screen (Ubuntu) or just the two lines (Advanced options for Ubuntu):
|
1 2 |
Loading Linux 3.18.0.13-generic.... Loading initial ramdisk... |
So I went to the BIOS in Advanced->Security Configuration, and disabled Intel TXE, which seems to have made the trick.
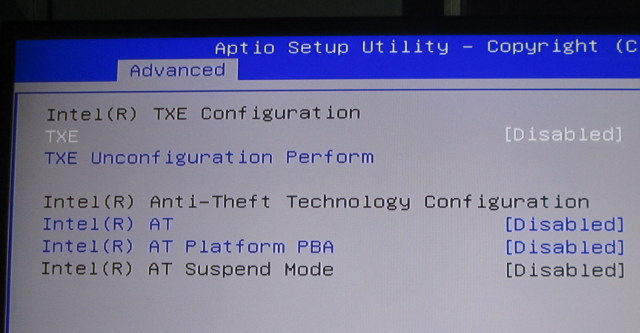 Boot time takes about 12 seconds from the time I press enter in grub to the login screen.
I haven’t tested it much for now, except from some web browsing, and playing YouTube in Firefox (very slow), but before doing my deeply into testing, I’d like to find out a way to enable audio on the platform, at least via the 3.5mm headphone jack, as HDMI audio may be more complicated. A workaround tried by other people is to use a USB sound card. Here’s the full boot log where you’ll see that the audio chipset (ALC5640) is detected, but the driver (byt-rt5640) fails to initialize it.
I adapted instructions from the three sources below:
- Linuxium triple boot method (Android, Windows, Linux) on MeegoPad T01.
- Ubuntu on Bay Trail tablets.
- Installing Ubuntu on Asus T100’s internal flash

Jean-Luc started CNX Software in 2010 as a part-time endeavor, before quitting his job as a software engineering manager, and starting to write daily news, and reviews full time later in 2011.
Support CNX Software! Donate via cryptocurrencies, become a Patron on Patreon, or purchase goods on Amazon or Aliexpress


Why vivid-desktop-amd64.iso for an Intel Atom processor? :s
You should try 3.19 kernel. There should be a support of bay trail audio.
are you got ACPI Errors in dmesg ?
@onebir
i386 = 32-bit x86
amd64 = 64-bit x86
@newbie
It’s something to study indeed.
@EKrava
The log is linked at the end of the post
@onebir obviously because the atom is 64 bit.
@newbie analogue or hdmi?
You can also create the usb boot with unetbootin. You just need to add the bootia32.efi file to /EFI/BOOT afterwards (same as above). unetbootin also works on linux, meaning I didn’t need windows or to download rufus.
@nickr
I tried with unetbootin first, but I did not manage to boot. So I thought the options in Rufus (e.g. GPT partition scheme for UEFI computer) might be important. It’s also possible I made a mistake in the process, which could explain why I did not manage to boot.
Now that you have Linux on it can you just do the sudo dd if=/dev/mmcblk0 | pv | dd of= Ubuntu 15.04 Alpha 2.img bs=16M and put it up so any one can download and dd copy it back?
Let me know if you need storage space with 1gbit speed.
Thanks for the documentation. Can’t wait to get my Pipo.
Is WLAN working?
@Raymond Day
That would be a 32GB file, about 15 days on a 512 Kbps ADSL line. I could probably tune this and compress the binary to 1GB though. But I think the instructions are easy enough to follow, and the first half would still need to be done even with the dump.
@Slackstick
Wi-Fi should not work out of the box, but there are instructions available. You just need to compile realtek wifi drivers.
What about Kodibuntu
Is it worth a try?
Since your audio is actually detected you could try replacing the contents of /lib/firmware/intel/ with the firmware files from chromium.
There is some info about running ubuntu on the asus t100 at http://www.jfwhome.com/2014/03/07/perfect-ubuntu-or-other-linux-on-the-asus-transformer-book-t100/
Check out section 8. Sound for info on the chromium firmware files and asound.state.
@cnxsoft
My experience (should have said I guess) is with guleek i8. But these Z3735F machines all seem very similar.
@newbie
Tried http://kernel.ubuntu.com/~kernel-ppa/mainline/v3.19-vivid/linux-image-3.19.0-031900-generic_3.19.0-031900.201502091451_amd64.deb
No improvement
@deadhp1
I’ve checked this out, but the system loads fw_sst_0f28.bin-48kHz_i2s_master, which is missing in the Chromium files. But present in Ubuntu 15.04, so if I replace the intel directory by the one in Chomium, it will complain that file is missing.
That’s what I get in dmesg
dmesg | grep “baytrail\|byt-”
[ 6.193789] byt-rt5640 byt-rt5640: ASoC: CPU DAI baytrail-pcm-audio not registered
[ 6.193942] platform byt-rt5640: Driver byt-rt5640 requests probe deferral
[ 6.258526] byt-rt5640 byt-rt5640: ASoC: CPU DAI baytrail-pcm-audio not registered
[ 6.258676] platform byt-rt5640: Driver byt-rt5640 requests probe deferral
[ 6.259333] byt-rt5640 byt-rt5640: ASoC: CPU DAI baytrail-pcm-audio not registered
[ 6.259476] platform byt-rt5640: Driver byt-rt5640 requests probe deferral
[ 6.269238] baytrail-pcm-audio baytrail-pcm-audio: error: invalid DMA engine 0
[ 6.269362] baytrail-pcm-audio baytrail-pcm-audio: sst_dma_new failed -22
[ 6.358973] byt-rt5640 byt-rt5640: ASoC: CPU DAI baytrail-pcm-audio not registered
[ 6.359128] platform byt-rt5640: Driver byt-rt5640 requests probe deferral
Still no audio hardware
aplay -l
aplay: device_list:268: no soundcards found…
lspci -n
00:00.0 0600: 8086:0f00 (rev 0f)
00:02.0 0300: 8086:0f31 (rev 0f)
00:14.0 0c03: 8086:0f35 (rev 0f)
00:1a.0 1080: 8086:0f18 (rev 0f)
00:1f.0 0601: 8086:0f1c (rev 0f)
lspci
00:00.0 Host bridge: Intel Corporation Atom Processor Z36xxx/Z37xxx Series SoC Transaction Register (rev 0f)
00:02.0 VGA compatible controller: Intel Corporation Atom Processor Z36xxx/Z37xxx Series Graphics & Display (rev 0f)
00:14.0 USB controller: Intel Corporation Atom Processor Z36xxx/Z37xxx Series USB xHCI (rev 0f)
00:1a.0 Encryption controller: Intel Corporation Atom Processor Z36xxx/Z37xxx Series Trusted Execution Engine (rev 0f)
00:1f.0 ISA bridge: Intel Corporation Atom Processor Z36xxx/Z37xxx Series Power Control Unit (rev 0f)
People using MeegoPad T01 have an audio device (https://plus.google.com/+IanMORRISON/posts/JcYDGALYhy5):
lspci
00:00.0 Host bridge: Intel Corporation Atom Processor Z36xxx/Z37xxx Series SoC Transaction Register (rev 0f)
00:02.0 VGA compatible controller: Intel Corporation Atom Processor Z36xxx/Z37xxx Series Graphics & Display (rev 0f)
00:14.0 USB controller: Intel Corporation Atom Processor Z36xxx/Z37xxx Series USB xHCI (rev 0f)
00:15.0 Multimedia audio controller: Intel Corporation Atom Processor Z36xxx/Z37xxx Series LPE Audio Controller (rev 0f)
00:1a.0 Encryption controller: Intel Corporation Atom Processor Z36xxx/Z37xxx Series Trusted Execution Engine (rev 0f)
00:1f.0 ISA bridge: Intel Corporation Atom Processor Z36xxx/Z37xxx Series Power Control Unit (rev 0f)
Does the wifi and bluetooth working? is there any sound output from HDMI PORT? also ethernet working?
@Eric
Wi-Fi – OK after building https://github.com/hadess/rtl8723as.git
Bluetooth – No
Ethernet – OK, out of the box
Audio – Not working via 3.5mm jack nor HDMI.
Looks like MeegoPad T01 does support HDMI audio however. So maybe a BIOS issue?
@cnxsoft
as far as I’ve seen on the meegopad the audio device only shows up in lspci is you change the bios setting, of course it stops working in windows then.
I do have audio working in linux with a 3.10 kernel I built with yocto, but it’s buggy in other ways.
I’m still working on patching a newer kernel. I just need some free time!
@deadhp1
Yes, you are correct. I’ve changed “LPE Audio ACPI mode” to “LPE Audio PCI mode” in Audio configuration, and lspci shows the audio device. However, I still don’t get any audio support.
Keep up the good work!
I MADE A USB installer with rufus but when i go to boot from i select it but still windows boots up i followed your review by the way my boxis the voyo mini pc.
@adem
Have you done that part? “you’ll need to download bootia32.efi, and copy it to /EFI/BOOT folder in the USB flash drive.”
ohhh crap i will give it a nother go thanks
Hello,
have a problem with my Mele PCG03.
I have Ubuntu booted via USB stick.
I then later the live Sytem of Ubuntu shut down and pulled the USB stick.
After this, I then pulled the power supply
Since then, makes my Mele PCG03 not turn on.
Have written an email to Mele, but have only given me the drivers.
The LED always looks red and blue
I made a video.
https://www.youtube.com/watch?v=tFdbJpIIXWM&feature=youtu.be
Can you help me?
thanks and best regards
Daniel
@Daniel
That’s Windows firmware for MeLE PCG03:
Link:http://pan.baidu.com/s/1o6LZzmE
pass:zlit
Thank You
But the unit is dead.
It only flashes red and blue.
How should I install the firmware here?
@Daniel
Sorry, I was not thinking clearly. If you can’t access the BIOS, I’m not sure how you can do it.
You should contact MeLE or your seller again.
Thank you for creating this guide. I purchased the PCG03 rebranded as the Quantum Byte and wasn’t expecting it to be so hard to replace Windows with Ubuntu. Compared to other fanless PCs I couldn’t beat the price. After disabling all the Secure Boot and TXE options in the BIOS and reformatting the SSD everything seems to be working well and fast in Lubuntu. I just wish I could get sound and bluetooth working.
@cnxsoft
Video showing how to re-install Windows 8.1 on MeLE PCG03 -> https://www.youtube.com/watch?v=r7IiCQiYe0k&feature=youtu.be&a
I got a Z3735F based tv box and installed ubuntu 14.10 with gnome live cd successfully following this guide. But when I install 15.04 with ubuntu-gnome-15.04-desktop-amd64, got a error at the step “Installing the ‘grub2’ package. The error message is “GRUB installation failed, The ‘grub-efi-amd64-singed’ package failed to install into /target/. Without the GRUB boot loader, the installed system will not boot.”. Any clue to solve this problem? Thanks..
Here’s one I hope you can solve. The techs at Quantum Suppliers are out of ideas. I was trying to install a fresh Win 8.1 image back on to my Quantum Byte and it wouldn’t boot. It blew away the OS completely. Then I tried disabling legacy USB in the BIOS to attempt to get the USB stick to boot. Big mistake. Since doing that, no USB 2.0 keyboard will work and it will only boot to the EFI shell prompt. The only thing that will show power on is when I insert a USB 3.0 stick into the port. If they made a USB 3.0 keyboard I would buy it, the quantum byte would recognize it, and then I could get back into the bios and be back in business. Tough one….is there not two pins I could short on the board to force a BIOS reset or something similiar?
everything is ok until command:
sudo cp /boot/efi/EFI/ubuntu/grubia32.efi /boot/efi/EFI/ubuntu/grubx64.efi
ubuntu says that there’s no such file or directory. what is wrong?
Hi, great guide. I used it to install Ubuntu on my Tablet HP with the same processor of the MeLE PCG03.
I’ have a problem when, after the installation, I reboot from USB:
typing “linux (hd1,gpt4)/boot/vmlinuz-3.16.0-46-generic root=/dev/mmcblk0p4” is ok, but when i type “initrd (hd1,gpt3)/boot/initrd-3.18.0-13-generic” the system says that the file dosen’t exist..
In the boot directory I don’t have this file but only “initrd.img-3.16.0-46-generic”.
Can you give me an help?
@ironhead
Make sure the step “sudo apt-get install grub-efi-ia32 grub-efi-ia32-bin” does not return errors
@Bouc
Maybe your version of Ubuntu 15.04 is a bit different from mine. Using Linux 3.16 should be OK.
Hi CNXsoft,
I installed Ubuntu 14.04 on my Minix z64 (same processor), and saw you had the same problem as me:
“Loading Linux 3.18.0.13-generic….
Loading initial ramdisk…
So I went to the BIOS in Advanced->Security Configuration, and disabled Intel TXE, which seems to have made the trick.”
That also happens to me from time to time… But i can’t find the TXE configuration on my system.
@cnxsoft
Now ok, for my installation the file correct is “initrd.img-3.16.0-46-generic” and not only “initrd-3.16.0-46-generic”.
Now I can boot from usb to may SO on the HD.
Thanks!
@Locked Out
i made same mistake…. long time of googling ,but i found solutiom by flash eprom by new bios. some soldering and flash programimg experience needed.
@juckveld
Can you describe the process of how you fixed your issue? Did you pretty much desoldier the flash chip, reprogram it, and solider back in? I was thinking you could replace the chip with a blank one, but not sure if that would work.
@Locked Out
Yes…desoldering flash chip 25QFW64.
I was try to reprograming, but chip is powered by 1,8V and i do mistake and programer using 3,3 V and i destroed flash. Then I buy new-one – aliexpress (0,5E) and this time used 3,3-1,8V converter and try reprograming again.
file bios.bin was about time of googling. I think (but not sure) it possible use bios.bin file from similar devices.
Programed chip soldered back to board and device will start and boot..and bios working including USB ports. jupíí
WIN10/8 does not start yet (win starting booting screen show and end by reboot request)… will need reinstall but its last problem.
sry my ENG. CZech
@Locked Out
Replacing by new blank chip will not work.
I tried to follow this guide, but for a Beelink Z83. Unfortunaly, the BIOS has no “Secure Boot” or “TXE” option at all. The only things to change there are date/time and the boot order 🙁
As descibed above, the boot process failed with a completely black screen. Is there any chance to install Ubuntu on this device?
Thx, Klaus
@Locked Out
Did you figure out how to reset the Quantum Byte Bios? My keyboard is good but I have lost my password. Tried removing the battery, it’s been out of it for 24+ hours. I have an EPROM programmer but not sure how it is loaded. Just flash the downloaded BIOS file as is? that’s it? Juckveld can you provide link to instructions, even if in different language?
@Eu
need : solder station + soldering experience with SMD , pc + flash programer (elnec…) , bios file … , 3,3V to 1,8V converter for flashing
or send me mail to service mele and ask for bios file. or google…
http://blog.warboutdistributie.nl/updaten-bios-mele-pcg03-tbv-auto-power-on/ (not tested this file.)
1. desolder 8pin 25qfw64 chip
2. erase a flash new bios.bin (or buy new blank chip on aliexpress)
3. solder chip back.
bios will start work…system win8 will need reinstall