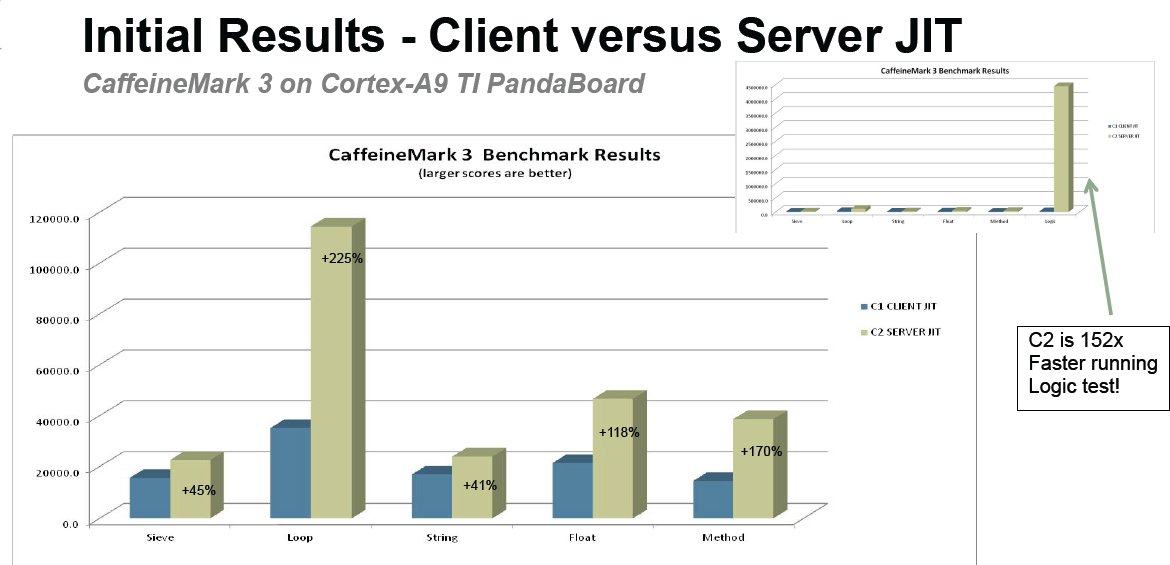
Hardware and software development is going full-steam ahead for ARM servers. After Calxeda and AppliedMicro server SoCs – based respectively on Cortex A9 and ARMv8 architecture – have been announced and Ubuntu focusing further ARM development on Servers (Calxeda, Marvell and ARMv8), Oracle has released the Java SE server compiler – a throughput optimizing JIT compiler – for ARMv7. The ARMv7 server compiler is part of Java SE for Embedded 7 Update 2. First, some quick explanations on the 2 JIT compilers available for Java SE: Client: The client compiler is a fast start-up, lightly optimizing compiler. It’s better suited for smaller footprint systems and those running applications that require fast start-up such as Android applications. Server: The server compiler is optimizing code for throughput and produces highly-optimized code but incurs a start-up cost in achieving that. The server compiler only works on ARMv7 processors with hardfloat (VFPv3 FPU), and initial […]
Spark: Linux Tablet with KDE based Plasma Active
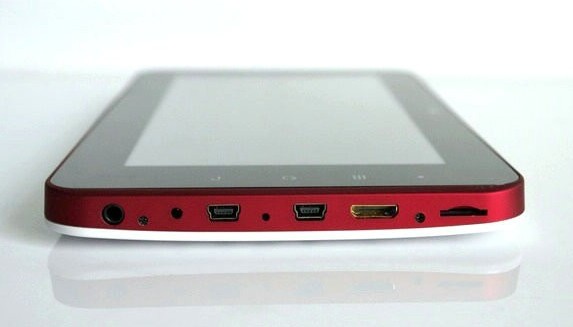
This must be the very first Linux tablet available on the market. Spark sports an open Linux stack on unlocked hardware and comes with an open content and services market. The user interface is Plasma Active running on KDE. Here are the technical specifications: CPU: ARM AMLogic (Cortex-A9) @ 1 GHz Mali-400 GPU 512 Mo RAM 7″ multi-touch capacitive touchscreen 4 Go Flash SD card slot WiFi, 3G (GSM), HDMI (1080p), 2 mini-USB ports Battery: 3000 mAh at 7,4 volts or 6000 mAh at 4,7 volts Weight: 355 grams You can see Plasma Active interface in the video below: The tablet will cost 200 Euros (about 270 USD). They did not provide availability, but promised further information on Tuesday. You can learn more about the user interface, getting a binary image and/or getting info to development apps for the platform on Plasma Active website. Jean-Luc Aufranc (CNXSoft)Jean-Luc started CNX Software in […]
HUD (Head-Up Display) Comes to Ubuntu 12.04
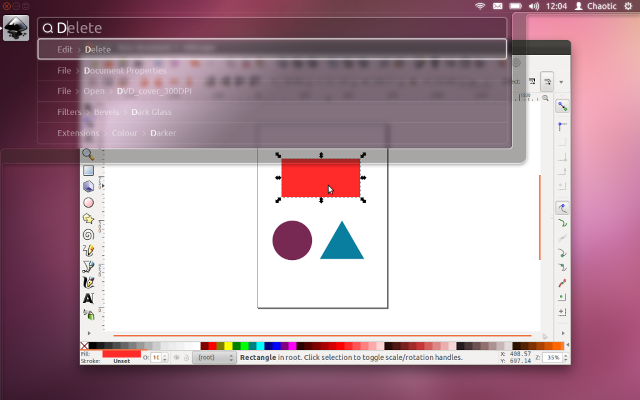
Ubuntu has announced Head-Up Display (HUD) for Ubuntu 12.04 (Precise Pangolin) a contextual search interface that could, as Canonical expects, ultimately replace menus in Unity applications. So when Ubuntu 12.04 is released in April 2012, it will be the first LTS (Long Term Support) Ubuntu version with the Unity interface and the new HUD feature. I like HUD, as I find it similar to what is done in Windows 7 and what could be done with Google Desktop in Windows XP previously, although Ubuntu HUD goes further as it includes menus in the search. What I would NOT like however, is that they completely remove menus. I’d like to see it as a complement of menus (Which will be the case in 12.04), but this does not seem to be Canonical’s intention for future versions of Ubuntu (12.10 and beyond), as they want to replace menus with HUD. HUD will […]
Linaro 12.01 Release with Kernel 3.2 – Android 4.0.3
Linaro has just released version 12.01 based on Linux Kernel 3.2 and Android ICS upgraded to 4.0.3. A lot of work has been done to have video hardware decoding on OMAP 4 (in GStreamer) enabling Pandaboard to run Ubuntu TV and XBMC with Video HW acceleration. Prebuilt binaries for Linaro GCC and Linaro GDBare now available which means you don’t need to use Ubuntu with Linaro Toolchain. It has been tested with Debian 6.0.2, Fedora 16, openSUSE 12.1 and Red Hat Enterprise Linux Workstation 5.7 and should run on any Linux Standard Base 3.0 compatible distribution. Windows binaries are also available and known to work on Windows XP Pro SP3, Windows Vista Business SP2 and Windows 7 Pro SP1. Here are the highlights of the release: Android Linaro’s ICS has been upgraded to 4.0.3. Linaro Android ICS builds are now optimized using -O3 with the Linaro Toolchain. Click through builds […]
The Past, Present and Future of Ubuntu for ARM
David Mandala of Canonical talked at Linux.Conf.Au on 18th of January 2012 about Ubuntu for ARM and the move from netbook to server support. You can read my notes below, or jump at the end of this post to watch the presentation. The Past 2008: Ubuntu decides to only support ARMv7 architecture vs. Debian that supports ARMv4 and above. 2009: Ubuntu release for Freescale i.MX51 (ARMv5 built), and then Marvell ARMAVA with ARMv6 and VFP (ARM floating point unit) support. 2010: April (10.04) The first ARMv7 release for OMAP3 (Beagleboard) with VFP, Thunb2, NEON and SMP for ARM and first netbook edition October (10.10) Pandabord (OMAP4) release with initial device tree support for ARM. Starts work with Linaro. 2011: 11.04 (5th release) – Supports OMAP3 and OMAP4 only. The netbook edition is using Qt, further improvement to device tree, further work with linaro and on the way to the Unified […]
Linux Debugging: Listing Shared Libraries at Runtime
I had a library (a python plugin) that crashed and outputted the “very useful”: illegal instruction I tried pdb (the Python Debugger) to find the issue without success. So I tried to add some printf to this library but none were outputted at runtime. So I guessed the illegal instructions was generated by the shared libraries. Let’s see how many libraries we’ve got: ldd libbrowsernode.so | wc -l 125 Oh dear!… 125 libraries.. This is where panic sets in. Luckily, there is a simple way to list the dynamic libraries as they are loaded (and some more useful info). Simply set: export LD_DEBUG=files before running your program. This is extremely verbose, so I recommend you redirect the output to a file. This method allowed me to find undefined symbols during dynamic libraries load time with errors such as: opening file=/usr/lib/gtk-2.0/2.10.0/loaders/libpixbufloader-png.so [0]; direct_opencount=1 14121: 14121: /usr/lib/gtk-2.0/2.10.0/loaders/libpixbufloader-png.so: error: symbol lookup error: undefined […]
Linux Kernel 3.1.9 for Raspberry Pi Released & Build Instructions
Raspberry Pi has just announced the release of a fork a linux kernel 3.1.9. The source code with patches is available at https://github.com/raspberrypi/linux. If you just want to download the patch, I’ve created one: r-pi_linux_3.1.9.patch.gz The code related to Broadcom BCM2835 processor is referred as bcm2708 in the kernel and I can see committed related to the watchdog timer, the framebuffer, the VCHIQ driver (the driver sending messages to the GPU) and general commits for bcm2708. For those interested in the messages used to communicate between userspace and the GPU, the VCHIQ driver code is located at drivers/misc/vc04_services in the tree. I haven’t studied it yet, but as the platform should support graphics standards such as OpenGL and OpenMAX IL, most people should not really care about this interface as I suppose the OpenGL library (Mesa?) uses this driver. Here are the build instructions for Raspberry Pi kernel. I cross-compiled […]
Embedded Linux Conference 2012 Schedule
The Embedded Linux Conference (ELC 2012) will take place on February 15 – 15, 2012 at Hotel Sofitel in San Francisco. ELC consists of 3 days of presentations, tutorials and sessions. There will be over 50 sessions during those 3 days. I’ll highlight a few sessions that I find particularly interesting. February 15 10:30 – 11: 30 – Profiling and Performance Measurement Techniques Using Linux Kernel Tools by Govindraj Raja, Software Engineer at Texas Instruments and Partha S Basak, Technical Manager at Texas Instruments. With ever growing features and functionality of Linux kernel, one needs methods to trace and profile parts of Linux kernel for various reasons like performance analysis, debugging etc. This presentation aims at providing an insight into few of these tools and their salient features. Supporting use case data as captured on open source OMAP4 pandaboard is also provided. 14:00 – 15:00 – The Yocto Project Overview […]


