Olimex announced open source hardware ESP8266 modules last month, and the company has just announced the availability of ESP8266-EVB board with an ESP8266 module, a relay, an UEXT connector for other compatible Olimex modules, and headers for access to GPIOs.
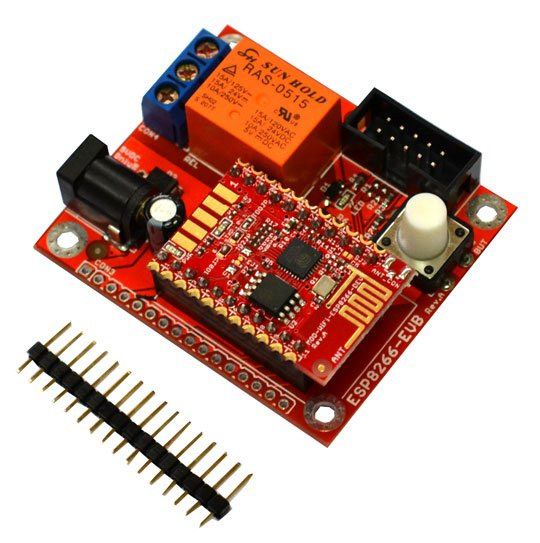
ESP8266 evaluation board specifications:
- MOD-WIFI-ESP8266-DEV Wi-Fi module with soldered connectors
- Female connectors for MOD-WIFI-ESP8266-DEV
- 10A/250VAC Relay
- Expansions
- 16-pin header (CON3) with access to some GPIOs, ADC, SDIO, RESET, and power signals.
- UEXT connector to connect modules and sensors from Olimex, or access I2C, UART, SPI, and extra GPIOs
- Misc – User Button which can also be pressed at boot time to enter bootloader mode for firmware upgrade.
- Power Supply – 5V/1A recommended; DCDC power converter to 3.3V to supply ESP8266 and UEXT modules with up to 1.5A current
- Dimensions – 57x50mm (4 mounting holes)
You’ll also need 5V power supply, and a USB to serial board (3.3V) in order to load the code, and which are not included with the kit. The schematics and hardware design files are available in Eagle and PDF formats.
The company heavily relies on the work by esp8266 community, abut there’s also working on create a demo application to control the board from a page, and switch on/off the relay, read the button status and send I2C or SPI commands. week.
ESP8266-EVB can be purchased for 9.95 Euros on Olimex website, where you’ll also find more details and links to documentation.
Jean-Luc started CNX Software in 2010 as a part-time endeavor, before quitting his job as a software engineering manager, and starting to write daily news, and reviews full time later in 2011.
Support CNX Software! Donate via cryptocurrencies, become a Patron on Patreon, or purchase goods on Amazon or Aliexpress
You can also add a link to their blog post about it:
https://olimex.wordpress.com/2015/01/26/new-product-in-stock-esp8266-evb-the-ultimate-internet-of-things-development-board/
For FOSDEMers, I also organize a small ESP8266 workshop the day before:
https://hackerspace.be/Esp8266-fosdem-workshop
I have used their module and expected more from the EVB. – no on board usb-uart converter – no usb connector for convient development (supply from PC) – inapropriate DCDC chip – limited input range (3-5.5V), not so good quiscent current (80uA) – power input is only barrel jack and labeled as “5V only” – no reset button (useful for entering boot mode) – no OR logic to combine reset button and wake up pulse from GPIO16 to RST (to exit deep sleep) I still prefer the NodeMCU dev kit board as development platform (and I hope that buying it… Read more »
@gicho
This looks good too, and open source hardware as well.
It’s 39 RMB on Taobao – http://item.taobao.com/item.htm?spm=a230r.1.14.1.ZXsj7A&id=43189493943&ns=1&abbucket=5#detail
But pricing is not really aggressive on Aliexpress ($25.50) -> http://www.aliexpress.com/store/product/New-Wireless-module-NodeMcu-Lua-WIFI-Internet-of-Things-development-board-based-ESP8266-Limited-number/1383971_32260333698.html
@Jean-Luc Aufranc (CNXSoft)
Agree, several days ago it was $11.90 🙂
Edit: still avaliable for $12:
http://www.aliexpress.com/item/NodeMcu-Lua-WIFI-development-board-based-on-ESP8266-Internet-of-things/32264797795.html
@gicho
I am building a simple USB converter here: http://www.zoobab.com/cp2102-esp8266
@zoobab I have seen your blog. Currenty I am using switching mode DCDC (something cheap based on MP1584) to supply my development “setup”. It contains FTDI USB-UART board, DCDC board, Olimex module and some wires. All of this could be replaced with nodemcu dev kit. It also has connections from uart flow control signals to control the boot mode – so whenever you activate download of firmware from host PC it automatically enters boot mode. Also, in contrast to the olimex one, it has OR logic and connection from GPIO16 to RST pin. TI also have some quite nice chip… Read more »
Hello World tutorial for the board: https://olimex.wordpress.com/2015/01/29/esp8266-building-hello-world-blink-led-and-simple-web-server-to-drive-the-relay-and-check-button-status/