
Now many products are sold on the market advertising 4K video output, but how to test and check if it just a lie with only part of the system support 4K (e.g. physical video output), but the rest of the system makes you lose quality? When I worked on DVD players, we had some special DVDs with video pattern allowing us to test different video quality. You can read about different video test patterns in “AVSHD 709 DVD document“. There are also some expensive equipments such as DVDO AVLab TPG – 4K Test Pattern Generator that generate test patterns to calibrate video equipments, but if all we want to do is to check the resolution has not been tempered with there must be a cheaper and easier way.
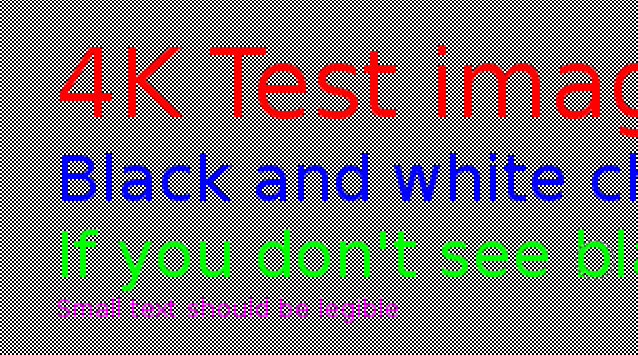
After having a discussion about this issue on Google+, Dan Car decided to create a 2160p (3840×2160) test pattern image with some text, and a 1-pixel grid with black and white pixels that’s now availabnle in PNG and original XCF format. So if your device actually outputs 4K UHD / 2160p all the way, you should clearly see black and white dots on your 4K TV, but if it is downscaled to 1080p in the process, you may just see an image with a gray background, or irregular white and black dots. So if you are the lucky owner of a 4K UHD TV, I encourage you to give it a try. For most Android devices, this image should be good enough to test 2160p resolution, because everything might be rendered to the framebuffer.
But based on my experience working with Sigma Designs processors a test image may not always be enough, as OSD, pictures, and videos may be rendered on different scalers.
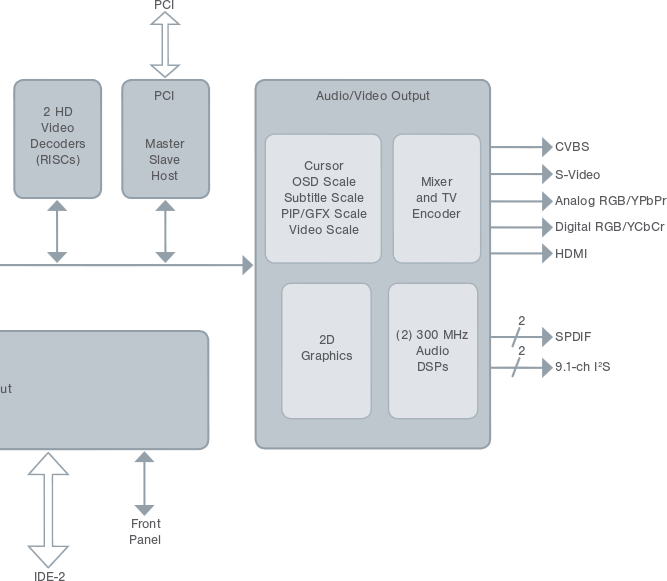
In the audio video output block, you’ll notice 4 “Scales”, normally referred as scalers in the source code. The OSD layer was normally mapped to the framebuffer in Linux, pictures either rendered to the framebuffer or the GFX scaler, and videos decoding on the video scaler. The fun part is that all these scalers (different layers) can have different resolution. For example the OSD (user interface) can be set to 1024×768, and the video scaler to 1920×1080. Before video output, the images from these scalers are downscaled or upscaled via the mixer outputted the video to whatever your chosen video output and resolution is. So that’s why you may need both image and video test pattern to test video resolution.
It has not really been straightforward. After trying some applications like ffDiaporama and Kdenlive, I quickly released they did not support 4K UHD resolution. (By the way, there’s a debate about using 4K for UHD / 2160p resolutions, since 4K may refer to at least 5 different resolutions, but the test pattern in this post is only for 3840×2160 resolution). Finally, I found a program called 4K Slideshow Maker specifically designed to create… 4K slideshow! And it worked great, except for the fact that it’s used to make a video slideshow of your holiday/wedding/party pictures, and compression is lossy, so the tiny pixels may have gone away, and I don’t have 4K UHD television to try it out. So I had to use a lossless compression to make sure the pattern is not distorted.
Finally, I found instructions to use avconv to encode losslessly with H.264, and create a slideshow with ffmpeg, which I adapted to avconv:
|
1 |
avconv -i 4ktest.png -c:v libx264 -preset veryslow -qp 0 -r 1/5 4ktest.mkv |
4ktest.png isthe original test pattern image renamed from “Black and white checkerboard 4K test image.png”
-c:v libx264 is to use H.264 encoding
-preset veryslow is to keep the video size as small as possible
-qp 0 is for lossless compression
-r 1/5 is for the framerate, here creating a 5 second video.
4ktest.mkv is the resulting video test pattern.
I have tried it with my FullHD TV using Totem Player and I can only see a gray background in full screen. For some reasons, the video does not play with VideoLAN. So if you have a UHD TV feel free to download 4K_video_test_pattern.mkv to try it out and confirm you can indeed see the black and white dots. Thanks!

Jean-Luc started CNX Software in 2010 as a part-time endeavor, before quitting his job as a software engineering manager, and starting to write daily news, and reviews full time later in 2011.
Support CNX Software! Donate via cryptocurrencies, become a Patron on Patreon, or purchase goods on Amazon or Aliexpress


