Z-Wave.Me has sent us a couple of Smart Home devices based on Z-Wave technology for review, namely the RaZberry 7 Pro Raspberry Pi HAT and the Z-Uno2 board. The Swiss company has primarily developed Z-Wave products for years and is a member of the Z-Wave Alliance. For those who are concerned about the issues of signal interference in the 2.4GHz range (WiFi, Zigbee, Bluetooth, and Thread), Z-Wave technology is an excellent choice because it operates on a less congested frequency range of 800-900MHz and the technology has been around for more than 20 years, resulting in a wide variety of Z-Wave devices available in the market, and they can work well together across different brands due to a proper certification process which is another advantage when compared to other protocols.
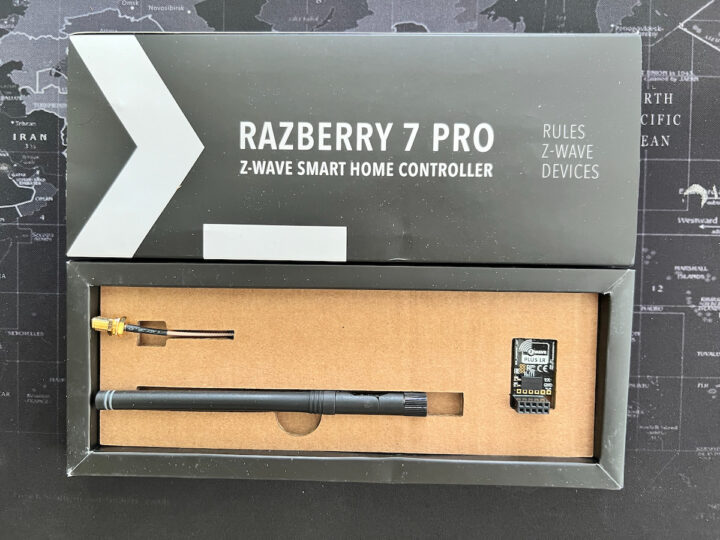
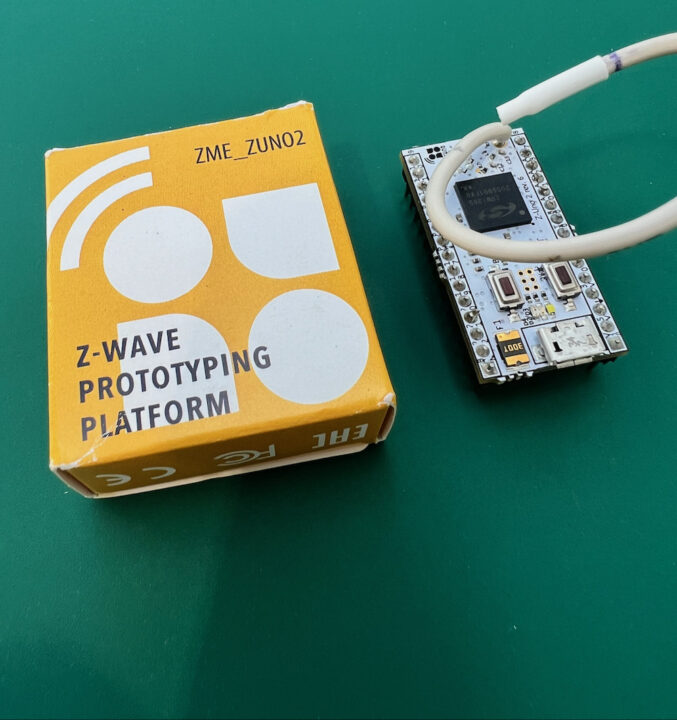
The two devices we received are RaZberry 7 Pro, which is a shield that plugs into the 40-pin GPIO header of the Raspberry Pi and turns it into a Z-Wave controller, and the Z-Uno2 development board that can be programmed using a simplified C language through the Arduino IDE. It is suitable for prototyping or DIY projects for those who want to create their own IoT devices using Z-Wave technology.
RaZberry 7 Pro unboxing
The RaZberry 7 Pro was released in 2022. It is in the form of a HAT/Shield that can be installed on the GPIO header of Raspberry Pi models from Pi1/2/3A/3B/3A+/3B+/4B which is a different approach from other Z-Wave controllers. However, this is a great idea since it doesn’t waste any USB port, and since it comes with an external antenna, signal transmission is better than plugging it directly into a USB port, especially when compared to Zigbee USB Dongles, which often require a USB extension cable to reduce signal interference. Z-Wave.me mentioned that it is possible for the RaZberry 7 Pro to work with other SBCs with a compatible GPIO header such as the Orange Pi SBC and the recently released Raspberry Pi 5.
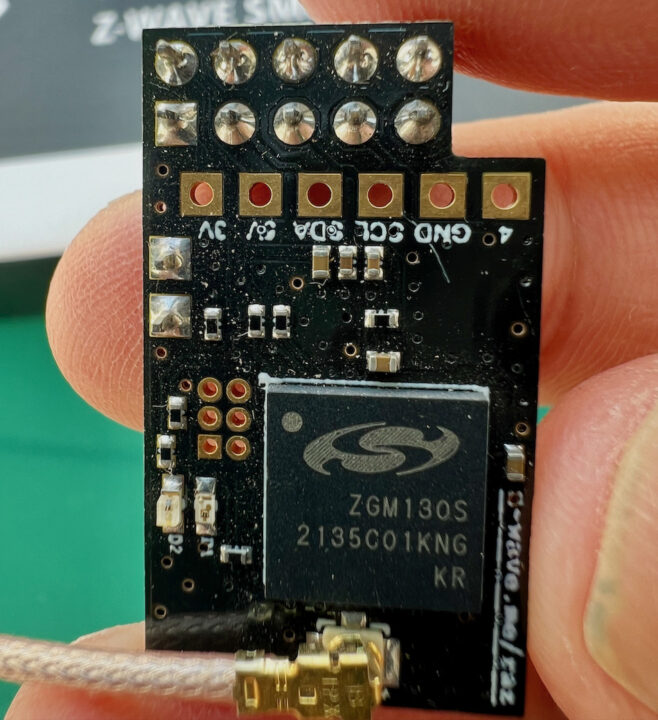
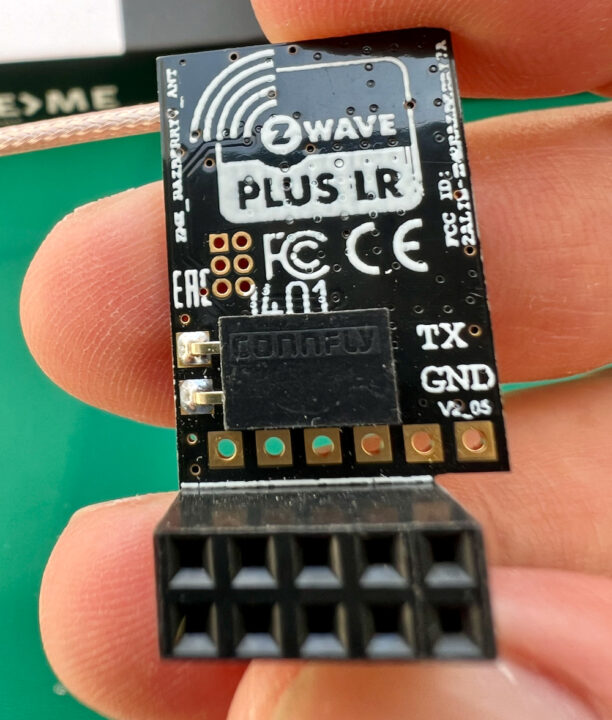
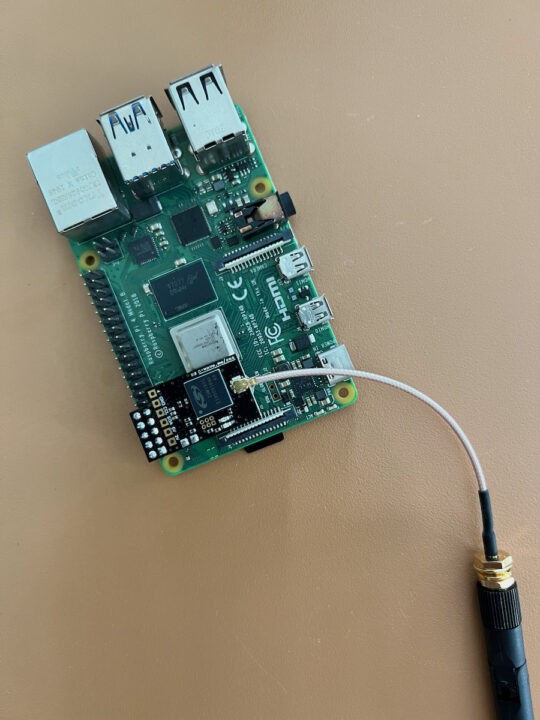
RaZberry 7 Pro comes with an external antenna (designed by Linx Technologies) for better signal transmission. It features the ZGM130S chip, a 7th Generation Z-Wave chip (700 series) that supports Z-Wave, Z-Wave Plus (500 series), and Z-Wave LR devices. However, at the time of this testing, Z-Wave LR (Long Range) does not work outside the United States yet although the hardware is ready. It is expected that if LR is implemented (both at the transmitter and endpoint), it will extend data transmission much further (Star Topology @ 1.6km range) by doing just a firmware upgrade on the RaZberry 7 Pro. Nevertheless, the RaZberry 7 Pro is also compatible with older-generation Z-Wave chip devices.
What makes RaZberry 7 Pro special is the included Z-Way software, which allows for various customizations such as transmission power and changing the Z-Wave frequency to match different countries, ranging from 865.2MHz to 926.3MHz. However, Z-Wave.me restricts frequency changes to only those under the same antenna filter, mainly divided into 3 groups.
Z-Way – Smart Home Software
RaZberry 7 Pro comes with Z-Way software, which is a Smart Home Controller software that manages Z-Wave (and Zigbee) devices. When purchasing hardware from Z-Wave.me, there are no additional fees associated with Z-Way. Additionally, if users wish to use other open-source Smart Home Platforms like Home Assistant, OpenHAB, Open Z-Wave, and others then Z-Wave.me has created add-ons to integrate with those platforms. An example of the integration will be described later.
What Z-Way Offers:
- Cross-platform compatibility: Works on Raspberry Pi, PCs running Ubuntu or Debian Linux, FreeBSD, or Windows
- Voice assistance support: Works with Apple HomeKit, Hey Google, and Amazon Alexa
- Multi-protocol support: Currently supports Z-Wave, Zigbee, and Enocean
- Deep customization with Z-Wave.Me devices
- Easy firmware updates
- Parameter adjustments
- Upgrade to future capabilities like LR (Long Range)
- Backup/Restore functionality
- Zniffer to view detailed network data for Z-Wave communication
- Network diagnostics tools for monitoring network status
- Intrusion detection system to prevent DoS attack
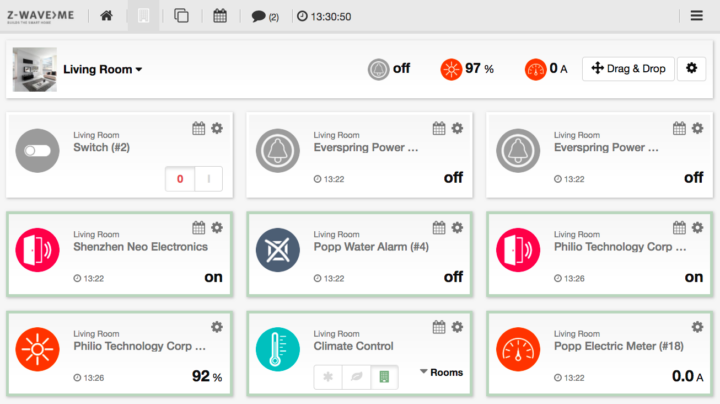
The image shown below is an example of the Z-Way BUI (Browser User Interface), but our test primarily focuses on testing with one of the open-source Smart Home software: Home Assistant.
Testing RaZberry 7 Pro with Home Assistant
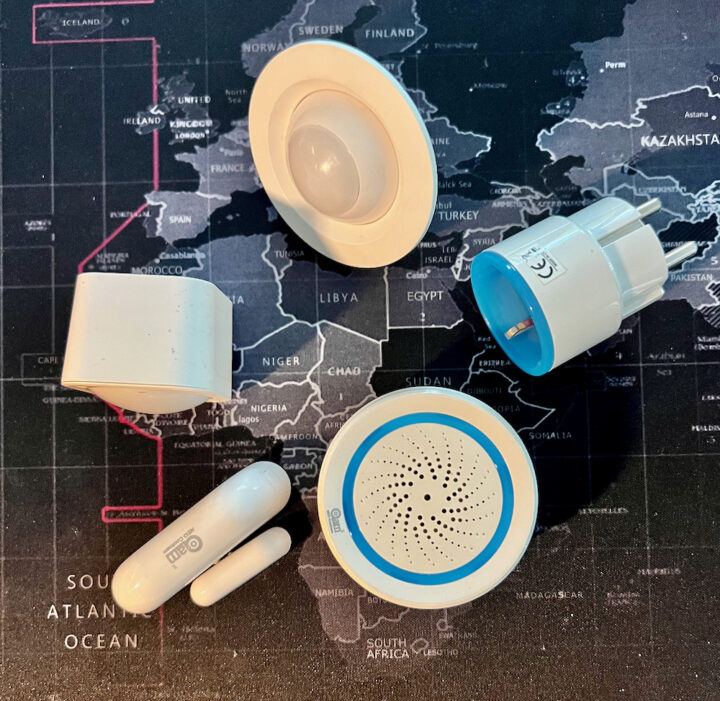
We conducted a quick test to integrate the RaZberry Pro 7 into Home Assistant. The test included sensors from various brands such as Fibaro (Motion), NeoCoolCam (Door Sensor, Smart Plug, Siren), and AeoTec (Siren, Multi Sensor). Both Home Assistant and RaZberry Pro 7 were running on the same device (Pi4). Details and testing process are provided below
- The test machine was a Raspberry Pi 4 Model B with 4GB RAM (without a case)
- Home Assistant version 2023.10.3 was installed on Operating System 11.0
- Z-Wave stack was Zwave-js 12.2.1
- The RaZberry Pro 7 had firmware version v.7.28
- The testing devices: Door Sensors, Smart Plugs from Neo CoolCam, Siren from Aeotec, and a Motion Sensor from Fibaro
- The installation involved attaching the RaZberry 7 Pro to the GPIO header on the Raspberry Pi, using 4 pins
(Gnd, VCC 3.3V, Serial Tx, and Serial Rx), although it occupies 10 pins physically - After attaching RaZberry 7 Pro to Pi4, Bluetooth on the Raspberry Pi had to be disabled since both Bluetooth and RaZberry 7 Pro use the same serial port (/dev/ttyAMA0). Here are the steps to disable
- Install Home Assistant (if you have not done so yet) on an SD card
- Insert the SD card into a PC
- Locate the ‘config.txt’ file at the root
- Append specific commands to ‘config.txt’ depending on the Pi model:
For Raspberry Pi 3:
12dtoverlay=pi3-disable-btenable_uart=1
For Raspberry Pi 4:
12dtoverlay=disable-btenable_uart=1 - Save ‘config.txt’ and exit
- Reinsert the micro SD card into the Pi and power it on
- In Home Assistant, it should recognize the RaZberry 7 Pro
- The next step is to install/set up the software with either one of two options:
-
- Use Z-Way as the manager, which will require installing both Z-Wave.me Integration and Z-Wave.me Add-on. This allows you to select which devices to display in Home Assistant. Z-Way has its own BUI to manage/set up the device with more in-depth functionality
- Use Zwave.js from Home Assistant itself. This option involves installing the add-on and integration within Home Assistant. A bit more simple than (1) but with less functionality
- For this test, we decided to go with the second option, which is suitable for Home Assistant enthusiasts since everything is done within the Home Assistant GUI
- Go to Home Assistant / Settings / Add-ons, then find ‘Z-Wave JS UI‘ and install it then start the add-on
- Access the Z-Wave JS UI web interface, go to Control Panel, select Settings, then Z-wave
- Choose the Serial Port (/dev/ttyAMA0) from the given list, which is the location of the RaZberry 7 Pro
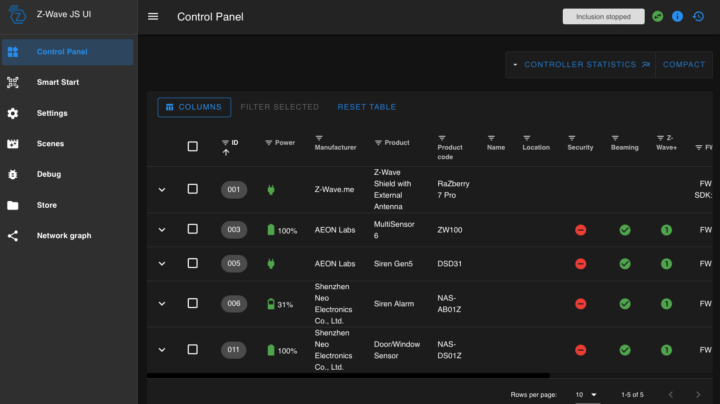
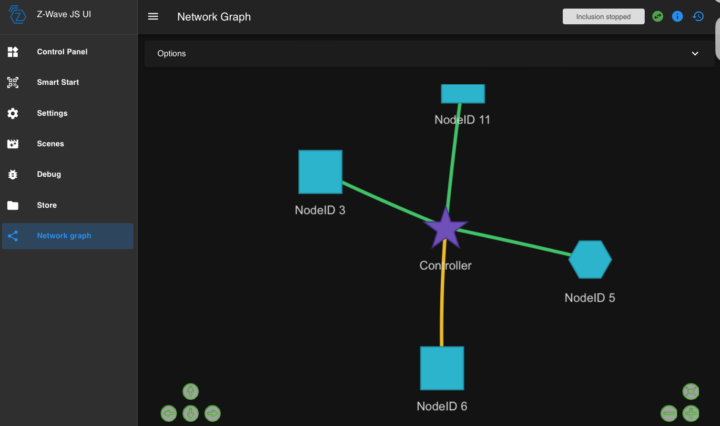
- At this point, you are ready to add Z-Wave devices to your Z-Wave network. Once added, you can also see the connections between sensors and RaZberry 7 Pro in the Control Panel and Network Graph. However, the entities of the devices won’t appear in Home Assistant until you proceed to the next step, which is installing Z-Wave Integration. See the below picture for reference.
- Go to the Home Assistant GUI, navigate to Settings, Devices, and Services, and select Add Integration
- Choose Z-Wave and uncheck ‘Use the Z-Wave JS Supervisor add-on’
- Enter ‘ws://a0d7b954-zwavejs2mqtt:3000’ (refer to Home Assistant Z-Wave setup)
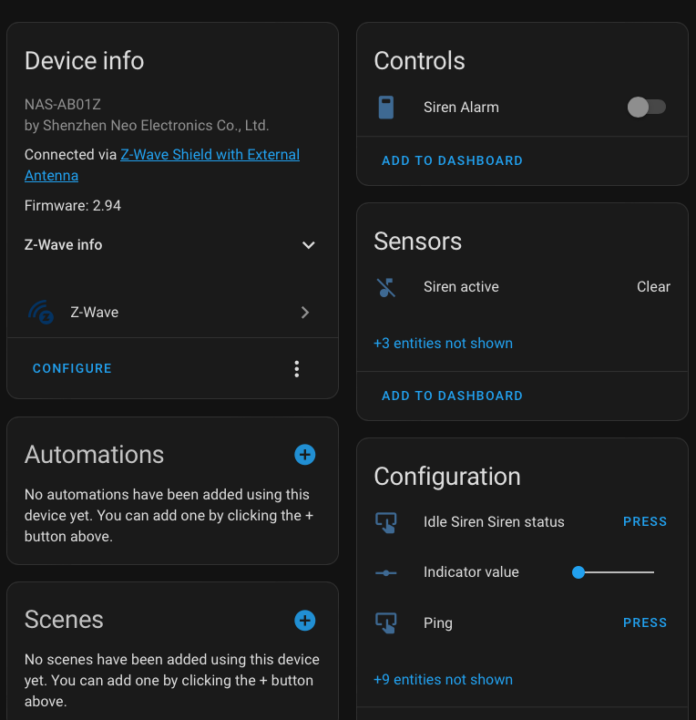
- If thing goes well, you will see the entities of the Z-Wave devices appear in Home Assistant, as shown in the image
It works straightforwardly. All devices were registered in Home Assistant without any major issues. The most difficult part is the need to disable Bluetooth, especially if you have only Mac computers in the lab 🙂 We created automations from these entities and tested too and found the responsiveness is good. However, we didn’t conduct signal strength comparisons since Z-Wave LR wasn’t enabled at the time of testing.
Z-Uno2 unboxing
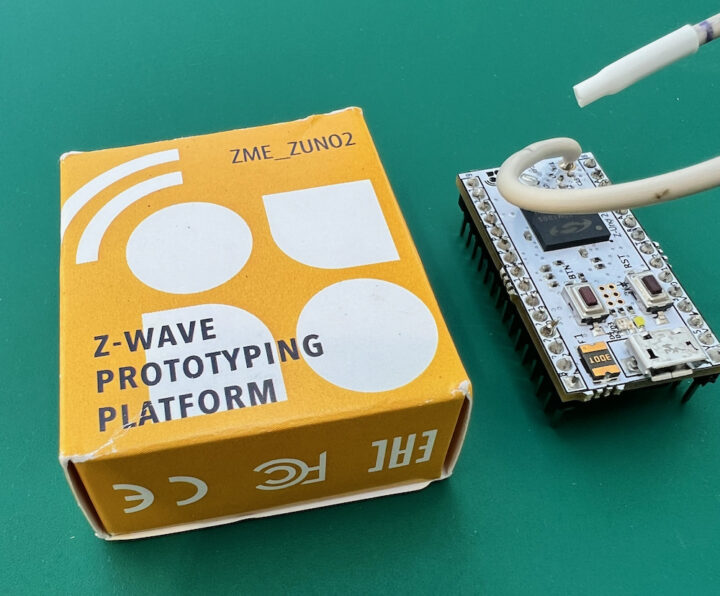
The next one is the Z-Uno2, which also uses a 700 series chip just like the RaZberry 7 Pro. It is a development board which is the first DIY solution we have ever tested using Z-Wave technology. This allows you to create your own Z-Wave device without prior Z-Wave knowledge. Z-Uno2 uses a simplified C programming language and the Arduino IDE for code development, making it easily accessible to users. Z-Wave.me also offers various code examples for learning and reuse. Although I didn’t have much experience with the Arduino IDE, we were able to learn and create Z-Wave sensors fairly quickly during testing. This reminds us of some open-source project that allows you to quickly build custom smart home solutions based on the ESP8266 or ESP32 microcontroller without the need to be a coding master.
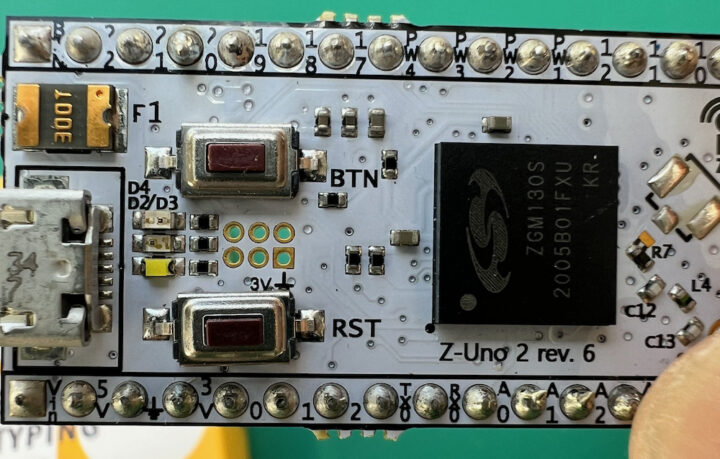
Z-Uno2 hardware specification:
- 174 KB Flash memory for your sketches
- 16 KB available RAM
- Z-Wave RF transmitter at 9.6/40/100 kbps
- Long Range
- 26 GPIO (overlaps with special hardware controllers)
- 4 ADC
- 4 PWM
- 2 UART
- 1 USB (serial port)
- 3 KB pseudo EEPROM
- 1 SPI (master or slave)
- 4 IR controllers, 1 IR learn capability
- 1 TRIAC/ZEROX to control dimmer
- 6 Interrupts
- 3 Timers
- I2C (software)
- 1-Wire (software)
- 8×6 Keypad Scanner (software)
- 2 service LED, 1 service button
- 1 user test LED
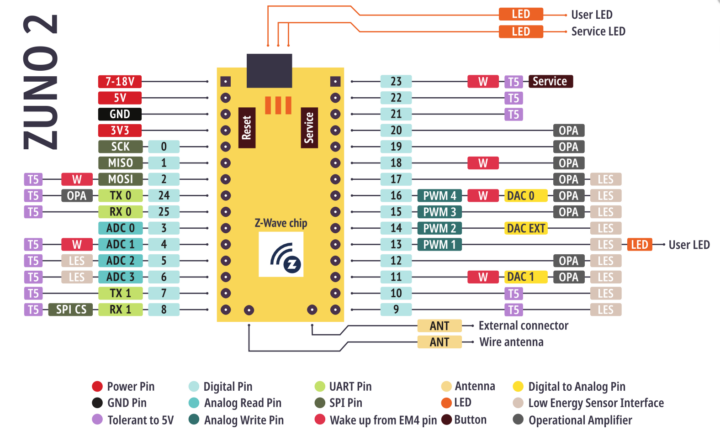
For more technical details about the Z-Uno2 on the product page.
Integrating Z-Uno2 with Home Assistant
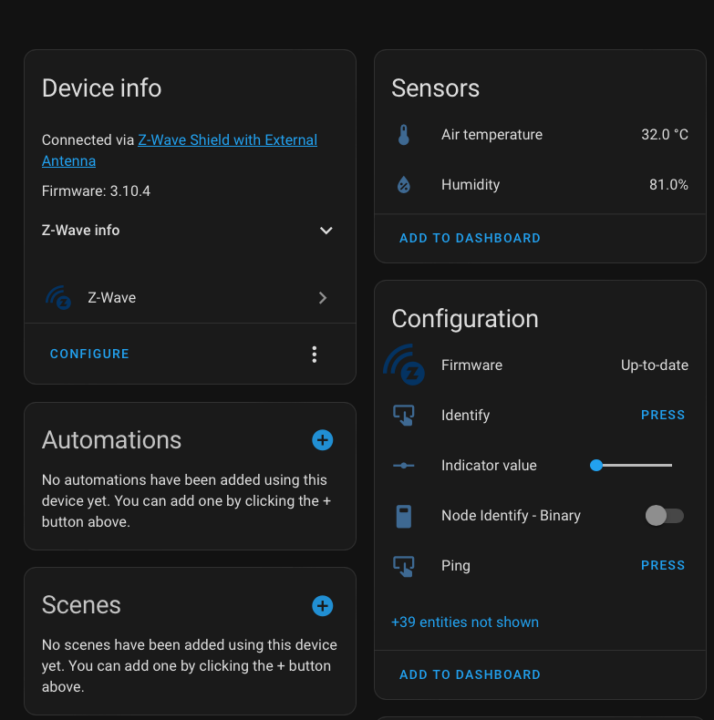
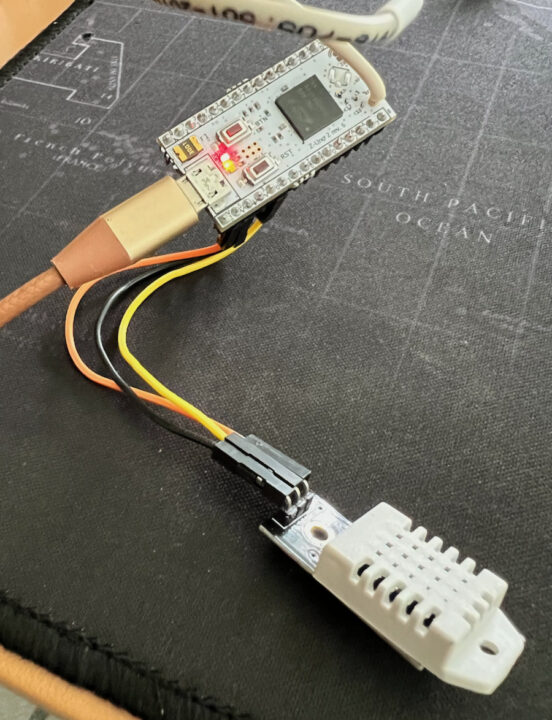
After creating a Z-Wave network using the RaZberry Pro7 as the Z-Wave controller and adding various off-the-shelf sensors in the first part of the review, we proceeded to build our Z-Wave sensor from scratch by attaching the Z-Uno2 and a DHT21 (AM2301) temperature and humidity sensor as shown in the photo and code below. The data (yellow) is on pin 9.
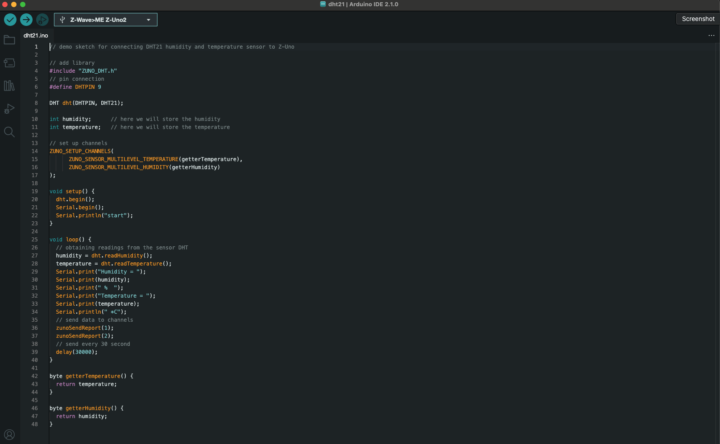
Instructions explaining how to install the Arduino IDE and the core library for Z-Uno2 can be found in the Getting Started guide.
We used the Arduino code provided in the example and uploaded it to the Z-Uno2 via USB. Next is to start the inclusion process in order to add the new Z-Wave device to the Z-Wave JS UI. By pressing and holding the BTN button until the red LED blinks, indicating that the Z-Uno2 is already in inclusion mode, then we immediately went to Z-Wave JS/Node Manager and selected Inclusion with the default setting. This allowed us to add the new sensor to Home Assistant as picture below.
This process is quite straightforward and can be done quickly, especially if you are familiar with Arduino IDE and C programming. We didn’t test with other sensors because the DHT21 was readily available at the time. Nevertheless, Z-Wave.me has indicated that any sensor compatible with Arduino should work with the Z-Uno2. We are looking forward to adding other sensors once available e.g., air quality sensor and relay.
Conclusion
Apart from its compact form factor, the RaZberry 7 Pro stands out for its USB port conservation and external antenna that improves signal transmission. We like the flexibility that RaZberry 7 Pro offers in customizing various settings via Z-Way, such as transmission power, frequency selection, and future feature upgrades. It’s a shame that we didn’t have the opportunity to test Z-Wave LR though the hardware is ready, as it should outperform the range of other protocols (e.g., Wi-Fi, Zigbee) easily and likely reduce the complexity of the Smart Home network in overall.
As for Z-Uno2, it’s a very good idea. It’s flexible and shortens the learning curve for Z-Wave development, it opens the door for more users to embrace Z-Wave technology with ease by reusing the code from various Arduino-compatible devices, hence, making it easily accessible to DIY enthusiasts as well as IoT developers. In addition, Z-Wave.me told CNX Software that they plan to soon launch the Z-Uno Shield Configurator tool for Z-Uno2 which will not only help you to wire your Z-Uno Shield correctly but will also write the Arduino sketch for you and you can still modify the generated code if needed. Stay tuned!
We’d like to thank Z-Wave.Me for sending the RaZBerry 7 Pro Raspberry Pi HAT and the Z-Uno2 board for review and play around with Z-Wave. The RazBerry 7 Pro can be purchased on Amazon for $85, while the Z-Uno2 goes for $64.90. If you are based in Europe or in Singapore, the devices are also available through local distributors.

Computer Engineering who previously worked with multinational IT company, rich experience in IT infrastructure, has a passion on Internet Of Thing i.e., Smart Home, Smart Farm as well as interested on Sustainability such as renewable energy, organic farming
Support CNX Software! Donate via cryptocurrencies, become a Patron on Patreon, or purchase goods on Amazon or Aliexpress


