
Yesterday, I’ve received MK908 mini PC featuring Rockchip RK3188, and a new firmware is available, so before further testing I’ll flash the firmware to the device basically using the instructions from Geekbuying. This method use standard Rockchip tools, so it should work for any RK3188 devices.
But first a little rant. Those instructions only work on Windows operating systems, so if you’re using Linux or Mac, you’re out of luck until you find a Windows PC, or launch Windows in a virtual machine. This method should just be used in case the device can’t boot, or you have serious issue with the device firmware, but it is also used for firmware upgrade for Rockchip mini PCs. This is just wrong. Typical users should not be asked to install software and drivers, press the recovery button, just to upgrade their firmware. The best very way would be OTA updates, but maybe this is asking too much. The alternative would be to just copy some files to a micro SD card, insert it in the mini PC, boot the device, and wait for the firmware to complete. This method could also avoid to complete wipe out your settings and installed applications, although apps like Titanium Backup can help restore those after a full firmware update.
The steps to install firmware to RK3188 based mini PCs, in this case MK908, are as follows:
- Download RkBatchTool 1.6 (password: GEEKBUYING.COM), the Windows only tool to flash firmware to RK3xxx devices, as well as RockUSB drivers v3.5, the USB drivers for Windows 2000/XP/vista/7/8.
- Download the firmware file for your device. For MK908: update_mk908_100j1101_6210.rar
- Uncompress those 3 files in a directory in a Windows PC.
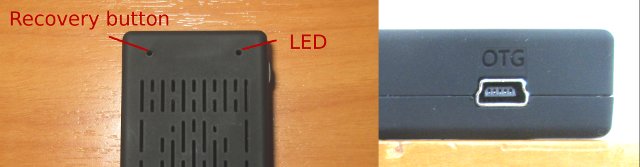
- Get the mini USB to USB cable, and connect it to your Windows PC. Now look at the back of MK908 with the HDMI connector pointing upwards, you should see 2 small holes at the top of the devices. The right hole is the power LED, and the left hole, the recovery button. Press the recovery button with a paper clip, and at the same time insert the other end of the USB cable into the OTG port of your device. Wait a few seconds before releasing the recovery button, and your windows PC should start installing the drivers automatically, but you don’t want that, so don’t let it install the drivers now, and move to the next step.

MK908 Recovery Button (Left) and OTG Port (Right) - There are different procedures depending on the version of Windows, but you should point the drivers installer to Rockusb_v3.5/Rockusb_v3.5/Rockusb/x86 (32-bit Windows) or Rockusb_v3.5/Rockusb_v3.5/Rockusb/x64 (64-bit Windows) and finally select the directory corresponding to your Windows version. Click OK or Next to complete the installation. In Windows XP, you should see “Class for rockusb devices->Rockusb Device” in the Device Manager.
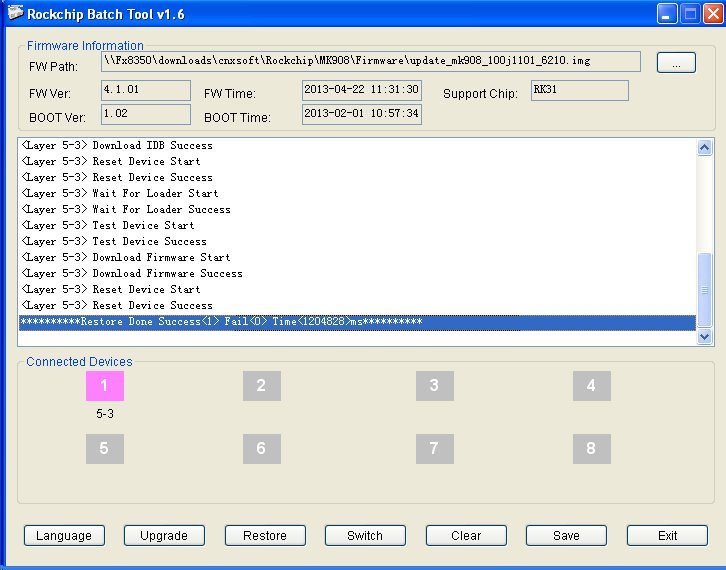
- Now go to GEEKBUYING_Rockchip_Batch_Tool_v1.6/Rockchip_Batch_Tool_v1.6 and double click on RKBatchTool.exe to launch the tool.
- Click on “…” at the top right of the window, select the firmware file (e.g. update_mk908_100j1101_6210.img), and RKBatchTool should now indicate one device is connected by showing a green square in the “Connected Devices” section of the windows.
- Click on “Restore” (and not Update) to flash the firmware. It will take a few minutes (It took 1204 seconds, or about 20 minutes). Once it’s finished, the device will reboot, Windows will install the adb drivers, and you should see the windows below.
 I’ve included the full log below for your reference:
11:34:08 674 Rockchip Batch Tool v1.6.8.1 start run
I’ve included the full log below for your reference:
11:34:08 674 Rockchip Batch Tool v1.6.8.1 start run
11:40:35 799 Rockchip Batch Tool v1.6.8.1 start run
11:40:50 236 **********Restore Start Total**********
11:40:50 267 Test Device Start
11:40:50 283 Test Device Success
11:40:50 299 Lowerformat Device Start
11:40:59 346 Lowerformat Device Success
11:40:59 377 Test Device Start
11:40:59 408 Test Device Success
11:40:59 424 Check Chip Start
11:40:59 439 Check Chip Success
11:40:59 455 Get FlashInfo Start
11:40:59 471 INFO:FlashInfo: 0 0 0 1 0 10 10 28 2A 4 1
11:40:59 502 Get FlashInfo Success
11:40:59 517 Prepare IDB Start
11:40:59 533 INFO:CS(1) (8192MB) (MICRON)
11:40:59 580 Prepare IDB Success
11:40:59 611 Download IDB Start
11:41:00 299 Download IDB Success
11:41:00 330 Reset Device Start
11:41:01 346 Reset Device Success
11:41:01 361 Wait For Loader Start
11:41:02 846 Wait For Loader Success
11:41:02 908 Test Device Start
11:41:02 955 Test Device Success
11:41:02 971 Download Firmware Start
12:00:51 736 Download Firmware Success
12:00:51 767 Reset Device Start
12:00:52 783 Reset Device Success
12:00:55 111 **********Restore Done Success Fail Time <1204828>ms********** - Connect your device to the TV and enjoy!
I first tried the procedure in a Windows 7 virtual machine running in Ubuntu 12.04 64-bit, I could detect the device 2207:310b, and start the firmware, but I pressed the wrong button “Upgrade” and it failed. Subsequently Linux failed to detect the device, even after closing Virtual Box, so I switched to a Windows XP netbook to complete the procedure.

Jean-Luc started CNX Software in 2010 as a part-time endeavor, before quitting his job as a software engineering manager, and starting to write daily news, and reviews full time later in 2011.
Support CNX Software! Donate via cryptocurrencies, become a Patron on Patreon, or purchase goods on Amazon or Aliexpress


