We have received the Seeed Studio 2-Channel Wi-Fi AC Relay for review. It is an IoT/Smart Home device featuring a 2-channel relay (wet contact) that operates over a WiFi network, and provides an alternative to SONOFF Smart switches like the SONOFF R2 Dual. The Seeed Studio device is a bit larger and instead of relying on eWelink firmware, it natively supports Home Assistant since it’s pre-installed with ESPHome open-source firmware. Alternatively, if you prefer standalone deployment (without Home Assistant), you can manage it via the web browser.
In addition to the basic relay function to control the AC-powered appliances, it also acts as a power meter. This is a good ready-to-use option for Home Assistant enthusiasts who prefer not to assemble their own components. Some practical applications include controlling electrical appliances such as lighting. Let’s dive into the details.
Seeed Studio 2-channel AC Wi-Fi Relay unboxing
The package we received was a simple box containing just the device itself—no cables or manuals were included. However, you can easily find additional information and installation details on Seeed Studio’s Wiki.
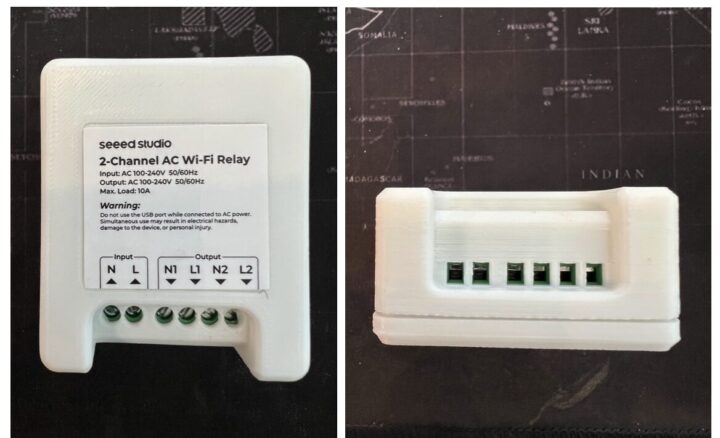
Looking at the device from the top, on the far left, you’ll see terminals for AC input, including both N (Neutral) and L (Line). On the right side, there are AC output terminals with both N and L, providing two channels. Each relay channel can handle a maximum load of 10A, and the control for switching is independent for each channel. Two buttons – Reset and Boot – can be found on the other side of the device.
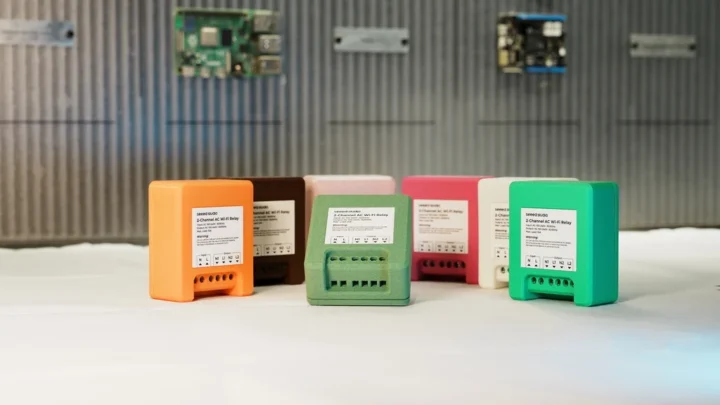
The enclosure of our sample is white, 3D-printed, and can be easily disassembled. Seeed Studio has made it convenient for users who want an enclosure with different colors or patterns by allowing them to download the 3D files from Thingiverse and print them at home.
Teardown
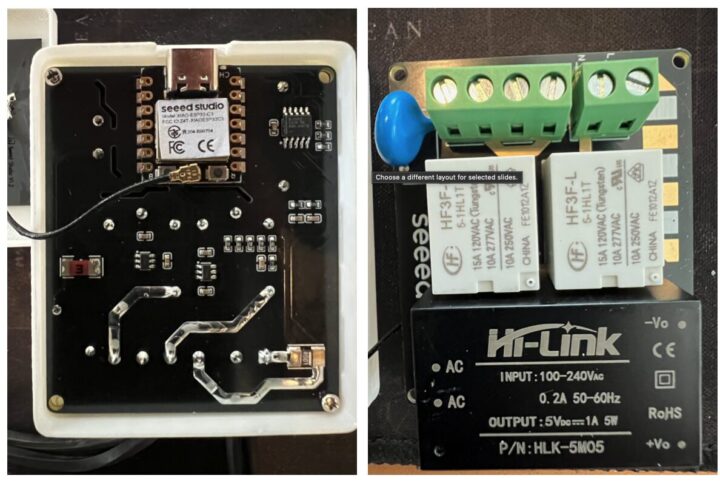
A teardown of the device reveals a XIAO-ESP32C3 module with an ESP32-C3 chip acting as the central controller. On the other side, you’ll see the small HLK-5M05 power module and two HF35F-L 10A 250VAC relays. A Belling BL0942 calibration-free metering IC is used for the power meter function.
Seeed Studio 2-channel Wi-Fi AC relay specifications
- MCU – XIAO ESP32C3 with ESP32-C3 WiFi 4 and Bluetooth 5.x RISC-V microcontroller, USB-C port
- Wireless connectivity – 2.4GHz Wi-Fi
- Relay channels – 2 independent channels
- Power
- Input terminals – Neutral (N), Live (L)
- Input voltage – 100-240V AC, 50/60Hz
- Output terminals
- Channel 1: N1 (Neutral), L1 (Live)
- Channel 2: N2 (Neutral), L2 (Live)
- Output voltage – 100-240V AC, 50/60Hz
- Maximum load – 10A per channel, 2400W
- Energy metering – BL0942 calibration-free IC
- Active energy measurement error – 0.1%
- Dynamic range – 4000:1
- Power monitoring – Real-time and historical energy tracking via Home Assistant
- Dimensions – 70 x 58 x 38 mm
Testing the ESPHome 2-channel Wi-Fi AC Relay with Home Assistant
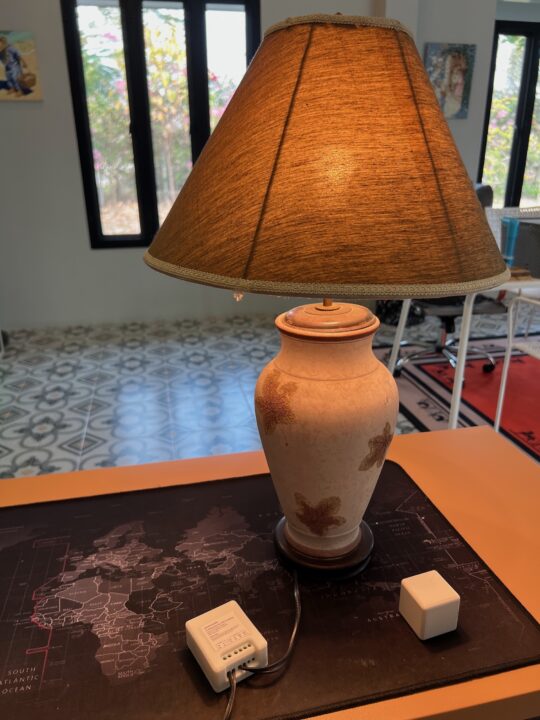
For this review, we connected the 2-channel Wi-Fi AC Relay to a 60W table lamp. The configuration process in Home Assistant is straightforward since the smart switch comes pre-installed with ESPHome. The general steps we followed are as outlined below:
- Make Home Assistant ready. In this test, we used the latest version, 2025.1, running on Raspberry Pi 4B hardware
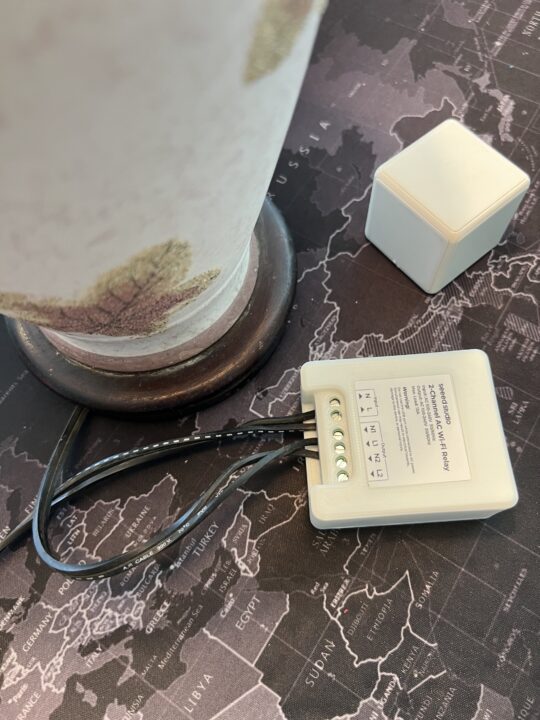
- Connect the power input and output wires to the desired device as shown in the image above
- Power up Seeed Studio’s 2-Channel AC Relay. Once it’s on, it will create an SSID named “seeedstudio-relay”
- Use either a mobile phone or computer to open a browser, then go to http://192.168.4.1, which is the default IP address
- You will see a list of SSIDs in the area. Select the SSID of the network you want to connect to and enter the WiFi password
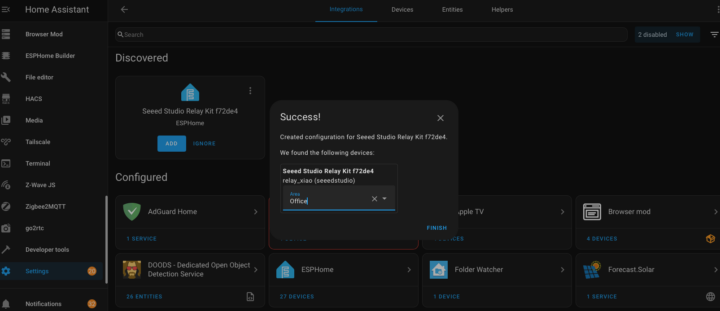
- Once the device is connected to the desired network (must be on the same network as the Home Assistant server), go to the Home Assistant dashboard, navigate to Settings -> Devices & Services, and you will see the Seeed Studio 2-Channel Wi-Fi AC Relay automatically discovered
- Click Add the device to your Home Assistant setup

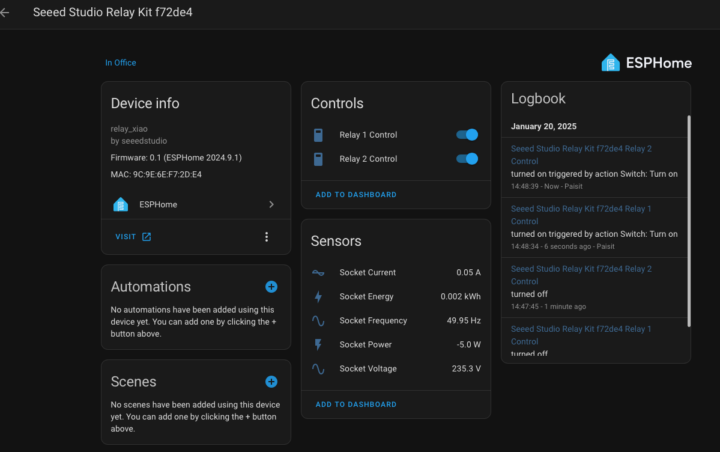
The smart switch is now ready for use. The list of provided Entities is shown in the screenshot below.
The two relays can be operated independently. However, we found that power metering measurement is combined and not separated for each channel. Additionally, the power usage report includes the device’s own power consumption. The screenshot above is without any load connected. We also observed that the data is updated approximately every 60 seconds.
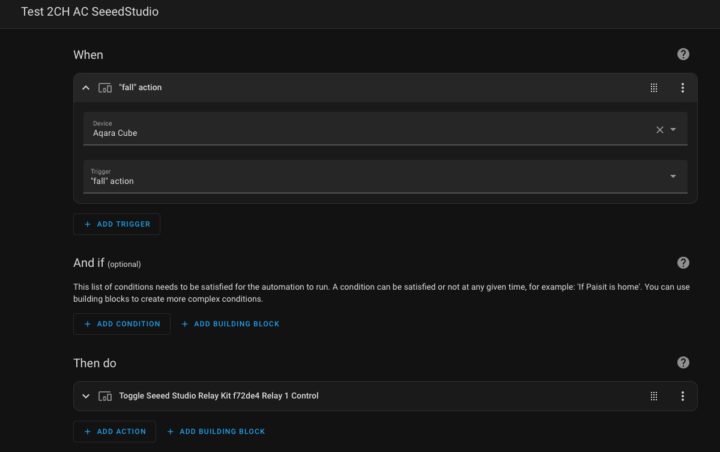
You can now create Automations in Home Assistant to use these entities of the Seeed Studio 2-Channel Wi-Fi AC Relay. For example, we created Automations that used an Aqara Cube (shown in the cover image) to control the on/off status of the table lamp that connected to Channel 1. Whenever the Cube is tossed up and falls back down, it toggles the status of Channel 1 to turn the table lamp on or off.
To this point, it’s straightforward from the first step to creating the automation, it takes no more than 5 minutes. This is very convenient for those who want a ready-to-use device. Seeed Studio also makes it easy for users who want to customize the software functionality further, such as increasing the data update frequency. The ESPHome YAML configuration files can be found on GitHub.
To modify the code, you need to install the ESPHome integration in Home Assistant by navigating to Settings -> Add Integration, selecting ESPHome/New, and copying the code from the GitHub link above then modifying it to whatever you like. Finally, you can compile and save it as a bin file to upload through the browser. We’ll cover that in the next section.
Testing Seeed Studio’s WiFi smart switch in Standalone Mode
If you’re not using Home Assistant or prefer standalone operation, it’s also possible. Follow these steps:
- Connect the power input and output wires to the desired device
- When powering up the Seeed Studio 2-Channel Wi-Fi AC Relay, it will create an SSID named “seeedstudio-relay”
- Use a mobile phone or computer to open a browser and go to “http://192.168.4.1”
- You’ll see a list of available SSIDs. Select your desired network and enter the WiFi password
- Use a browser on your mobile phone or computer to access the relay by pointing the browser to the IP assigned by DHCP.
In addition to the relay and metering the power consumption, you can also update the software using the OTA Update button through the web browser. Referring to the previous section, once you have compiled the file, you can upload it here, which is quite straightforward.
We observed that when the power supply is interrupted, the “Socket Energy” field resets to zero. This means that the 2-Channel Wi-Fi AC Relay does not store accumulated energy usage data in non-volatile memory. If the power goes out, the accumulated energy data is lost and starts from zero again once the power is back.
Home Assistant already stores historical voltage, current, and frequency data in a database. However, storing historical records for the accumulated energy/power consumption must be done separately by using Integral integration and the metering cycle (i.e., hourly, daily) must be done via the Utility Meter integration. In standalone mode, the smart switch will only retain the accumulated energy data as long as it is powered.
Summary
The Seeed Studio 2-Channel WiFi AC Relay is an easy & flexible device to use with Home Assistant since it works out of the box. Sometimes you may be lazy or have no time to assemble ESP32 boards with other components and write code by yourself. So it’s a decent choice for controlling AC devices and also includes a power metering function, making it ideal for controlling lighting or devices with power consumption under 10A.
Additionally, Seeed Studio allows for some customization by providing a 3D file for printing your own case and the ESPHome YAML configuration so that you can reflash your own ESPHome firmware. One downside is that the power metering function is for the whole unit, and not per channel like competing products such as the Shelly 2PM or SONOFF Dual R3 (flashed with ESPHome).
We’d like to thank Seeed Studio for sending a 2-Channel AC Wi-Fi Relay for review. It can be purchased on the company’s online store for $19.90.

Computer Engineering who previously worked with multinational IT company, rich experience in IT infrastructure, has a passion on Internet Of Thing i.e., Smart Home, Smart Farm as well as interested on Sustainability such as renewable energy, organic farming
Support CNX Software! Donate via cryptocurrencies, become a Patron on Patreon, or purchase goods on Amazon or Aliexpress


