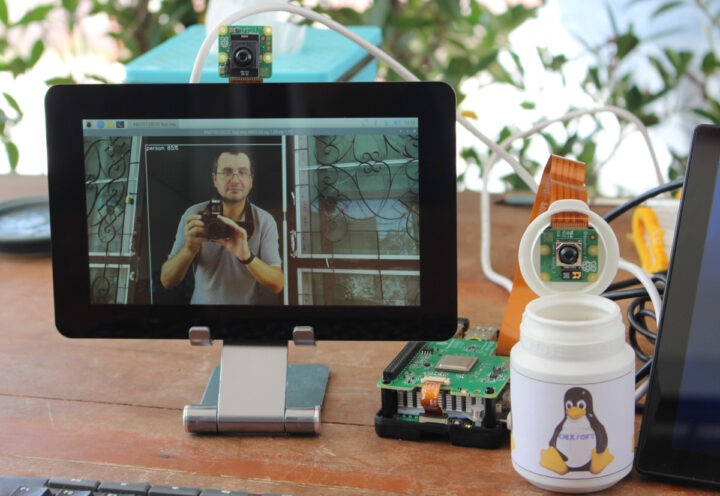
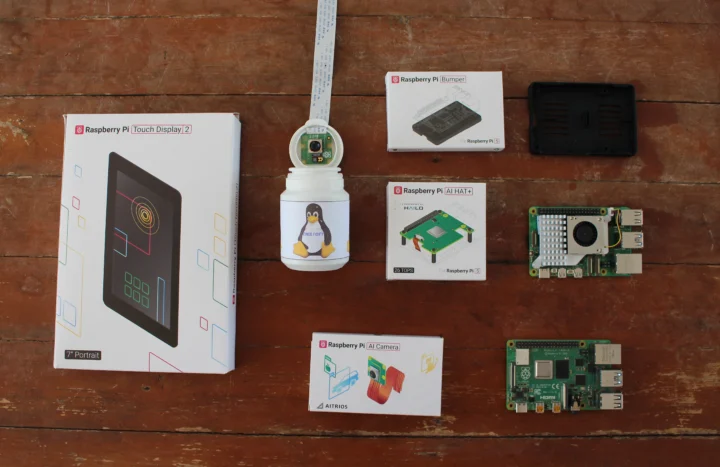
Raspberry Pi recently launched several AI products including the Raspberry Pi AI HAT+ for the Pi 5 with 13 TOPS or 26 TOPS of performance and the less powerful Raspberry Pi AI camera suitable for all Raspberry Pi SBC with a MIPI CSI connector. The company sent me samples of the AI HAT+ (26 TOPS) and the AI camera for review, as well as other accessories such as the Raspberry Pi Touch Display 2 and Raspberry Pi Bumper, so I’ll report my experience getting started mostly following the documentation for the AI HAT+ and AI camera.
Hardware used for testing
In this tutorial/review, I’ll use a Raspberry Pi 5 with the AI HAT+ and a Raspberry Pi Camera Module 3, while I’ll connect the AI camera to a Raspberry Pi 4. I also plan to use one of the boards with the new Touch Display 2.
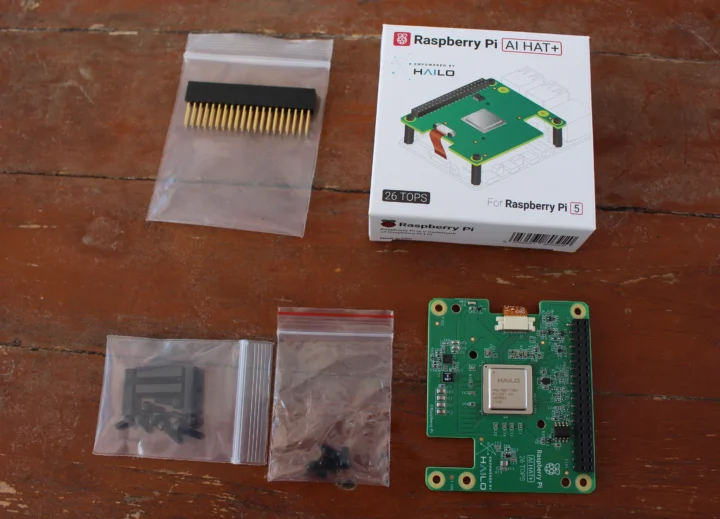
Let’s go through a quick unboxing of the new Pi AI hardware starting with the 26 TOPS AI HAT+.
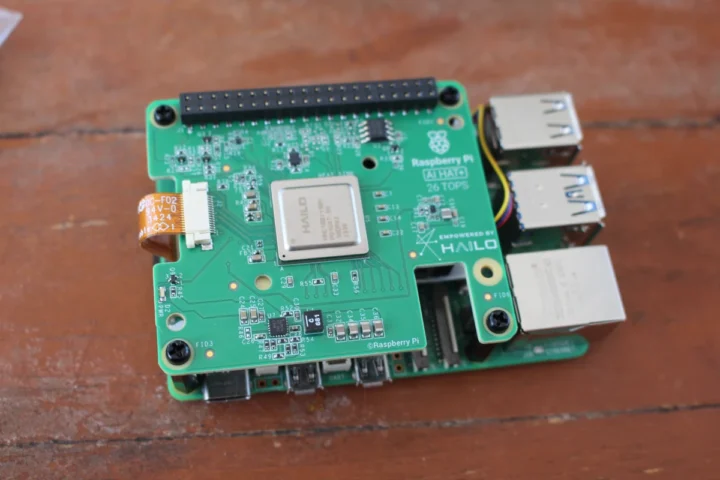
The package includes the AI HAT+ itself with a Hailo-8 26 TOPS AI accelerator soldered on the board as opposed to an M.2 module like in the Raspberry Pi AI Kit which was the first such hardware launched by the company, as well as a 40-pin stacking header and some plastic standoffs and screws.
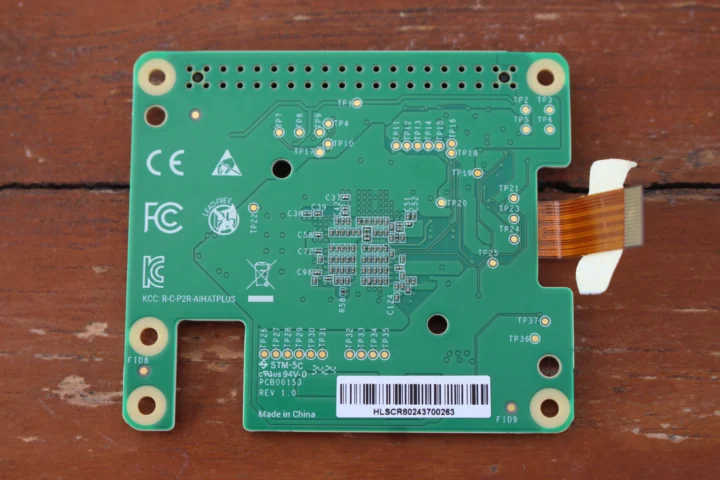
A ribbon cable is also connected to the HAT+, and the bottom side has no major components, only a few passive components, plus a good number of test points.
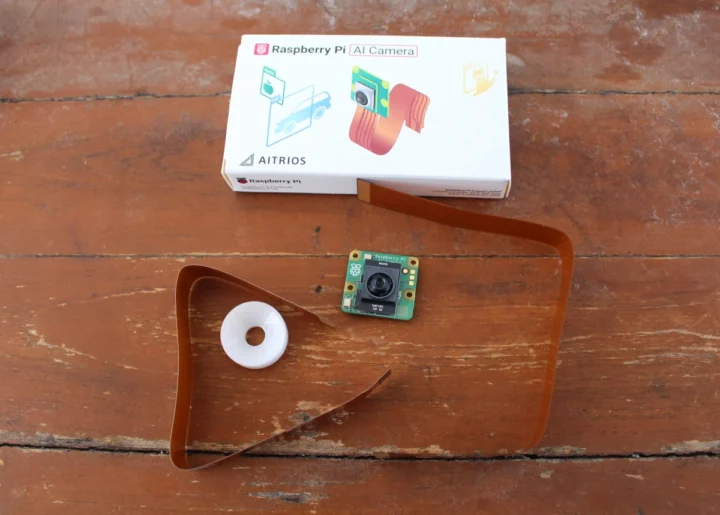
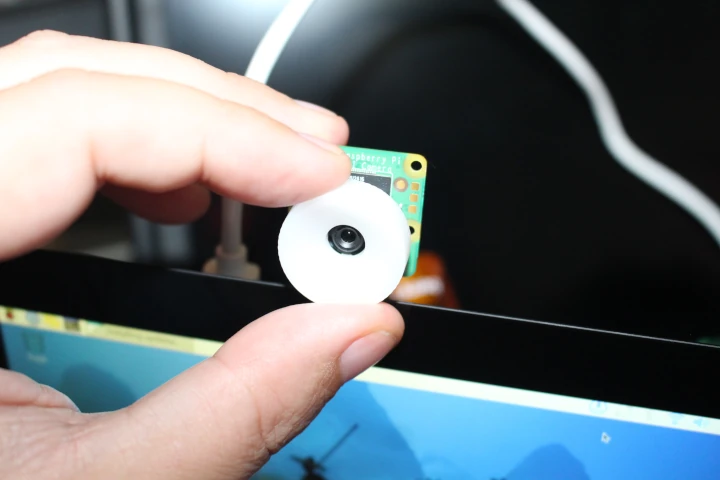
The Raspberry Pi AI Camera package features the camera module with a Sony IMX500 Intelligent Vision Sensor, 22-pin and 15-pin cables that fit the MIPI CSI connector on various Raspberry Pi boards, and a white ring used to adjust the focus manually.
For example, the 22-pin cable would be suitable for the Raspberry Pi 5, and the 15-pin cable for the Raspberry Pi 4, so we’ll use the latter in this review.
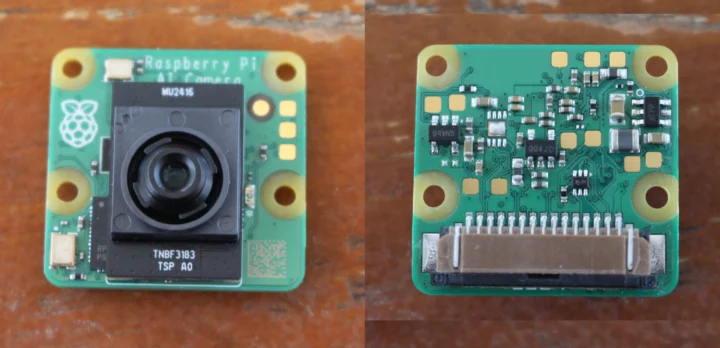
Here’s a close-up of the Raspberry Pi AI Camera module itself.
Raspberry Pi AI HAT+ installation on the Raspberry Pi 5
I would typically use my Raspberry Pi 5 with an NVMe SSD, but it’s not possible with the AI HAT+ when using the standard accessories Raspberry Pi provides. So I removed the SSD and HAT, and will boot Raspberry Pi OS from an official Raspberry Pi microSD card instead.
I could still keep the active cooler. The first part of the installation is to insert the GPIO stacking header on the Pi 5’s 40-pin GPIO header, install standoffs, and connect the PCIe ribbon cable as shown in the photo below.
Once done, we can insert the HAT+ in the male header and secure it with four screws.
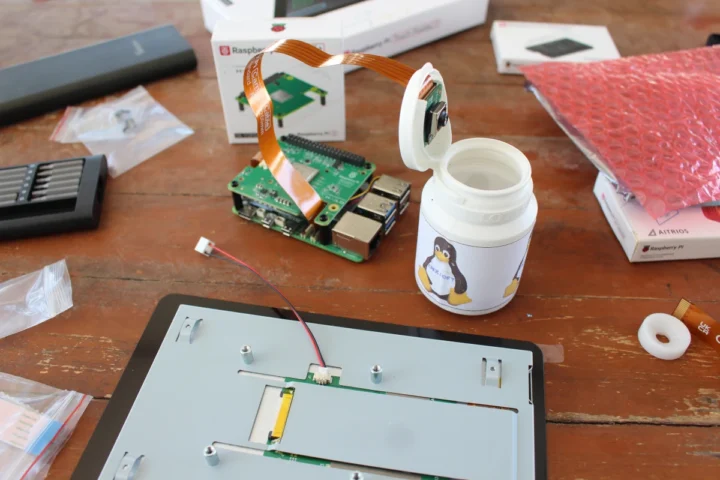
I also connected the Raspberry Pi Camera Module 3 to the Pi 5, but I had to give up installing the SBC on the Touch Display 2 because it can’t be mounted when there’s HAT and I would not have been able to connect the power cable with the GPIO stacking header used here.
So I complete the build by removing four screws holding the standoffs, placing the Bumper on the bottom side, and securing it by tightening the screws back in place.
Raspberry Pi AI camera and Touch Display 2 installation with Raspberry Pi 4
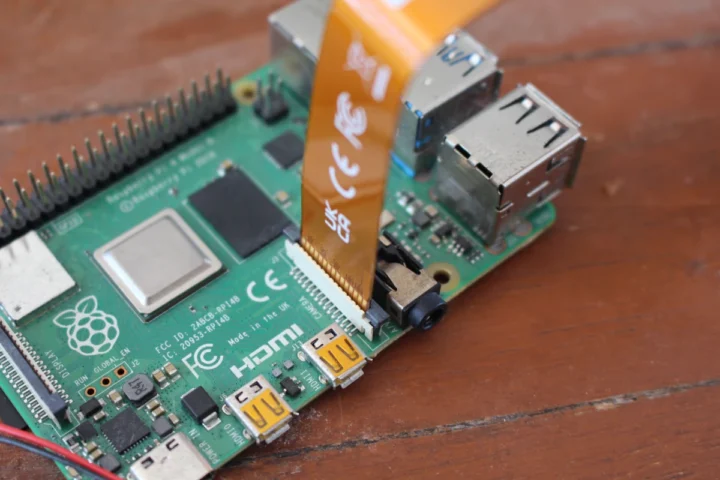
Let’s now install the AI camera to our Raspberry Pi 4 by first connecting the 15-pin cable as shown below with the golden contacts facing towards the micro HDMI connectors.
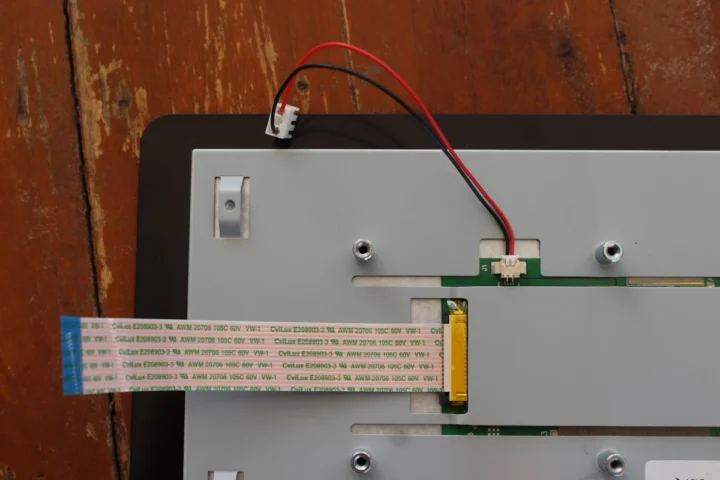
That’s all there is to it if you’re going to use the hardware with an HDMI monitor. But we want to use the Raspberry Pi Touch Display 2, so we’ll need to connect the MIPI DSI flat cable and power cable as shown below.
The power cable can be inserted either way and the first time I made a mistake with the red wire on the left, so it didn’t work… It must be connected with the black cable on the left as shown in the photo above.
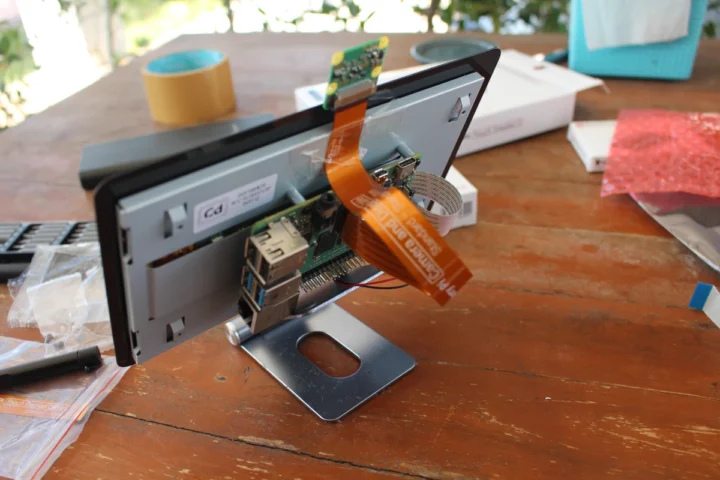
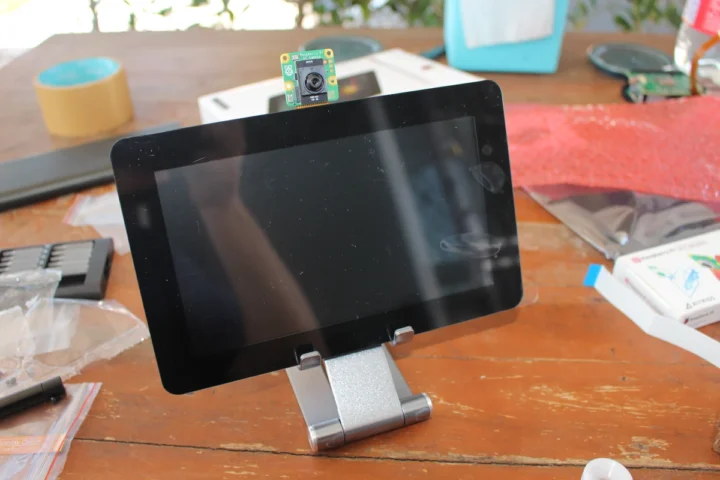
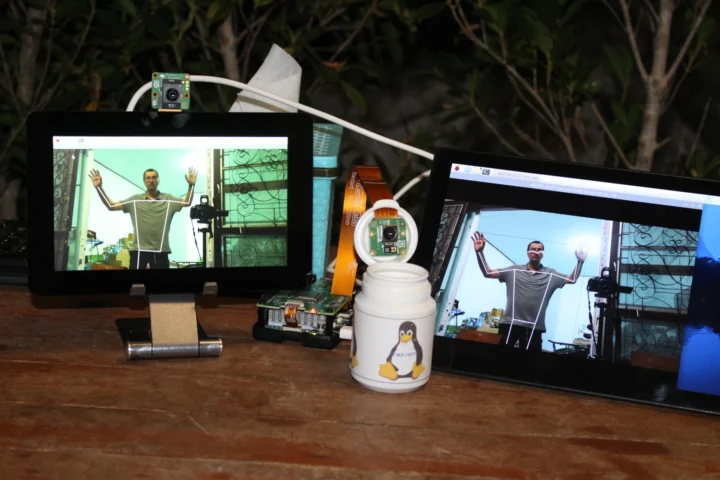
After that, we can insert the MIPI DSI cable into the Raspberry Pi 4 making the blue part of the cable face the black part of the connector, before securing the SBC with four screws. I attach the AI camera to the back of the display with some sticky tape. I wish Raspberry Pi had thought of some mount mechanism for their cameras…
But it does the job with the display placed on a smartphone holder.
Getting started with Raspberry Pi AI camera with RPICam-apps and Libcamera2 demos
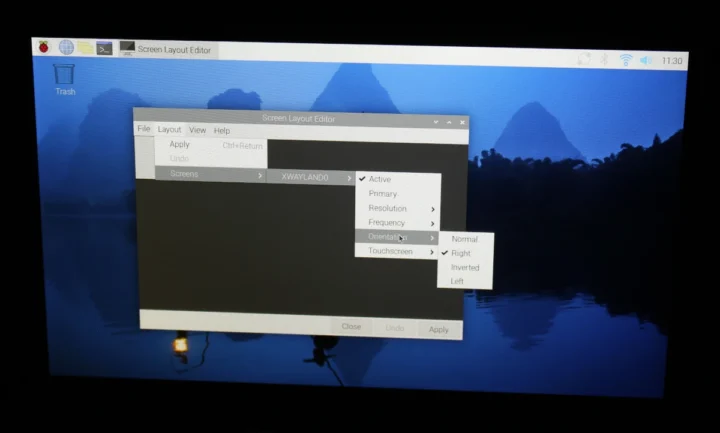
The first step was to configure the display in landscape mode because Raspberry Pi OS will start in portrait mode by default. All I had to do was go to the Screen Layout Editor and select Layout->Screens->XWAYLAND0->Orientation->Right.
We can now install the firmware, software, and assets for the Raspberry Pi AI camera with a single command, plus a reboot.
|
1 2 |
sudo apt install imx500-all sudo reboot |
We can now try a few ” rpicam-apps” demos starting with object detection:
|
1 |
rpicam-hello -t 0s --post-process-file /usr/share/rpi-camera-assets/imx500_mobilenet_ssd.json --viewfinder-width 1920 --viewfinder-height 1080 --framerate 30 |
or launched from SSH (remote access):
|
1 |
DISPLAY=:0 rpicam-hello -t 0s --post-process-file /usr/share/rpi-camera-assets/imx500_mobilenet_ssd.json --viewfinder-width 1920 --viewfinder-height 1080 --framerate 30 |
That’s the output or the command:
|
1 2 3 4 5 6 7 8 9 10 11 12 13 14 15 16 17 18 19 20 21 22 |
[0:01:25.418428032] [2246] INFO Camera camera_manager.cpp:325 libcamera v0.3.2+27-7330f29b [0:01:25.438252186] [2249] WARN CameraSensorProperties camera_sensor_properties.cpp:305 No static properties available for 'imx500' [0:01:25.438624029] [2249] WARN CameraSensorProperties camera_sensor_properties.cpp:307 Please consider updating the camera sensor properties database [0:01:25.466632714] [2249] WARN RPiSdn sdn.cpp:40 Using legacy SDN tuning - please consider moving SDN inside rpi.denoise [0:01:25.469557259] [2249] INFO RPI vc4.cpp:447 Registered camera /base/soc/i2c0mux/i2c@1/imx500@1a to Unicam device /dev/media4 and ISP device /dev/media0 [0:01:25.469652592] [2249] INFO RPI pipeline_base.cpp:1126 Using configuration file '/usr/share/libcamera/pipeline/rpi/vc4/rpi_apps.yaml' Made X/EGL preview window IMX500: Unable to set absolute ROI Reading post processing stage "imx500_object_detection" ------------------------------------------------------------------------------------------------------------------ NOTE: Loading network firmware onto the IMX500 can take several minutes, please do not close down the application. ------------------------------------------------------------------------------------------------------------------ Reading post processing stage "object_detect_draw_cv" Mode selection for 1920:1080:12:P(30) SRGGB10_CSI2P,2028x1520/30.0219 - Score: 2467.7 SRGGB10_CSI2P,4056x3040/9.9987 - Score: 43357.3 Stream configuration adjusted [0:01:28.520565569] [2246] INFO Camera camera.cpp:1197 configuring streams: (0) 1920x1080-YUV420 (1) 2028x1520-SRGGB10_CSI2P [0:01:28.521339201] [2249] INFO RPI vc4.cpp:622 Sensor: /base/soc/i2c0mux/i2c@1/imx500@1a - Selected sensor format: 2028x1520-SRGGB10_1X10 - Selected unicam format: 2028x1520-pRAA Network Firmware Upload: 100% (3872/3872 KB) |
The network firmware upload took a few seconds the first time, but then it’s fast during subsequent tries. Since the image was not clear, I had to adjust the focus manually with the white focus ring provided with the camera.
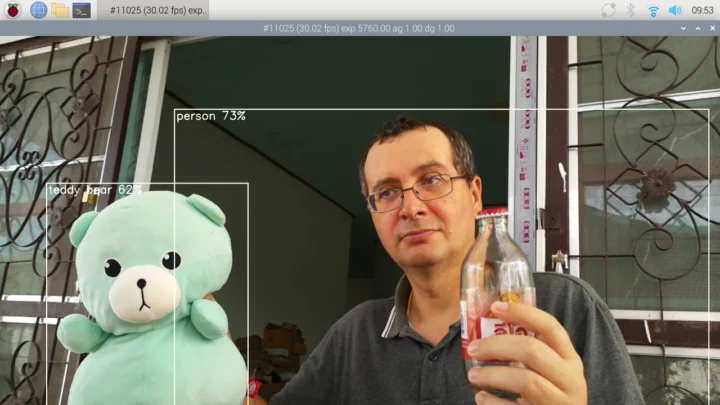
The demo could easily detect a person and a teddy bear, but not the bottle whatever angle I tried. The video is quite smooth and inference is fast.
That’s all good, except the documentation and the actual command to run are not in sync at this time, but as noted above, I found a solution in the forums. I also realized that Scrot can’t do screenshots in Wayland (the resulting images are black), so I had to switch to the Grim utility instead…
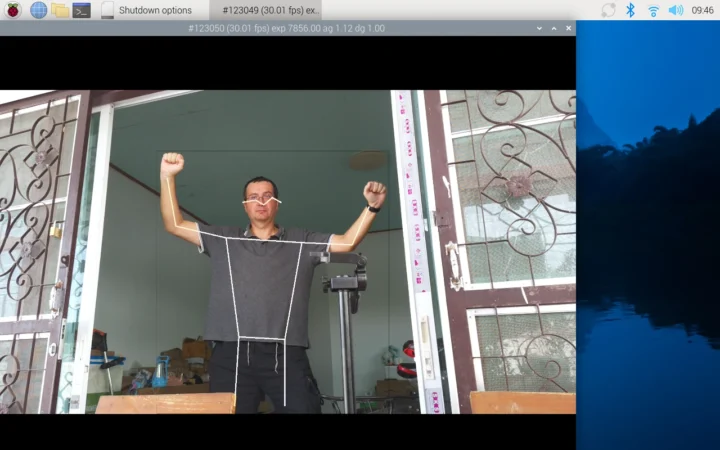
Let’s try another sample: Pose estimation.
|
1 |
rpicam-hello -t 0s --post-process-file /usr/share/rpi-camera-assets/imx500_posenet.json --viewfinder-width 1920 --viewfinder-height 1080 --framerate 30 |
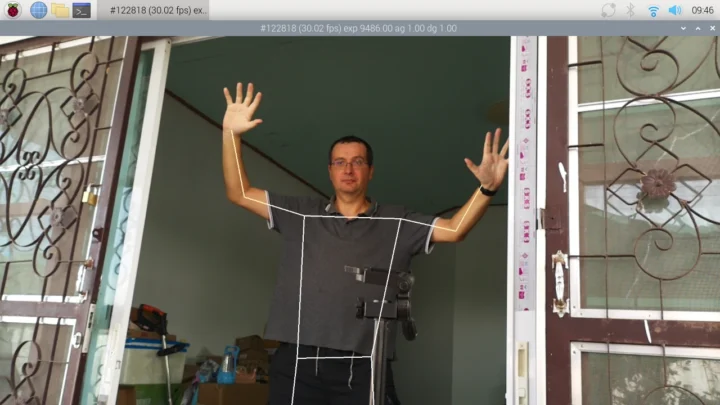
The first time we ran the model it needed to be transferred to the camera, and it probably took about 2 minutes, but subsequent runs are fast. Again tracking is real-time, and there’s no lag that I could notice. I’ll show a video demo of body segmentation comparing the AI camera to the AI HAT+ demos later in this review.
You’ll find more models to play with in the imx500-models directory.
|
1 2 3 4 5 6 7 8 9 10 11 12 13 14 15 16 17 18 19 20 21 22 23 24 25 26 27 |
pi@raspberrypi:~ $ ls -l /usr/share/imx500-models/ total 98700 -rw-r--r-- 1 root root 2574800 Sep 28 20:37 imx500_network_deeplabv3plus.rpk -rw-r--r-- 1 root root 3722528 Sep 28 20:37 imx500_network_efficientdet_lite0_pp.rpk -rw-r--r-- 1 root root 6285760 Sep 28 20:37 imx500_network_efficientnet_bo.rpk -rw-r--r-- 1 root root 5576144 Sep 28 20:37 imx500_network_efficientnet_lite0.rpk -rw-r--r-- 1 root root 6838704 Sep 28 20:37 imx500_network_efficientnetv2_b0.rpk -rw-r--r-- 1 root root 6681664 Sep 28 20:37 imx500_network_efficientnetv2_b1.rpk -rw-r--r-- 1 root root 6826864 Sep 28 20:37 imx500_network_efficientnetv2_b2.rpk -rw-r--r-- 1 root root 2104384 Sep 28 20:37 imx500_network_higherhrnet_coco.rpk -rw-r--r-- 1 root root 67056 Sep 28 20:37 imx500_network_inputtensoronly.rpk -rw-r--r-- 1 root root 5222544 Sep 28 20:37 imx500_network_levit_128s.rpk -rw-r--r-- 1 root root 5072400 Sep 28 20:37 imx500_network_mnasnet1.0.rpk -rw-r--r-- 1 root root 4079808 Sep 28 20:37 imx500_network_mobilenet_v2.rpk -rw-r--r-- 1 root root 3612448 Sep 28 20:37 imx500_network_mobilevit_xs.rpk -rw-r--r-- 1 root root 2335520 Sep 28 20:37 imx500_network_mobilevit_xxs.rpk -rw-r--r-- 1 root root 3281696 Sep 28 20:37 imx500_network_nanodet_plus_416x416_pp.rpk -rw-r--r-- 1 root root 3118976 Sep 28 20:37 imx500_network_nanodet_plus_416x416.rpk -rw-r--r-- 1 root root 1663152 Sep 28 20:37 imx500_network_posenet.rpk -rw-r--r-- 1 root root 3440912 Sep 28 20:37 imx500_network_regnetx_002.rpk -rw-r--r-- 1 root root 4054464 Sep 28 20:37 imx500_network_regnety_002.rpk -rw-r--r-- 1 root root 5464912 Sep 28 20:37 imx500_network_regnety_004.rpk -rw-r--r-- 1 root root 6211824 Sep 28 20:37 imx500_network_resnet18.rpk -rw-r--r-- 1 root root 4081184 Sep 28 20:37 imx500_network_shufflenet_v2_x1_5.rpk -rw-r--r-- 1 root root 1597680 Sep 28 20:37 imx500_network_squeezenet1.0.rpk -rw-r--r-- 1 root root 3965824 Sep 28 20:37 imx500_network_ssd_mobilenetv2_fpnlite_320x320_pp.rpk -rw-r--r-- 1 root root 3126656 Sep 28 20:37 imx500_network_yolov8n_pp.rpk |
The Raspberry Pi AI camera also supports the Picamera2 framework. We can install the dependencies and demo programs as follows:
|
1 2 |
sudo apt install python3-opencv python3-munkres git clone https://github.com/raspberrypi/picamera2 |
Let’s now try to run Yolov8:
|
1 2 |
cd picamera2/examples/imx500/ DISPLAY=:0 python imx500_object_detection_demo.py --model /usr/share/imx500-models/imx500_network_ssd_mobilenetv2_fpnlite_320x320_pp.rpk |
But it did not quite work as expected:
|
1 2 3 4 5 6 7 8 9 10 11 12 13 14 15 16 17 18 19 20 21 22 23 |
pi@raspberrypi:~/picamera2/examples/imx500 $ DISPLAY=:0 python imx500_object_detection_demo.py --model /usr/share/imx500-models/imx500_network_ssd_mobilenetv2_fpnlite_320x320_pp.rpk [0:17:09.224913642] [40685] INFO Camera camera_manager.cpp:325 libcamera v0.3.2+27-7330f29b [0:17:09.251033940] [40690] WARN CameraSensorProperties camera_sensor_properties.cpp:305 No static properties available for 'imx500' [0:17:09.251093511] [40690] WARN CameraSensorProperties camera_sensor_properties.cpp:307 Please consider updating the camera sensor properties database [0:17:09.272530936] [40690] WARN RPiSdn sdn.cpp:40 Using legacy SDN tuning - please consider moving SDN inside rpi.denoise [0:17:09.274669644] [40690] INFO RPI vc4.cpp:447 Registered camera /base/soc/i2c0mux/i2c@1/imx500@1a to Unicam device /dev/media4 and ISP device /dev/media0 [0:17:09.274828357] [40690] INFO RPI pipeline_base.cpp:1126 Using configuration file '/usr/share/libcamera/pipeline/rpi/vc4/rpi_apps.yaml' ------------------------------------------------------------------------------------------------------------------ NOTE: Loading network firmware onto the IMX500 can take several minutes, please do not close down the application. ------------------------------------------------------------------------------------------------------------------ [0:17:09.456145829] [40685] INFO Camera camera.cpp:1197 configuring streams: (0) 640x480-XBGR8888 (1) 2028x1520-SRGGB10_CSI2P [0:17:09.456830363] [40690] INFO RPI vc4.cpp:622 Sensor: /base/soc/i2c0mux/i2c@1/imx500@1a - Selected sensor format: 2028x1520-SRGGB10_1X10 - Selected unicam format: 2028x1520-pRAA Network Firmware Upload: 100%|█████████████████████████████████████████████████████████████████████| 3.78M/3.78M [00:11<00:00, 360kbytes/s] Traceback (most recent call last): File "/home/pi/picamera2/examples/imx500/imx500_object_detection_demo.py", line 179, in <module> last_results = parse_detections(picam2.capture_metadata()) ^^^^^^^^^^^^^^^^^^^^^^^^^^^^^^^^^^^^^^^^^^^ File "/home/pi/picamera2/examples/imx500/imx500_object_detection_demo.py", line 28, in parse_detections bbox_order = intrinsics.bbox_order ^^^^^^^^^^^^^^^^^^^^^ AttributeError: 'NetworkIntrinsics' object has no attribute 'bbox_order' |
I’m not the only one to have this issue, and by running the following command before:
|
1 |
export PYTHONPATH=/home/pi/picamera2/ |
We can go further, but it still not working with another error:
|
1 2 3 |
File "/home/pi/picamera2/picamera2/devices/imx500/imx500.py", line 548, in __get_output_tensor_info raise ValueError(f'tensor info length {len(tensor_info)} does not match expected size {size}') ValueError: tensor info length 260 does not match expected size 708 |
Again, another person had the size mismatch issue, but this time around, there does not seem to be an obvious solution. So as of November 24, 2024, the Picamera2 framework is not compatible with the AI Raspberry Pi AI camera. Hopefully, it will be fixed in the next few weeks. The documentation has more details of the architecture and instructions show how to deploy your own TensorFlow or Pytorch models, but it’s out of the scope of this getting started guide.
Getting started with Raspberry Pi AI HAT+
Raspberry Pi recommends enabling PCIe Gen3 for optimal performance, but I did not need to do that, since I already enabled PCIe Gen3 when I tested the official Raspberry Pi SSD. So let’s install the Hailo resources and reboot the machine.
|
1 2 |
sudo apt install hailo-all sudo reboot |
Note that a close to 900MB installation for the Hailo kernel device driver and firmware, HailoRT middleware software, Hailo Tappas core post-processing libraries, and the rpicam-apps Hailo post-processing software demo stages.
We can check whether the Hailo-8 AI accelerator is detected with the following command:
|
1 |
hailortcli fw-control identify |
output:
|
1 2 3 4 5 6 7 8 9 10 |
Executing on device: 0000:01:00.0 Identifying board Control Protocol Version: 2 Firmware Version: 4.18.0 (release,app,extended context switch buffer) Logger Version: 0 Board Name: Hailo-8 Device Architecture: HAILO8 Serial Number: <N/A> Part Number: <N/A> Product Name: <N/A> |
There aren’t any serial and part numbers or product name, so maybe those only be reported when using an M.2 or mPCIe Hailo module.
We can also see some Hailo-related info in the kernel log:
|
1 2 3 4 5 6 7 8 9 10 11 12 13 14 15 16 |
pi@raspberrypi:~ $ dmesg | grep -i hailo [ 3.671365] hailo: Init module. driver version 4.18.0 [ 3.671510] hailo 0000:01:00.0: Probing on: 1e60:2864... [ 3.671517] hailo 0000:01:00.0: Probing: Allocate memory for device extension, 11632 [ 3.671539] hailo 0000:01:00.0: enabling device (0000 -> 0002) [ 3.671546] hailo 0000:01:00.0: Probing: Device enabled [ 3.671566] hailo 0000:01:00.0: Probing: mapped bar 0 - 00000000a06c39ed 16384 [ 3.671572] hailo 0000:01:00.0: Probing: mapped bar 2 - 00000000a39a70f5 4096 [ 3.671577] hailo 0000:01:00.0: Probing: mapped bar 4 - 00000000800179f8 16384 [ 3.671581] hailo 0000:01:00.0: Probing: Force setting max_desc_page_size to 4096 (recommended value is 16384) [ 3.671589] hailo 0000:01:00.0: Probing: Enabled 64 bit dma [ 3.671592] hailo 0000:01:00.0: Probing: Using userspace allocated vdma buffers [ 3.671595] hailo 0000:01:00.0: Disabling ASPM L0s [ 3.671599] hailo 0000:01:00.0: Successfully disabled ASPM L0s [ 3.898016] hailo 0000:01:00.0: Firmware was loaded successfully [ 3.913417] hailo 0000:01:00.0: Probing: Added board 1e60-2864, /dev/hailo0 |
We can now check out the rpicam-apps demo from GitHub:
|
1 |
git clone --depth 1 https://github.com/raspberrypi/rpicam-apps.git ~/rpicam-apps |
And test one of the samples as indicated in the documentation:
|
1 2 3 4 5 6 7 8 |
pi@raspberrypi:~ $ DISPLAY=:0 rpicam-hello -t 0 --post-process-file ~/rpicam-apps/assets/hailo_yolov8_inference.json --lores-width 640 --lores-height 640 [0:39:01.996590396] [17167] INFO Camera camera_manager.cpp:325 libcamera v0.3.2+27-7330f29b [0:39:02.004488912] [17170] INFO RPI pisp.cpp:695 libpisp version v1.0.7 28196ed6edcf 29-08-2024 (16:33:32) [0:39:02.022338997] [17170] INFO RPI pisp.cpp:1154 Registered camera /base/axi/pcie@120000/rp1/i2c@80000/imx708@1a to CFE device /dev/media2 and ISP device /dev/media0 using PiSP variant BCM2712_C0 Made X/EGL preview window Postprocessing requested lores: 640x640 BGR888 Reading post processing stage "hailo_yolo_inference" ERROR: *** No such node (hef_file) *** |
Oops… it’s not working. Somebody in the Raspberry Pi forums recommends to use the models in /usr/share/rpi-camera-assets/ instead:
|
1 2 3 4 5 6 7 8 9 10 11 12 13 14 15 16 17 |
pi@raspberrypi:~ $ DISPLAY=:0 rpicam-hello -t 0 --post-process-file /usr/share/rpi-camera-assets/hailo_yolov8_inference.json --lores-width 640 --lores-height 640 --rotation 180 [0:42:20.662134072] [17198] INFO Camera camera_manager.cpp:325 libcamera v0.3.2+27-7330f29b [0:42:20.673362106] [17201] INFO RPI pisp.cpp:695 libpisp version v1.0.7 28196ed6edcf 29-08-2024 (16:33:32) [0:42:20.695581852] [17201] INFO RPI pisp.cpp:1154 Registered camera /base/axi/pcie@120000/rp1/i2c@80000/imx708@1a to CFE device /dev/media2 and ISP device /dev/media0 using PiSP variant BCM2712_C0 Made X/EGL preview window Postprocessing requested lores: 640x640 BGR888 Reading post processing stage "hailo_yolo_inference" Reading post processing stage "object_detect_draw_cv" Mode selection for 2304:1296:12:P SRGGB10_CSI2P,1536x864/0 - Score: 3400 SRGGB10_CSI2P,2304x1296/0 - Score: 1000 SRGGB10_CSI2P,4608x2592/0 - Score: 1900 Stream configuration adjusted [0:42:21.844252109] [17198] INFO Camera camera.cpp:1197 configuring streams: (0) 2304x1296-YUV420 (1) 640x640-BGR888 (2) 2304x1296-BGGR_PISP_COMP1 [0:42:21.844388530] [17201] INFO RPI pisp.cpp:1450 Sensor: /base/axi/pcie@120000/rp1/i2c@80000/imx708@1a - Selected sensor format: 2304x1296-SBGGR10_1X10 - Selected CFE format: 2304x1296-PC1B [HailoRT] [warning] HEF was compiled for Hailo8L device, while the device itself is Hailo8. This will result in lower performance. [HailoRT] [warning] HEF was compiled for Hailo8L device, while the device itself is Hailo8. This will result in lower performance. |
It’s finally working and the result is quite similar to the Raspberry Pi AI camera’s MobileNet demo, but YOLOv8 on the AI HAT+ also picks up my bottle… You’ll also note I added an orientation parameter because my camera mount/box requires the software to rotate the image by 180 degrees.
There’s also a Pose estimation sample:
|
1 2 3 4 5 6 7 8 9 10 11 12 13 14 15 16 |
pi@raspberrypi:~ $ DISPLAY=:0 rpicam-hello -t 0 --post-process-file /usr/share/rpi-camera-assets/hailo_yolov8_pose.json --lores-width 640 --lores-height 640 --rotation 180 [3:39:11.229348188] [334368] INFO Camera camera_manager.cpp:325 libcamera v0.3.2+27-7330f29b [3:39:11.237309251] [334371] INFO RPI pisp.cpp:695 libpisp version v1.0.7 28196ed6edcf 29-08-2024 (16:33:32) [3:39:11.255766175] [334371] INFO RPI pisp.cpp:1154 Registered camera /base/axi/pcie@120000/rp1/i2c@80000/imx708@1a to CFE device /dev/media2 and ISP device /dev/media0 using PiSP variant BCM2712_C0 Made X/EGL preview window Postprocessing requested lores: 640x640 BGR888 Reading post processing stage "hailo_yolo_pose" Mode selection for 2304:1296:12:P SRGGB10_CSI2P,1536x864/0 - Score: 3400 SRGGB10_CSI2P,2304x1296/0 - Score: 1000 SRGGB10_CSI2P,4608x2592/0 - Score: 1900 Stream configuration adjusted [3:39:12.423058392] [334368] INFO Camera camera.cpp:1197 configuring streams: (0) 2304x1296-YUV420 (1) 640x640-BGR888 (2) 2304x1296-RGGB_PISP_COMP1 [3:39:12.423195170] [334371] INFO RPI pisp.cpp:1450 Sensor: /base/axi/pcie@120000/rp1/i2c@80000/imx708@1a - Selected sensor format: 2304x1296-SRGGB10_1X10 - Selected CFE format: 2304x1296-PC1R [HailoRT] [warning] HEF was compiled for Hailo8L device, while the device itself is Hailo8. This will result in lower performance. [HailoRT] [warning] HEF was compiled for Hailo8L device, while the device itself is Hailo8. This will result in lower performance. |
It’s very similar to the AI camera demo but adds nose and eye tracking, and virtually no delay, it starts immediately even the first time.
Note that all samples are compiled for the 13 TOPS Hailo-8L accelerator instead of the 26 TOPS Hailo-8 chip, but it does not seem to impact the performance from a user perspective. I’ve asked Raspberry Pi whether they have a demo specific to the 26 TOPS Hailo-8, and update this post after I give it a try.
The Raspberry Pi AI HAT+ documentation is not quite as detailed as the one for the Raspberry Pi AI camera, and we’re redirected to the hailo-rpi5-examples GitHub repo for more details and the Hailo community for support.
Raspberry Pi AI Camera vs AI HAT+ pose estimation demo
My first impression is that the object detection and pose estimation work similarly on the Raspberry Pi AI camera and the AI HAT+ on they are up and running.
The main difference for the pose estimation is that the very first run is slow to start on the AI camera because it takes time to transfer the model (almost two minutes). Subsequent runs are fast once the model is in the camera’s storage. As we’ve seen the Yolov8 pose estimation running on the AI HAT+ also adds eye and nose tracking, but it’s probably just due to the different model used instead of a limitation of the hardware.
While the expansion board is more powerful on paper, both the Raspberry Pi AI camera and AI HAT+ can run similar demos. The AI HAT+ relies on PCIe and will only work with the Raspberry Pi 5 and upcoming CM5 module, while the AI camera will work with any Raspberry Pi with a MIPI CSI connector. The demos load slower the first time on the AI camera, but apart from that there aren’t many differences. Documentation is not always in sync with the actual commands for either and I had to browse the forums to successfully run the demos. Both sell for the same price ($70) if we are talking about the 13 TOPS AI HAT+ kit, but note that most applications will require a Raspberry Pi camera module with the AI HAT+. The 26 TOPS AI HAT+ kit reviewed here sells for $110.

Jean-Luc started CNX Software in 2010 as a part-time endeavor, before quitting his job as a software engineering manager, and starting to write daily news, and reviews full time later in 2011.
Support CNX Software! Donate via cryptocurrencies, become a Patron on Patreon, or purchase goods on Amazon or Aliexpress


