

We received the Edge 2 Kit IoT gateway on the Rockchip RK3568-powered Edge2 single board computer (SBC) and a 2-in-1 Zigbee and Z-Wave mPCIe card from Mixtile which we will be reviewing from the perspective of smart home applications using Home Assistant open-source home automation framework.
Let’s dive into the details.
Unboxing Mixtile Edge 2 Kit
CNX Software previously reported on the Mixtile Edge 2 Kit in 2022 and you can check the detailed specifications and block diagram in that earlier article. Since then, Mixtile has found a wider range of applications for the device and is also promoting it as an Edge AI Box that performs AI object detection using the Edge 2 Kit (or the more powerful Mixtile Blade 3) using the built-in NPU (Neural Processing Unit) with up to 1 TOPS of AI performance for tasks such as object detection. Let’s unbox it and take a closer look.

Inside the box, you’ll find the Edge 2 Kit itself along with two antennas for Wi-Fi and a USB-C cable for power. The black/blue strip metal case is quite sturdy. It has side and bottom panels with secure screws, providing good protection against dust.
The device has various expansion ports around it: the front features a slot for a MicroSD card, a headphone jack, and USB ports, while the back has USB 3.0 ports, an HDMI connector, an RS485 serial port, an RJ45 network port (Gigabit Ethernet), and a USB-C port for power. On the side, there’s a U2 slot for adding an SSD drive and a DC 12V power input. If you open the bottom panel of the device, you’ll see slots for inserting 4G/5G SIM modules via M.2 and mPCIe, along with mPCIe and M.2 slots for adding extra devices like Z-Wave, Zigbee, GPS, or LoRa as well as real-time clock with battery.

The Edge 2 Kit has up to six external antenna ports, which are more than enough if you’re planning to use multiple wireless protocols simultaneously. It comes with external Wi-Fi antenna ports, and if used with the 2-in-1 mPCIe Zigbee + Z-Wave module, which also includes external antennas for these two protocols, it can enhance the signal range and reduce interference. This is particularly useful when used in a Smart Home setup, as it minimizes the hassle of needing additional USB expansion cables for the Zigbee protocol, which can be easily interfered with.

Edge 2 Kit teardown
When we unscrewed and removed the heat sink to look inside, the Edge 2 Kit is essentially the Edge 2 single board computer with additional external antenna connectors and a case. The board features the Rockchip RK3568 quad-core Cortex-A55 processor and comes with 4GB of RAM and 32GB of eMMC flash storage. As noted above, the RK3568 has a 1 TOPS NPU, which is highly efficient for deep learning frameworks like TensorFlow, Caffe, Tflite, Pytorch, Onnx NN, and Android NN. However, if you need more NPU performance, Mixtile also offers Mixtile Blade 3 with a Rockchip R3588 SoC equipped with a 6 TOPS NPU.

Unboxing Mixtile 2-in-1 Zigbee & Z-Wave mPCIe Interface Module
The Mixtile 2-in-1 Zigbee & Z-Wave mPCIe interface module relies on Silicon Labs’ EFR32 Series 2 chips (EZSP v8) with a signal transmission power of over 20+dBm. The card itself contains two embedded chips: the EFR32MG24 SoC, which supports protocols operating in the 2.4GHz frequency range, such as Zigbee 3.0 or Thread (OpenThread/Matter/CHIP over Thread), and the EFR32ZG23 SoC, which is used for the Z-Wave protocol, operating in sub-1GHz frequencies. The specific Z-Wave frequency varies by country, such as 868.4MHz, 869.85 MHz for EU countries, 908.4, 916.0 MHz for the United States, and 919.8~926.3 MHz for Australia and New Zealand.
Mixtile also offers utilities for the Mixtile Add-on for Home Assistant to enhance functionality:
- MIXTILE Flasher: This add-on allows you to re-flash the firmware for the Zigbee System on Chip (soC) and support different functions. Currently, Mixtile provides two types of firmware:
- Zigbee firmware
- Zigbee + Thread firmware
- MIXTILE Z-Wave Region Configurator: This add-on allows you to change the region settings for the Z-Wave SoC.

The plastic box we received contains the mPCIe card and antennas for both Zigbee and Z-Wave, each clearly labeled to indicate which is which, ensuring they’re connected correctly since the two protocols use different radio frequencies and the antennas look the same.

For this test, we chose the card with a Z-Wave frequency of 868.42MHz, which is compatible with the existing Z-Wave devices we have for our test environment. As shown in the image above, you can see both the EFR32MG24 and EFR32ZG23 chips, as well as the external antenna connectors. We’ll connect the provided antennas to the IPEX-1 connectors as shown in the picture.
If you’re using this with a computer with a spare mPCIe slot with USB 2.0, like the Mixtile Edge 2 Kit, you don’t need to purchase anything extra. However, if you’re using a computer without an mPCIe slot, for example, the Raspberry Pi4, you’ll need to buy an mPCIe HAT Extension Module. We will also test the module with the Raspberry Pi 4 Model B. You can check the Mixtile 2-in-1 Zigbee & Z-Wave mPCIe specifications in our previous article.
Installing Home Assistant on the Edge 2 Kit
Mixtile provides two options for installing Home Assistant. The first option is to use a factory-installed Home Assistant image. In that case, the installation will be straightforward, as the user just needs to connect the Ethernet cable to the RJ45 port, the display to the HDMI port, and the keyboard to the USB port, before turning on the device. After that, the user can follow the on-screen instructions to complete the installation.
The second option is to install everything from scratch. Since the Edge 2 Kit is designed for DIY projects, frequently changing the installed software is common.
The Mixtile team has written a detailed setup guide that outlines the steps from downloading the necessary files, entering MaskROM mode, connecting the Edge 2 Kit to a PC via USB-C, and uploading the Home Assistant installation program.
Here are the main steps we have done successfully in our testing:
- Download the “upgrade tool” for Ubuntu from Linux_Upgrade_Tool.zip. Although a Mac computer can be used for installation, we encountered some issues, so using a PC with Linux is much easier and saves time.
- Download the installation file: Home Assistant
- Download the file: SP Loader
- Open the device cover first because the MaskROM button is inside.
- Then press and hold the MaskROM button before powering on the device. After 2-3 seconds, release the MaskROM button. The device will enter MaskROM mode, and the screen connected to the Edge 2 Kit will be completely black
- On the PC, open the Terminal and use the following two commands to upload the SPL loader and Home Assitant image
- This command writes the program to the 0x0 address of the eMMC.
1sudo ./upgrade_tool db /[your folder path]/rk356x_spl_loader_v1.13.112.bin - This command loads the initial Home Assistant image
1sudo ./upgrade_tool wl 0 /[your folder path]/image-release-raw-format-mixtile-edge2-homeassistant12.2-rc1-240610.img - After the upload is complete, reboot the device and wait 3-5 minutes until Home Assistant appears on the Edge 2 Kit console
- On the PC, use a browser and go to http://homeassistant.local:8123 or, if you know the IP address, use http://[your IP address]:8123
- Follow the on-screen instructions to set up Home Assistant, which will take approximately 20 minutes.
- After the setup is completed, you’ll see the Home Assistant dashboard as shown in the image below.

Installing the 2-in-1 Zigbee & Z-Wave mPCIe Card on Edge 2 Kit

After successfully installing Home Assistant on the Mixtile Edge 2 Kit, the next step is to install the mPCIe card into the gateway. First, shut down the device before opening the bottom cover and inserting the 2-in-1 card. Then, connect the antenna cables to the external antennas, attach them to the IPEX-1 connector, and securely tighten all four antennas (2x for WiFi, 1x Zigbee, and 1x Z-Wave). After that, power on the device. After a short wait, the Mixtile Edge 2 Kit will automatically detect the 2-in-1 card upon booting, as shown in the screenshot below. To check whether the installation is successful, go to Settings -> Systems -> All Hardware in Home Assistant, and look for the lines ttyACM0 and ttyACM1.
")
Adding Zigbee Devices on Home Assistant
Before using Zigbee with Home Assistant, we need to install the Zigbee management software in Home Assistant. We chose the ZHA integration, which comes with Home Assistant, but other options like Zigbee2MQTT can also be used instead.
For sensor testing, we used the SONOFF Zigbee Water Leak Sensor Door. We added the device directly to Home Assistant without needing to use any SONOFF software beforehand. The steps and parameters are shown in the images below.

After installing ZHA, we added the SONOFF Water Leak Sensor, which uses the Zigbee 3.0 protocol. The installation process was straightforward, and we encountered no issues. The added sensor was immediately available for use in Home Assistant automation.

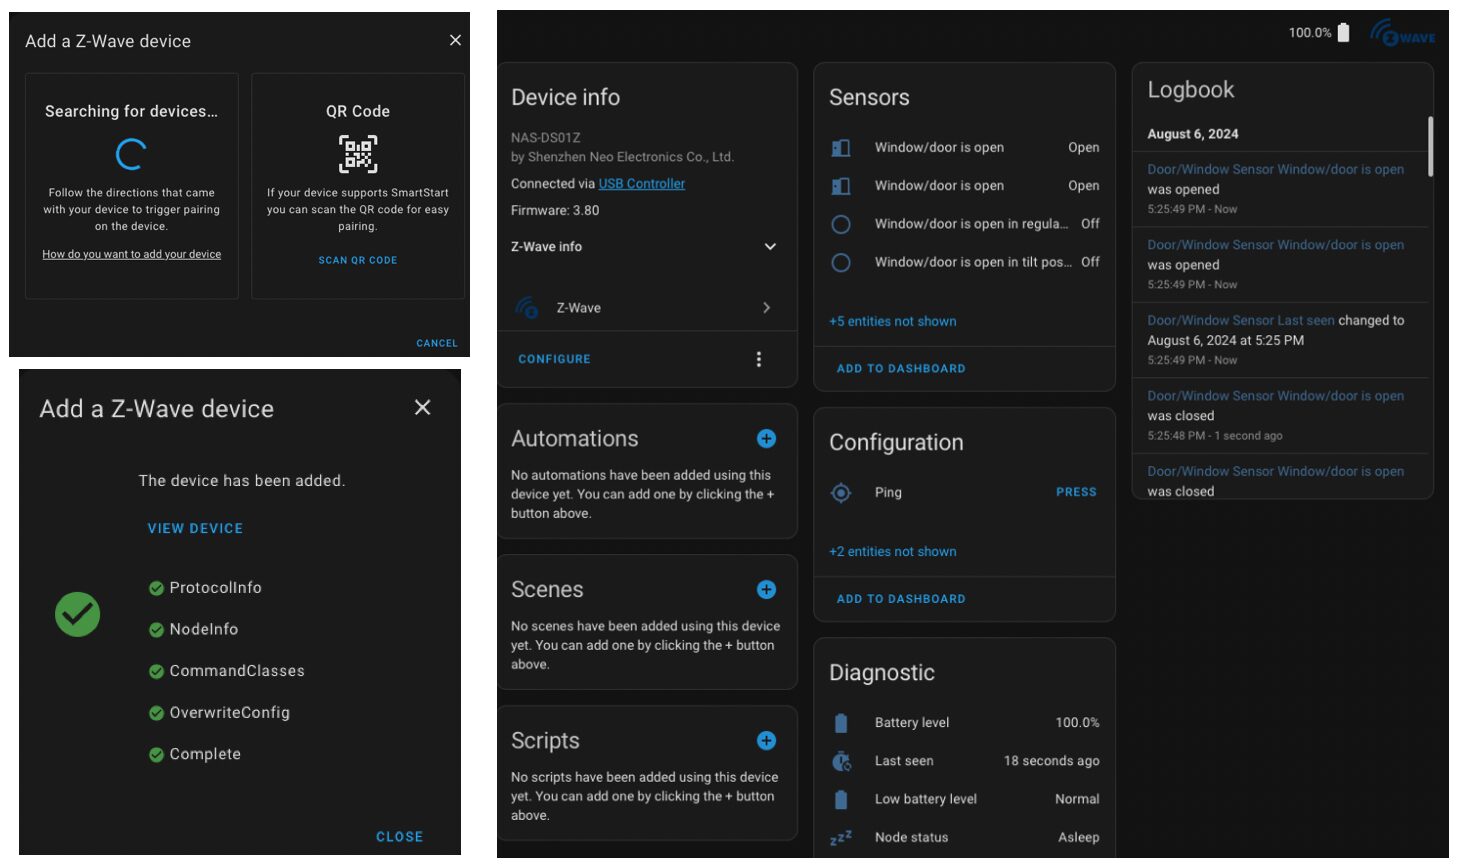
Adding Z-Wave Devices to Mixtile Edge 2 running Home Assistant
Next, we installed the software for managing Z-Wave devices, which is included in Home Assistant but requires configuration. For testing, we selected the Z-Wave Door/Window sensor from Neo Coolcam. Even though this sensor is quite old (300/500 series), it was easily added to Home Assistant.

We noticed that the system will prompt for security keys when installing the Z-Wave JS add-on. According to the documentation from Mixtile, these should be automatically provided. If they are not, and all fields are empty, reboot the device once. Once rebooted, add the Z-Wave add-on again, and this time it will skip the security keys step.
We added the Z-Wave sensor by holding down the button on the Neo CoolCam sensor until the red light blinked. Then select Add Z-Wave Device in Home Assistant. After a few seconds, the Z-Wave sensor was successfully added to Home Assistant and ready for automation.

Installing the 2-in-1 mPCIe Card on a Raspberry Pi 4 with Home Assistant
Since the 2-in-1 card can be used with other devices besides the Mixtile, we also tested it with our Raspberry Pi 4 Model B board. Before inserting the 2-in-1 card, we performed a fresh install of Home Assistant, as we wanted to see if the Raspberry Pi 4 could detect the card.
Since the Pi 4 doesn’t have an mPCIe slot, we used a 3rd party mPCIe HAT Extension Module provided to us by Mixtile to connect the 2-in-1 mPCIe card to the SBC through a USB cable, as shown in the images below. After the card was installed, we powered on the board and checked if Home Assistant detected the card, which it did automatically.

Testing Raspberry Pi 4 and 2-in-1 Z-Wave / Zigbee mPCIe with Zigbee Devices
We need to install the Zigbee integration before using Zigbee devices. We chose ZHA for this test, and the process was similar to what we did with the Edge 2 Kit.
")
We then proceeded to add Zigbee devices as usual.
")
Adding Z-Wave Devices on Home Assistant running on the Raspberry Pi 4
For Z-Wave testing, we still used the same Neo Coolcam Window/Door Sensor as before. The results were identical, and we encountered no issues during the setup.
")
Conclusion
After more than two weeks of testing, we found that while the Mixtile Edge 2 Kit is designed with an industrial focus, it is also a decent option for Smart Home use with the provided Home Assistant image. What we like is the wide range of connectivity options, from WiFi 6 to 4G LTE/5G and Zigbee/Z-Wave, as well as built-in GPIO, RS485, which offer great flexibility. Additionally, the external antenna ports make it flexible to deploy in Smart Home environments where multiple protocols from various IoT devices are the norm.
We were told that Mixtile plans to use the Edge 2 Kit as a hardware platform for AI tasks e.g. object detection. They are also working on making it a Home Assistant add-on running on the same machine to maximize the computing resources, which is quite intriguing.
Lastly, the 2-in-1 Z-Wave/Zigbee mPCIe card is an appealing option for Home Assistant enthusiasts, combining two or more protocols into one small, easy-to-install, and affordable card. It saves USB ports if your Home Assistant host device has a spare mPCIe (USB) socket reducing the hassle of using USB dongles and easing potential signal interference. Home Assistant users having issues with Zigbee channels overlapping with neighbors may benefit from Z-Wave, which uses a less crowded frequency band.
Wed like to thank Mixtile for sending the Edge 2 Kit and 2-in-1 Zigbee & Z-Wave mPCIe interface module for review. You can purchase the Mixtile Edge 2 Kit 4GB+32GB pre-installed with Home Assistant, and shipping with the 2-in-1 module and antennas for $296.90 from the company’s online store, or the Edge 2 Kit 2GB+16GB variants for $266.90. If you only need the 2-in-1 Zigbee & Z-Wave mPCIe module it’s available on the same link, but the minimal order is for 50 pieces for $1,030.50 with external antennas.

Computer Engineering who previously worked with multinational IT company, rich experience in IT infrastructure, has a passion on Internet Of Thing i.e., Smart Home, Smart Farm as well as interested on Sustainability such as renewable energy, organic farming
Support CNX Software! Donate via cryptocurrencies, become a Patron on Patreon, or purchase goods on Amazon or Aliexpress


