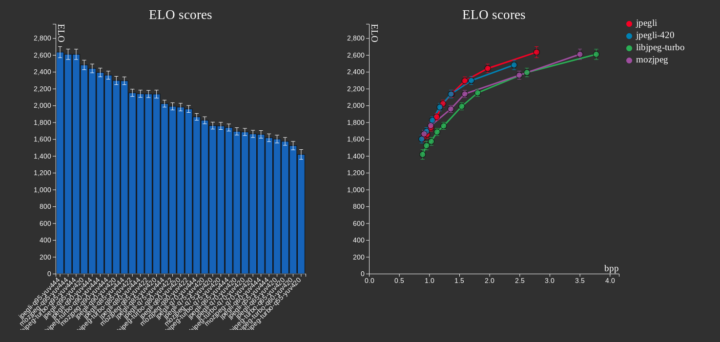
Google has released the Jpegli open-source library for advanced JPEG coding that maintains backward compatibility while delivering an up to 35% compression ratio improvement at high-quality compression settings.
Google Research has been working on improving the compression of data (Brotli), audio (e.g. Lyra V2), and images with a project such as WebP for many years in order to speed up the web and make it consume less bandwidth for dollar savings and lower carbon emissions. Jpegli is their latest project and aims to improve the compression ratio of legacy JPEG files on systems were modern compression such as WebP may not be available or desirable.

Jpegli highlights:
- Support both an encoder and decoder complying with the original JPEG standard (8-bit) and offering API/ABI compatibility with libjpeg-turbo and MozJPEG.
- Focus on high-quality results with up to 35% better compression ratio.
- Just as fast as libjpeg-turbo and MozJPEG.
- Support for 10+ bits coding. Google explains traditional JPEG coding solutions offer only 8-bit per component dynamics causing visible banding artifacts in slow gradients, but Jpegli’s 10+ bits coding works around this while remaining compatible with 8-bit viewers. Benefiting from the extra bits requires code changes available through an API.
Jpegli works by using adaptive quantization heuristics from the JPEG XL reference implementation and an improved quantization matrix selection to respectively reduce noise and improve image quality AND optimize (the data) for a mix of psychovisual quality metrics. Google’s open-source blog has more details about the internals of the library.
Jpegli JPEG encoder and decoder implementation is part of the JPEG XL image format reference implementation (libjxl) and you’ll find the source code on GitHub. Eventually, it might be integrated into your favorite libraries and programs, and you’ll be able to install JPEG XL’s Jpegli support from the libjxl-tools package in your preferred Linux distribution. But in the meantime, we can use the tools/cjpegli and tools/djpegli tools by building libjxl from source (tested in Ubuntu 22.04):
|
1 2 3 4 5 6 7 8 9 |
git clone https://github.com/libjxl/libjxl.git --recursive --shallow-submodules cd libjxl sudo apt install cmake pkg-config libbrotli-dev sudo apt install clang libstdc++-12-dev export CC=clang CXX=clang++ mkdir build cd build cmake -DCMAKE_BUILD_TYPE=Release -DBUILD_TESTING=OFF .. cmake --build . -- -j$(nproc) |
Once the build is complete, we can check the usage for the decompression and compression utilities:
|
1 2 3 4 5 6 7 8 9 10 11 12 13 14 15 16 17 18 19 20 21 22 23 24 25 26 27 28 29 30 31 32 33 34 35 36 37 38 39 40 41 42 43 44 |
jaufranc@CNX-LAPTOP-5:~/edev/sandbox/libjxl/build$ tools/djpegli Usage: tools/djpegli INPUT OUTPUT [OPTIONS...] INPUT The JPG input file. OUTPUT The output can be PNG, PFM or PPM/PGM/PNM --disable_output No output file will be written (for benchmarking) --bitdepth=8|16 Sets the output bitdepth for integer based formats, can be 8 (default) or 16. Has no impact on PFM output. --num_reps=N Sets the number of times to decompress the image. Used for benchmarking, the default is 1. --quiet Silence output (except for errors). -h, --help Prints this help message. All options are shown above. jaufranc@CNX-LAPTOP-5:~/edev/sandbox/libjxl/build$ tools/cjpegli Usage: tools/cjpegli INPUT OUTPUT [OPTIONS...] INPUT the input can be PNG, APNG, GIF, EXR, PPM, PFM, or PGX OUTPUT the compressed JPG output file -d maxError, --distance=maxError Max. butteraugli distance, lower = higher quality. 1.0 = visually lossless (default). Recommended range: 0.5 .. 3.0. Allowed range: 0.0 ... 25.0. Mutually exclusive with --quality and --target_size. -q QUALITY, --quality=QUALITY Quality setting (is remapped to --distance). Default is quality 90. Quality values roughly match libjpeg quality. Recommended range: 68 .. 96. Allowed range: 1 .. 100. Mutually exclusive with --distance and --target_size. --chroma_subsampling=444|440|422|420 Chroma subsampling setting. -p N, --progressive_level=N Progressive level setting. Range: 0 .. 2. Default: 2. Higher number is more scans, 0 means sequential. -v, --verbose Verbose output; can be repeated, also applies to help (!). -h, --help Prints this help message. Add -v (up to a total of 2 times) to see more options. |
I used a PNG screenshot for testing compression first:
|
1 2 3 4 5 6 7 8 9 |
jaufranc@CNX-LAPTOP-5:~/edev/sandbox/libjxl/build/tools$ time ./cjpegli screenshot.png screenshot.jpg Read 1291x1132 image, 164009 bytes. Encoding [YUV d1.000 AQ p2 OPT] Compressed to 137052 bytes (0.750 bpp). 1291 x 1132, 45.812 MP/s [45.81, 45.81], , 1 reps, 1 threads. real 0m0.057s user 0m0.044s sys 0m0.012s |
It did the job and I could open the resulting file with the GNOME image viewer with very small differences against the PNG file in terms of quality after zooming on specific zones (text), but a smaller file size:
|
1 2 3 |
ls -lh screenshot.* -rw-rw-r-- 1 jaufranc jaufranc 134K Apr 4 17:49 screenshot.jpg -rw-rw-r-- 1 jaufranc jaufranc 161K Apr 4 17:48 screenshot.png |
The decompress command works about the same way:
|
1 2 3 4 5 6 7 |
$ time ./djpegli screenshot.jpg screenshot-decode.png Read 137052 compressed bytes. 1291 x 1132, 42.052 MP/s [42.05, 42.05], , 1 reps, 1 threads. real 0m0.097s user 0m0.078s sys 0m0.013s |
The resulting PNG file is much bigger than the original, but that’s normal due to the artifact created by the JPEG compression:
|
1 2 3 4 |
$ ls -l screenshot* -rw-rw-r-- 1 jaufranc jaufranc 330728 Apr 4 18:06 screenshot-decode.png -rw-rw-r-- 1 jaufranc jaufranc 137052 Apr 4 17:49 screenshot.jpg -rw-rw-r-- 1 jaufranc jaufranc 164009 Apr 4 17:48 screenshot.png |
Anyway, it’s easy to try with various image files and compare the results against jpeg-turbo, MozJPEG, or graphical tools like GIMP making sure to use the same compression settings.

Jean-Luc started CNX Software in 2010 as a part-time endeavor, before quitting his job as a software engineering manager, and starting to write daily news, and reviews full time later in 2011.
Support CNX Software! Donate via cryptocurrencies, become a Patron on Patreon, or purchase goods on Amazon or Aliexpress


