Excited to share my first review, written for CNX Software! This time, we’re diving into the Seeed Studio mmWave Human Detection Sensor Kit, which harnesses the power of mmWave radar. The technology I’m particularly interested in for its smart home potential. Therefore, I jumped at the chance when CNX Software offered a product review opportunity. The kit arrived promptly at my doorstep just one week after accepting CNX Software’s offer. Here are my initial findings of the product and its capabilities to replace existing motion detection products.
Unboxing the mmWave sensor kit
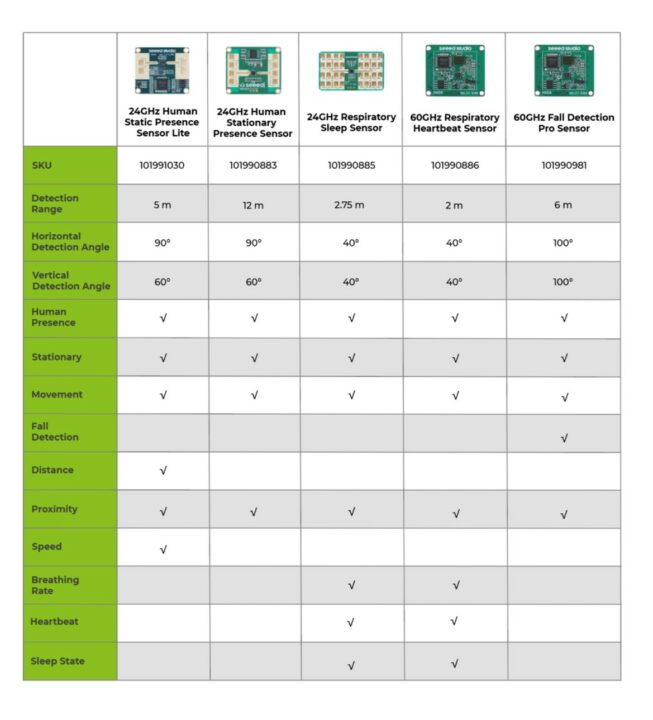
I opened the DHL box and found the neatly bubble-wrapped mmWave Human Detection Sensor Kit. Alongside the kit, I discovered a bonus: the MR60FDA1 60GHz mmWave Sensor – Fall Detection Module Pro. This higher-frequency module boasts better resolution and even adds a fall detection feature compared to the kit’s included module, the MR24HPC1. However, the MR24HPC1 24GHz mmWave Sensor – Human Static Presence Module Lite is more affordable ($6.9) and better suited for detecting larger objects like humans. It’s worth noting that the market offers various options like the Socionext MN87900 24 GHz radio wave radar module, which prioritizes human detection within its designated zone.
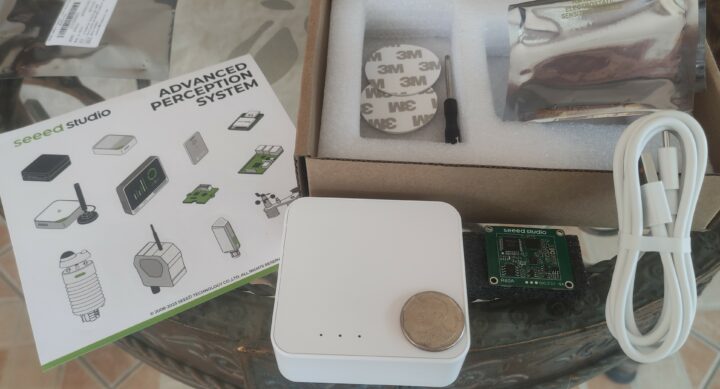
The sensor kit is a rectangular white plastic box with a sturdy touch when holding it. I found a neatly arranged collection of accessories, including a USB Type-C data cable for powering/programming the device, a Phillips screwdriver, a bag of screws for attaching the expansion board inside the box, and several 3M double-sided adhesive pads for mounting the kit onto a wall. At first glance, it feels like a gadget enthusiast’s dream, brimming with DIY potential. However, a minor inconvenience arose when the included screwdriver proved inadequate for removing the screw-hole cover. Fortunately, a quick swap with another screwdriver resolved the issue. Upon finally opening the box, my impression transformed into a sense of excitement as I discovered the components within.
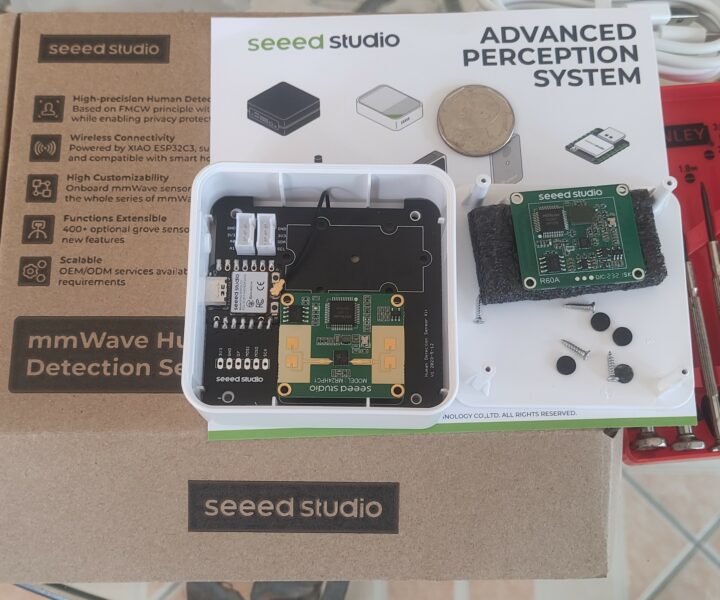
As the processor, a Xiao ESP32-C3 board is soldered to the baseboard. The 24GHz MR24HPC1 module is plugged into the header pins, allowing easy swapping with another mmWave sensor module of your choice. This opens up possibilities for using the kit beyond human detection. The baseboard has room for an additional sensor like temperature or humidity modules to be connected via either Grove analog or I2C connectors. That explains why the cover of the case had 3 small holes designed to facilitate the air intake required by environmental sensors.
How does a FMCW radar work?
Before looking at the details and functionality of the sensor kit, let’s explore the underlying technology: Frequency-Modulated Continuous Wave (FMCW) radar. Unlike the PIR sensor, which gets easily confused by heat and distance, FMCW radar uses high-frequency radio waves (those gold stripes on the MR24HPC1 module are its antennas) to see things differently. Here’s how it works: The module sends out a continuous stream of radio waves, and when these waves bounce off objects, they come back slightly changed. This “Doppler effect” tells the module how fast and far away something is moving.
By employing multiple transmitters and receivers, advanced signal processing techniques can be applied to recognize specific motion patterns. Consequently, mmWave sensors excel in scenarios where PIR sensors fall short. They are unaffected by sunlight, providing reliable performance in bright conditions. They also offer precise information on the distance and speed of moving objects, making them ideal for smart home applications.
Seeed Studio offers a diverse range of mmWave radar products, each with varying frequencies and processing software tailored to specific applications. Choosing the right module depends on balancing key factors: higher signal frequencies translate to finer detection resolution but reduced detection distance, while the number and arrangement of antennas determine the field of view. The MR24HPC1 module included in the sensor kit excels at detecting body movements within normal living spaces. On the contrary, the MR60FDA1 module, boasting specialized firmware for fall detection based on vertical speed changes, finds its ideal application in bathrooms and other safety-critical areas.
Product details
Instead of pure DIY, the sensor kit offers a convenient entry point to experiment with mmWave radar technology. The included Xiao ESP32-C3 board comes pre-programmed to support ESPHome and Home Assistant, enabling seamless integration into your existing smart home system. For those seeking more hands-on experience, the kit also offers the opportunity to write Arduino code for the Xiao ESP32-C3. By utilizing the UART port, you can communicate with other mmWave radar modules, unlocking possibilities for customized projects.
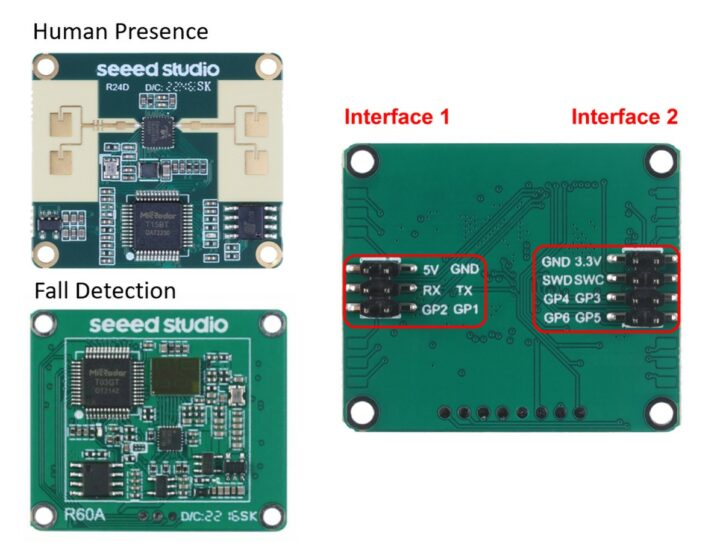
Two mmWave sensor modules are delivered by Seeed Studio. Part 1 will emphasize the MR24HPC1 module in the sensor kit since we would like to try the integration with smart home systems. Part 2 will swap the MR60FDA1 module into the sensor kit to explore how much Arduino coding skills are required. Both modules are the same in terms of size and connectivity, so it is an easy option for exploring mmWave technology.
-
- Size 35 mm x 30 mm.
- Power supply 4.5 – 6.0 volts.
- UART port speed 115,200 bps.
- SWD (Serial Wire Debug) connector for firmware programming.
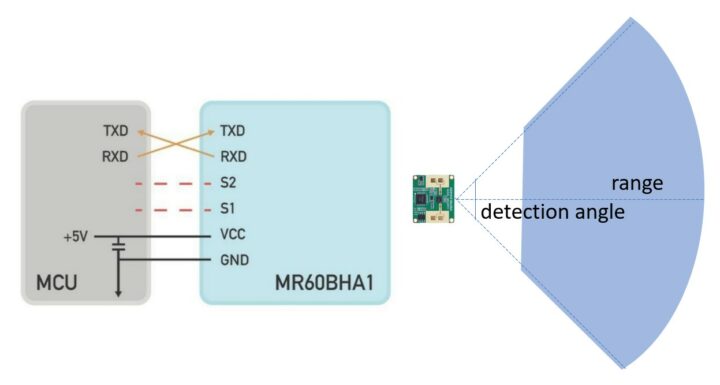
To choose a mmWave sensor module, the primary consideration should be the module’s detection area, which can be determined by the distance and detection angle.
The MR24HPC1 module offers the following specifications:
- Detection range: 5 meters
- Horizontal detection angle: 90 degrees
- Vertical detection angle: 60 degrees
While its primary advantage is its low price, the MR24HPC1 module is limited to basic readings such as distance, speed, and movement. This overlaps with the functionalities offered by PIR sensors, such as monitoring people in/out of a store, triggering automatic doors, or controlling room lighting.
Using mmWave sensor kit
The sensor kit includes the Xiao ESP32-C3 module as its brain. The module supports both WiFi and Bluetooth communication, thus unlocking applications of the Internet of Things. Thanks to Seeed Studio’s pre-loaded firmware, the module is compatible with Home Assistant, the well-known smart home platform, via the ESPHome addon. Simply connect the kit, and we can check a live feed of the home’s activities via a dashboard on our smartphone, tablet, or any other connected device.
Preparing Home Assistant
Home Assistant is like building blocks for your smart home. It’s free, open-source software that lets you connect and control all sorts of devices. So instead of struggling with different apps for each gadget, you have one central hub. The best part is its strong community of techie folks and small companies create tons of stuff that works with Home Assistant. Therefore, you have loads of choices for your smart home setup. Just check out the cool devices in the review list to see how they pair up with Home Assistant.
Getting Home Assistant running can be done two ways: buy a gadget with the software pre-installed (like Home Assistant Green), or set it up yourself on a server. I went the DIY route with a Raspberry Pi 400 to handle both Home Assistant and ESPHome in one go. It is quite easy since the Raspberry Pi Imager tool has a dedicated Home Assistant option. Simply choose your SD card, write the image, and push it into the Raspberry Pi 400. Be patient though, it took me about 20 minutes for everything to download and install.
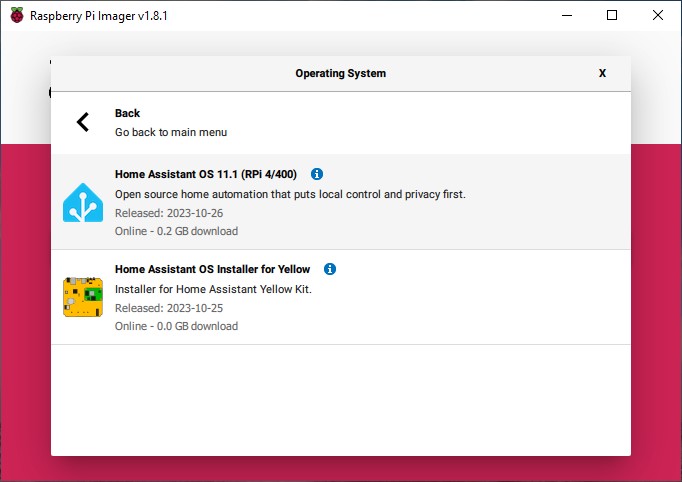
Once it finishes, you can check the installation in two ways:
- Web browser: Type “homeassistant:8123” in the address bar and hit enter.
- App: Download the Home Assistant Companion app for iOS or Android and connect to your Wi-Fi network.
That’s it! Your smart home HQ is up and running, ready to be customized, and filled with cool devices. The next step is just following the procedure described by the onboarding page.

Adding ESPHome
To add the mmWave sensor kit to Home Assistant, we need the ESPHome as a translator for DIY devices using ESP8266 or ESP32 chips. ESPHome is available as an addon in Home Assistant. No need for extra apps or setups. So, it is easy to add and manage the mmWave sensor kit and other compatible devices through the web UI of Home Assistant.
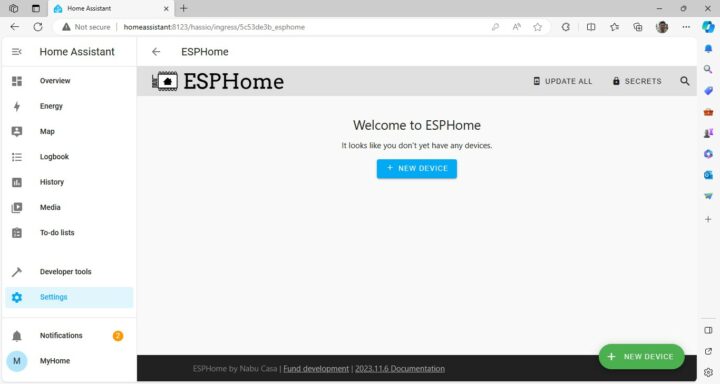
To add the mmWave sensor kit to Home Assistant, just plug it into an adaptor with the included USB cable. Then, check the soft access point with the SSID “mmwave-kit” to pop up. Next, use a computer or smartphone to connect to that network. Open a web browser and type in 192.168.4.1 to access and input your home Wi-Fi SSID/password. Once the kit connects with the same network, use ESPHome’s web interface to add the sensor kit to Home Assistant. If something goes wrong, just use the “flash firmware” option to reset everything, then reboot Home Assistant.
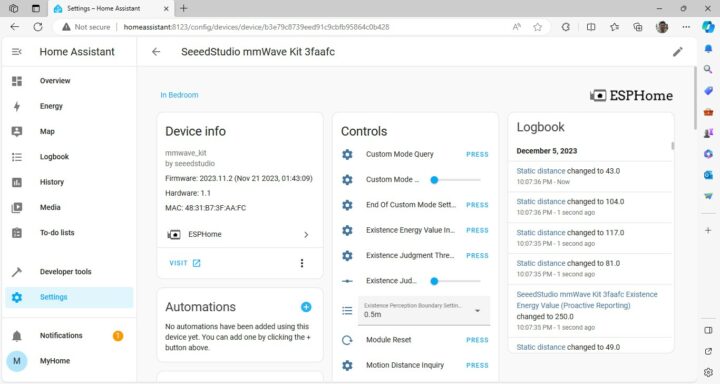
After your mmWave sensor kit works in Home Assistant, you can access your device in Settings > Devices & services.
- Controls: You can tweak settings like detection range or sensitivity to tailor it to your needs.
- Sensors: This group shows readings from the kit, like distance, speed, and even presence. No more just either on or off like those old-school PIR sensors.
Exploring these options will unlock a world of innovative ideas for your smart home design.
Adjusting Home Assistant
After activating the mmWave sensor kit, its group is automatically added to the Home Assistant’s Dashboard. Clicking “PRESS” shows you a bunch of values the kit reads, but to make it truly useful, you can customize the Dashboard to display specific ones. For example, the “distance” readings are split into “static” (for things that don’t move) and “motion” (for anything that moves). When I waved my hand in front of the kit, the motion distance changed within 1-2 seconds, and it was accurate down to 0.5 meters.
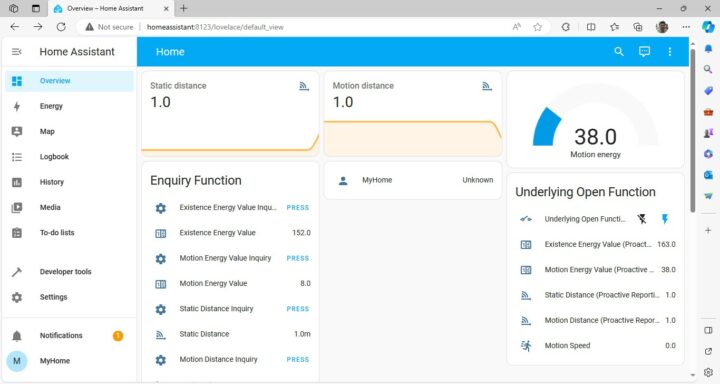
Another cool reading is the “motion energy” numbers showing how much something’s moving around. This reading is quite sensitive compared to those motion detectors. I tried waving my hand slowly, and the number went from less than 10 to a jump past 100. Another trial was wiggling my fingers from two meters also made the gauge swing a lot. The kit’s “field of view” covers a wide area to the sides, just like the specs for the MR24HPC1 module say.
My first impressions
After playing with the mmWave sensor kit for a few days, I have mixed feelings. For most smart home newbies, it’s probably not plug-and-play friendly. Connecting it to Home Assistant’s Dashboard can be clunky and require some tech know-how. But for DIY enthusiasts and advanced smart home builders, this kit could be a goldmine. It offers features beyond basic motion detection like “motion energy” readings and separate static/motion distances, perfect for tackling niche sensing needs. Plus the open-source firmware on GitHub unlocks custom possibilities, turning this hardware into a unique tool for specific projects.
So, is it a smart gadget for the end-user market? Probably not. Seeed Studio might be aiming for tech-savvy developers who can truly unlock its potential. If that’s you, dive in! For others, maybe hold off until it gets a bit more user-friendly.
This article (part 1) will not try the MR60FDA1 module yet because the content of just trying it out is already quite long. Therefore, I will write the addition of the MR60FDA1 module in the next article and part 2 will have more technical content. In addition, I want to focus on the experiment of importing readings to display on the computer as well, which is necessary for special detection applications.
I’d like to thank Seeed Studio for sending us the mmWave Human Detection Sensor Kit for review. This kit with the 24GHz MR24HPC1 module sells for $26.99 and the 60 GHz MR60FDA1 mmWave fall detection sensor can be purchased for $37.00 on the same page.
Support CNX Software! Donate via cryptocurrencies, become a Patron on Patreon, or purchase goods on Amazon or Aliexpress


