Youyeetoo X1 is an x86 single board computer (SBC) powered by an 11th Gen Intel Celeron N5105 quad-core Jasper Lake processor clocked up to 2.9GHz with 4GB to 16GB RAM and up to 256GB eMMC. The board comes with a variety of connectivity options such as M.2 M key and E key sockets for connecting Wi-Fi, 4G LTE or SSD modules, as well as MIPI DSI and HDMI interfaces for up to 4K resolution display, and I/Os such as UART, I2C, and SPI
Whether you are a maker, an IoT developer, or a system integrator, the Youyeetoo X1 SBC board can be integrated into various applications such as industrial automation, IoT gateways, robots, and others. Since the Youyeetoo X1 SBC is based on an x86 processor, there is no need to worry about operating system or application compatibility as would be the case on systems based on the Arm architecture, and in this review, we’ll use Ubuntu 22.04 for testing.
Unboxing of Youyeetoo X1 SBC and 7-inch LCD display
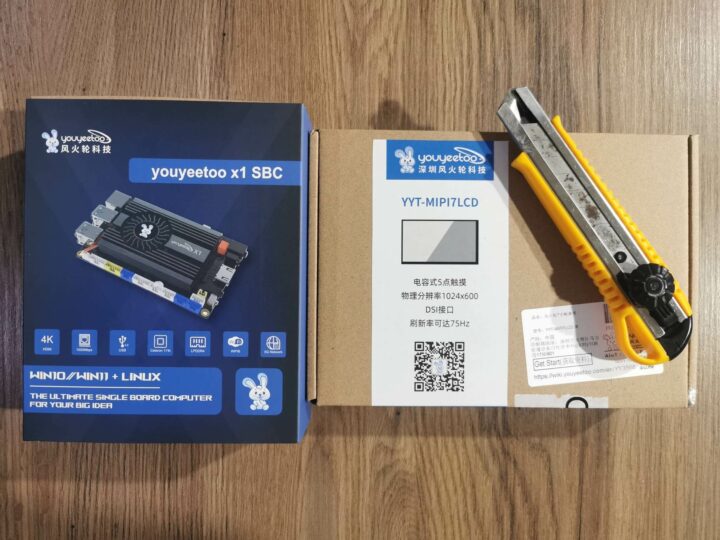
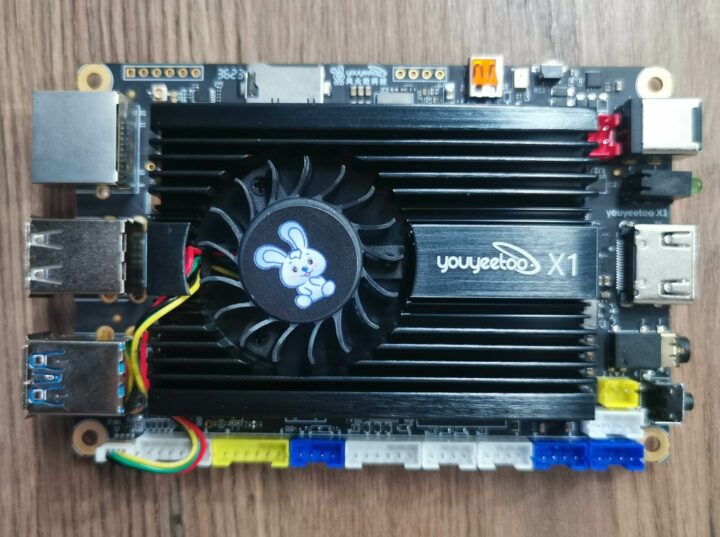
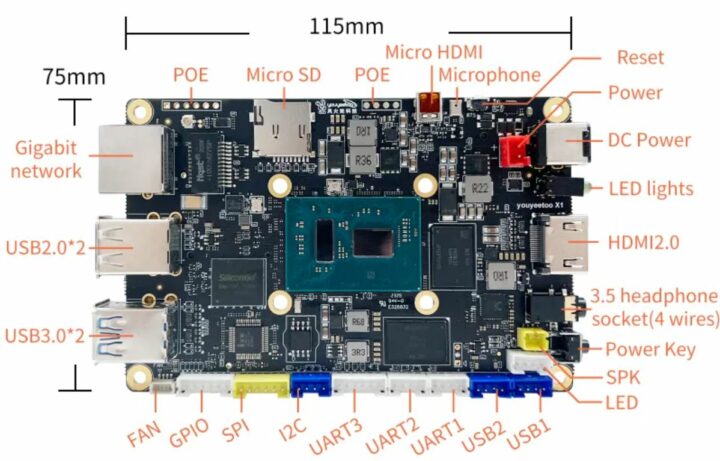
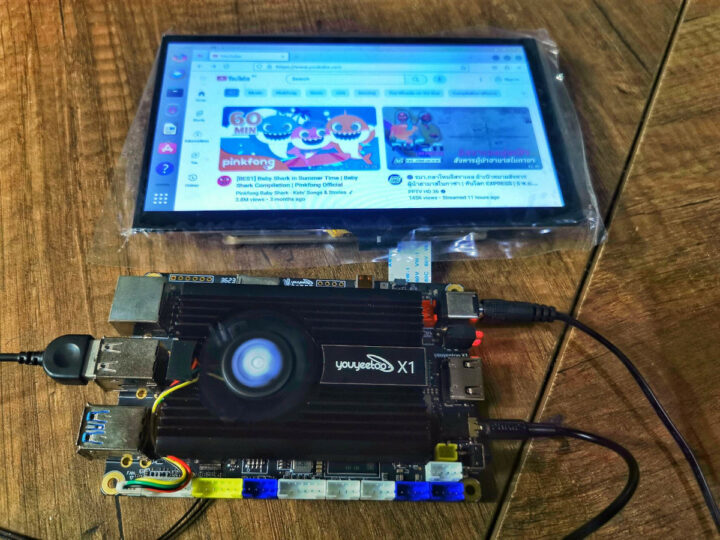
Youyeetoo sent a package with two boxes: one with the Youyeetoo X1 SBC and the other with YYT-MIPI7LCD 7-inch MIPI CSI touchscreen display with 1024 x 600 resolution. The board does come with an HDMI port, so the display is optional. This is what the Youyeetoo X1 SBC looks like.
The board comes with a large heatsink covering most of the board and an integrated cooling fan. We’ll see the cooling efficiency and performance of the board when we benchmark. Besides the usual gigabit Ethernet, HDMI, and USB ports, the X1 SBC also features several color-coded headers for I/Os.
The package also includes a Youyeetoo-branded 12V/3A power adapter as the company typically provides accessories under its own brand. As a side note, the Youyeetoo website provides decent documentation with a Wiki and community forums to help users.
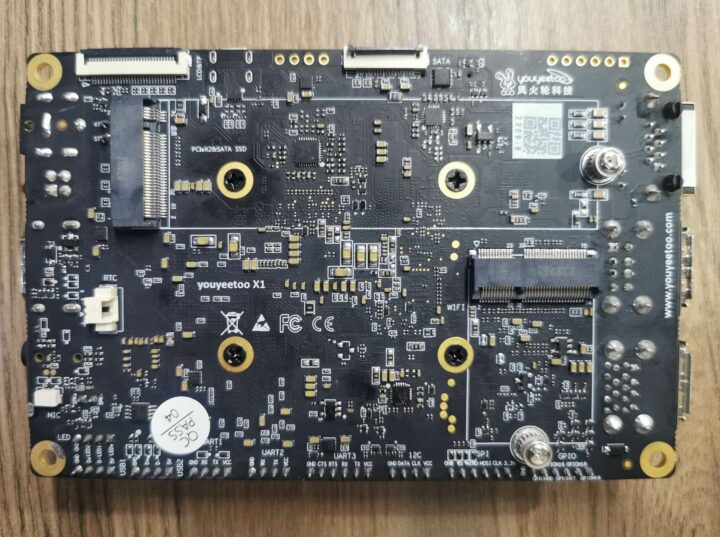
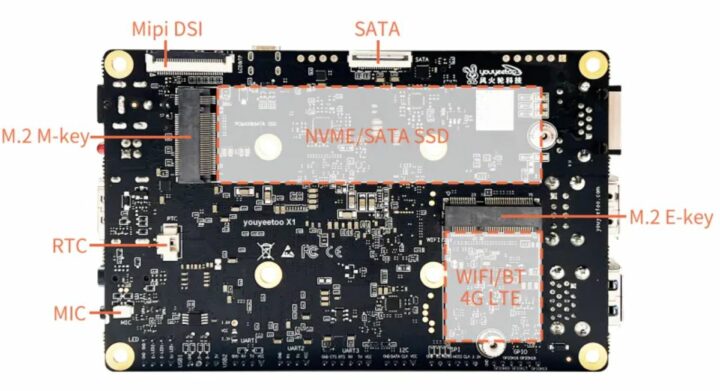
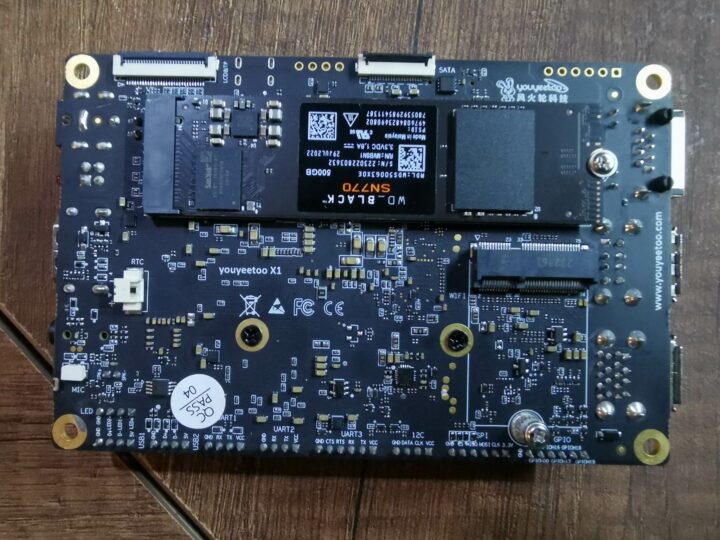
Looking at the bottom of the board, we will find another 5 additional connectors with two M.2 sockets, both keyed M and E, an FPC connector for connecting a MIPI DSI display, another FPC connector to connect a SATA drive, and a 2-pin connector for a real-time clock and battery.
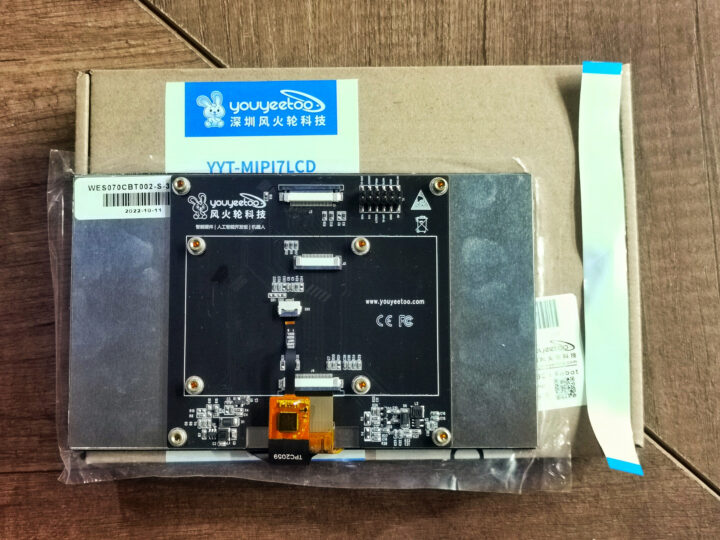
The 7-inch LCD comes with an FPC cable and features a GOODIX GT711 5-point capacitive touch controller.
Youyeetoo X1 specifications
We’ve already covered the X1 SBC specifications in the announcement post, but here they are again for reference:
- SoC – Intel Celeron N5105 quad-core Jasper Lake processor @ 2.0 GHz / 2.9GHz (Turbo), with Intel UHD Graphics @ up to 800MHz; TDP: 10W
- System Memory – 4GB, 8GB, or 16GB LPDDR4
- Storage
- Optional eMMC flash with 64GB, 128GB, or 256GB capacity
- M.2 Key-M socket for M.2 2280 NVMe or SATA SSD
- SATA III support via expansion board purchased separately
- Video Output
- HDMI 2.0 up to 4Kp60
- Micro HDMI 2.0 up to 4Kp60
- MIPI DSI FPC interface with support for MIPI7LCD (1024×600 LCD touchscreen)
- Audio
- 3.5mm headphone jack (4-pole) for headset with a built-in microphone
- Speaker header with an onboard 3W amplifier compatible with 8-ohm speakers
- HDMI audio output
- On-board digital microphone with noise reduction function
- 2-pin header for analog microphone (3.3V)
- Connectivity
- Gigabit Ethernet RJ45 port
- Optional WiFi 5 and Bluetooth 5.0 or WiFi 6 and Bluetooth 5.2 M.2 E-Key module
- Optional 4G LTE M.2 Key-E module (e.g. Quectel EC20); Note WiFi and 4G share the same slot, so only one is possible.
- NFC is almost mentioned, but it’s unclear how it is supported
- USB – 2x USB 3.0 Type-A ports, 2x USB 2.0 Type-A ports, 2x USB 2.0 interfaces via headers
- Serial – 3x UART TTL connector for RS232, RS485, or CAN Bus.
- Expansion
- M.2 2280 M-key socket for NVMe or SATA SSD
- M.2 2230 E-Key socket for wireless connectivity (WiFi + Bluetooth or 4G LTE)
- 4-pin I2C header, 5-pin SPI header, 6-pin header with 5x GPIOs; I/O voltage: 3.3V
- Misc
- 2x red and blue LEDs, 4-pin headers for extra LEDs
- Power button, Reset button (for resetting BIOS settings)
- RTC SH1.0 socket plus CR2032 button battery
- Auto power on support in BIOS
- Integrated heatsink and fan for cooling
- Power Supply
- 12V DC / 3A+ via DC jack or 2-pin header
- 6-pin + 4-pin PoE headers…
- Dimensions – 115 x 75mm
A quick look at the BIOS
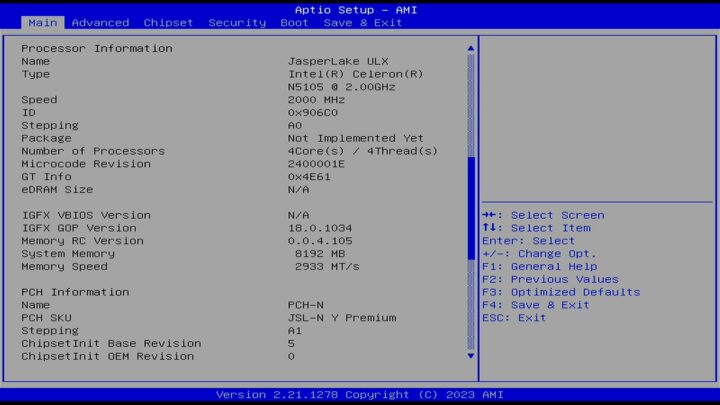
We can enter the BIOS page to set various settings by connecting a USB keyboard and pressing the Delete key. The X1 relies on the familiar AMI BIOS, and when scrolling down, we can find more information system, notably the use of an Intel Celeron N5105 and 8GB RAM (8192 MB) at 2933 MT/s.
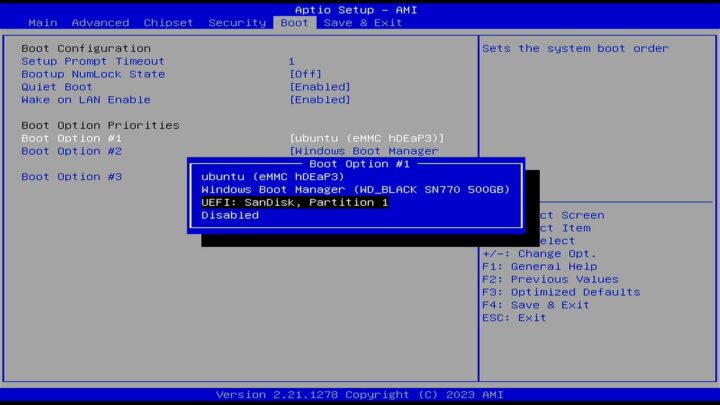
The “Boot” section allows us to define the boot order and select eMMC or SSD boot to easily run Windows and Linux separately.
BIOS update
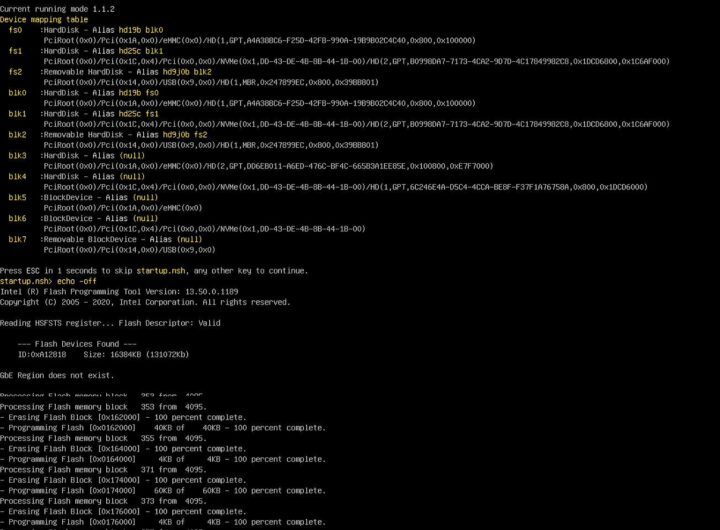
Youyeetoo provides different BIOS/UEFI firmware depending on the use case. The default BIOS output to HDMI and voltage levels for I2C, GPIO, UART, SPI are set 3.3V. But since we want to use the provided MIPI DSI display, we’ll need to update the BIOS. In a nutshell, we’ll need to copy the UEFI firmware files to a USB flash drive, plug it into the USB port of the Youyeetoo X1 SBC board, wait for the update to complete, and then we can use the new BIOS version immediately.
The detailed steps can be described as follows:
- Download the BIOS file (default)
- Unzip the folder to the root folder of the flash drive
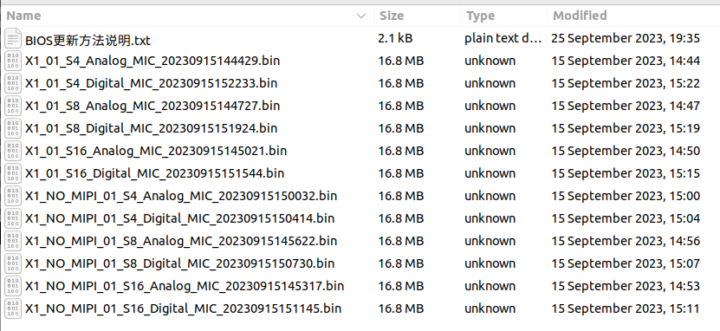
- Download the file BIOS.zip and extract it. It contains several binaries with the file name describing its key capability, but it’s obvious. The txt file also explains the features enabled in each file, and also it’s only in Chinese, it’s understandable with MIPI or NO MIPI (i.e. HDMI), the memory capacity (4GB to 16GB), and Analog or Digital microphone.

We’ll use X1_01_Digital_S8_20231023175931_3.3V.bin here as our board comes with 8GB RAM, a digital microphone, and we want to use a 7-inch MIPI DSI display. The GPIOs are also set to 3.3V. - Copy the file to the USB flash drive and rename it BIOS.bin
- Plug the flash drive into one of Youyeetoo X1 SBC’s USB ports and boot up the board.
- Wait for the process to end.
Installing an M.2 NVMe SSD
We’ll test the M.2 Key-M 2280 socket on the Youyeetoo X1 SBC by installing a 500GB M.2 NVMe SSD (WD_BLACK SN770) and fastening it with a screw. We will now boot and enter the BIOS by pressing the Delete key and then navigating to the “Boot” page where we’ll find our SSD in the “Boot Option #1” section. But we will first choose the SanDisk USB flash drive as default since we want to install the Ubuntu 22.04 Linux operating system from the USB drive to the SSD we’ve just installed on the Youyeetoo X1 single board computer.
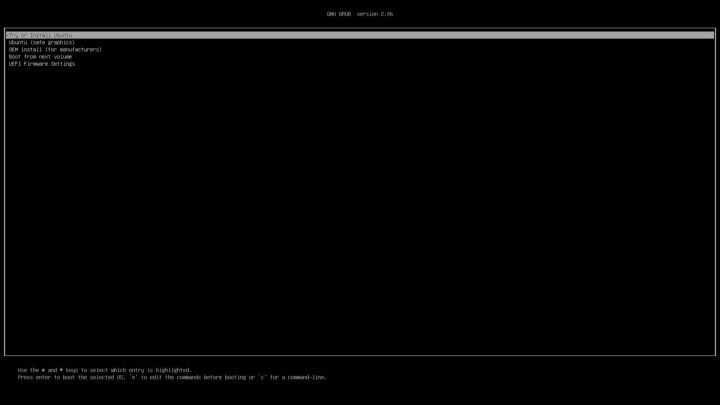
After restarting the system, a GNU GRUB window will appear and we’ll select “Try or install Ubuntu” from there to install Ubuntu 22.04 on the Youyeetoo X1 SBC’s M.2 SSD.
Installing Ubuntu 22.04 on Youyeetoo X1 SBC
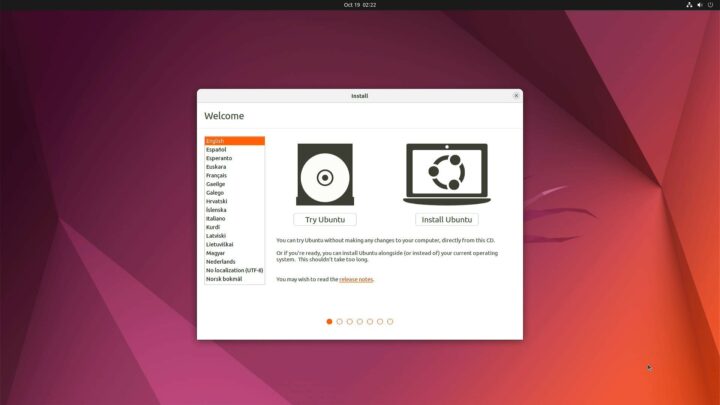
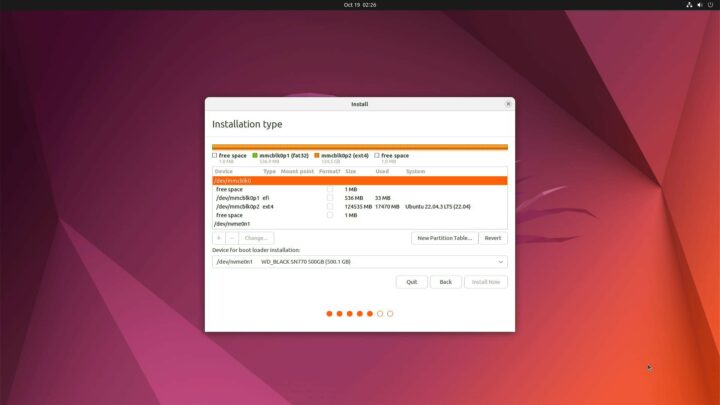
Installing Ubuntu 22.04 on the Youyeetoo X1 SBC board is basically the same as installing it on a normal computer contrary to Arm-based SBCs that generally require the user to flash OS image to a microSD card or other storage device. Here, we can freely choose to install the operating system without having to look for an image specific to the board or learn how to build an image from the source code. We went through the setup wizard to select the language, partition the drive, etc…
It went smoothly, and after the installation, we removed the USB drive to boot up the system with Ubuntu 22.04 installed on the M.2 NVMe SSD.
Youyeetoo X1’s touchscreen display
We did everything with the 7-inch display so far, and since it has a touchscreen function we can tap the screen to launch applications, navigate the web, play YouTube videos, and so on. The video below is a short demo showing how the touchscreen display works within the Ubuntu 22.04 desktop.
Youyeetoo X1 benchmarks
Let’s now run some benchmarks starting with Thomas Kaiser’s sbc-bench.sh:
|
1 2 3 4 5 6 7 8 9 10 11 12 13 14 15 16 17 18 19 20 21 22 23 24 25 26 27 28 29 30 31 32 33 34 35 36 37 38 39 40 41 42 43 44 45 46 47 48 49 50 51 52 53 54 55 56 57 58 59 60 61 62 63 64 65 66 67 68 69 70 71 72 73 74 75 76 77 78 79 80 81 82 83 84 85 86 87 88 89 90 |
Results validation: * Measured clockspeed not lower than advertised max CPU clockspeed * Background activity (%system) OK * Powercap detected. Details: "sudo powercap-info -p intel-rapl" Memory performance memcpy: 8425.7 MB/s memset: 8804.4 MB/s 7-zip total scores (3 consecutive runs): 11354,11336,11411, single-threaded: 3032 OpenSSL results: type 16 bytes 64 bytes 256 bytes 1024 bytes 8192 bytes 16384 bytes aes-128-cbc 588777.50k 980048.26k 1081149.95k 1112624.81k 1122642.60k 1121796.10k aes-128-cbc 600510.03k 1061338.41k 1107592.45k 1119897.26k 1123145.05k 1123822.25k aes-192-cbc 622847.98k 896034.26k 929211.22k 924579.16k 932894.04k 936334.68k aes-192-cbc 620347.69k 894636.59k 929147.31k 937226.58k 939816.28k 939136.34k aes-256-cbc 597456.35k 774433.41k 799639.64k 805960.36k 808266.41k 807960.58k aes-256-cbc 502644.37k 728045.91k 786825.90k 803047.42k 807905.96k 807419.90k Unable to upload full test results. Please copy&paste the below stuff to pastebin.com and provide the URL. Check the output for throttling and swapping please. sbc-bench v0.9.49 YouYeeToo YouYeeToo X1 / Celeron N5105 @ 2.00GHz (Thu, 02 Nov 2023 21:44:14 +0700) Distributor ID: Ubuntu Description: Ubuntu 22.04.3 LTS Release: 22.04 Codename: jammy Device Info: Manufacturer: YouYeeToo Product Name: YouYeeToo X1 SKU Number: 00040001 Family: Jasper Lake Client System BIOS/UEFI: Vendor: American Megatrends International, LLC. Version: Y_FIVE_NO_MIPI_01003 Release Date: 09/15/2023 BIOS Revision: 5.19 Firmware Revision: 0.0 /usr/bin/gcc (Ubuntu 11.4.0-1ubuntu1~22.04) 11.4.0 Uptime: 21:44:14 up 42 min, 3 users, load average: 0.17, 0.19, 0.46, 49.0°C, 55619837 Linux 6.2.0-34-generic (unoiot-YouYeeToo-X1) 02/11/2566 _x86_64_ (4 CPU) avg-cpu: %user %nice %system %iowait %steal %idle 15.26 0.17 0.86 0.14 0.00 83.57 Device tps kB_read/s kB_wrtn/s kB_dscd/s kB_read kB_wrtn kB_dscd mmcblk1 1.54 20.83 1.17 201.38 53492 3013 517028 nvme0n1 30.64 821.77 631.41 183544.94 2109879 1621117 471246120 total used free shared buff/cache available Mem: 7.6Gi 1.0Gi 5.9Gi 207Mi 685Mi 6.2Gi Swap: 0B 0B 0B ########################################################################## Intel P-States: Intel P-state driver initializing, HWP enabled Powercap present. You might want to check with "powercap-info -p intel-rapl" Checking cpufreq OPP: Cpufreq OPP: 2900 Measured: 2885 (2887.143/2885.631/2884.660) Cpufreq OPP: 800 Measured: 843 (900.291/820.022/809.778) (+5.4%) ########################################################################## Hardware sensors: coretemp-isa-0000 Package id 0: +48.0 C (high = +105.0 C, crit = +105.0 C) Core 0: +45.0 C (high = +105.0 C, crit = +105.0 C) Core 1: +45.0 C (high = +105.0 C, crit = +105.0 C) Core 2: +45.0 C (high = +105.0 C, crit = +105.0 C) Core 3: +45.0 C (high = +105.0 C, crit = +105.0 C) acpitz-acpi-0 nvme-pci-0200 Composite: +49.9 C (low = -40.1 C, high = +83.8 C) (crit = +87.8 C) Sensor 1: +70.8 C (low = -273.1 C, high = +65261.8 C) Sensor 2: +44.9 C (low = -273.1 C, high = +65261.8 C) |
The CPU temperature peaked at 74.0°C under load:
|
1 2 3 4 5 6 7 8 9 10 11 12 13 14 15 16 17 18 19 20 21 22 23 24 25 26 27 |
System health while running 7-zip single core benchmark: Time CPU load %cpu %sys %usr %nice %io %irq Temp 21:48:13: 2824MHz 1.02 17% 0% 16% 0% 0% 0% 60.0°C 21:48:18: 2844MHz 1.02 25% 0% 25% 0% 0% 0% 56.0°C 21:48:23: 2842MHz 1.02 25% 0% 25% 0% 0% 0% 56.0°C 21:48:28: 2843MHz 1.02 25% 0% 24% 0% 0% 0% 56.0°C 21:48:33: 2831MHz 1.02 25% 0% 24% 0% 0% 0% 55.0°C 21:48:38: 2850MHz 1.01 26% 1% 25% 0% 0% 0% 56.0°C 21:48:43: 2852MHz 1.01 25% 0% 25% 0% 0% 0% 55.0°C 21:48:48: 2831MHz 1.01 25% 0% 24% 0% 0% 0% 57.0°C 21:48:53: 2864MHz 1.01 25% 0% 24% 0% 0% 0% 56.0°C 21:48:58: 2842MHz 1.01 25% 0% 24% 0% 0% 0% 55.0°C System health while running 7-zip multi core benchmark: Time CPU load %cpu %sys %usr %nice %io %irq Temp 21:49:01: 2800MHz 1.01 17% 0% 16% 0% 0% 0% 69.0°C 21:49:13: 2700MHz 1.55 96% 0% 96% 0% 0% 0% 71.0°C 21:49:24: 2771MHz 1.93 97% 0% 96% 0% 0% 0% 72.0°C 21:49:37: 2800MHz 2.26 93% 1% 91% 0% 0% 0% 74.0°C 21:49:49: 2700MHz 2.90 96% 1% 95% 0% 0% 0% 72.0°C 21:50:01: 2800MHz 3.14 97% 0% 96% 0% 0% 0% 73.0°C 21:50:13: 2800MHz 3.27 93% 1% 91% 0% 0% 0% 74.0°C 21:50:24: 2800MHz 3.31 91% 0% 90% 0% 0% 0% 72.0°C 21:50:36: 2727MHz 3.17 96% 1% 95% 0% 0% 0% 75.0°C 21:50:49: 2800MHz 3.43 95% 1% 93% 0% 0% 0% 73.0°C |
We’ll use the Phoronix test suite to run some other benchmarks, notably storage read and write speed using pts/iozone using a 2MB record size and a 512MB file. This resulted in an average read speed of 5523.01 MB/s and a write speed of 551.61 MB/s.
|
1 2 3 4 5 6 7 8 9 10 11 12 13 14 15 16 17 18 19 20 21 22 23 24 25 26 27 28 29 30 31 32 33 34 35 36 37 38 39 40 41 42 43 44 45 46 47 48 |
IOzone 3.465: pts/iozone-1.9.6 [Record Size: 2MB - File Size: 512MB - Disk Test: Read Performance] Test 1 of 2 Test Profile Status: Deprecated Estimated Trial Run Count: 3 Estimated Test Run-Time: 1 Minute Estimated Time To Completion: 1 Minute [16:31 UTC] Started Run 1 @ 16:30:40 Started Run 2 @ 16:30:46 Started Run 3 @ 16:30:52 Record Size: 2MB - File Size: 512MB - Disk Test: Read Performance: 5533.8837890625 5505.0859375 5530.05078125 Average: 5523.01 MB/s Deviation: 0.28% Comparison of 270 OpenBenchmarking.org samples since 9 May 2020; median result: 4952 MB/s. Box plot of samples: [ |---------------*-------#################################!######*######*#############-----------------------------------------------------*--------------------------| ] This Result (58th Percentile): 5523 ^ 240GB DELLBOSS VD: 11227 ^ 120GB SSDSCKJB120G7R: 6085 ^ ^ 16GB DG4016: 1818 IOzone 3.465: pts/iozone-1.9.6 [Record Size: 2MB - File Size: 512MB - Disk Test: Write Performance] Test 2 of 2 Test Profile Status: Deprecated Estimated Trial Run Count: 3 Estimated Time To Completion: 1 Minute [16:31 UTC] Started Run 1 @ 16:31:05 Started Run 2 @ 16:31:10 Started Run 3 @ 16:31:16 Record Size: 2MB - File Size: 512MB - Disk Test: Write Performance: 548.9208984375 552.53125 553.376953125 Average: 551.61 MB/s Deviation: 0.43% Comparison of 272 OpenBenchmarking.org samples since 9 May 2020; median result: 174 MB/s. Box plot of samples: [-#*####!##########-----*---------------------------------------------------------------------------------------------------| ] ^ This Result (83rd Percentile): 552 ^ 16GB DG4016: 61 |
The 500GB WD_BLACK SN770 specifications list up to 5000MB/s sequential read performance and up to 4000MB/s sequential write performance. So the results are probably not correct on either side, with the read speed being too high, and the write speed being too low. So we repeated the test with iozone directly and the results were much different…
|
1 2 3 4 5 6 7 8 9 |
unoiot@unoiot-YouYeeToo-X1:~$ iozone -I -s 512M -r 2048k -r 16384k Iozone: Performance Test of File I/O Version $Revision: 3.489 $ Compiled for 64 bit mode. Build: linux-AMD64 random random bkwd record stride kB reclen write rewrite read reread read write read rewrite read fwrite frewrite fread freread 524288 2048 2466960 2385197 2391519 2332760 2327023 2471576 2311409 2423567 1916664 1643891 2869196 5776189 4667968 524288 16384 2823202 2897787 2910979 2901458 2936624 2770200 2982503 2867030 2984215 1650978 2789743 4848813 3970461 |
The sequential read speed reaches about 2.9 MB/s, and the sequential write speed goes up to around 2.8 MB/s, which looks closer to the capabilities of the board and WD_BLACK SSD.
We also tested GPU performance with the pts/gputest benchmark
The Intel UHD Graphics in the Celeron N5095 delivered low-end 3G graphics performance, but this should be expected for an integrated GPU:
|
1 2 3 4 5 6 7 8 9 10 11 12 13 14 15 16 17 18 19 20 21 22 23 24 |
GpuTest 0.7.0: pts/gputest-1.3.2 [Test: GiMark - Resolution: 1920 x 1080 - Mode: Fullscreen] Test 1 of 1 Estimated Trial Run Count: 3 Estimated Time To Completion: 4 Minutes [13:00 UTC] Started Run 1 @ 12:56:45 Started Run 2 @ 12:58:01 Started Run 3 @ 12:59:11 Test: GiMark - Resolution: 1920 x 1080 - Mode: Fullscreen: 1116 1116 1116 Average: 1116 Points Deviation: 0.00% Comparison of 812 OpenBenchmarking.org samples since 7 June 2015; median result: 2941 Points. Box plot of samples: [|-#*####*!##########-------*-------------*------------*------*----| ] ^ This Result (22nd Percentile): 1116 ^ GTX 760: 2714 Gigabyte RX 6800 XT: 18527 ^ RTX 3080: 16525 ^ RX 5700: 12458 ^ GTX 1080: 8435 ^ |
Networking performance (Ethernet and Wi-Fi)
To test the network performance, we will test the speed of the Ethernet port and Wi-Fi using iperf3.
iperf3 on eth0
The board is supposed to come with a gigabit Ethernet port, so we tested the eth0 port and found that the data transmission speed was 0.77 Gbps per second, which is quite disappointing. This was tested with the router that came from AIS (broadband operator in Thailand), and other devices can achieve the usual 940 Mbps with this tested.
|
1 2 3 4 5 6 7 8 9 10 11 12 13 14 15 16 17 18 19 20 |
unoiot@unoiot-YouYeeToo-X1:~$ iperf3 -c 192.168.1.162 -f g Connecting to host 192.168.1.162, port 5201 [ 5] local 192.168.1.175 port 39796 connected to 192.168.1.162 port 5201 [ ID] Interval Transfer Bitrate Retr Cwnd [ 5] 0.00-1.00 sec 93.0 MBytes 0.78 Gbits/sec 0 308 KBytes [ 5] 1.00-2.00 sec 91.3 MBytes 0.77 Gbits/sec 0 308 KBytes [ 5] 2.00-3.00 sec 91.1 MBytes 0.76 Gbits/sec 0 308 KBytes [ 5] 3.00-4.00 sec 91.1 MBytes 0.76 Gbits/sec 0 308 KBytes [ 5] 4.00-5.00 sec 91.2 MBytes 0.77 Gbits/sec 0 308 KBytes [ 5] 5.00-6.00 sec 91.3 MBytes 0.77 Gbits/sec 0 308 KBytes [ 5] 6.00-7.00 sec 91.2 MBytes 0.77 Gbits/sec 0 308 KBytes [ 5] 7.00-8.00 sec 90.8 MBytes 0.76 Gbits/sec 0 308 KBytes [ 5] 8.00-9.00 sec 91.9 MBytes 0.77 Gbits/sec 0 375 KBytes [ 5] 9.00-10.00 sec 91.1 MBytes 0.76 Gbits/sec 0 375 KBytes - - - - - - - - - - - - - - - - - - - - - - - - - [ ID] Interval Transfer Bitrate Retr [ 5] 0.00-10.00 sec 914 MBytes 0.77 Gbits/sec 0 sender [ 5] 0.00-10.04 sec 912 MBytes 0.76 Gbits/sec receiver iperf Done. |
iperf3 on WLAN0
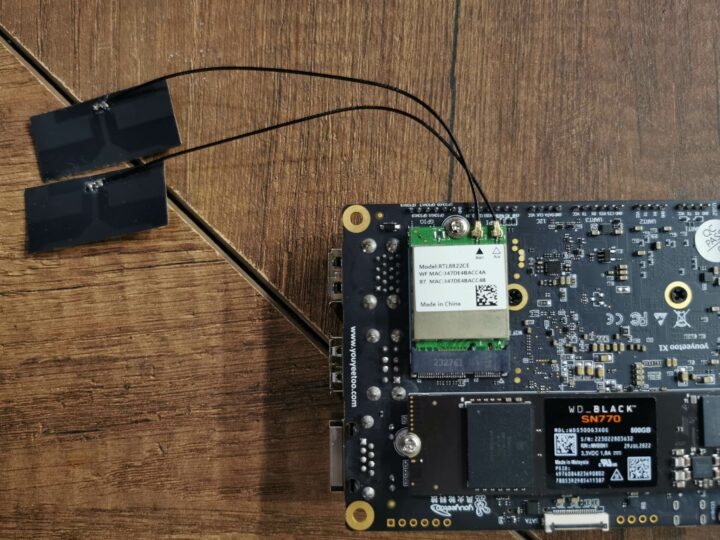
Our kit came with an M.2 wireless module based on the RTL8822CE (Wi-Fi 5) chipset. We tested it using the same AIS router’s 5GHz network, which averaged a data transmission speed of 578 Mbps and this matches our experience with another board, so this looks fine.
|
1 2 3 4 5 6 7 8 9 10 11 12 13 14 15 16 17 18 19 20 |
unoiot@unoiot-YouYeeToo-X1:~$ iperf3 -c 192.168.1.162 -f m -4 Connecting to host 192.168.1.162, port 5201 [ 5] local 192.168.1.124 port 48496 connected to 192.168.1.162 port 5201 [ ID] Interval Transfer Bitrate Retr Cwnd [ 5] 0.00-1.00 sec 58.7 MBytes 492 Mbits/sec 0 3.08 MBytes [ 5] 1.00-2.00 sec 68.8 MBytes 575 Mbits/sec 0 3.08 MBytes [ 5] 2.00-3.00 sec 70.0 MBytes 589 Mbits/sec 0 3.08 MBytes [ 5] 3.00-4.00 sec 71.2 MBytes 598 Mbits/sec 0 3.08 MBytes [ 5] 4.00-5.00 sec 70.0 MBytes 587 Mbits/sec 0 3.08 MBytes [ 5] 5.00-6.00 sec 71.2 MBytes 598 Mbits/sec 0 3.08 MBytes [ 5] 6.00-7.00 sec 71.2 MBytes 598 Mbits/sec 0 3.08 MBytes [ 5] 7.00-8.00 sec 71.2 MBytes 598 Mbits/sec 0 3.08 MBytes [ 5] 8.00-9.00 sec 70.0 MBytes 587 Mbits/sec 0 3.08 MBytes [ 5] 9.00-10.00 sec 71.2 MBytes 598 Mbits/sec 0 3.08 MBytes - - - - - - - - - - - - - - - - - - - - - - - - - [ ID] Interval Transfer Bitrate Retr [ 5] 0.00-10.00 sec 694 MBytes 582 Mbits/sec 0 sender [ 5] 0.00-10.07 sec 693 MBytes 578 Mbits/sec receiver iperf Done. |
Review Summary
Our review of the Youyeetoo X1 SBC with Ubuntu 22.04 shows that installing an operating system on the board is just as easy as it is on an Intel mini PC or computer, although we had to flash another BIOS to use the 7-inch MIPI DSI touchscreen display sent to us by company.
Another advantage of the board is that is quite compact, and wireless networking is working well, although we’d wish gigabit Ethernet to perform a bit better. We also like the ability to connect a MIPI DSI display since it’s not something typically feasible with an Intel mini PC, and that’s only an option since users can still use the HDMI port on the board if they wish.
Furthermore, the Youyeeto X1 comes with several I/O headers (set to 3.3V or 1.8V in the BIOS) to connect external modules and sensors as needed. We’ll use those capabilities in the second part of the review where we’ll be using the board as part of a home automation system and testing several modules connected to the GPIO headers.
We’d like to thank Youyeetoo for sending the X1 SBC board with 8GB RAM and a 128GB eMMC flash, plus the 7-inch YYT-MIPI7LCD touchscreen display for review. Youyeetoo X1 SBC can be purchased on Amazon, Aliexpress, and the company’s online store. Prices start at $109.99 for the 4GB RAM model without storage, and the model reviewed here goes for $139.99, while the YYT-MIPI7LCD display adds an extra $30.
Continue reading “Youyeetoo X1 x86 SBC Review – Part 2: GPIO, UART, I2C, SPI, NFC, PoE module, and power consumption”
CNXSoft: This post was translated from the original review on CNX Software Thailand by Arnon Thongtem, and edited by Suthinee Kerdkaew

Jean-Luc started CNX Software in 2010 as a part-time endeavor, before quitting his job as a software engineering manager, and starting to write daily news, and reviews full time later in 2011.
Support CNX Software! Donate via cryptocurrencies, become a Patron on Patreon, or purchase goods on Amazon or Aliexpress


