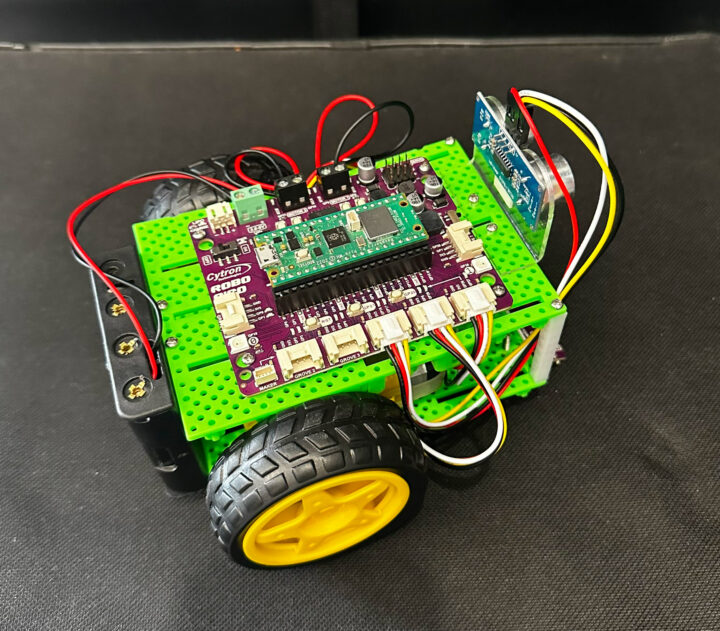
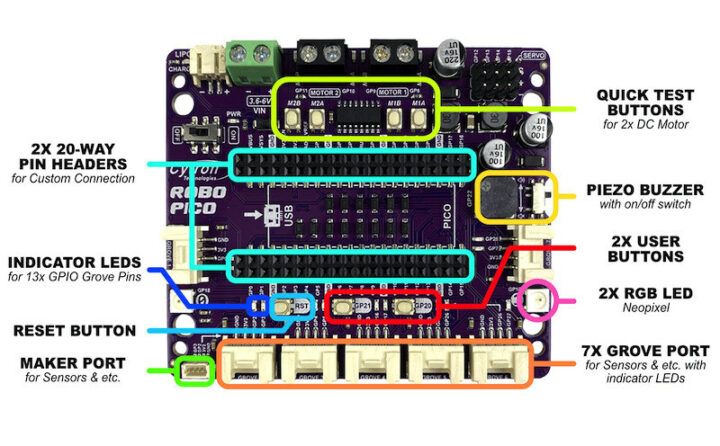
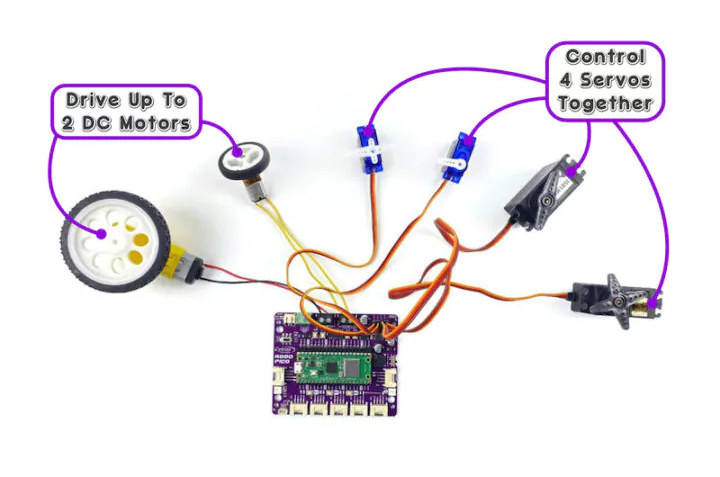
Cytron Robo Pico is a carrier board for the Raspberry Pi Pico (W) specially designed for robotics & IoT applications with a 2-channel DC motor driver, four servo motor ports, and seven Grove I/O connectors to connect various sensors and/or actuators.
When the company asked us to review the Robo Pico board, I noticed they had a car robotic kit based on the board called the BocoBot that comes with installation videos and five tutorials including obstacle avoidance movement with ultrasonic sensors, light search, line following, and WiFi remote control. So I asked for the full kit to make the review more fun and interesting.
Robo Pico board
Robo Pico specifications:
- Supported MCU board – Raspberry Pi Pico/Pico W and compatible
- Motor control
- 2x DC Motor terminals with
- Motor status LEDs for each motor terminal
- 2x motor test buttons for each motor terminal
- Header to connect to 4x servos
- 2x DC Motor terminals with
- Expansion
- 7x Grove Ports (flexible I/O options: digital, analog, I2C, SPI, UART…)
- 1x Maker Port (JST-SH 4-ways connector compatible with Stemma QT/Qwiic connector)
- GPIO Breakout for Raspberry Pi Pico/Pico W
- Misc
- Reset button
- 13x status indicator LEDs for GPIO pins
- 2x RGB LED (Neopixel)
- 2x programmable buttons
- Piezo buzzer with mute switch
- Power circuit
- Automatic power selection: 5V USB, LiPo (1-cell), or 3.6 to 6V Vin via terminal block
- Built-in 1-cell LiPo/Li-Ion charger with over-charged & over-discharged protection
- Power on/off switch with status LED
- Dimensions
- 88 x 72 mm
- Mounting holes – 4x 4.8mm mounting hole, 4x M3 screw hole
BocoBot kit content and features
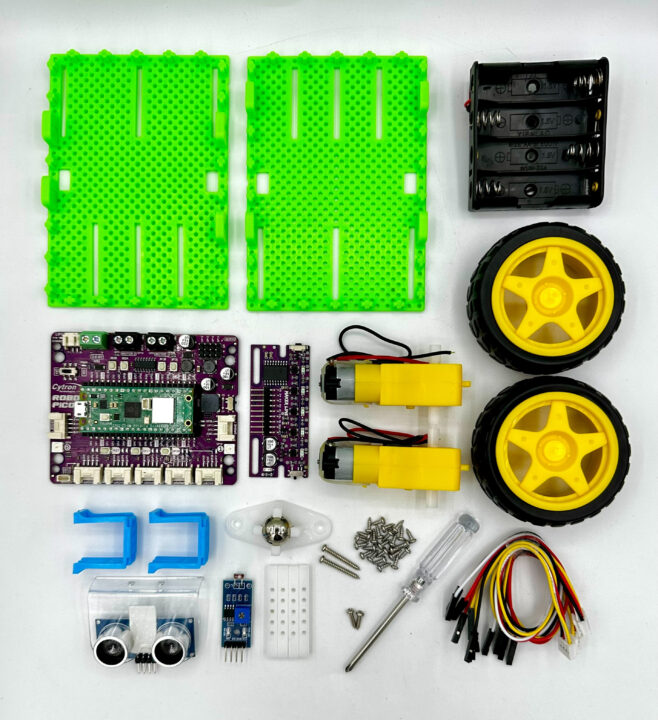
Our kit came with the following items as shown in the photo above:
- Pico Robo board fitted with Raspberry Pi Pico W
- 3x Grove to Female Jumper Wires
- Screwdriver and screws set
- Robot Chassis
- Maker Line sensor board for line following
- Ultrasonic sensor module (HC-SR04) with bracket
- Light sensor module
- 2x TT motors and 2x wheels
- A caster (small metal wheel mounted on a plastic frame)
- Battery holder for 4x AA batteries
- USB Cable
- Double-sided tape
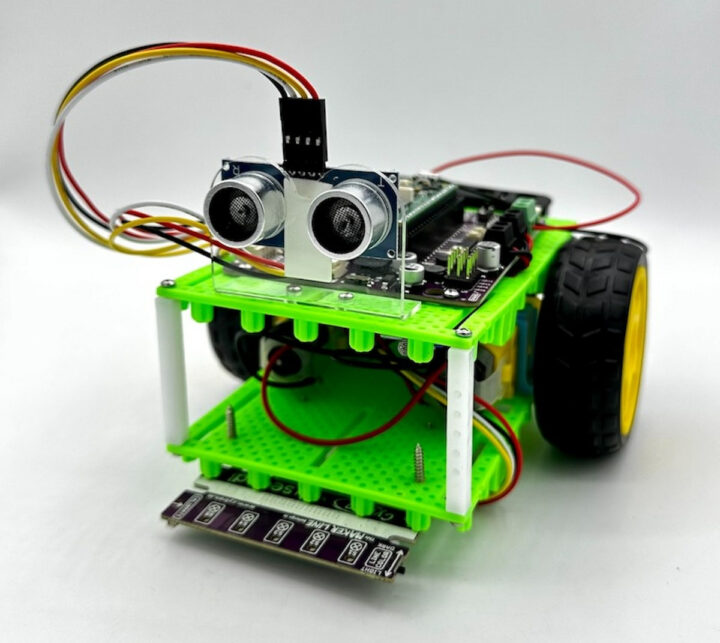
This is what the kit looks like after assembly.
Cytron provides video instructions to make the assembly easier.
Tools, firmware, and libraries installation for CircuiPython programming
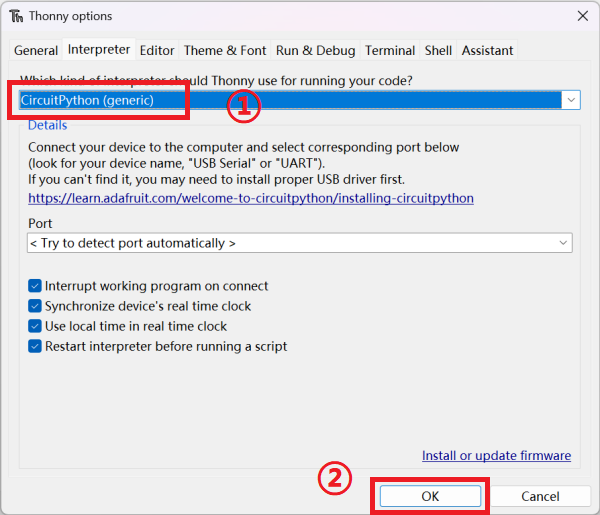
The Raspberry Pi Pico supports C/ C++, MicroPython, and CircuitPython, and we’ll go with the latter in this review. We’ll use the Thonny IDE for programming as we did in our previous reviews. It can be installed on Windows, Linux, macOS, or even run from a Raspberry Pi SBC. Once the installation is complete, open Thonny, then click on the “Run” menu and select “Configure interpreter” and select “CircuitPython(generic)”.
We also need to flash the CircuitPython firmware to the Raspberry Pi Pico W by simply copying the latest UF2 firmware file to the board.
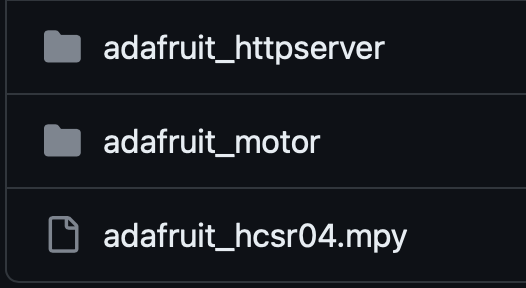
Cytron also shared from Adafruit libraries for the Robo Pico kit available on GitHub. You can copy the content to the “CIRCUITPY” drive for installation.
Testing Robo Pico with CircuitPython and the BocoBot kit
Motor control programming
In order to test the two DC motor ports, we’ll connect the left motor to GPIO8 & GPIO9, and the right motor to GPIO10 & GPIO11 using PWM to control the speed of both motors. Programming is simplified by using the Robot_Movement(speedL, speedR) function:
|
1 2 3 4 5 6 7 8 9 10 11 12 13 14 15 16 17 18 19 20 21 22 23 24 25 26 27 28 29 30 31 32 33 34 35 36 37 38 |
import time import board import digitalio import pwmio from adafruit_motor import motor # Left Motor PWM_M1A = board.GP8 PWM_M1B = board.GP9 # Right Motor PWM_M2A = board.GP10 PWM_M2B = board.GP11 # DC motor setup # DC Motors generate electrical noise when running that can reset the microcontroller in extreme # cases. A capacitor can be used to help prevent this. pwm_1a = pwmio.PWMOut(PWM_M1A, frequency=10000) pwm_1b = pwmio.PWMOut(PWM_M1B, frequency=10000) motorL = motor.DCMotor(pwm_1a, pwm_1b) pwm_2a = pwmio.PWMOut(PWM_M2A, frequency=10000) pwm_2b = pwmio.PWMOut(PWM_M2B, frequency=10000) motorR = motor.DCMotor(pwm_2a, pwm_2b) def Robot_Movement(speedL, speedR): motorL.throttle = speedL motorR.throttle = speedR while True: Robot_Movement(0, 0) #Stop time.sleep(2) Robot_Movement(0.8, 0.8) #Forward time.sleep(3) Robot_Movement(-0.8, -0.8) #Backward time.sleep(3) Robot_Movement(0.1, 0.8) #Turn Left time.sleep(3) Robot_Movement(0.8, 0.1) #Turn Right time.sleep(3) |
Obstacle avoidance robot
The HC-SR04 ultrasonic sensor will be used for the obstacle avoidance demo. Two pins are used (Trigger = GPIO16, Echo = GPIO17) plus 5V and GND, and the sensor will send the values in centimeters. In our test program, the robot will turn left for one second if the sensor detects an object less than 10 centimeters away, and move forward with there’s no obstacle:
|
1 2 3 4 5 6 7 8 9 10 11 12 13 14 15 16 17 18 19 20 21 22 23 24 25 26 27 28 29 30 31 32 33 34 35 36 37 38 39 40 41 42 43 |
import time import board import digitalio import pwmio from adafruit_motor import motor import adafruit_hcsr04 sonar = adafruit_hcsr04.HCSR04(trigger_pin=board.GP16, echo_pin=board.GP17) # Left Motor PWM_M1A = board.GP8 PWM_M1B = board.GP9 # Right Motor PWM_M2A = board.GP10 PWM_M2B = board.GP11 # DC motor setup # DC Motors generate electrical noise when running that can reset the microcontroller in extreme # cases. A capacitor can be used to help prevent this. pwm_1a = pwmio.PWMOut(PWM_M1A, frequency=10000) pwm_1b = pwmio.PWMOut(PWM_M1B, frequency=10000) motorL = motor.DCMotor(pwm_1a, pwm_1b) pwm_2a = pwmio.PWMOut(PWM_M2A, frequency=10000) pwm_2b = pwmio.PWMOut(PWM_M2B, frequency=10000) motorR = motor.DCMotor(pwm_2a, pwm_2b) def Robot_Movement(sL, sR): motorL.throttle = sL motorR.throttle = sR def Read_Ultrasonic(): time.sleep(0.1) return sonar.distance while True: Distance = Read_Ultrasonic() print(Distance) if (Distance < 10): Robot_Movement(0.1, 0.5) #Turn Left print("Turn Left") time.sleep(1) else: Robot_Movement(0.5, 0.54) #Forward |
Programming a light-following robot
The light-following demo relies on the (analog) value returned by the light sensor module. The 3v3 pin is connected to Vcc, A0 to GPIO27, and we also make sure to connect the ground (GND). Our test program monitors the sensor’s value (between 0-30000) in an infinite loop and if the brightness is under 15000, the robot will move forward, otherwise, the robot will keep on turning left.
|
1 2 3 4 5 6 7 8 9 10 11 12 13 14 15 16 17 18 19 20 21 22 23 24 25 26 27 28 29 30 31 32 33 34 35 36 37 38 39 40 |
import time import board import analogio import digitalio import pwmio from adafruit_motor import motor # Left Motor PWM_M1A = board.GP8 PWM_M1B = board.GP9 # Right Motor PWM_M2A = board.GP10 PWM_M2B = board.GP11 # DC motor setup # DC Motors generate electrical noise when running that can reset the microcontroller in extreme # cases. A capacitor can be used to help prevent this. pwm_1a = pwmio.PWMOut(PWM_M1A, frequency=10000) pwm_1b = pwmio.PWMOut(PWM_M1B, frequency=10000) motorL = motor.DCMotor(pwm_1a, pwm_1b) pwm_2a = pwmio.PWMOut(PWM_M2A, frequency=10000) pwm_2b = pwmio.PWMOut(PWM_M2B, frequency=10000) motorR = motor.DCMotor(pwm_2a, pwm_2b) ldr = analogio.AnalogIn(board.GP27) def Robot_Movement(sL, sR): motorL.throttle = sL motorR.throttle = sR while True: raw = ldr.value print("raw = {:5d}".format(raw)) time.sleep(0.1) if (raw < 15000): # << Please changed HERE Robot_Movement(0.5, 0.53) # Forward print("Move Forward") else: Robot_Movement(0.1, 0.33) # Turn Left print("Turn Left") |
Line following robot
The line-following robot test will feature the Maker Line 5-line sensor that reads the analog light value and is connected to the Robo Pico board using 3v3 = Vcc, GND, and A0 = GPIO26. The sensor sends voltage values between 0V and 3.3V for testing. The test program changes the speed of the wheels (and directly of the robot) if the sensor detects the line with the speed depending on the returned analog value.
|
1 2 3 4 5 6 7 8 9 10 11 12 13 14 15 16 17 18 19 20 21 22 23 24 25 26 27 28 29 30 31 32 33 34 35 36 37 38 39 40 41 42 43 44 45 46 47 48 49 50 51 52 53 54 |
import time import board import analogio import digitalio import pwmio from adafruit_motor import motor # Left Motor PWM_M1A = board.GP8 PWM_M1B = board.GP9 # Right Motor PWM_M2A = board.GP10 PWM_M2B = board.GP11 # DC motor setup # DC Motors generate electrical noise when running that can reset the microcontroller in extreme # cases. A capacitor can be used to help prevent this. pwm_1a = pwmio.PWMOut(PWM_M1A, frequency=10000) pwm_1b = pwmio.PWMOut(PWM_M1B, frequency=10000) motorL = motor.DCMotor(pwm_1a, pwm_1b) pwm_2a = pwmio.PWMOut(PWM_M2A, frequency=10000) pwm_2b = pwmio.PWMOut(PWM_M2B, frequency=10000) motorR = motor.DCMotor(pwm_2a, pwm_2b) # Sensors SA = analogio.AnalogIn(board.GP26) def Robot_Movement(sL, sR): motorL.throttle = sL motorR.throttle = sR while True: an = (SA.value * 3.3) / 65536 print(an) if (an>1.4 and an<1.5): #1.4 - 1.7v print("move forward") Robot_Movement(0.5, 0.53) elif (an>1.8 and an<2.2): # 1.7 - 2.2v Robot_Movement(0.5, 0.3) elif (an>0.8 and an<1.4): # 0.8 - 1.4v Robot_Movement(0.3, 0.53) elif (an>2.2 and an<2.85): # 2.2 - 2.85v Robot_Movement(0.6, 0.2) elif (an>0.4 and an<0.8): # 0.6 - 0.8v Robot_Movement(0.2, 0.63) elif (an>2.85 and an<3.0): # 2.85 - 3.0v Robot_Movement(0.6, 0) elif (an>0.3 and an<0.4): # 0.3 - 0.4v Robot_Movement(0, 0.64) elif (an<0.3 or an>3): # <0.3v or >3V #Robot_Movement(0, 0) continue |
Controlling the Robo Pico robotic kit over WiFi
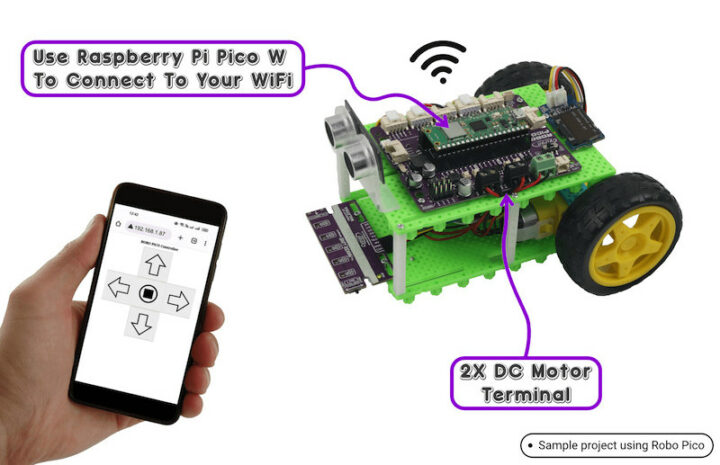
Our last demo will control the Robo Pico-based BocoBot robotic kit over WiFi using a simple web interface. We’ll set up a web server on the Raspberry Pi Pico and write some HTML code to create a remote control for the robot. We can open a web browser on a phone or computer and type the Raspberry Pi Pico W’s IP address to load the remote and make the robot move forward, backward, turn left, turn right, or stop it.
|
1 2 3 4 5 6 7 8 9 10 11 12 13 14 15 16 17 18 19 20 21 22 23 24 25 26 27 28 29 30 31 32 33 34 35 36 37 38 39 40 41 42 43 44 45 46 47 48 49 50 51 52 53 54 55 56 57 58 59 60 61 62 63 64 65 66 67 68 69 70 71 72 73 74 75 76 77 78 79 80 81 82 83 84 85 86 87 88 89 90 91 92 93 94 95 96 97 98 99 100 101 102 103 104 105 106 107 108 109 110 111 112 113 114 115 116 117 118 119 120 121 122 123 124 125 126 127 128 129 130 131 132 133 134 135 136 137 138 139 140 141 142 143 144 145 146 147 148 149 150 151 152 153 154 155 156 157 158 159 160 161 162 163 164 165 166 167 168 169 170 171 172 173 174 175 176 177 178 179 180 181 182 183 184 185 186 187 188 189 190 191 192 193 194 195 196 197 198 199 200 201 202 203 204 205 206 207 208 209 210 211 212 213 214 215 216 217 |
import os import time import ipaddress import wifi import socketpool import board import microcontroller import digitalio import pwmio from adafruit_motor import motor from digitalio import DigitalInOut, Direction from adafruit_httpserver.server import HTTPServer from adafruit_httpserver.request import HTTPRequest from adafruit_httpserver.response import HTTPResponse from adafruit_httpserver.methods import HTTPMethod from adafruit_httpserver.mime_type import MIMEType # Left Motor PWM_M1A = board.GP8 PWM_M1B = board.GP9 # Right Motor PWM_M2A = board.GP10 PWM_M2B = board.GP11 # DC motor setup # DC Motors generate electrical noise when running that can reset the microcontroller in extreme # cases. A capacitor can be used to help prevent this. pwm_1a = pwmio.PWMOut(PWM_M1A, frequency=10000) pwm_1b = pwmio.PWMOut(PWM_M1B, frequency=10000) motorL = motor.DCMotor(pwm_1a, pwm_1b) pwm_2a = pwmio.PWMOut(PWM_M2A, frequency=10000) pwm_2b = pwmio.PWMOut(PWM_M2B, frequency=10000) motorR = motor.DCMotor(pwm_2a, pwm_2b) def Robot_Movement(sL, sR): motorL.throttle = sL motorR.throttle = sR # connect to network print() print("Connecting to WiFi") # set static IP address # ipv4 = ipaddress.IPv4Address("192.168.1.42") # netmask = ipaddress.IPv4Address("255.255.255.0") # gateway = ipaddress.IPv4Address("192.168.1.1") # wifi.radio.set_ipv4_address(ipv4=ipv4,netmask=netmask,gateway=gateway) # connect to your SSID wifi.radio.connect(os.getenv('CIRCUITPY_WIFI_SSID'), os.getenv('CIRCUITPY_WIFI_PASSWORD')) print("Connected to WiFi") pool = socketpool.SocketPool(wifi.radio) server = HTTPServer(pool, "/static") def move_forward(): print ("Forward") Robot_Movement(0.5, 0.53) def move_backward(): print ("Backward") Robot_Movement(-0.5, -0.53) def move_left(): print ("Left") Robot_Movement(0, 0.5) def move_right(): print ("Right") Robot_Movement(0.5, 0) def move_stop(): print ("Stop") Robot_Movement(0, 0) # the HTML script # setup as an f string # this way, can insert string variables from code.py directly # of note, use {{ and }} if something from html *actually* needs to be in brackets # i.e. CSS style formatting def webpage(): html = f""" <!DOCTYPE html> <html> <head> <meta http-equiv="Content-type" content="text/html;charset=utf-8"> <meta name="viewport" content="width=device-width, initial-scale=1"> <script> function buttonDown(button) {{ // Send a POST request to tell the Pico that the button was pressed var xhttp = new XMLHttpRequest(); xhttp.open("POST", "/", true); xhttp.setRequestHeader("Content-type", "application/x-www-form-urlencoded"); xhttp.send(button + "=true"); }} function buttonUp() {{ // Send a POST request to tell the Pico that the button was released (stop) var xhttp = new XMLHttpRequest(); xhttp.open("POST", "/", true); xhttp.setRequestHeader("Content-type", "application/x-www-form-urlencoded"); xhttp.send("stop=true"); }} </script> <style> h1 {{ text-align: center; }} body {{ display: flex; flex-direction: column; align-items: center; justify-content: center; height: 80vh; margin: 0; }} .controls {{ display: grid; grid-template-columns: repeat(3, 1fr); gap: 10px; }} .button {{ font-size: 90px; display: flex; align-items: center; justify-content: center; //border: 2px solid black; //border-radius: 10px; background: white; padding: 10px; user-select: none; width: 80px; height: 80px; }} </style> </head> <body> <h1>Robo Pico Wifi Control Car</h1> <center><b> <div class="controls"> <div></div> <div class="button" id="forward" ontouchstart="buttonDown(this.id)" ontouchend="buttonUp()" onmousedown="buttonDown(this.id)" onmouseup="buttonUp()">⬆️</div> <div></div> <div class="button" id="left" ontouchstart="buttonDown(this.id)" ontouchend="buttonUp()" onmousedown="buttonDown(this.id)" onmouseup="buttonUp()">⬅️</div> <div></div> <div class="button" id="right" ontouchstart="buttonDown(this.id)" ontouchend="buttonUp()" onmousedown="buttonDown(this.id)" onmouseup="buttonUp()">➡️</div> <div></div> <div class="button" id="backward" ontouchstart="buttonDown(this.id)" ontouchend="buttonUp()" onmousedown="buttonDown(this.id)" onmouseup="buttonUp()">⬇️</div> <div></div> </div> </body></html> """ return html # route default static IP @server.route("/") def base(request: HTTPRequest): # pylint: disable=unused-argument # serve the HTML f string # with content type text/html with HTTPResponse(request, content_type=MIMEType.TYPE_HTML) as response: response.send(f"{webpage()}") # if a button is pressed on the site @server.route("/", method=HTTPMethod.POST) def buttonpress(request: HTTPRequest): # get the raw text raw_text = request.raw_request.decode("utf8") #print(raw_text) # if the Forward button was pressed if "forward" in raw_text: # move car forward move_forward() if "backward" in raw_text: # move car forward move_backward() if "right" in raw_text: # move car forward move_right() if "left" in raw_text: # move car forward move_left() if "stop" in raw_text: # move car forward move_stop() # reload site with HTTPResponse(request, content_type=MIMEType.TYPE_HTML) as response: response.send(f"{webpage()}") print("starting server..") # startup the server try: server.start(str(wifi.radio.ipv4_address)) print("Listening on http://%s" % wifi.radio.ipv4_address) # if the server fails to begin, restart the pico w except OSError: time.sleep(5) print("restarting..") microcontroller.reset() while True: try: # poll the server for incoming/outgoing requests server.poll() except Exception as e: print(e) continue |
You can also watch the video review/demo below to see the robot in action.
Video review/demo of the Robo Pico with the BocoBot robotic kit
Conclusion
The Robo Pico is a great expansion board for the Raspberry Pi Pico W for robotics and IoT projects, and the BocoBot educational robot kit makes it really easy to get started with the board. It allowed us to create an obstacle avoidance robot with an ultrasonic sensor and a line-following robot, and we could also implement a Web-based interface to remotely control the robot over WiFi.
You can also create your own project as the board is quite versatile with two DC electric motors, each with a button to test the motor operation, four servo motor connectors, a piezo sound speaker with a mute switch, two user-programmable push-buttons, and LEDs to show the status of all 13 GPIO ports that are seen on most Cytron boards. The board also includes two RGB LEDs, and seven 4-pin Grove connectors for expansion modules. The Pico Robo and BocoBot are suitable for those who are interested in learning to build their own robots, as well as for STEM education.
We would like to thank Cytron for sending the BocoBot robot kit with the Robo Pico board for review. The Robo Pico board can be purchased for $14.90 without a Raspberry Pico board, or with the Pico / Pico W for a few dollars, while the full BocoBot robotic kit goes for $36.88 with a Raspberry Pi Pico W.
This review is adapted from the original article on CNX Software Thailand by Kajornsak Janjam.

Jean-Luc started CNX Software in 2010 as a part-time endeavor, before quitting his job as a software engineering manager, and starting to write daily news, and reviews full time later in 2011.
Support CNX Software! Donate via cryptocurrencies, become a Patron on Patreon, or purchase goods on Amazon or Aliexpress


