
Last month I received Microchip PolarFire SoC FPGA Icicle development kit that features PolarFire SoC FPGA with a Penta–core 64-bit RISC-V CPU subsystem and an FPGA with 254K LE, and booted it into the pre-installed Linux operating systems based on OpenEmbedded.
Today, I’ll show how to get started with the Yocto BSP and run the EEMBC CoreMark benchmark, and I’ll check out the FPGA with Libero SoC Design Suite in a couple of weeks.
Operating Systems supported by PolarFire SoC FPGA
My initial idea was to focus this part of the review on Linux on RISC-V status, checking some system information, running some benchmarks (e.g. SBC-Bench), compiling the Linux kernel, and installing services like a LEMP stack (Linux, Nginx (pronounced Engine-X), MySQL, PHP) which could be used for WordPress hosting for instance. But then I looked at the operating systems supported with Microchip PolarFire SoC FPGA.
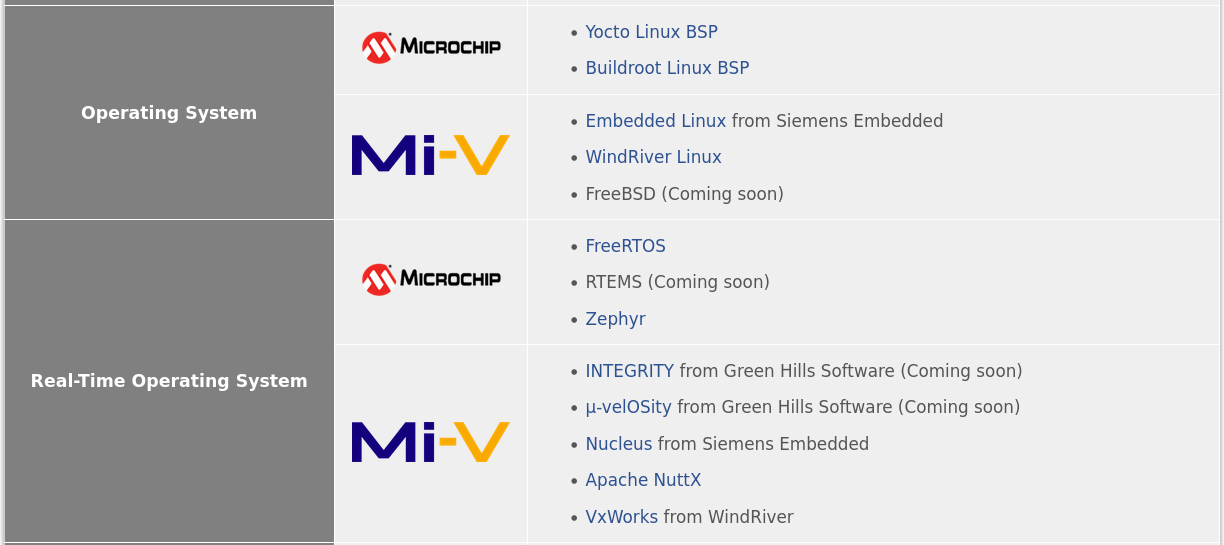
There’s a Yocto Linux BSP and a Buidlroot Linux BSP supported by Microchip, and Embedded Linux distributions from third parties like Siemens Embedded and WindRiver. FreeBSD is said to be coming soon, and several real-time operating systems should probably be for the small 64-bit RISC-V core from the SoC.
That means there’s no package manager and no Debian-based root filesystem excepted by some of the tools I planned to use. So while in theory, it would still be possible to achieve what I intended to do, I don’t have the 100+ hours required to achieve that… So I scaled down my ambition, and instead will report my experience building the Yocto images from images, cross-compile a hello world, and natively compile and run EEMBC benchmark. It’s not my first time playing with the Yocto Project, but I still learned a few things along the way, and I hope you will too.
Webserver demo and Voltage/Current Analytics
Before working on the Yocto BSP, I connected the board to Ethernet to complete Microchip’s getting started guide, and run a webserver.
|
1 2 |
$ cd /opt/microchip/iiohttpserver $ ./run |
We can access a web page that will show voltage and current for VDDA (XCVR Tx/Rx Lanes Supply), VDD25 (PLL and PNVM Supply), VDDA25 (XCVR PLL Supply), and VDD (Core Supply) by going to http://<board_ip_address>
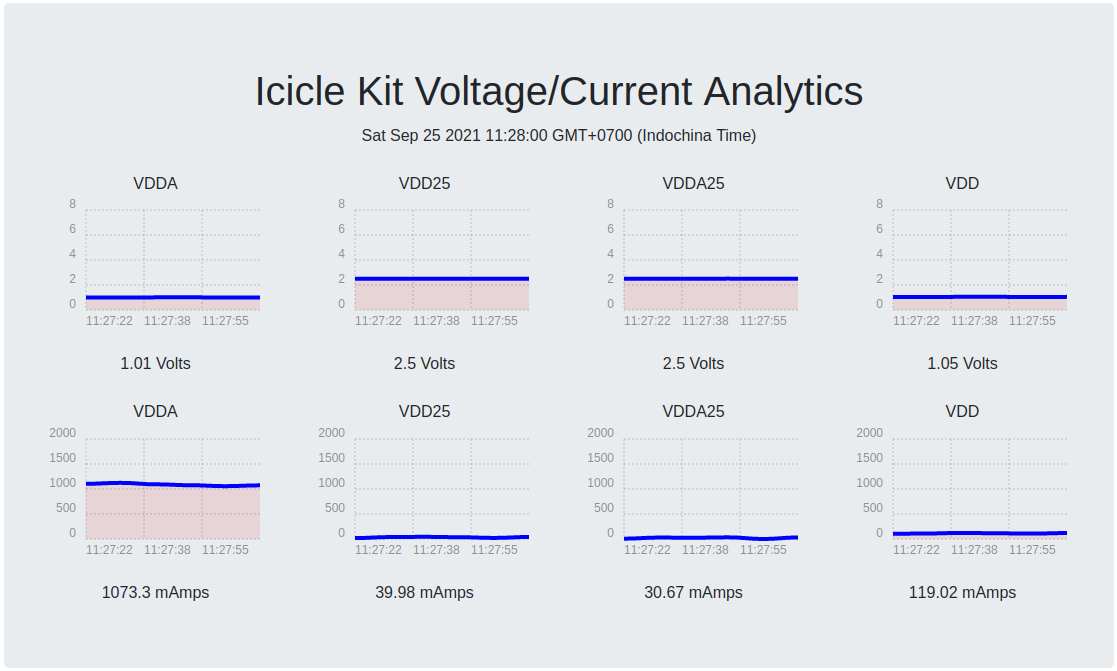
It will be interesting to revisit this page once we run EEMBC CoreMark benchmark.
Yocto Linux BSP
Let’s build Linux using the Yocto BSP as explained on Github. For reference, I’m using a laptop running Ubuntu 20.04, and I had to change some of the commands.
First, let’s install the repo utility:
|
1 2 3 4 |
export REPO=$(mktemp /tmp/repo.XXXXXXXXX) curl -o ${REPO} https://storage.googleapis.com/git-repo-downloads/repo gpg --keyserver hkps://keyserver.ubuntu.com --recv-key 8BB9AD793E8E6153AF0F9A4416530D5E920F5C65 curl -s https://storage.googleapis.com/git-repo-downloads/repo.asc | gpg --verify - ${REPO} && install -m 755 ${REPO} ~/bin/repo |
then a few dependencies:
|
1 |
sudo apt install python3-distutils libyaml-dev libelf-dev chrpath diffstat |
Time to initialize the repo:
|
1 |
~/bin/repo init -u https://github.com/polarfire-soc/meta-polarfire-soc-yocto-bsp.git -b master -m tools/manifests/riscv-yocto.xml |
We can now configure the build:
|
1 2 3 4 5 6 7 8 9 10 11 12 13 14 15 16 17 18 19 20 21 22 23 24 25 26 27 28 29 30 31 32 33 34 35 36 37 38 39 40 41 42 43 44 45 46 47 48 49 50 51 52 53 54 55 56 57 58 59 60 61 62 63 64 65 66 67 68 |
. ./meta-polarfire-soc-yocto-bsp/polarfire-soc_yocto_setup.sh /home/jaufranc/edev/Microchip/yocto-dev expect is already installed at the requested version (5.45.4-2build1) expect is already installed at the requested version (5.45.4-2build1) No packages will be installed, upgraded, or removed. 0 packages upgraded, 0 newly installed, 0 to remove and 9 not upgraded. Need to get 0 B of archives. After unpacking 0 B will be used. spawn sudo dpkg-reconfigure -freadline dash sudo] password for jaufranc: Configuring dash ---------------- The system shell is the default command interpreter for shell scripts. Using dash as the system shell will improve the system's overall performance. It does not alter the shell presented to interactive users. Use dash as the default system shell (/bin/sh)? [yes/no] yes Init OE ### Shell environment set up for builds. ### You can now run 'bitbake <target>' Common targets are: core-image-minimal core-image-full-cmdline core-image-sato core-image-weston meta-toolchain meta-ide-support You can also run generated qemu images with a command like 'runqemu qemux86'. Other commonly useful commands are: - 'devtool' and 'recipetool' handle common recipe tasks - 'bitbake-layers' handles common layer tasks - 'oe-pkgdata-util' handles common target package tasks Adding layers NOTE: Starting bitbake server... NOTE: Starting bitbake server... NOTE: Starting bitbake server... NOTE: Starting bitbake server... NOTE: Starting bitbake server... NOTE: Starting bitbake server... Creating auto.conf To build an image run --------------------------------------------------- MACHINE=icicle-kit-es bitbake mpfs-dev-cli --------------------------------------------------- Buildable machine info --------------------------------------------------- Default MACHINE=icicle-kit-es * icicle-kit-es: Microchip Polarfire SoC Icicle Kit Engineering Sample, emmc/sd boot. * qemuriscv64: The 64-bit RISC-V machine --------------------------------------------------- Bitbake Image --------------------------------------------------- * mpfs-dev-cli: MPFS Linux console-only image with development packages. * core-image-minimal-dev: OE console-only image, with some additional development packages. * core-image-minimal: OE console-only image * core-image-full-cmdline: OE console-only image with more full-featured Linux system functionality installed. * qemuriscv64: The 64-bit RISC-V machine --------------------------------------------------- |
To start the build, run the following command:
|
1 |
MACHINE=icicle-kit-es bitbake mpfs-dev-cli |
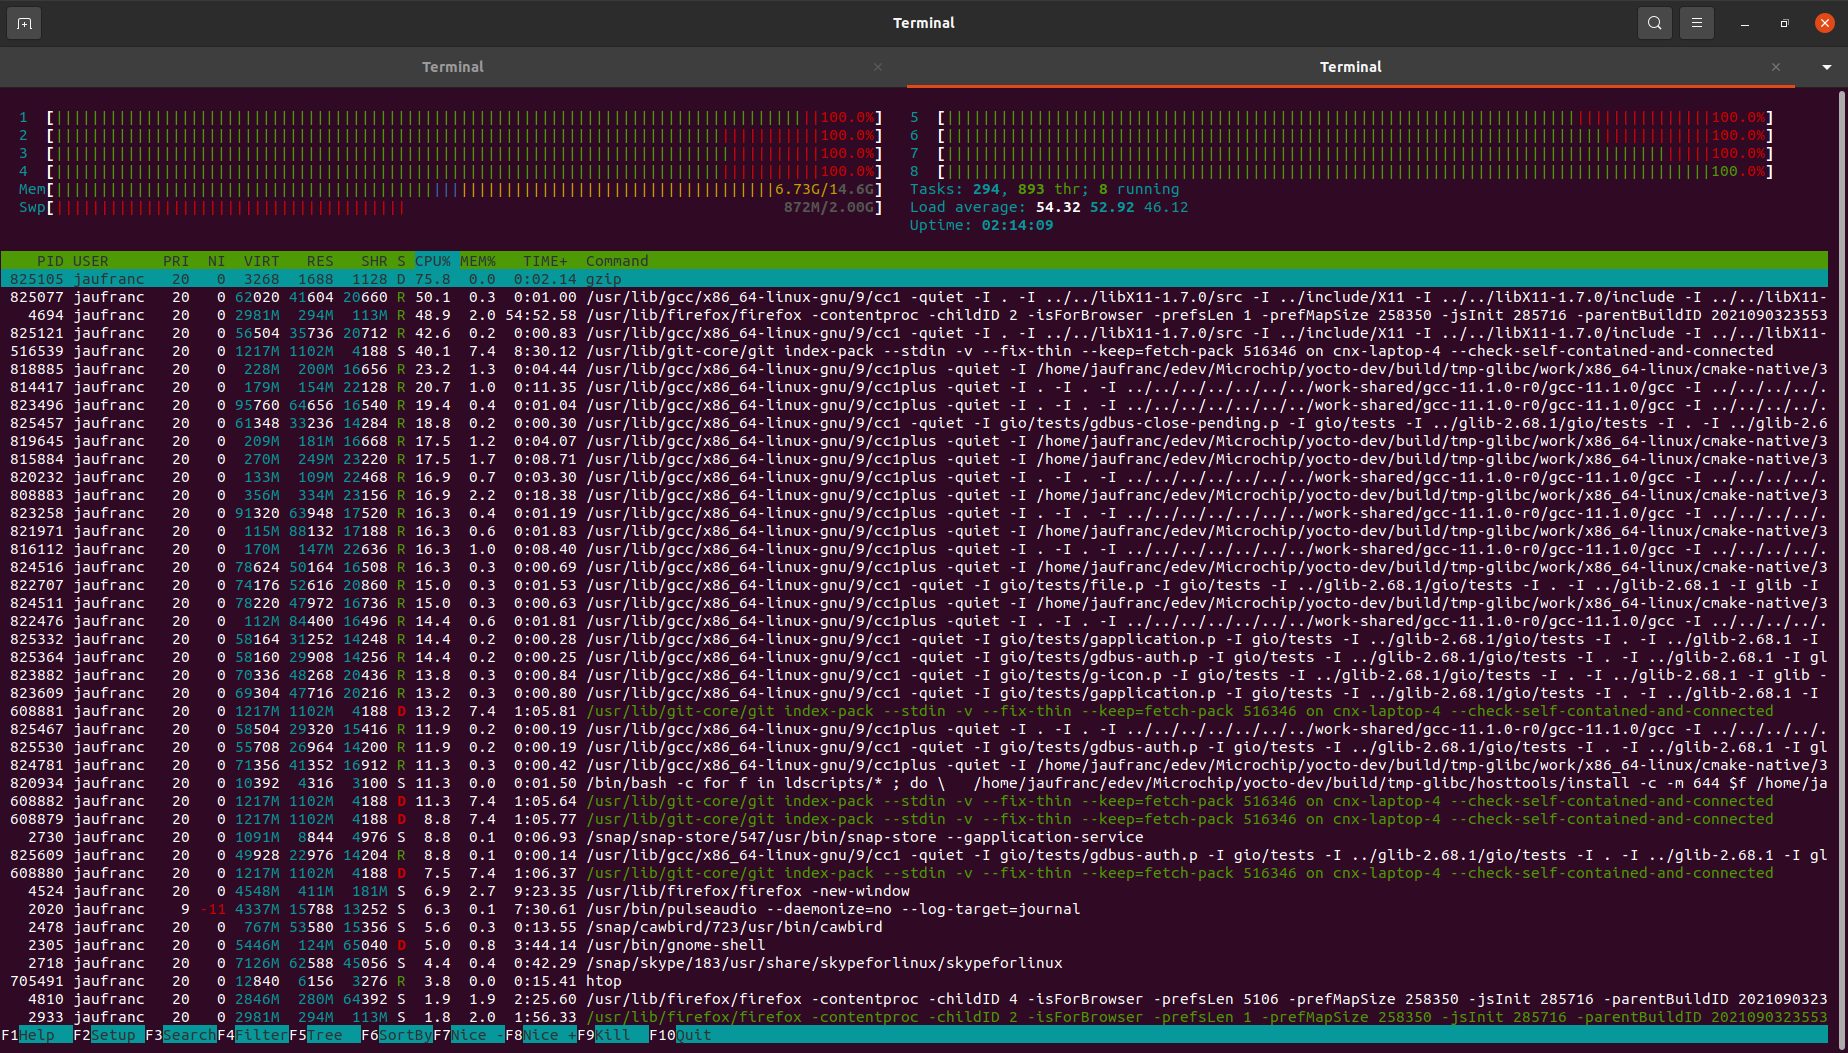
I remember Yocto build system can take a lot of time having spent over 24 hours building an image on a low-end laptop about 10 years ago, and with the default settings, my laptop, powered by an 8-core AMD Ryzen 7 2700U processor and fitted with 16 GB RAM, quickly become very slow and close to unusable with a 50+ CPU load:
I let the build run its course as I went to bed after launching it. But I did not check the storage requirements, and the build stops after about two hours with my hard drive running out of space. As we’ll see once the build is completed, around 100 GB of free storage is required.
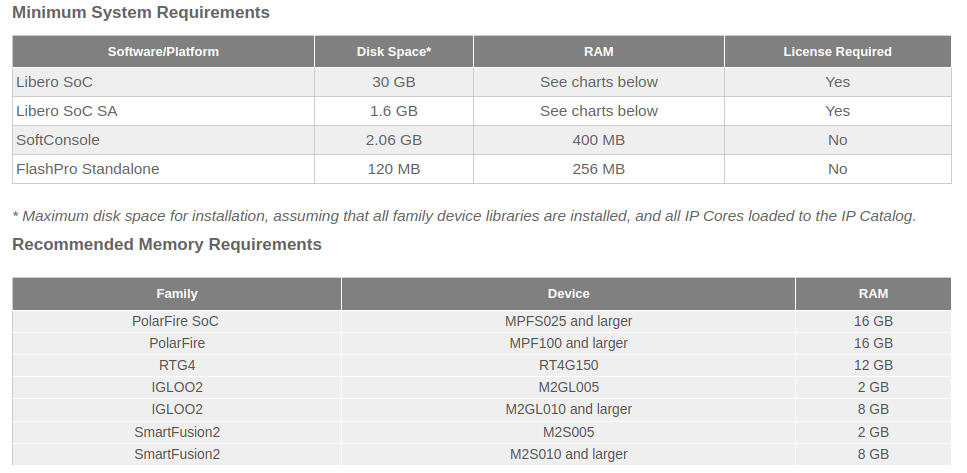 While we are on the topic of system requirements, Libero SoC design suite will need around 35 GB extra space, and for PolarFire SoC development at least 16 GB RAM. So you’ll want to have a powerful workstation to develop applications on PolarFire SoC FPGA Icicle development kit with plenty of RAM and sufficient storage.
Back to our Yocto build. The ideal would be to have a dedicated build server, but if you intend to use your computer at the same time as the build take place you may want to edit [your_yocto_build_dir]/conf/local.conf
|
1 2 |
BB_NUMBER_THREADS = "4" PARALLEL_MAKE = "-j 4" |
then
|
1 |
source setup-environment ./your_build_folder |
Before starting the build…
An alternative is to pause the build with Ctrl-Z, which works in a similar way to Ctrl-C, but uses SIGTSTP instead of SIGINT in order to pause the process, and not terminate it.
|
1 2 3 4 5 6 7 8 9 10 11 12 13 14 15 16 17 18 19 20 21 22 23 24 25 26 27 28 29 30 31 32 33 34 35 36 37 38 39 40 41 42 43 44 45 46 47 |
time MACHINE=icicle-kit-es bitbake mpfs-dev-cli Loading cache: 100% | | ETA: --:--:-- Loaded 0 entries from dependency cache. Parsing recipes: 100% |##########################################| Time: 0:01:43 Parsing of 2381 .bb files complete (0 cached, 2381 parsed). 3667 targets, 166 skipped, 0 masked, 0 errors. NOTE: Resolving any missing task queue dependencies Build Configuration: BB_VERSION = "1.51.0" BUILD_SYS = "x86_64-linux" NATIVELSBSTRING = "ubuntu-20.04" TARGET_SYS = "riscv64-oe-linux" MACHINE = "icicle-kit-es" DISTRO = "nodistro" DISTRO_VERSION = "nodistro.0" TUNE_FEATURES = "riscv64" meta = "HEAD:14795ee305f3c11fcc31cc7ca815b8ff1020e29a" meta-oe meta-python meta-multimedia meta-networking = "HEAD:dcb9ecc1e5720c9614b1cd27575e1e4886dff5c1" meta-riscv = "HEAD:35d1d5849294ff9f2fb98b90657bbf7a1e532d0d" meta-polarfire-soc-yocto-bsp = "HEAD:3c53ffcae8ac86686a53cd15b4541fc7eca1e36f" NOTE: Fetching uninative binary shim http://downloads.yoctoproject.org/releases/uninative/3.1/x86_64-nativesdk-libc.tar.xz;sha256sum=5d0611df544edff6428cef7d871257a91aa6ba1bd92f5365a2df8deb54b6b31e (will check PREMIRRORS first) Initialising tasks: 100% |#######################################| Time: 0:00:11 Sstate summary: Wanted 2529 Local 0 Network 0 Missed 2529 Current 0 (0% match, 0% complete) NOTE: Executing Tasks WARNING: expat-native-2.3.0-r0 do_fetch: Failed to fetch URL https://downloads.sourceforge.net/expat/expat-2.3.0.tar.bz2, attempting MIRRORS if available WARNING: libtalloc-2.3.2-r0 do_fetch: Failed to fetch URL https://www.samba.org/ftp/talloc/talloc-2.3.2.tar.gz, attempting MIRRORS if available WARNING: boost-1.76.0-r0 do_fetch: Failed to fetch URL https://dl.bintray.com/boostorg/release/1.76.0/source/boost_1_76_0.tar.bz2, attempting MIRRORS if available WARNING: htop-3.0.5-r0 do_fetch: Failed to fetch URL git://github.com/htop-dev/htop.git, attempting MIRRORS if available Currently 8 running tasks (5382 of 7084) 75% |####################### | Currently 6 running tasks (6040 of 7084) 85% |########################## | 0: cmake-3.20.1-r0 do_compile (pid 3565535) 72% |#################### | 1: boost-1.76.0-r0 do_compile - 24m44s (pid 3578779) 2: kernel-devsrc-1.0-r0 do_install - 15m17s (pid 3619862) 3: gcc-11.1.0-r0 do_package_write_ipk - 1m23s (pid 3665048) 4: libcheck-0.15.2-r0 do_package_write_ipk - 32s (pid 3669480) 5: libsamplerate0-0.1.9-r1 do_package_write_ipk - 24s (pid 3669801) [1]+ Stopped MACHINE=icicle-kit-es bitbake mpfs-dev-cli real 328m42.945s user 0m0.000s sys 0m0.004s jaufranc@cnx-laptop-4:~/edev/Microchip/yocto-dev/build$ |
Since bitbake spawns so many other processes, we have to wait for them to complete, and it took about 10 minutes to get back to having a usual computer.
I stopped for about 3 hours, and then it can be resumed with the command “fg“. It’s like a hibernation mode for terminal programs, and it’s been around forever, but I either forgot about it, or never used it myself. The complete build took around 7 to 8 hours on my machine.
That’s the space used by the Yocto BSP:
|
1 2 3 4 5 6 7 8 |
~/edev/Microchip/yocto-dev$ du --max-depth=1 -h 313M ./.repo 36M ./meta-openembedded 376K ./meta-polarfire-soc-yocto-bsp 6.3M ./meta-riscv 94G ./build 45M ./openembedded-core 94G . |
We can find the images in tmp-glibc/deploy/images/icicle-kit-es/ folder:
|
1 2 3 4 5 6 7 8 9 10 11 12 13 14 15 16 17 18 19 20 21 22 23 24 25 26 27 28 29 30 31 32 33 34 35 36 |
ls -lh tmp-glibc/deploy/images/icicle-kit-es/ total 9.8G -rwxr-xr-x 1 jaufranc jaufranc 1.3K Sep 26 18:06 boot.scr.uimg lrwxrwxrwx 2 jaufranc jaufranc 68 Sep 26 18:07 fitImage -> fitImage--5.12.1+git0+ce6fc289da-r0-icicle-kit-es-20210926061423.bin -rw-r--r-- 2 jaufranc jaufranc 4.6M Sep 26 18:07 fitImage--5.12.1+git0+ce6fc289da-r0-icicle-kit-es-20210926061423.bin lrwxrwxrwx 2 jaufranc jaufranc 68 Sep 26 18:07 fitImage-icicle-kit-es.bin -> fitImage--5.12.1+git0+ce6fc289da-r0-icicle-kit-es-20210926061423.bin -rw-r--r-- 2 jaufranc jaufranc 1.7K Sep 26 18:08 fitImage-its--5.12.1+git0+ce6fc289da-r0-icicle-kit-es-20210926061423.its lrwxrwxrwx 2 jaufranc jaufranc 72 Sep 26 18:08 fitImage-its-icicle-kit-es -> fitImage-its--5.12.1+git0+ce6fc289da-r0-icicle-kit-es-20210926061423.its -rw-r--r-- 2 jaufranc jaufranc 4.6M Sep 26 18:08 fitImage-linux.bin--5.12.1+git0+ce6fc289da-r0-icicle-kit-es-20210926061423.bin lrwxrwxrwx 2 jaufranc jaufranc 78 Sep 26 18:08 fitImage-linux.bin-icicle-kit-es -> fitImage-linux.bin--5.12.1+git0+ce6fc289da-r0-icicle-kit-es-20210926061423.bin -rw-r--r-- 2 jaufranc jaufranc 11K Sep 26 18:08 microchip-mpfs-icicle-kit--5.12.1+git0+ce6fc289da-r0-icicle-kit-es-20210926061423.dtb lrwxrwxrwx 2 jaufranc jaufranc 85 Sep 26 18:08 microchip-mpfs-icicle-kit.dtb -> microchip-mpfs-icicle-kit--5.12.1+git0+ce6fc289da-r0-icicle-kit-es-20210926061423.dtb lrwxrwxrwx 2 jaufranc jaufranc 85 Sep 26 18:08 microchip-mpfs-icicle-kit-icicle-kit-es.dtb -> microchip-mpfs-icicle-kit--5.12.1+git0+ce6fc289da-r0-icicle-kit-es-20210926061423.dtb lrwxrwxrwx 2 jaufranc jaufranc 38 Sep 26 18:06 mmc-tftp-icicle-kit-es.txt -> mmc-tftp-icicle-kit-es-v2021.04-r0.txt -rw-r--r-- 2 jaufranc jaufranc 1.2K Sep 26 18:06 mmc-tftp-icicle-kit-es-v2021.04-r0.txt lrwxrwxrwx 2 jaufranc jaufranc 38 Sep 26 18:06 mmc-tftp.txt -> mmc-tftp-icicle-kit-es-v2021.04-r0.txt -rw-r--r-- 2 jaufranc jaufranc 1.6M Sep 26 18:08 modules--5.12.1+git0+ce6fc289da-r0-icicle-kit-es-20210926061423.tgz lrwxrwxrwx 2 jaufranc jaufranc 67 Sep 26 18:08 modules-icicle-kit-es.tgz -> modules--5.12.1+git0+ce6fc289da-r0-icicle-kit-es-20210926061423.tgz -rw-r--r-- 2 jaufranc jaufranc 5.1K Sep 27 09:29 mpfs-dev-cli.env -rw-r--r-- 2 jaufranc jaufranc 5.4G Sep 27 09:46 mpfs-dev-cli-icicle-kit-es-20210927021251.rootfs.ext4 -rw-r--r-- 2 jaufranc jaufranc 103K Sep 27 09:27 mpfs-dev-cli-icicle-kit-es-20210927021251.rootfs.manifest -rw-r--r-- 2 jaufranc jaufranc 5.5G Sep 27 09:50 mpfs-dev-cli-icicle-kit-es-20210927021251.rootfs.wic -rw-r--r-- 2 jaufranc jaufranc 1.4G Sep 27 09:58 mpfs-dev-cli-icicle-kit-es-20210927021251.rootfs.wic.gz -rw-r--r-- 2 jaufranc jaufranc 225K Sep 27 09:27 mpfs-dev-cli-icicle-kit-es-20210927021251.testdata.json lrwxrwxrwx 2 jaufranc jaufranc 53 Sep 27 09:46 mpfs-dev-cli-icicle-kit-es.ext4 -> mpfs-dev-cli-icicle-kit-es-20210927021251.rootfs.ext4 lrwxrwxrwx 2 jaufranc jaufranc 57 Sep 27 09:27 mpfs-dev-cli-icicle-kit-es.manifest -> mpfs-dev-cli-icicle-kit-es-20210927021251.rootfs.manifest lrwxrwxrwx 2 jaufranc jaufranc 55 Sep 27 09:27 mpfs-dev-cli-icicle-kit-es.testdata.json -> mpfs-dev-cli-icicle-kit-es-20210927021251.testdata.json lrwxrwxrwx 2 jaufranc jaufranc 52 Sep 27 09:58 mpfs-dev-cli-icicle-kit-es.wic -> mpfs-dev-cli-icicle-kit-es-20210927021251.rootfs.wic lrwxrwxrwx 2 jaufranc jaufranc 55 Sep 27 09:58 mpfs-dev-cli-icicle-kit-es.wic.gz -> mpfs-dev-cli-icicle-kit-es-20210927021251.rootfs.wic.gz -rwxr-xr-x 1 jaufranc jaufranc 477K Sep 26 22:30 payload.bin lrwxrwxrwx 2 jaufranc jaufranc 36 Sep 26 18:06 u-boot.bin -> u-boot-icicle-kit-es-v2021.04-r0.bin lrwxrwxrwx 2 jaufranc jaufranc 36 Sep 26 18:06 u-boot-icicle-kit-es.bin -> u-boot-icicle-kit-es-v2021.04-r0.bin -rw-r--r-- 2 jaufranc jaufranc 476K Sep 26 18:06 u-boot-icicle-kit-es-v2021.04-r0.bin lrwxrwxrwx 2 jaufranc jaufranc 49 Sep 26 18:06 u-boot-mpfs-initial-env -> u-boot-mpfs-initial-env-icicle-kit-es-v2021.04-r0 lrwxrwxrwx 2 jaufranc jaufranc 49 Sep 26 18:06 u-boot-mpfs-initial-env-icicle-kit-es -> u-boot-mpfs-initial-env-icicle-kit-es-v2021.04-r0 -rw-r--r-- 2 jaufranc jaufranc 3.2K Sep 26 18:06 u-boot-mpfs-initial-env-icicle-kit-es-v2021.04-r0 |
The uncompressed image is 5.5GB large so it would be into an 8GB SD card, but 16GB or 32GB cards are recommended. This is the command provided by Microchip to flash it to an SD card:
|
1 |
zcat tmp-glibc/deploy/images/icicle-kit-es/mpfs-dev-cli-icicle-kit-es.wic.gz | sudo dd of=/dev/sdX bs=4096 iflag=fullblock oflag=direct conv=fsync status=progress |
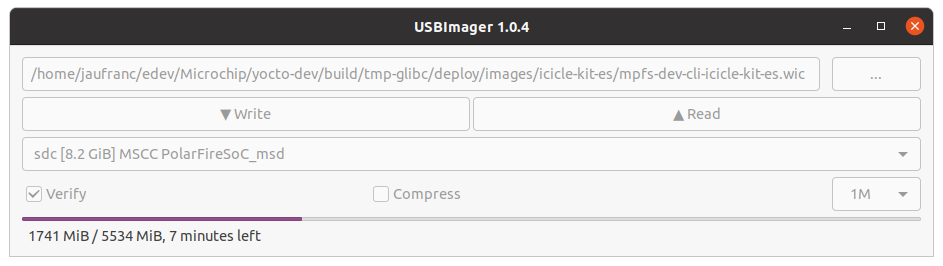
But if you want image verification, utilities like USBImager would be preferred. That’s what I used to flash the image to a 32GB SD card, which I then inserted into the SD card slot of the board to try it out.
Let’s interrupt the boot to check the SD card is detected:
|
1 2 3 4 5 6 7 8 9 10 11 12 13 14 15 16 17 18 19 20 21 22 23 24 |
U-Boot 2021.04 (Sep 26 2021 - 09:16:21 +0000) CPU: rv64imafdc Model: Microchip MPFS Icicle Kit DRAM: 2 GiB MMC: mmc@20008000: 0 In: serial@20100000 Out: serial@20100000 Err: serial@20100000 Net: eth0: ethernet@20112000 Hit any key to stop autoboot: 0 RISC-V # mmcinfo Device: mmc@20008000 Manufacturer ID: 0 OEM: 3432 Name: SD16G Bus Speed: 50000000 Mode: SD High Speed (50MHz) Rd Block Len: 512 SD version 3.0 High Capacity: Yes Capacity: 29.1 GiB Bus Width: 4-bit Erase Group Size: 512 Bytes |
All good, let’s carry on… and it fails to switch to the kernel. I eventually reflashed the image using the uncompressed binary, and I could login to the terminal:
|
1 2 3 4 5 6 7 8 9 10 11 12 13 14 15 16 17 18 19 20 21 22 23 24 25 26 27 28 29 30 31 32 |
root@icicle-kit-es:~# uname -a Linux icicle-kit-es 5.12.1 #1 SMP Sun Sep 26 08:45:19 UTC 2021 riscv64 riscv64 riscv64 GNU/Linux root@icicle-kit-es:~# df -g df: invalid option -- 'g' Try 'df --help' for more information. root@icicle-kit-es:~# df -f df: invalid option -- 'f' Try 'df --help' for more information. root@icicle-kit-es:~# df -h Filesystem Size Used Avail Use% Mounted on /dev/root 5.2G 4.2G 733M 86% / devtmpfs 817M 0 817M 0% /dev tmpfs 818M 0 818M 0% /dev/shm tmpfs 327M 9.5M 318M 3% /run tmpfs 4.0M 0 4.0M 0% /sys/fs/cgroup tmpfs 818M 0 818M 0% /tmp tmpfs 818M 100K 818M 1% /var/volatile tmpfs 164M 0 164M 0% /run/user/0 root@icicle-kit-es:~# fdisk -l GPT PMBR size mismatch (11334293 != 61067263) will be corrected by write. The backup GPT table is not on the end of the device. Disk /dev/mmcblk0: 29.12 GiB, 31266439168 bytes, 61067264 sectors Units: sectors of 1 * 512 = 512 bytes Sector size (logical/physical): 512 bytes / 512 bytes I/O size (minimum/optimal): 512 bytes / 512 bytes Disklabel type: gpt Disk identifier: 707A61C6-0BE8-405E-BF47-9E8071F3EEC9 Device Start End Sectors Size Type /dev/mmcblk0p1 8192 47009 38818 19M Microsoft basic data /dev/mmcblk0p2 47010 63393 16384 8M BIOS boot /dev/mmcblk0p3 65536 11334259 11268724 5.4G Linux filesystem |
The rootfs was not resized automatically, and it seems there’s a problem with the GPT table… I’m not quite sure what happened here. But since our self-built image is working, and we have an eMMC flash let’s flash it to the internal storage instead.
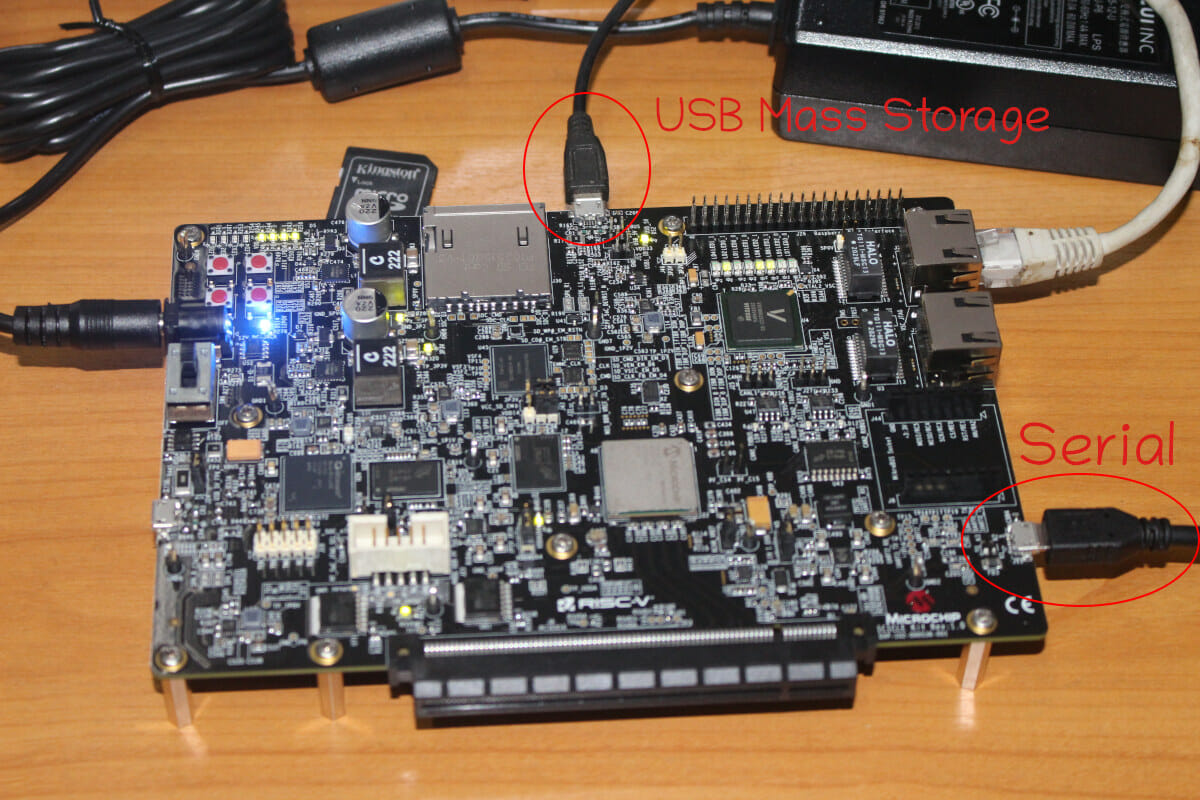
Power off the board, remove the SD card, and connect to ttyUSB0 with Bootterm to access the HSS terminal:
|
1 |
bt ttyUSB0 |
Before restarting the board, interrupting the boot, and type “usbdmsc” to expose the eMMC flash as a USB mass storage to our Ubuntu laptop.
|
1 2 3 4 5 6 7 8 9 10 11 12 13 14 15 16 |
[5.623947] HSS_MMCInit(): Attempting to select eMMC ... Passed Press a key to enter CLI, ESC to skip Timeout in 5 seconds .[6.915522] HSS_ShowTimeout(): Character 32 pressed [6.921945] HSS_TinyCLI_Parser(): Type HELP for list of commands [6.929236] HSS_TinyCLI_Parser(): >> usbdmsc [27.703151] HSS_TinyCLI_Execute(): Unknown command >><<. [27.710094] HSS_TinyCLI_Parser(): >> usbdmsc [37.207116] HSS_MMCInit(): Attempting to select SDCARD ... [38.215220] mmc_init_common(): MSS_MMC_init() returned unexpected 0 Failed [38.223900] HSS_MMCInit(): Attempting to select eMMC ... Passed Waiting for USB Host to connect... (CTRL-C to quit) USB Host connected. Waiting for disconnect... (CTRL-C to quit) 664064 bytes written, 21166080 bytes read |
We’ll need another Micro USB cable connected to J16 Micro USB port to see the flash in Ubuntu.
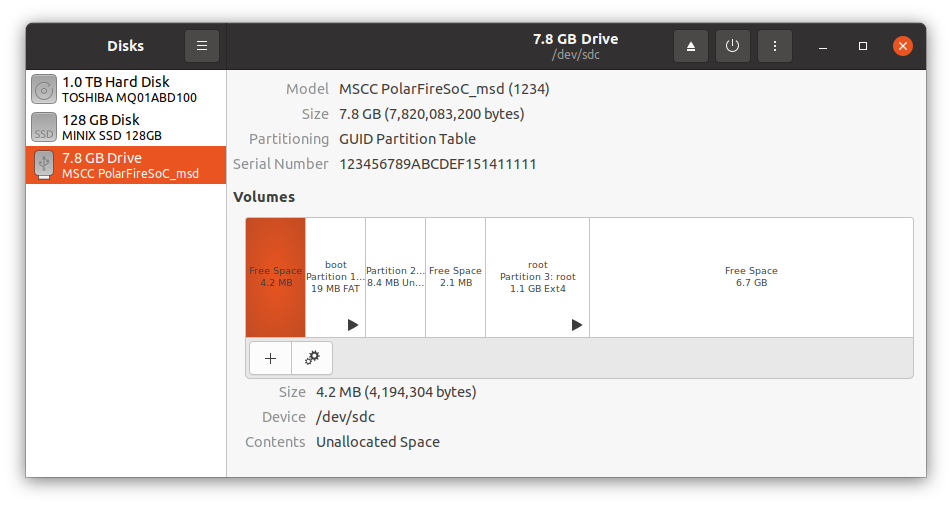
We can unmount the Boot and root partitions before flashing the image as we did for the SD card. I tried with the gz image first, but I had the same problem as with the SD card with the root partition failing to mount even on PC, so I went with the uncompressed image, and everything went smoothly.
 After completion, we can remove the micro USB cable connected to J16, and access our Linux image…
|
1 2 3 4 5 6 7 8 9 10 11 12 13 14 15 16 17 18 |
jaufranc@cnx-laptop-4:~/edev/Microchip/yocto-dev/build$ bt ttyUSB1 Trying port ttyUSB1... Connected to ttyUSB1 at 115200 bps. Escape character is 'Ctrl-]'. Use escape followed by '?' for help. icicle-kit-es login: root root@icicle-kit-es:~# uname -a Linux icicle-kit-es 5.12.1 #1 SMP Sun Sep 26 08:45:19 UTC 2021 riscv64 riscv64 riscv64 GNU/Linux root@icicle-kit-es:~# df -h Filesystem Size Used Avail Use% Mounted on /dev/root 5.2G 4.2G 733M 86% / devtmpfs 817M 0 817M 0% /dev tmpfs 818M 0 818M 0% /dev/shm tmpfs 327M 9.6M 318M 3% /run tmpfs 4.0M 0 4.0M 0% /sys/fs/cgroup tmpfs 818M 0 818M 0% /tmp tmpfs 818M 100K 818M 1% /var/volatile tmpfs 164M 0 164M 0% /run/user/0 root@icicle-kit-es:~# |
Hello World Cross-Compilation
Let’s try to cross-compile the Hello World program.
|
1 2 3 4 5 |
#include <stdio.h> int main() { printf("Hello, World!\n"); return 0; } |
for RISC-V using the Yocto toolchain, which we’ll first add to our path:
|
1 |
export PATH=$PATH:~/edev/Microchip/yocto-dev/build/tmp-glibc/sysroots-components/x86_64/gcc-cross-riscv64/usr/bin/riscv64-oe-linux |
and use the RISCV GCC tool to build it:
|
1 2 3 4 5 |
riscv64-oe-linux-gcc hello.c -o hello hello.c:1:10: fatal error: stdio.h: No such file or directory 1 | #include <stdio.h> | ^~~~~~~~~ compilation terminated. |
Oops, it does not work as expected. It looks like the toolchain is not properly installed, or I used the wrong one. I’ve tried to play with CFLAGS, but no luck… Maybe it’s only supposed to work within Yocto/Bitbake framework… I’ve got more experience with buildroot, and usually the cross-compilation toolchain works out of the box.
EEMBC CoreMark Benchmark
So I’ll build EEMBC CoreMark natively, i.e. directly on the board. The image we’ve built comes with git and the GNU GCC toolchain so it should be straightforward.
|
1 2 3 |
https://github.com/eembc/coremark cd coremark/ make -j4 |
This both builds and runs CoreMark with two files generated
- run1.log
12345678910111213141516172K performance run parameters for coremark.CoreMark Size : 666Total ticks : 14935Total time (secs): 14.935000Iterations/Sec : 1339.136257Iterations : 20000Compiler version : GCC11.1.0Compiler flags : -O2 -DPERFORMANCE_RUN=1 -lrtMemory location : Please put data memory location here(e.g. code in flash, data on heap etc)seedcrc : 0xe9f5[0]crclist : 0xe714[0]crcmatrix : 0x1fd7[0]crcstate : 0x8e3a[0]crcfinal : 0x382fCorrect operation validated. See README.md for run and reporting rules.CoreMark 1.0 : 1339.136257 / GCC11.1.0 -O2 -DPERFORMANCE_RUN=1 -lrt / Heap - run2.log
123456789101112131415162K validation run parameters for coremark.CoreMark Size : 666Total ticks : 14907Total time (secs): 14.907000Iterations/Sec : 1341.651573Iterations : 20000Compiler version : GCC11.1.0Compiler flags : -O2 -DPERFORMANCE_RUN=1 -lrtMemory location : Please put data memory location here(e.g. code in flash, data on heap etc)seedcrc : 0x18f2[0]crclist : 0xe3c1[0]crcmatrix : 0x0747[0]crcstate : 0x8d84[0]crcfinal : 0xd304Correct operation validated. See README.md for run and reporting rules.
The board achieved a 1339.136257 score, or about 2.23 CoreMark/MHz since the RISC-V cores run at 600 MHz. But Microchip reports 3.25 CoreMark/MHz on the board. Let’s try again with the same flags as used by the company:
|
1 2 |
make clean make XCFLAGS="-O3 -DHAS_STDIO -DHAS_TIME_H -DUSE_CLOCK -fno-common -funroll-loops -finline-functions -falign-functions=16 -falign-jumps=4 -falign-loops=4 -finline-limit=1000 -fno-if-conversion2 -fselective-scheduling -fno-tree-dominator-opts -lpthread -DHAS_FLOAT=0 -mtune=sifive-7-series" |
This is the content of run1.log:
|
1 2 3 4 5 6 7 8 9 10 11 12 13 14 15 16 |
2K performance run parameters for coremark. CoreMark Size : 666 Total ticks : 12874295 Total time (secs): 12 Iterations/Sec : 1666 Iterations : 20000 Compiler version : GCC11.1.0 Compiler flags : -O2 -O3 -DHAS_STDIO -DHAS_TIME_H -DUSE_CLOCK -fno-common -funroll-loops -finline-functions -falign-functions=16 -falign-jumps=4 -falign-loops=4 -finline-limit=1000 -fno-if-conversion2 -fselective-scheduling -fno-tree-dominator-opts -lpthread -DHAS_FLOAT=0 -mtune=sifive-7-series -DPERFORMANCE_RUN=1 -lrt Memory location : Please put data memory location here (e.g. code in flash, data on heap etc) seedcrc : 0xe9f5 [0]crclist : 0xe714 [0]crcmatrix : 0x1fd7 [0]crcstate : 0x8e3a [0]crcfinal : 0x382f Correct operation validated. See README.md for run and reporting rules. |
Somehow the CoreMark score is nowhere to be found, but we still have the Iterations/Sec that went from 1341.651573 to 1666. So it’s improved. It’s easy to see why the score did not show by looking at the code:
|
1 2 3 4 5 6 7 8 9 10 11 |
ee_printf( "Correct operation validated. See README.md for run and reporting " "rules.\n"); #if HAS_FLOAT if (known_id == 3) { ee_printf("CoreMark 1.0 : %f / %s %s", default_num_contexts * results[0].iterations / time_in_secs(total_time), COMPILER_VERSION, COMPILER_FLAGS); |
Let’s repeat this with -DHAS_FLOAT=1 instead…
|
1 |
make clean make XCFLAGS="-O3 -DHAS_STDIO -DHAS_TIME_H -DUSE_CLOCK -fno-common -funroll-loops -finline-functions -falign-functions=16 -falign-jumps=4 -falign-loops=4 -finline-limit=1000 -fno-if-conversion2 -fselective-scheduling -fno-tree-dominator-opts -lpthread -DHAS_FLOAT=1 -mtune=sifive-7-series" |
This time it looks correct:
|
1 2 3 4 5 6 7 8 9 10 11 12 13 14 15 16 17 |
2K performance run parameters for coremark. CoreMark Size : 666 Total ticks : 12842191 Total time (secs): 12.842191 Iterations/Sec : 1557.366652 Iterations : 20000 Compiler version : GCC11.1.0 Compiler flags : -O2 -O3 -DHAS_STDIO -DHAS_TIME_H -DUSE_CLOCK -fno-common -funroll-loops -finline-functions -falign-functions=16 -falign-jumps=4 -falign-loops=4 -finline-limit=1000 -fno-if-conversion2 -fselective-scheduling -fno-tree-dominator-opts -lpthread -DHAS_FLOAT=1 -mtune=sifive-7-series -DPERFORMANCE_RUN=1 -lrt Memory location : Please put data memory location here (e.g. code in flash, data on heap etc) seedcrc : 0xe9f5 [0]crclist : 0xe714 [0]crcmatrix : 0x1fd7 [0]crcstate : 0x8e3a [0]crcfinal : 0x382f Correct operation validated. See README.md for run and reporting rules. CoreMark 1.0 : 1557.366652 / GCC11.1.0 -O2 -O3 -DHAS_STDIO -DHAS_TIME_H -DUSE_CLOCK -fno-common -funroll-loops -finline-functions -falign-functions=16 -falign-jumps=4 -falign-loops=4 -finline-limit=1000 -fno-if-conversion2 -fselective-scheduling -fno-tree-dominator-opts -lpthread -DHAS_FLOAT=1 -mtune=sifive-7-series -DPERFORMANCE_RUN=1 -lrt / Heap |
But that’s only 2.59 CoreMark/Mhz, still not quite up to 3.125 CoreMark/MHz. Actually, it matches Microchip’s results using unsigned index. Somebody tried to do the same and was advised to change the code in posix/core_portme.h to use signed index:
|
1 |
typedef signed int ee_u32; |
After running the benchmark again, the score is even higher:
|
1 2 3 4 5 6 7 8 9 10 11 12 13 14 15 16 17 |
2K performance run parameters for coremark. CoreMark Size : 666 Total ticks : 16767651 Total time (secs): 16.767651 Iterations/Sec : 1789.159376 Iterations : 30000 Compiler version : GCC11.1.0 Compiler flags : -O2 -O3 -DHAS_STDIO -DHAS_TIME_H -DUSE_CLOCK -fno-common -funroll-loops -finline-functions -falign-functions=16 -falign-jumps=4 -falign-loops=4 -finline-limit=1000 -fno-if-conversion2 -fselective-scheduling -fno-tree-dominator-opts -lpthread -DHAS_FLOAT=1 -mtune=sifive-7-series -DPERFORMANCE_RUN=1 -lrt Memory location : Please put data memory location here (e.g. code in flash, data on heap etc) seedcrc : 0xe9f5 [0]crclist : 0xe714 [0]crcmatrix : 0x1fd7 [0]crcstate : 0x8e3a [0]crcfinal : 0x5275 Correct operation validated. See README.md for run and reporting rules. CoreMark 1.0 : 1789.159376 / GCC11.1.0 -O2 -O3 -DHAS_STDIO -DHAS_TIME_H -DUSE_CLOCK -fno-common -funroll-loops -finline-functions -falign-functions=16 -falign-jumps=4 -falign-loops=4 -finline-limit=1000 -fno-if-conversion2 -fselective-scheduling -fno-tree-dominator-opts -lpthread -DHAS_FLOAT=1 -mtune=sifive-7-series -DPERFORMANCE_RUN=1 -lrt / Heap |
1789.159376 CoreMark corresponds to roughly 2.98 CoreMark/MHz. Let’s do a final hack by defining HAS_FLOAT=0 in the make command line. Results:
|
1 2 3 4 5 6 7 8 9 10 11 12 13 14 15 16 |
2K performance run parameters for coremark. CoreMark Size : 666 Total ticks : 16694339 Total time (secs): 16 Iterations/Sec : 1875 Iterations : 30000 Compiler version : GCC11.1.0 Compiler flags : -O2 -O3 -DHAS_STDIO -DHAS_TIME_H -DUSE_CLOCK -fno-common -funroll-loops -finline-functions -falign-functions=16 -falign-jumps=4 -falign-loops=4 -finline-limit=1000 -fno-if-conversion2 -fselective-scheduling -fno-tree-dominator-opts -lpthread -DHAS_FLOAT=0 -mtune=sifive-7-series -DPERFORMANCE_RUN=1 -lrt Memory location : Please put data memory location here (e.g. code in flash, data on heap etc) seedcrc : 0xe9f5 [0]crclist : 0xe714 [0]crcmatrix : 0x1fd7 [0]crcstate : 0x8e3a [0]crcfinal : 0x5275 Correct operation validated. See README.md for run and reporting rules. |
Let’s use the Iterations/Sec result: 1875 as the CoreMark 1.0 value, and in this case, we can indeed achieve exactly 3.125 CoreMark/MHz as Microchip did for using a signed index. Why signed is significantly faster than unsigned, I’m not quite sure… and we’d need to look at the assembly, and check the number of cycles for each instruction to find out.
It truly shows how benchmarks can be tweaked/manipulated to achieve greater results, and also the importance of compile flags to optimize the code. The voltage/current analytics web page did not show any significant variation during testing.
That will be all for today, and in a few weeks, I’ll hopefully post something about the FPGA part. Somebody asked me to assess virt-io over the PCI-e bus, but due to time constraints, I was unable to do so. I still asked Microchip who replied that it should work, but they haven’t tested for it…
If you are interested in the board, it’s available from various distributors, such as Mouser, for under $500.

Jean-Luc started CNX Software in 2010 as a part-time endeavor, before quitting his job as a software engineering manager, and starting to write daily news, and reviews full time later in 2011.
Support CNX Software! Donate via cryptocurrencies, become a Patron on Patreon, or purchase goods on Amazon or Aliexpress


