
Swift programming language has been developed by Apple for iOS, iPadOS, macOS, watchOS, tvOS, and Linux. The programming language works with Apple’s Cocoa and Cocoa Touch frameworks, as well as existing Objective-C code written for Apple products.
MadMachine has now created an Arm Cortex-M7 development board, named SwiftIO, specifically designed for Swift programming language through MadMachine IDE and SwiftIO framework.
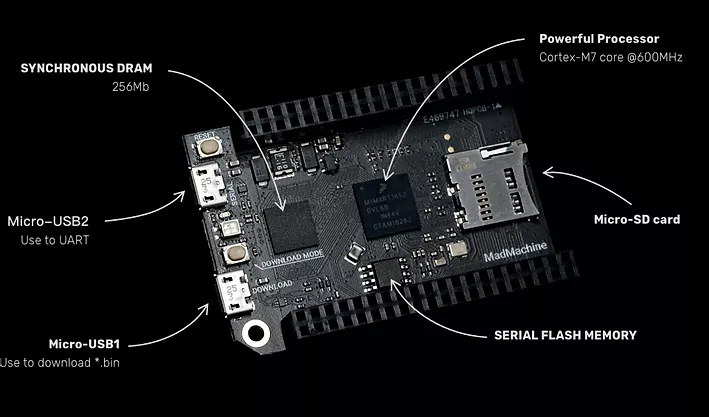
SwiftIO hardware specifications:
- SoC – NXP i.MX RT1052 Arm Cortex-M7 Crossover Processor @ 600MHz
- System Memory – 32 MB SRAM
- Storage – MicroSD card slot supporting standard and high capacity SD cards
- USB – 1x Micro USB connector for power, 1x Micro USB connector for serial communication
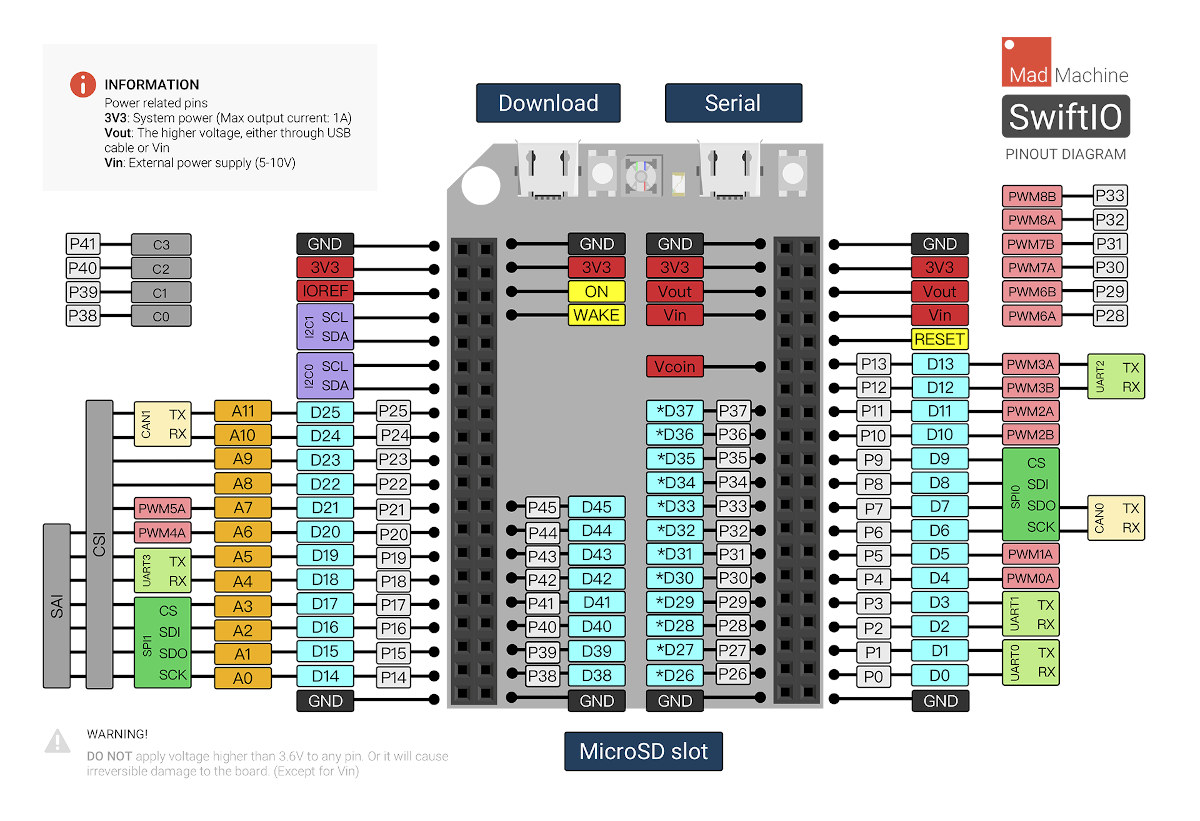
- Expansion – 2x 46 GPIO headers with 12x 12-bit analog to digital (ADC) converters, 4x UART, 2x CAN, 2x IIC, 2x SPI, 14x PWM
- Misc – On-board RGB LED, download and reset buttons
- Power Supply – 5V via Micro USB port
- Dimensions – TBD
MadMachine IDE is the equivalent of the Arduino IDE for Arduino compatible boards, and allows the development of Swift programs on Mac OS X or Windows, with Linux support in the works.
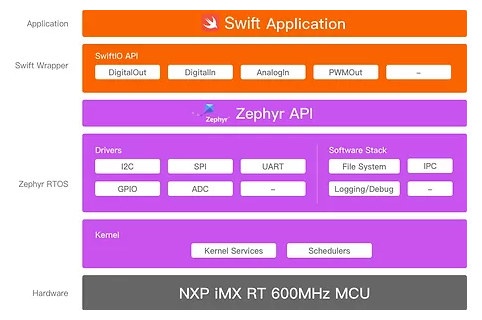
The software architecture diagram shows the board relies on Zephyr real-time operating systems, and MadMachine provides higher-level API to control I/O using the Swift programming language.
Since MadMachine IDE is not yet available for Linux, I installed the IDE (270MB) in a Windows virtual machine, and the development workflow looks similar to what you’d do with Arduino boards as the resulting binary uploaded to the board via a micro USB cable. Here’s what the Blink “Sketch” looks like:
|
1 2 3 4 5 6 7 8 9 10 11 12 13 14 15 16 17 18 |
/// Turn on and off the onboard LED continuously. /// Import the library to enable the relevant classes and functions. import SwiftIO /// Initialize the onboard green LED with other parameters set to default. let green = DigitalOut(Id.GREEN) /// Blink the LED over and over again. while true { // Apply a high votage and turn off the LED. green.write(true) // Keep the light off for a minute. sleep(ms: 1000) // Apply a low voltage and turn on the LED. green.write(false) // Keep the light on for a minute. sleep(ms: 1000) } |
You can also watch the video below to learn how to get started.
You’ll also documentations and code samples on Github.
SwiftIO Arm Cortex-M7 board can be purchased now for $68 on MadMachine store, and there’s also a $118 kit with various components such as a buzzer, resistors, a servo, etc… in order to get started with electronics design using Swift. More details can be found on MadMachine.io website.

Jean-Luc started CNX Software in 2010 as a part-time endeavor, before quitting his job as a software engineering manager, and starting to write daily news, and reviews full time later in 2011.
Support CNX Software! Donate via cryptocurrencies, become a Patron on Patreon, or purchase goods on Amazon or Aliexpress


