
![]()
The Build Process
Below steps cover the required pre-build environment and how to build OpenWrt from the source tree for Raspberry Pi board. Even though OpenWrt recommends Debian for the build machine, I built it successfully on Ubuntu 18.04 Desktop.
Setup Build Environment
|
1 2 3 4 5 6 7 |
sudo apt-get update sudo apt-get install git-core subversion mercurial build-essential libssl-dev libncurses5-dev unzip gawk zlib1g-dev unset SED unset GREP_OPTIONS export GREP_OPTIONS= export PATH=$PATH:~/openwrt/openwrt/staging_dir/host/bin export PATH=$PATH:~/openwrt/openwrt/staging_dir/toolchain-mips_34kc_gcc-5.3.0_musl-1.1.16 |
Build OpenWrt
Fetch the source tree from Openwrt git repo
|
1 |
git clone https://github.com/openwrt/openwrt.git |
Move to OpenWRT source tree and execute the following commands:
|
1 2 3 4 |
cd openwrt ./scripts/feeds update -a ./scripts/feeds install -a make menuconfig |
Make menuconfig will bring a GUI to select various parameters before initiating the build process such as –
- Target build system & subsystem
- Packages required to be part of the build – Base packages, packages required for system administration, development packages & extra packages.
- Firmware for various (wireless) chips/modules
- Kernel modules
- Option to enable support for various programming languages & libraries
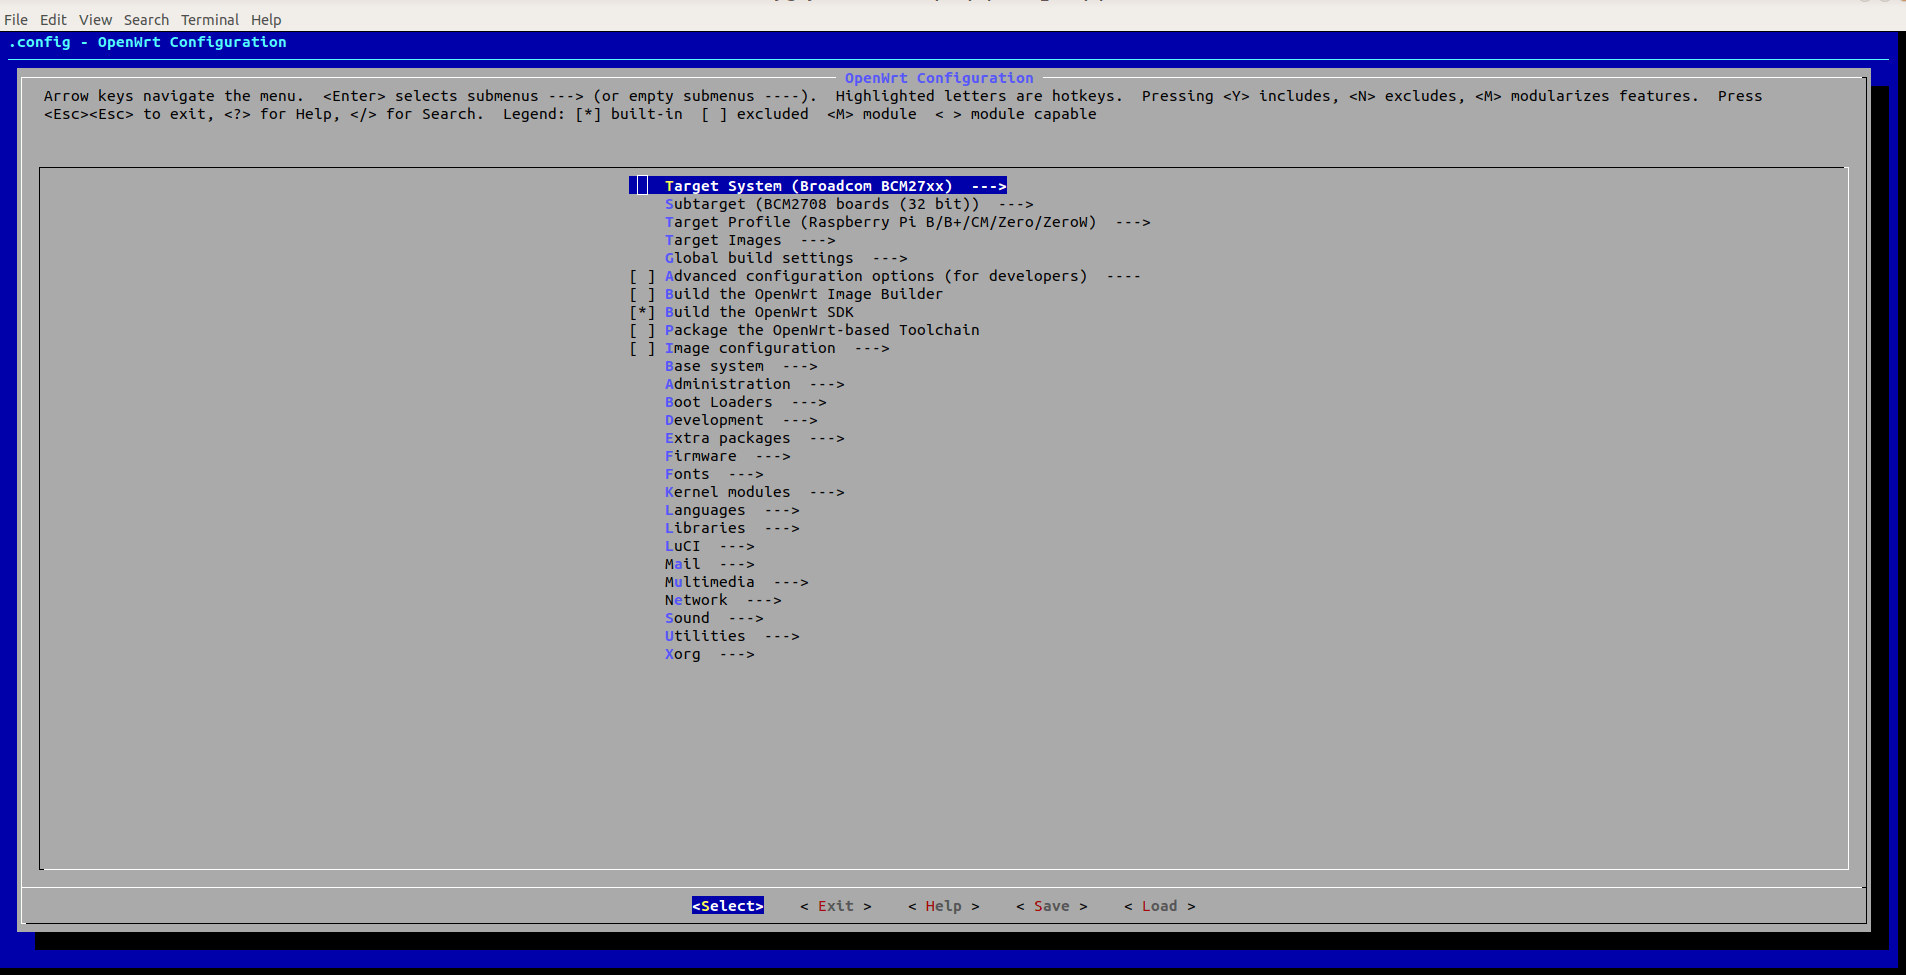
The below build instructions are for building Openwrt for RPi B+, and the Target System will remain the same (BCM27XX) for other Raspberry Pi boards as highlighted in the screenshot below.
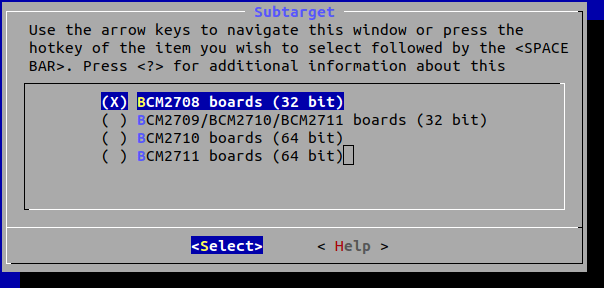
The Subtarget will be BCM2708 for the original Raspberry Pi boards and Pi Zero variants, while, the second option is preferred for Raspberry Pi 2B (BCM2709), Raspberry Pi 3B (BCM2710), and Raspberry Pi 4 (BCM2711) as highlighted below.
Once the necessary modifications been added and saved you can exit from the GUI and can start the actual build process by executing the following command.
|
1 |
make |
This process may take from several minutes up to a few hours. Once the build process is completed successfully you will be able to see the compiled images and packages at “/openwrt/bin/targets/brcm2708/bcm2708”.
If the build fails with some errors, it’s better to recompile by using the following command to get more details of the error:
|
1 |
make -j1 V=s |
Customizations
Netdata is part of the build system
We can install Netdata performance and system health monitoring easily as the required components (Packages, MakeFile and custom configuration files) are already part of OpenWrt Source tree in openwrt/feeds/packages/admin. We can enable the specific package with “make menuconfig” and netdata will compile at the time of source tree build.

Post compilation and build process, the ipk of netdata will be available in “openwrt/bin/targets/brcm2708/bcm2708/packages” folder.
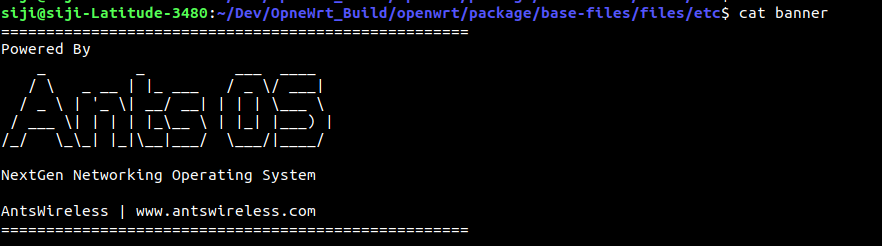
Add a custom pre-login message
You can modify the file “banner” in “openwrt/package/base-files/files/etc” folder so that your image shows a custom pre-login message at boot time.
FIGlet Linux utility can create ASCII art from the text using the command line. Simply install it, and create ASCII art using the commands below.
|
1 2 |
$ sudo apt-get install figlet $ figlet "Ants OS" > ~/banner.txt |
The ASCII artwork will be generated and saved in banner.txt in your home folder. There are also some other online tools available to generate ASCII art from text.

An Entrepreneur, an Opensource Enthusiast and Researcher in the domain of Embedded Systems, Wireless and IoT – Has over 16+ years of experience in managing and contributing enterprise Research Projects, in Embedded Systems, Software Technologies, Product Conceptualizations and development, Telecommunication, Media and Entertainment and Consumer Electronics.
Support CNX Software! Donate via cryptocurrencies, become a Patron on Patreon, or purchase goods on Amazon or Aliexpress


