
The web is becoming more secure as more and more websites leverage HTTPS, which also improves privacy since the only nodes that know which exact page you are accessing should be your computer/device and the server running the website. If you’re using a search engine, they will also know and potentially get track of your history depending on your favorite search engine.
One thing that’s still often unencrypted are DNS requests which convert a website name into an IP address. The servers are also often provided by your ISP, so they may not know which exact page you’ve accessed, but they can still keep track of the websites you’ve visited.
Depending where you live, your government may also block DNS servers in your country during “periods of unstability”, so third-party DNS services can be useful. For example, using 8.8.8.8 or 8.8.8.4 from Google, and now 1.1.1.1 or 1.0.0.1 from Cloudflare, which – beside improved privacy – has the advantage of being faster than competing services (14.8ms vs 68.23 for average ISP DNS server), and supports DNS over HTTPS (DoH) or DNS over TLS to encrypt the requests over the Internet.
DNS will always require a third party, so in practice, you are moving from your ISP DNS to Cloudflare DNS, but the company promises not to log your IP address with KPMG contracted to audit their systems annually.
Changing your DNS address is fairly easy, and you can simply adds the four addresses below in your DNS settings of your computer and/or router.
- IPv4 – 1.1.1.1 & 1.0.0.1
- IPv6 – 2606:4700:4700::1111 & 2606:4700:4700::1001
Disconnect and reconnect your connection, and you should see the DNS servers in use.
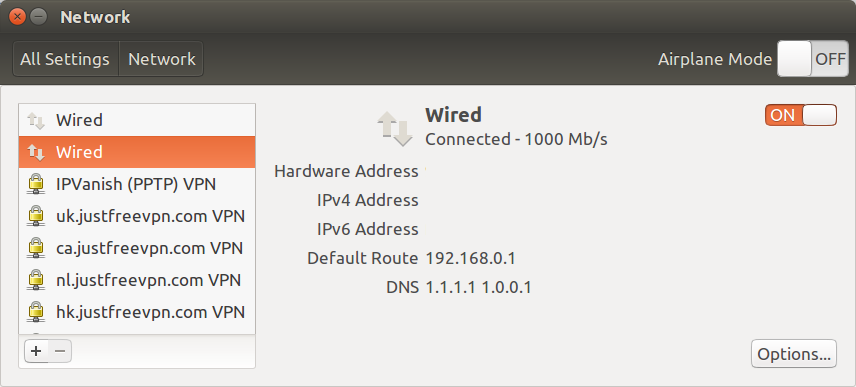
Access a website with ping or a web browser, and you should it using 1.1.1.1 and 1.0.0.1.
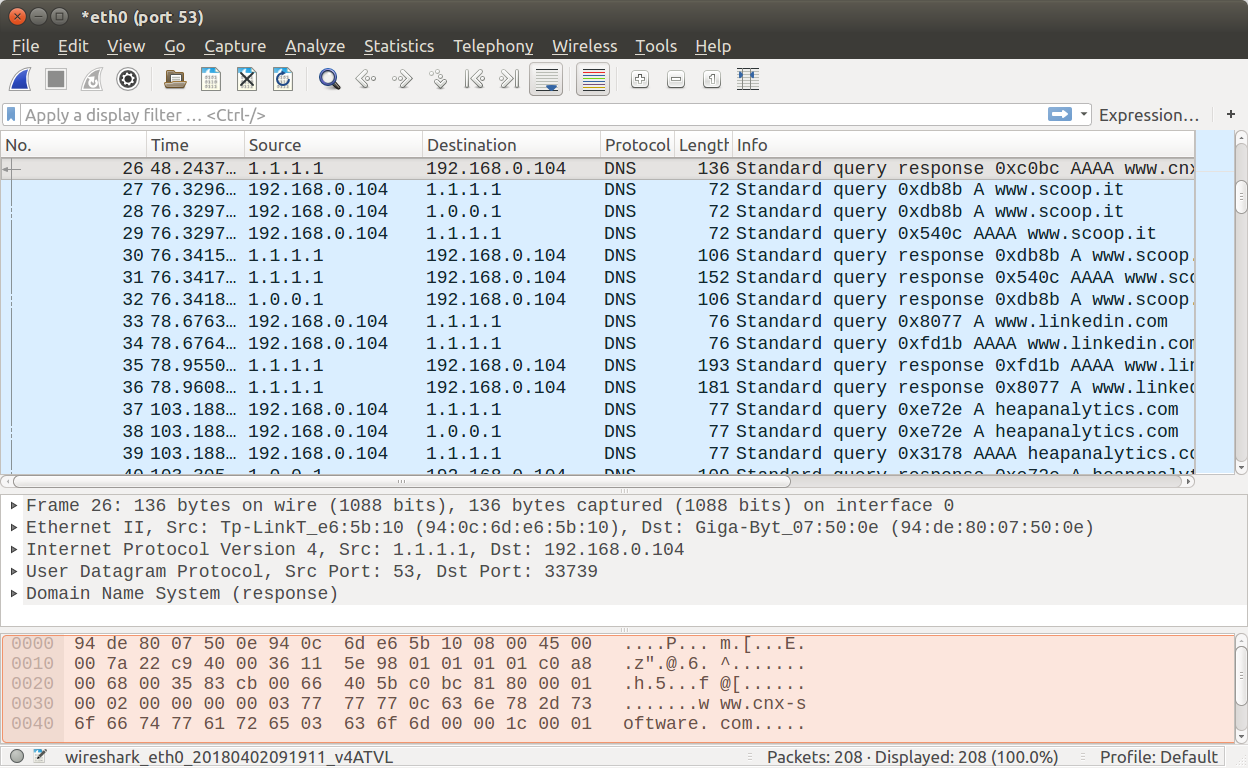
You’re now not sending DNS traffic to your ISP DNS servers, but unencrypted traffic still go through, so in theory they’d be able to easily track and log your DNS requests if they wished. So you may want to encrypt data using DNS-over-TLS and DNS-over-HTTPS since both are supported by 1.1.1.1 service.
The instructions for DNS over HTTPS are easier to follow, so I selected this method, and Cloudflare offers two options of clients: cloudflared or dnscrypt-proxy.
Cloudflared is useful for a quick check, but eventually you may want to run dnscrypt-proxy since it’s supported by Linux distributions, and there’s already a community around it.
I still tried Cloudflared first. My computer is running Ubuntu 16.04 64-bit, so all instructions will be for this OS, but you’ll be able to use at least one of the client on Windows, Arm Linux, Mac OS, Android, etc…
Cloudlfared installation:
|
1 2 |
wget https://bin.equinox.io/c/VdrWdbjqyF/cloudflared-stable-linux-amd64.deb sudo dpkg -i cloudflared-stable-linux-amd64.deb |
Checking version:
|
1 2 |
cloudflared --version cloudflared version 2018.3.11 (built 2018-03-29-2244 UTC) |
Running the proxy…
|
1 2 3 4 |
sudo cloudflared proxy-dns INFO[0000] Adding DNS upstream url="https://cloudflare-dns.com/.well-known/dns-query" INFO[0000] Starting metrics server addr="127.0.0.1:45261" INFO[0000] Starting DNS over HTTPS proxy server addr="dns://localhost:53" |
and doing a quick test on cnx-software.com:
|
1 2 3 |
dig +short @127.0.0.1 cnx-software.com AAAA 2400:cb00:2048:1::681c:125f 2400:cb00:2048:1::681c:135f |
It seems to be working as expected. But as mentioned previoulsy, dnscrypt-proxy is probably a better idea, and it’s part of Ubuntu 16.04 repository:
|
1 2 3 |
sudo apt install dnscrypt-proxy dnscrypt-proxy -V dnscrypt-proxy 1.6.1 |
However version 2.0 or greater is required by 1.1.1.1, so I downloaded the latest version (2.08) which you’ll find for many different targets and operating systems. I picked up the release for Linux x86_64:
|
1 2 |
wget https://github.com/jedisct1/dnscrypt-proxy/releases/download/2.0.8/dnscrypt-proxy-linux_x86_64-2.0.8.tar.gz tar xvf dnscrypt-proxy-linux_x86_64-2.0.8.tar.gz |
Now we can enter the extracted directory, copy the example dnscrypt-proxu.toml configuration file…
|
1 2 |
cd linux-x86_64 cp example-dnscrypt-proxy.toml dnscrypt-proxy.toml |
and edit the server_names line as follows:
|
1 |
server_names = ['cloudflare', 'cloudflare-ipv6'] |
or if you want to also keep the other services. The fastest DNS service will be selected at start time (always Cloudflare in my case)
|
1 |
server_names = ['scaleway-fr', 'google', 'yandex', 'cloudflare', 'cloudflare-ipv6'] |
Save, and we can test whether the proxy is working with the following command:
|
1 2 3 4 5 6 7 8 |
./dnscrypt-proxy -resolve cloudflare-dns.com Resolving [cloudflare-dns.com] Domain exists: yes, 3 name servers found Canonical name: cloudflare-dns.com. IP addresses: 104.16.112.25, 104.16.111.25, 2400:cb00:2048:1::6810:7019, 2400:cb00:2048:1::6810:6f19 TXT records: - Resolver IP: 67.215.80.70 (m37.sin.opendns.com.) |
I found three 3 name servers and IP addresses using an opendns.com resolver, so it looks all good, and we can now run dnscrypt-proxy as a service.
But first I had to remove version 1.6.1 I installed from the Ubuntu repository, and the installation script – precisely systemctl -will fail:
|
1 2 |
sudo apt purge dnscrypt-proxy sudo rm /etc/systemd/system/dnscrypt-proxy.service |
Now we can install it and start the service:
|
1 2 3 4 5 6 7 8 |
sudo ./dnscrypt-proxy -service install [2018-04-02 10:03:12] [NOTICE] Source [public-resolvers.md] loaded [2018-04-02 10:03:12] [NOTICE] dnscrypt-proxy 2.0.8 [2018-04-02 10:03:13] [NOTICE] Installed as a service. Use `-service start` to start sudo ./dnscrypt-proxy -service start [2018-04-02 10:03:32] [NOTICE] Source [public-resolvers.md] loaded [2018-04-02 10:03:32] [NOTICE] dnscrypt-proxy 2.0.8 [2018-04-02 10:03:36] [NOTICE] Service started |
We also need to update /etc/network/interfaces
|
1 |
sudoedit /etc/network/interfaces |
by adding the following line at the end of the file:
|
1 |
dns-nameservers 127.0.0.1 |
We can now restart the loopback interface:
|
1 |
sudo ifdown lo && sudo ifup lo |
The final step is to change the DNS in your router or computer setting to 127.0.0.1, replacing the 1.1.1.1 and 1.0.0.1 values we used in the configuration above.
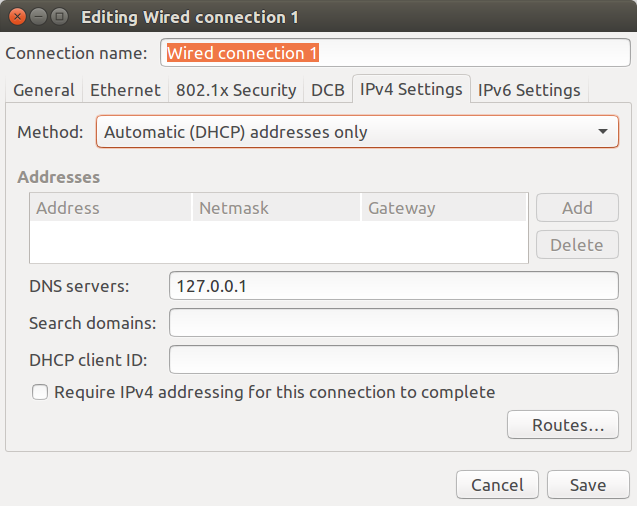
All DNS traffic will now be redirected to the loopback interface (lo), and send over HTTPS to the Internet.
You may wish to visit 1.1.1.1 website for more details.

Jean-Luc started CNX Software in 2010 as a part-time endeavor, before quitting his job as a software engineering manager, and starting to write daily news, and reviews full time later in 2011.
Support CNX Software! Donate via cryptocurrencies, become a Patron on Patreon, or purchase goods on Amazon or Aliexpress


