Venus Supply is an embedded systems company based in Bangkok, Thailand that sells products through their ThaiEasyElec website/brand, as well as a act as a local distributor for popular DIY electronics items. I previously tested their ESPino32 ESP32 board, and the company has now send me another of their new product called “3G HAT Expansion for Raspberry Pi” and based on Quectel UC20-G that support 3G and GPS/GLONASS connectivity globally, meaning it should work in any country with 2G or 3G coverage.
After listing the specifications, going through unboxing and assembly with a Raspberry Pi 2/3 board, I’ll write some quick start guide to show what I had to do to use GPS and connect to 3G with a Hologram SIM card.
3G HAT Expansion for Raspberry Pi Specifications
- Quectel UC20-G wireless module supporting
- Cellular
- 3G – UMTS @ 800/850/900/1900/2100 MHz
- 2G – GSM @ 850/900/1800/1900 MHz
- Data – HSPA+ up to 14.4 Mbps Downlink, 5.76 Mbps Uplink, EDGE, GPRS
- Push-Pull SIM Card with ESD protection
- Main + Diversity RP-SMA antenna connectors
- GNSS
- Qualcomm gpsOne Gen8 engine
- GPS, GLONASS
- RP-SMA antenna connector
- Cellular
- Host interface – USB and UART
- Audio – Audio codec, and 3.5 audio jack with microphone and mono audio
- Misc
- Auto start jumper (J3)
- Software start/stop via GPIO17 or GPIO18 pin configurable via Jumper “P8”
- Power switch
- LED – Status LED, network, power
- Back-up battery to reduce GPS fix time
- Raspberry Pi Hat Compatible with 40-pin Raspberry Pi header
Unboxing
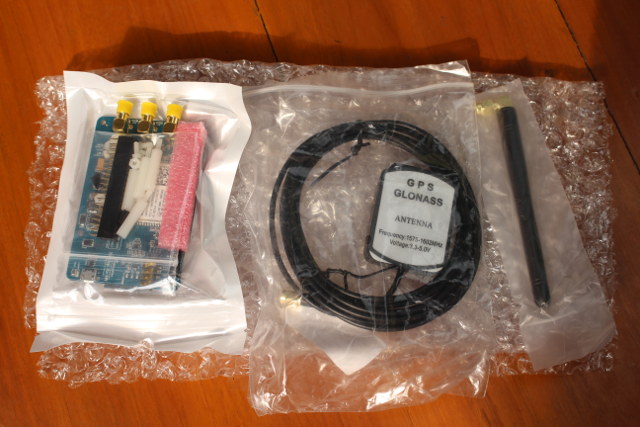
I received the kit in a carton box with three zipped packages: one for the board and accessories, and two for the GPS/GLONASS and 3G antennas which are not included by default.
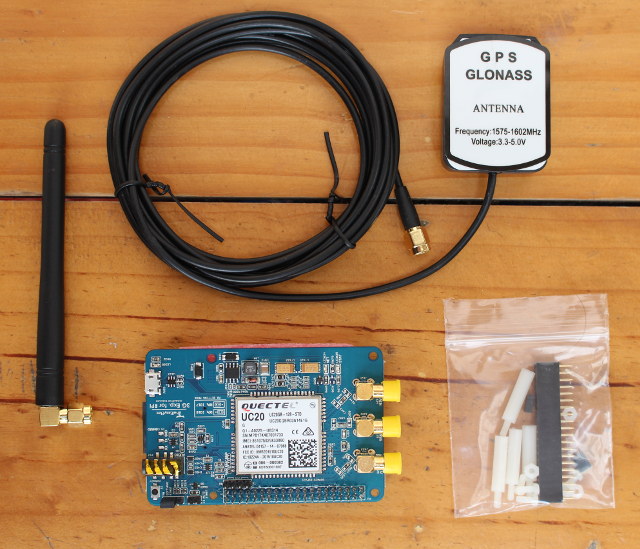
The GPS antenna comes with a 3-meter cable which should make it suitable to install in most cars or trucks, and the HAT package includes an extra zip bag with spacers, screws, nuts, and a 40-pin female header. I’ve also been told a 25cm micro USB cable should be included, but it seems they forgot it for my package…
Looking closer at the board we can see Quectel UC20GB module in the center of the board, the three RP-SMA antenna connectors clearly marked with DIV, GNSS, and MAIN, the micro USB port for power and data, the 3.5mm audio jack, and in the top right connector J3 2-pin header to enable autostart, 3-pin P8 header to select GPIO 17 or GPIO 18 for software on/off, and the power key to manually start or stop the the module.
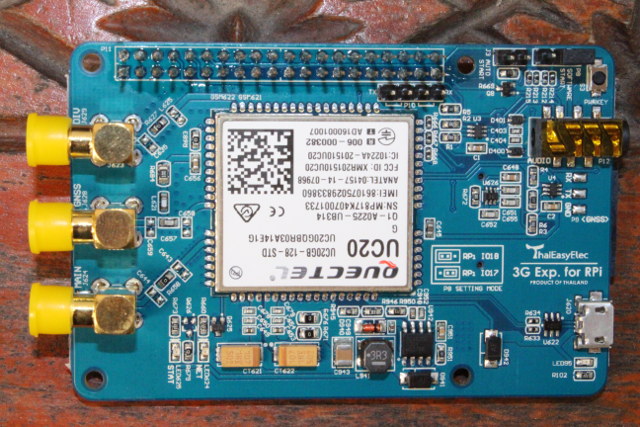
They’ve also given access the the 40-pin RPi header using male pins, as a 4-pin UART connector.
The other side of the battery comes the audio codec board based on Nuvoton NAU8814Y mono audio codec, the SIM card slot fitted with a black dummy SIM card, a CR1220 coincell battery for GPS fix backup, and a 40-pin female header used for connection to the Raspberry Pi.
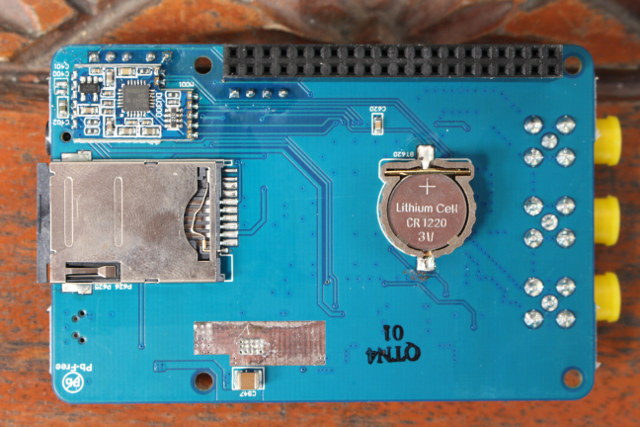
I’ve been told the battery supploes power to the internal clock engine of the module, which can calculate the new position of satellites and get GPS fix faster from data used up to 3 days ago.
3G HAT Assembly and Configuration with Raspberry Pi 2/3
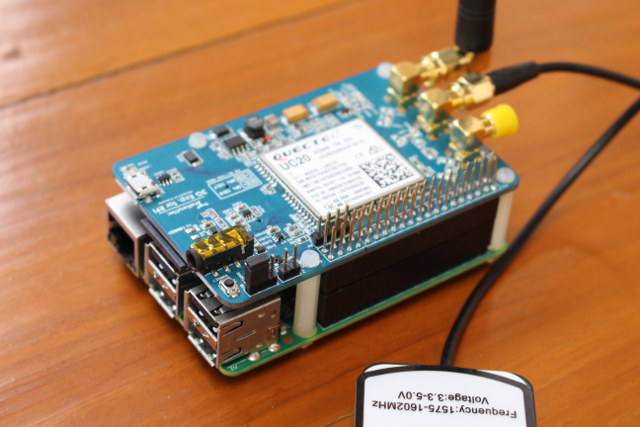 Connect the cellular antenna to the MAIN connector, and the GPS antenna to the GNSS connector. You’ll also need to flash Raspbian to a micro SD card. I’ll run the same Raspbian Stretch Lite image as I used with ANAVI Light pHAT starter kit.
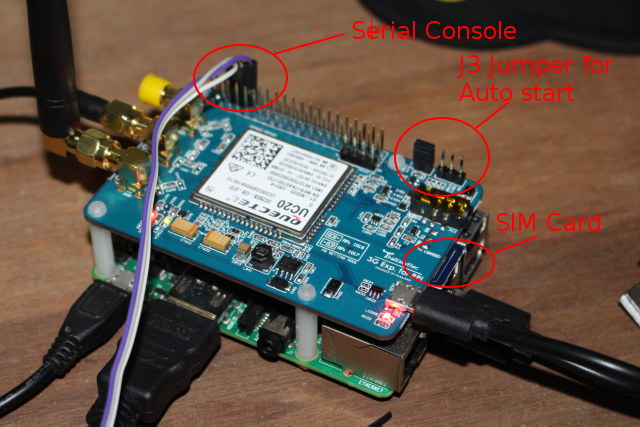
Find a (short) micro USB to USB cable to connect the micro USB port of the HAT expansion board to the one of the USB ports of the Raspberry Pi to power on the board. I also had to remove the dummy SIM card, and insert my own SIM card with the contacts facing the board. After installation, we’ll see around 3mm of the SIM card, but that’s normal. Finally, you’ll need to decide how you want to manage the power: either with the power button, J3 jumper to autostart, or with pin 17 or 18 from the Raspberry Pi. I decided to move the jumper to J3 to always power on the module, but if you run on batteries, you’ll probably want to use the GPIO pin instead.
Verify the 3G HAT is Recognized in Linux
Now we are ready to start our Raspberry Pi board, and login to a terminal via SSH, serial, or in the desktop. We should find Quectel UC20 module with 05c6:9003 VID:PID with lsusb:
|
1 2 |
lsusb Bus 001 Device 004: ID 05c6:9003 Qualcomm, Inc. Quectel UC20 |
If you don’t see it, make sure the USB cable is connected, and you’ve powered the module up. I recommend you move the jumper to J3 at first like I did. Then you should see four ttyUSB devices:
|
1 2 |
ls /dev/ttyUSB* /dev/ttyUSB0 /dev/ttyUSB1 /dev/ttyUSB2 /dev/ttyUSB3 |
Each are used by the module as follows:
- /dev/ttyUSB0 – DM interface – Diagnose port (no used in this review)
- /dev/ttyUSB1 – NMEA interface – For GPS NMEA sentence output (read-only)
- /dev/ttyUSB2 – AT interface (for GPS)
- /dev/ttyUSB3 – Modem interface for PPP connections and AT command
Controlling GPS and Handling GPS Data
ThaiEasyElec uses Putty for Linux, but since I’m doing this headless I’ll install picocom intead:
|
1 |
sudo apt install picocom |
Now we can connect to /dev/ttyUSB2 using 115200 8N1 to send some AT commands to the module:
|
1 2 3 4 5 6 7 8 9 |
picocom /dev/ttyUSB2 -b 115200 picocom v1.7 ... Terminal ready AT+QGPS=1 OK AT+QGPSEND OK |
The first command (AT+QGPS=1) turns the GNSS module on, and the second one (AT+QGPSEND) turns it off.
Let’s keep it on for now, and connect to /dev/ttyUSB1 @ 9600 baud to check NMEA output which should be updated every second when GPS is enabled:
|
1 2 3 4 5 6 7 8 9 10 11 12 13 14 15 16 17 18 19 20 21 22 23 24 25 26 27 28 |
pi@raspberrypi:~ $ picocom /dev/ttyUSB1 -b 9600 picocom v1.7 ... Terminal ready $GPGSV,1,1,01,14,,,44*7D $GPVTG,,T,,M,,N,,K,N*2C $GPGSA,A,1,,,,,,,,,,,,,,,*1E $GPGGA,,,,,,0,,,,,,,,*66 $GPRMC,,V,,,,,,,,,,N*53 $GPGSV,1,1,03,14,,,44,31,,,36,33,,,39*72 $GPVTG,,T,,M,,N,,K,N*2C $GPGSA,A,1,,,,,,,,,,,,,,,*1E $GPGGA,,,,,,0,,,,,,,,*66 $GPRMC,,V,,,,,,,,,,N*53 $GPGSV,1,1,04,03,,,37,14,,,44,31,,,37,33,,,40*7D $GPVTG,,T,,M,,N,,K,N*2C $GPGSV,2,1,08,26,63,009,42,01,01,246,,03,31,299,,16,74,250,*7C $GPGSV,2,2,08,22,43,278,,23,04,320,,27,27,168,,29,00,047,*78 $GPVTG,,T,,M,,N,,K,N*2C $GPGSA,A,1,,,,,,,,,,,,,,,*1E $GPGGA,,,,,,0,,,,,,,,*66 $GPRMC,,V,,,,,,,,,,N*53 $GPGSV,3,1,09,14,,,44,26,63,009,43,01,01,246,,03,31,299,*4B $GPGSV,3,2,09,16,74,250,,22,43,278,,23,04,320,,27,27,168,*73 $GPGSV,3,3,09,29,00,047,*48 $GPVTG,,T,,M,,N,,K,N*2C $GPGSA,A,1,,,,,,,,,,,,,,,*1E |
That’s the meaning for each field:
- GPGGA – Global Positioning System Fix Data, Time, Position and related fix data
- GPRMC – Recommended minimum data
- GPGSV – Detailed satellite data
- GPGSA – Overall satellite data
- GPVTG – Vector track and speed over the ground
GPGSA does not have data in the output above, simply because the GPS fix did not occur yet.
If you just want to enable GNSS each time the module is powered on, run the following command:
|
1 2 |
AT+QGPSCFG="autogps",1 OK |
To disable this option, simply run the same command with 0 instead of 1. You can also query “autogps” status but running the command without the second parameter:
|
1 2 3 4 |
AT+QGPSCFG="autogps" +QGPSCFG: "autogps",1 OK |
You’ll find more details about the GNSS AT command set for GPS and GLONASS in Quectel UC20 GNSS AT Commands Manual (pdf).
Reading NMEA sentences is possible, but not really user friendly, and if we want to see a nice representation of the data we can run the GPS Daemon (gspd) and client (cgps) instad. Let’s exit both picocom sessions with GPS still running, and install the necessary packages:
|
1 |
sudo apt install gpsd gpsd-clients python-gps |
The daemon will automatically run after installation, so let’s stop it…
|
1 |
sudo systemctl stop gpsd.socket |
… in order to run it with our own parameters, i.e. using /dev/ttyUSB1 NMEA interface:
|
1 |
sudo gpsd /dev/ttyUSB1 –F /var/run/gpsd.sock |
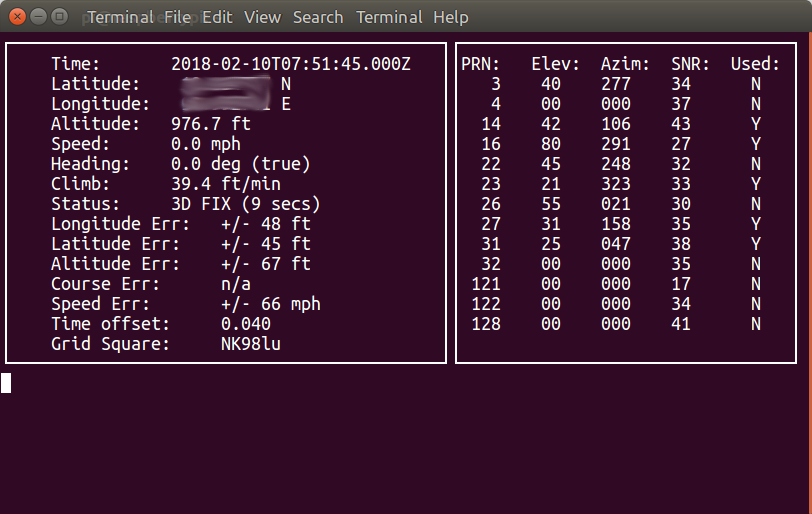
Now we can run the client as follows:
|
1 |
cgps –s |
After a few seconds should get a fix with details information (left) and data about the satellites (right).
I previously played with GPS using NavSpark mini GPS Module (Arduino compatible), and at the time I could manage to get a GPS fix inside my room, but in this case I had to move the antenna outdoor to get signal. If you want to integrate such capability into your own app, you may want to study cgps source code.
It’s also possible to get the coordinate through /dev/ttyUSB2 terminal using QGPSLOC AT command with one of the following three modes:
- Mode 0 – format = ddmm.mmmmN/S, dddmm.mmmmE/W
- Mode 1 – format = ddmm.mmmmmmN/S, dddmm.mmmmmmE/W
- Mode 2 – format = (-d)dd.ddddd,(-)ddd.ddddd
|
1 2 3 4 5 6 7 8 9 10 11 12 |
AT+QGPSLOC=0 +QGPSLOC: 075825.0,1111.0856N,01111.5670E,0.7,300.8,2,0.00,0.0,0.0,100218,09 OK AT+QGPSLOC=1 +QGPSLOC: 075850.0,1111.085526,N,01111.566956,E,1.0,300.3,2,0.00,0.0,0.0,100218,08 OK AT+QGPSLOC=2 +QGPSLOC: 075921.0,11.83475,011.99278,0.8,299.2,2,0.00,0.0,0.0,100218,09 OK |
The fields from left to right: <UTC time>,<latitude>,<longitude>,<hdop>,<altitude>,<fix>,<cog>,<spkm>,<spkn>,<UTC date>,<nsat>
Short explanation for the not-so-obvious fields:
- <hdop> – Horizontal precision, 0.5-99.9 (quoted from GPGGA sentence)
- <fix> – GNSS positioning mode (quoted from GNGSA/GPGSA): 2 = 2D positioning; 3 = 3D positioning
- <cog> – Ground heading based on true north. Format: ddd.mm (quoted from GPVTG sentence)
- <spkm> – Speed over ground. Format: xxxx.x, unit: Km/h, accurate to one decimal place (quoted from GPVTG sentence)
- <spkn> – Speed over ground. Format: xxxx.x, unit: knots, accurate to one decimal place (quoted from GPVTG sentence)
- <nsat> – Number of satellites, from 00 to 24 (the first 0 will also be transferred, quoted from GPGGA sentence)
3G HAT with Hologram SIM Card
Let’s now move to the cellular part of the module. I’ll use Hologram developer IoT SIM card, but any 3G SIM card should do.
Connection Method 1 – Sakis3G and UMTSkeeper
ThaiEasyElec documentation uses the two following programs to establish a 3G PPP connection:
- Sakis3G is a parameter and hardware controller for connecting to the Internet.
- UMTSkeeper is reconnecting with Sakis3G when the connection is down.
Booth can be found in umtskeeper package that we can install from a tarball:
|
1 2 3 4 |
mkdir umtskeeper cd umtskeeper/ wget http://mintakaconciencia.net/square/umtskeeper/src/umtskeeper.tar.gz tar xvf umtskeeper.tar.gz |
We then need to install some extra packages:
|
1 |
sudo apt install usb-modeswitch ppp |
We’re then told to launch Sakis3G in interactive mode to configure the connection. The look of it will depend whether you launch it from the dekstop, a SSH terminal, or a serial terminal. The interface looks really ugly (and messy) from the serial console, so instead I launched it from an SSH terminal:
|
1 |
sudo ./sakig3G --interactive |
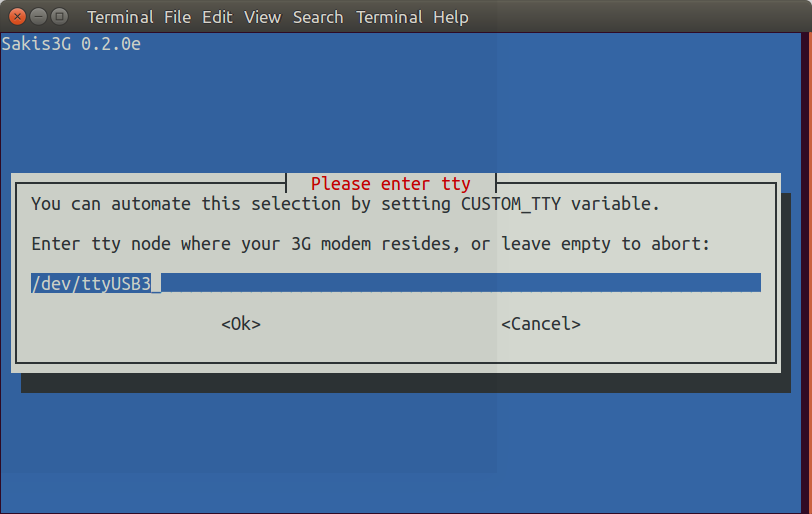
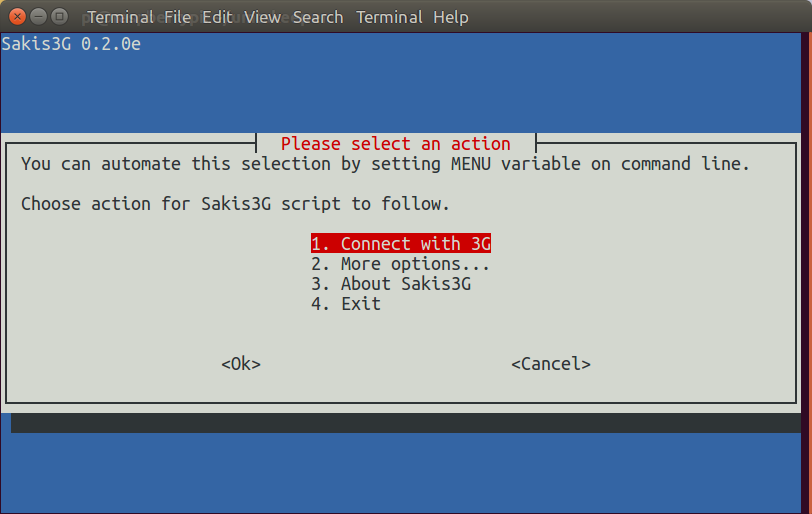 We need to select 1. Connect with 3G, then 3. Custom tty…, and input /dev/ttyUSB3 for CUSTOM_TTY variable.
The next step auto-detected the correct APN (HOLOGRAM), so I just selected OK, and then was asked about APN_USER and APN_PASS.
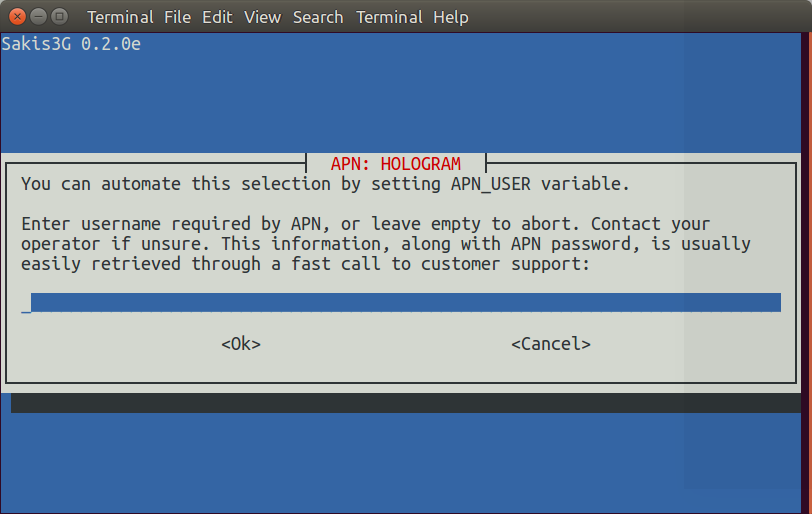 Those parameters will also depend on your specific connection. Hologram does not use user and password, but simply pressing Enter will abort the configuration, so I entered 0 for both. After that, Sakig3G will try to connect and it worked!
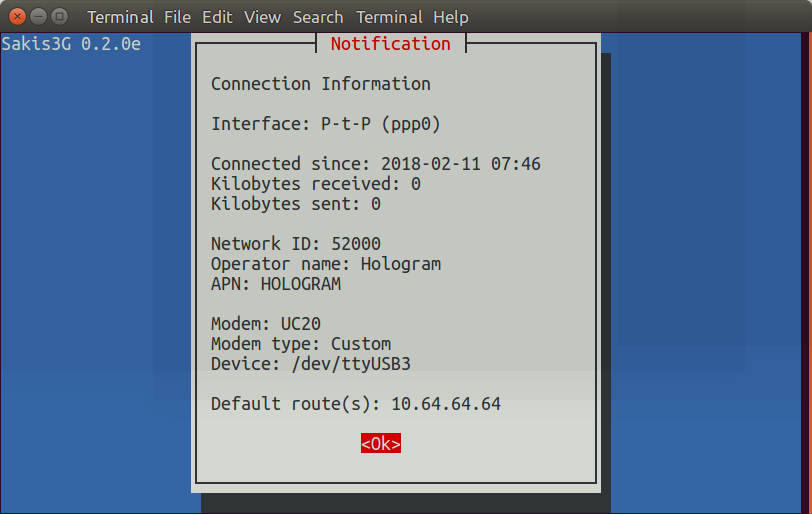
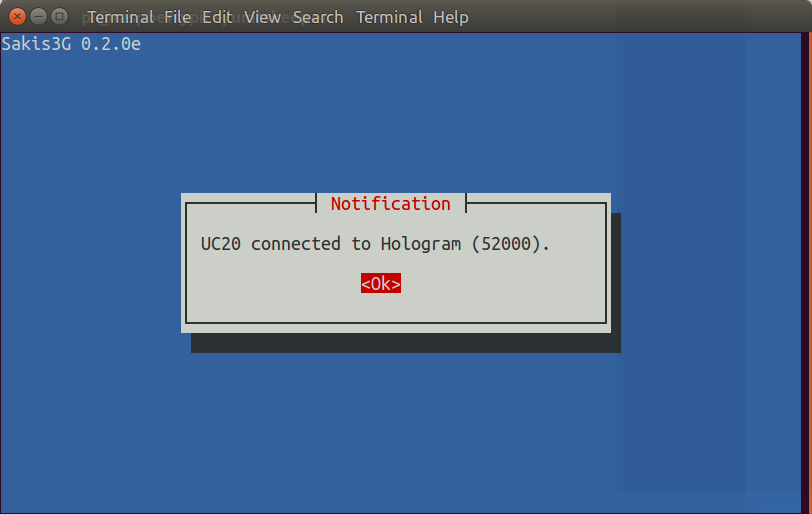 Pressing Enter will bring us back to the main menu, where we can select Connection Information to find a few more details.
Let’s go back in the top menu, disconnect, and exit Sakis3G. Now we can run umtskeeper with the same parameters:
|
1 |
sudo ./umtskeeper --sakisoperators "OTHER='CUSTOM_TTY' CUSTOM_TTY='/dev/ttyUSB3' APN='CUSTOM_APN' CUSTOM_APN='HOLOGRAM' APN_USER='0' APN_PASS='0'" --sakisswitches "--sudo --console" --devicename 'Quectel' --log --nat 'no' |
But the output does not look so good the very first time, since it complains about “no modem connected”:
|
1 2 3 4 5 6 7 8 9 10 11 12 13 14 15 |
2018-02-11 08:01:32 Start: ver. 2.07 20151004; PID = 5259; Python v. 2.7.13 stats period = 8s, connection check period = 32s Internet status: Cell network: No modem plugged or modem not set up. 2018-02-11 08:01:32 Sending SIGTERM signal to running program instance with PID=31984. 2018-02-11 08:01:32 Found version 1.xx statfile, converting to new format. Reading main stats file returned an error: "name 'currHour' is not defined". Main stats file is incomplete. This happens in rare cases when UMTSkeeper is killed in the wrong moment. Trying to load backup file. This can cause slight inacurracies in the stati. stats period = 8s, connection check period = 32s 2018-02-11 08:01:40 Program startup. Calling Sakis3G connect, to be sure... Sakis3G cmdLine: nice /home/pi/umtskeeper/sakis3g connect --sudo --console OTHER='CUSTOM_TTY' CUSTOM_TTY='/dev/ttyUSB3' APN='CUSTOM_APN' CUSTOM_APN='HOLOGRAM' APN_USER='0' APN_PASS' Sakis3G says... UC20 connected to Hologram (52000). 2018-02-11 08:01:49 Testing connection... 2018-02-11 08:01:57 Success... we are online! |
But eventually we do get a connection. If you connect later, the Internet status message changes to:
|
1 2 3 |
Internet status: Network link status on ppp0: unknown Cell network: Connected. |
Connection Method 2 – PPP Creator Script
While I was eventually successful, the first time I tried Method 1 I failed for some reasons, so at the time I looked for alternatives way to connect, and found Sixfab also used Hologram SIM card with their own RPi 3G/4G shield – also based a a Quectel module, and instead wrote ppp-creator.sh script.
So I downloaded it to my Raspberry Pi board, and executed it which created some other connection scripts.
|
1 2 3 |
wget https://raw.githubusercontent.com/sixfab/rpiShields/master/tutorials/tutorial3/ppp-creator.sh chmod +x ppp-creator sudo ./ppp-creator.sh HOLOGRAM ttyUSB3 |
Now we can run pppd call gprs command to establish a connection:
|
1 2 3 4 5 6 7 8 9 10 11 12 13 14 15 16 17 18 19 20 21 22 23 24 25 26 27 28 29 30 31 32 33 34 35 36 37 38 39 40 41 42 43 44 45 46 47 48 49 50 51 52 53 54 55 56 57 58 59 60 61 62 63 64 65 66 67 68 69 70 71 72 73 74 75 76 77 78 79 80 81 82 83 84 85 86 87 88 89 90 91 92 93 94 95 96 97 98 99 100 101 102 103 104 105 106 107 108 109 110 111 112 113 114 115 116 117 |
sudo pppd call gprs pppd options in effect: debug # (from /etc/ppp/peers/gprs) nodetach # (from /etc/ppp/peers/gprs) dump # (from /etc/ppp/peers/gprs) noauth # (from /etc/ppp/peers/gprs) remotename 3gppp # (from /etc/ppp/peers/gprs) /dev/ttyUSB3 # (from /etc/ppp/peers/gprs) 115200 # (from /etc/ppp/peers/gprs) lock # (from /etc/ppp/peers/gprs) connect chat -s -v -f /etc/chatscripts/quectel-chat-connect -T HOLOGRAM # (from /etc/ppp/peers/gprs) disconnect chat -s -v -f /etc/chatscripts/quectel-chat-disconnect # (from /etc/ppp/peers/gprs) nocrtscts # (from /etc/ppp/peers/gprs) modem # (from /etc/ppp/peers/gprs) asyncmap 0 # (from /etc/ppp/options) lcp-echo-failure 4 # (from /etc/ppp/options) lcp-echo-interval 30 # (from /etc/ppp/options) hide-password # (from /etc/ppp/peers/gprs) novj # (from /etc/ppp/peers/gprs) novjccomp # (from /etc/ppp/peers/gprs) ipcp-accept-local # (from /etc/ppp/peers/gprs) ipcp-accept-remote # (from /etc/ppp/peers/gprs) ipparam 3gppp # (from /etc/ppp/peers/gprs) noipdefault # (from /etc/ppp/peers/gprs) ipcp-max-failure 30 # (from /etc/ppp/peers/gprs) defaultroute # (from /etc/ppp/peers/gprs) usepeerdns # (from /etc/ppp/peers/gprs) noccp # (from /etc/ppp/peers/gprs) noipx # (from /etc/ppp/options) abort on (BUSY) abort on (NO CARRIER) abort on (NO DIALTONE) abort on (ERROR) abort on (NO ANSWER) timeout set to 30 seconds send (AT^M) expect (OK) AT^M^M OK -- got it send (ATE0^M) expect (OK) ^M ATE0^M^M OK -- got it send (ATI;+CSUB;+CSQ;+CPIN?;+COPS?;+CGREG?;&D2^M) expect (OK) ^M ^M Quectel^M UC20^M Revision: UC20GQBR03A14E1G^M ^M SubEdition: V01^M ^M +CSQ: 21,99^M ^M +CPIN: READY^M ^M +COPS: 0,0,"True Move Hologram",6^M ^M +CGREG: 0,5^M ^M OK -- got it send (AT+CGDCONT=1,"IP","HOLOGRAM",,0,0^M) expect (OK) ^M ^M OK -- got it send (ATD*99#^M) expect (CONNECT) ^M ^M CONNECT -- got it Script chat -s -v -f /etc/chatscripts/quectel-chat-connect -T HOLOGRAM finished (pid 8861), status = 0x0 Serial connection established. using channel 1 Using interface ppp0 Connect: ppp0 <--> /dev/ttyUSB3 sent [LCP ConfReq id=0x1 <asyncmap 0x0> <magic 0x10623c2f> <pcomp> <accomp>] rcvd [LCP ConfReq id=0x0 <asyncmap 0x0> <auth pap> <magic 0x73462b62> <pcomp> <accomp>] No auth is possible sent [LCP ConfRej id=0x0 <auth pap>] rcvd [LCP ConfAck id=0x1 <asyncmap 0x0> <magic 0x10623c2f> <pcomp> <accomp>] rcvd [LCP ConfReq id=0x1 <asyncmap 0x0> <magic 0x73462b62> <pcomp> <accomp>] sent [LCP ConfAck id=0x1 <asyncmap 0x0> <magic 0x73462b62> <pcomp> <accomp>] sent [LCP EchoReq id=0x0 magic=0x10623c2f] sent [IPCP ConfReq id=0x1 <addr 0.0.0.0> <ms-dns1 0.0.0.0> <ms-dns2 0.0.0.0>] rcvd [LCP DiscReq id=0x2 magic=0x73462b62] rcvd [LCP EchoRep id=0x0 magic=0x73462b62 10 62 3c 2f] rcvd [proto=0x3] 01 00 04 Unsupported protocol 0x3 received sent [LCP ProtRej id=0x2 00 03 01 00 04] rcvd [IPCP ConfReq id=0x0] sent [IPCP ConfNak id=0x0 <addr 0.0.0.0>] rcvd [IPCP ConfNak id=0x1 <addr 10.170.40.106> <ms-dns1 212.9.0.135> <ms-dns2 212.9.0.136>] sent [IPCP ConfReq id=0x2 <addr 10.170.40.106> <ms-dns1 212.9.0.135> <ms-dns2 212.9.0.136>] rcvd [IPCP ConfReq id=0x1] sent [IPCP ConfAck id=0x1] rcvd [IPCP ConfAck id=0x2 <addr 10.170.40.106> <ms-dns1 212.9.0.135> <ms-dns2 212.9.0.136>] Could not determine remote IP address: defaulting to 10.64.64.64 not replacing default route to eth0 [192.168.0.1] local IP address 10.170.40.106 remote IP address 10.64.64.64 primary DNS address 212.9.0.135 secondary DNS address 212.9.0.136 Script /etc/ppp/ip-up started (pid 8869) Script /etc/ppp/ip-up finished (pid 8869), status = 0x0 |
All good, and even simpler than the first method, although you may have to change the script in case you need APN username and password.
Testing the Connection
Whether we use method 1 or 2, we can now verify ppp0 is indeed up and connected.
|
1 2 3 4 5 6 7 8 |
ifconfig ppp0 ppp0: flags=4305<UP,POINTOPOINT,RUNNING,NOARP,MULTICAST> mtu 1500 inet 10.170.40.106 netmask 255.255.255.255 destination 10.64.64.64 ppp txqueuelen 3 (Point-to-Point Protocol) RX packets 5 bytes 55 (55.0 B) RX errors 0 dropped 0 overruns 0 frame 0 TX packets 4 bytes 58 (58.0 B) TX errors 0 dropped 0 overruns 0 carrier 0 collisions 0 |
I did that with Ethernet connected, so now I’ll disconnect Ethernet, turn it down, and start the script from the serial connection as a background process:
|
1 2 |
sudo ifconfig eth0 down sudo pppd call gprs & |
Again we can see on ppp0 is an active connection:
|
1 2 3 4 5 6 7 8 9 10 11 12 13 14 15 16 17 18 19 20 21 22 23 24 |
ifconfig lo: flags=73<UP,LOOPBACK,RUNNING> mtu 65536 inet 127.0.0.1 netmask 255.0.0.0 inet6 ::1 prefixlen 128 scopeid 0x10<host> loop txqueuelen 1 (Local Loopback) RX packets 22986 bytes 7354748 (7.0 MiB) RX errors 0 dropped 0 overruns 0 frame 0 TX packets 22986 bytes 7354748 (7.0 MiB) TX errors 0 dropped 0 overruns 0 carrier 0 collisions 0 ppp0: flags=4305<UP,POINTOPOINT,RUNNING,NOARP,MULTICAST> mtu 1500 inet 10.170.40.106 netmask 255.255.255.255 destination 10.64.64.64 ppp txqueuelen 3 (Point-to-Point Protocol) RX packets 26 bytes 2892 (2.8 KiB) RX errors 0 dropped 0 overruns 0 frame 0 TX packets 25 bytes 1659 (1.6 KiB) TX errors 0 dropped 0 overruns 0 carrier 0 collisions 0 wwan0: flags=4099<UP,BROADCAST,MULTICAST> mtu 1500 ether da:4d:8c:1e:d0:81 txqueuelen 1000 (Ethernet) RX packets 0 bytes 0 (0.0 B) RX errors 0 dropped 0 overruns 0 frame 0 TX packets 3 bytes 270 (270.0 B) TX errors 0 dropped 0 overruns 0 carrier 0 collisions 0 |
I can test outboud traffic with ping.
|
1 2 3 4 5 6 7 8 9 10 11 12 |
ping cnx-software.com PING cnx-software.com (104.28.18.95) 56(84) bytes of data. 64 bytes from 104.28.18.95: icmp_seq=1 ttl=52 time=601 ms 64 bytes from 104.28.18.95: icmp_seq=2 ttl=52 time=558 ms 64 bytes from 104.28.18.95: icmp_seq=3 ttl=52 time=555 ms 64 bytes from 104.28.18.95: icmp_seq=4 ttl=52 time=605 ms ping google.com PING google.com (216.58.208.238) 56(84) bytes of data. 64 bytes from par10s22-in-f14.1e100.net (216.58.208.238): icmp_seq=1 ttl=49 tims 64 bytes from par10s22-in-f14.1e100.net (216.58.208.238): icmp_seq=2 ttl=49 tims 64 bytes from par10s22-in-f14.1e100.net (216.58.208.238): icmp_seq=3 ttl=49 tims |
All good, but then I tried to connect via SSH using
|
1 |
ssh pi@10.170.40.106 |
But it failed to connection, maybe because 10.170.40.106 is a “local IP address”, and the “remote IP address” set to 10.64.64.64 is just a default address as shown in the log while running pppd call gprs.
SSH Tunelling with Hologram SIM card
I’m not familiar enough with 3G/4G connectivity to know if it’s a common issue but in the case of Hologram service we need to setup tunnelling to access via SSH (or another port/service). This can be done via SpaceBrige program or the command line, as you’ll find both methods on the relevant page on Hologram website.
I used SpaceBridge program in this case. You can download the client for Windows, Linux, or Mac OS. This is what I had to do in Ubuntu 16.04:
|
1 2 3 4 |
wget http://downloads.hologram.io/spacebridge/spacebridge-0.4.2-x86_64-pc-linux-gnu.tar.bz2 tar xvf spacebridge-0.4.2-x86_64-pc-linux-gnu.tar.bz2 cd spacebridge-0.4.2-x86_64-pc-linux-gnu/bin ./spacebridge |
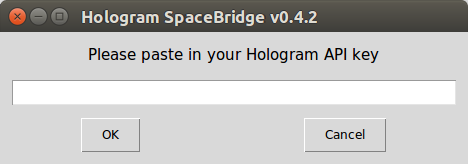
Now you’ll need to enable Tunneling for your device in Hologram dashboard, and get your Hologram API key, which you can generate and copy from your account.
Click OK, select your device(s), input your device port (e.g. 22 for SSH), and the local port on the computer to remotely access your Raspberry Pi over 3G.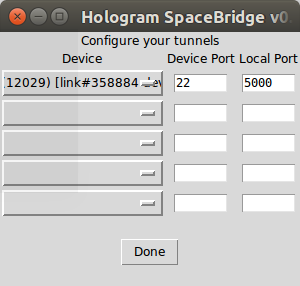 Click Done, and within a few seconds the tunnerl should be up and running.
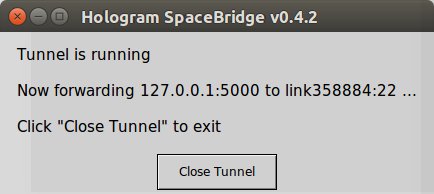 I was finally able to connect the Raspberry Pi over SSH using the following command:
|
1 |
ssh -p 5000 pi@127.0.0.1 |
I could also get the GPS coordinate from there using cgps client.
If you want to stop the connection manually started with pppd call gprs, find the PID, and kill it:
|
1 2 3 4 5 6 7 8 9 10 11 12 13 14 |
sudo kill 10678 Terminating on signal 15 Connect time 3.4 minutes. Sent 5885 bytes, received 6313 bytes. Script /etc/ppp/ip-down started (pid 10828) sent [LCP TermReq id=0x3 "User request"] pi@raspberrypi:~$ rcvd [LCP TermAck id=0x3] Connection terminated. abort on (ERROR) abort on (NO DIALTONE) unterminated quote (line 4) Script chat -s -v -f /etc/chatscripts/quectel-chat-disconnect finished (pid 1081 disconnect script failed Script /etc/ppp/ip-down finished (pid 10828), status = 0x0 |
In your actual project, you’ll want to control the connection using initd scripts or systemd.
I’d like to thanks Venus Supply / ThaiEasyElec for sending the product for review, it’s been fun to try out. If you’re interested you can purchase the board for 2350 THB (~$75) on their website, and may also consider adding the GSM/3G antenna for 120 THB (~$4) as well as the GNSS antenna for 350 THB (~$12).

Jean-Luc started CNX Software in 2010 as a part-time endeavor, before quitting his job as a software engineering manager, and starting to write daily news, and reviews full time later in 2011.
Support CNX Software! Donate via cryptocurrencies, become a Patron on Patreon, or purchase goods on Amazon or Aliexpress


