
I’ve been using an SSL certificate to the download subdomain of this blog running ownCloud for about 2 years, but recently my free StartSSL certificate expired, and I had troubles to renew it, and I also received an email from Google telling me that “Starting October 2017, Chrome (version 62) will show a “NOT SECURE” warning when users enter text in a form on an HTTP page, and for all HTTP pages in Incognito mode”. So I decide to use free LetsEncrypt SSL/TLS certificates to replace the one in the download subdomain, as well as this main blog. Such SSL/TLS certificates are also very useful for the IoT gateways many of use have started using, and I found it’s even simpler than install a self-signed certificate, so there’s no reason to use those anymore.

The easiest way to install Let’s Encrypt certificate is by using Certbot with instructions for various web server or hosting platforms (nginx, apache, pleask, haproxy…) and BSD & Linux based operating systems. I’m using Ubuntu 14.04 trusty with nginx, so the instructions below are for this combination, and it took me around 2 to 3 minutes in my VPS to have the SSL/TLS certificate installed, and up and running.
Cerbot installation:
|
1 2 3 4 5 |
sudo apt update sudo apt install software-properties-common sudo add-apt-repository ppa:certbot/certbot sudo apt update sudo apt install python-certbot-nginx |
Certificate installation for nginx on download.cnx-software.com subdomain:
|
1 2 3 4 5 6 7 8 9 10 11 12 13 14 15 16 17 18 19 20 21 22 23 24 25 26 27 28 29 30 31 32 33 34 35 36 37 38 39 40 41 42 43 44 45 46 47 48 49 50 51 52 53 54 55 56 57 58 59 60 61 62 63 64 65 66 67 68 69 70 71 72 |
sudo certbot --nginx Saving debug log to /var/log/letsencrypt/letsencrypt.log Enter email address (used for urgent renewal and security notices) (Enter 'c' to cancel): your@email.com ------------------------------------------------------------------------------- Please read the Terms of Service at https://letsencrypt.org/documents/LE-SA-v1.1.1-August-1-2016.pdf. You must agree in order to register with the ACME server at https://acme-v01.api.letsencrypt.org/directory ------------------------------------------------------------------------------- (A)gree/(C)ancel: A ------------------------------------------------------------------------------- Would you be willing to share your email address with the Electronic Frontier Foundation, a founding partner of the Let's Encrypt project and the non-profit organization that develops Certbot? We'd like to send you email about EFF and our work to encrypt the web, protect its users and defend digital rights. ------------------------------------------------------------------------------- (Y)es/(N)o: N Which names would you like to activate HTTPS for? ------------------------------------------------------------------------------- 1: cnx-software.com 2: download.cnx-software.com 3: www.cnx-software.com ------------------------------------------------------------------------------- Select the appropriate numbers separated by commas and/or spaces, or leave input blank to select all options shown (Enter 'c' to cancel): 2 Obtaining a new certificate Performing the following challenges: tls-sni-01 challenge for download.cnx-software.com Waiting for verification... Cleaning up challenges Deployed Certificate to VirtualHost /etc/nginx/sites-enabled/download.cnx-software.com for set(['download.cnx-software.com']) Please choose whether or not to redirect HTTP traffic to HTTPS, removing HTTP access. ------------------------------------------------------------------------------- 1: No redirect - Make no further changes to the webserver configuration. 2: Redirect - Make all requests redirect to secure HTTPS access. Choose this for new sites, or if you're confident your site works on HTTPS. You can undo this change by editing your web server's configuration. ------------------------------------------------------------------------------- Select the appropriate number [1-2] then [enter] (press 'c' to cancel): 2 The appropriate server block is already redirecting traffic. To enable redirect anyway, uncomment the redirect lines in /etc/nginx/sites-enabled/download.cnx-software.com. ------------------------------------------------------------------------------- Congratulations! You have successfully enabled https://download.cnx-software.com You should test your configuration at: https://www.ssllabs.com/ssltest/analyze.html?d=download.cnx-software.com ------------------------------------------------------------------------------- IMPORTANT NOTES: - Congratulations! Your certificate and chain have been saved at: /etc/letsencrypt/live/download.cnx-software.com/fullchain.pem Your key file has been saved at: /etc/letsencrypt/live/download.cnx-software.com/privkey.pem Your cert will expire on 2017-11-18. To obtain a new or tweaked version of this certificate in the future, simply run certbot again with the "certonly" option. To non-interactively renew *all* of your certificates, run "certbot renew" - Your account credentials have been saved in your Certbot configuration directory at /etc/letsencrypt. You should make a secure backup of this folder now. This configuration directory will also contain certificates and private keys obtained by Certbot so making regular backups of this folder is ideal. - If you like Certbot, please consider supporting our work by: Donating to ISRG / Let's Encrypt: https://letsencrypt.org/donate Donating to EFF: https://eff.org/donate-le |
Done! I could now go to https://download.cnx-software.com with my freshly installed certificate. That’s it for the 2-minute installation procedure, but as with such quick and easy procedure, you can always add “wasting countless hours” steps to it, and that’s what I did, by first checking out the Qualys SSL Report as recommended in the output of the terminal above.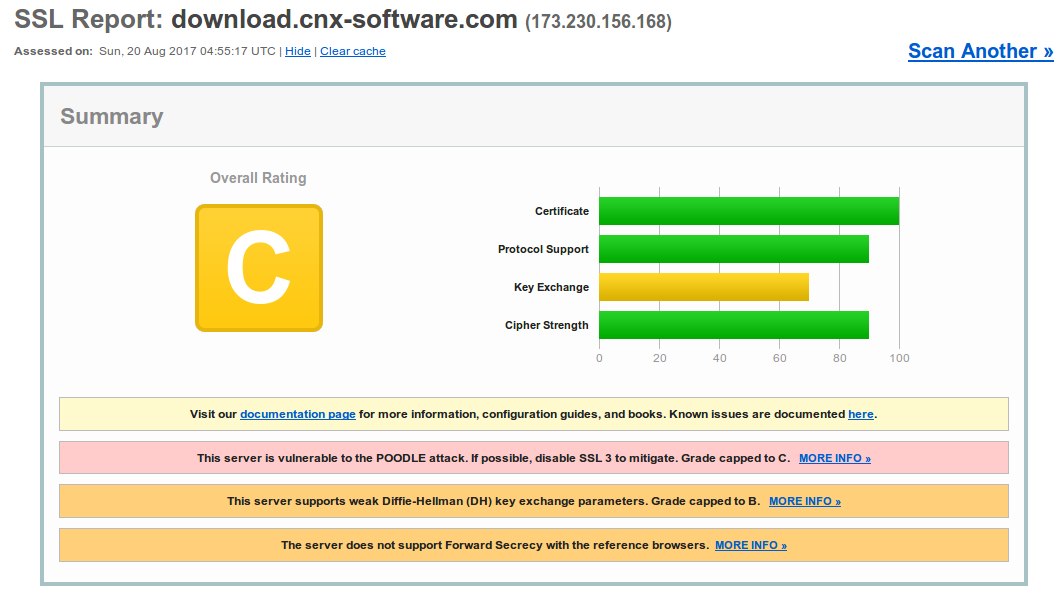
Grade C, not good. The certificate is mostly there to protect my login credentials, as I don’t have any important private data in that server, but let’s still try to improve this. The most critical issue is that the server is vulnerable to the POODLE attack, but luckily Nginx guys have a fix: disable SSLv3.
I just had to change a single line in the server block of the domain configuration file in /etc/nginx/sites-enabled directory to only allow for TLS connections:
|
1 |
ssl_protocols TLSv1 TLSv1.1 TLSv1.2;# omit SSLv3 because of POODLE (CVE‑2014‑3566) |
I then reload the configuration with:
|
1 |
nginx -s reload |
Ran the SSL report again, and I improved to Grade B. That was easy.
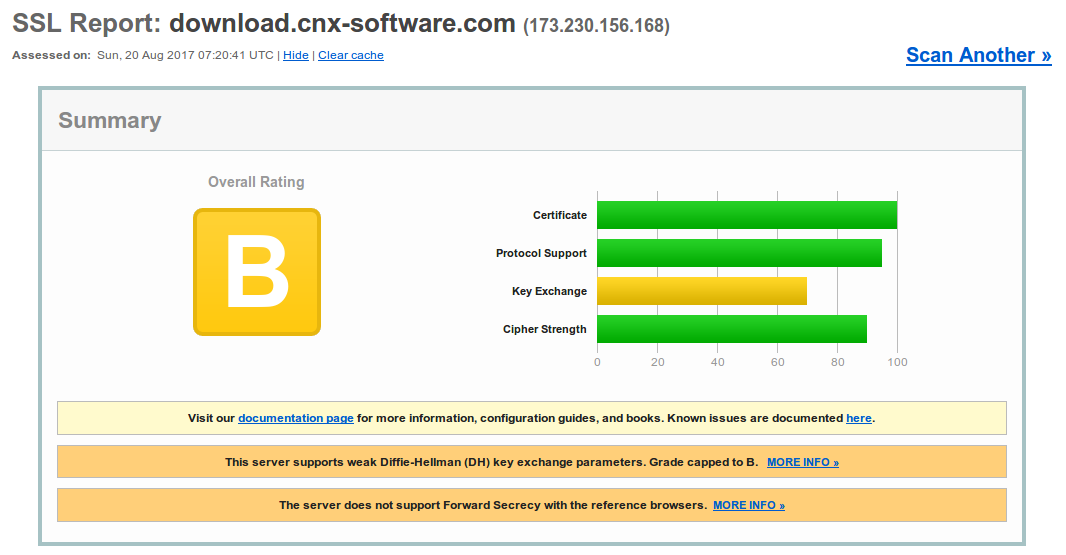
The second problem is about “weak Diffle Hellman (DH) key exchange parameters”, but again there are solutions.
First I had to create a dhparams.pem file with the following command line:
|
1 |
openssl dhparam -out dhparams.pem 2048 |
then edit the domain configuration file in /etc/nginx/sites-enabled/ directory by adding the following in the server block:
|
1 2 3 4 |
ssl_ciphers 'ECDHE-RSA-AES128-GCM-SHA256:ECDHE-ECDSA-AES128-GCM-SHA256:ECDHE-RSA-AES256-GCM-SHA384:ECDHE-ECDSA-AES256-GCM-SHA384:DHE-RSA-AES128-GCM-SHA256:DHE-DSS-AES128-GCM-SHA256:kEDH+AESGCM:ECDHE-RSA-AES128-SHA256:ECDHE-ECDSA-AES128-SHA256:ECDHE-RSA-AES128-SHA:ECDHE-ECDSA-AES128-SHA:ECDHE-RSA-AES256-SHA384:ECDHE-ECDSA-AES256-SHA384:ECDHE-RSA-AES256-SHA:ECDHE-ECDSA-AES256-SHA:DHE-RSA-AES128-SHA256:DHE-RSA-AES128-SHA:DHE-DSS-AES128-SHA256:DHE-RSA-AES256-SHA256:DHE-DSS-AES256-SHA:DHE-RSA-AES256-SHA:AES128-GCM-SHA256:AES256-GCM-SHA384:AES128-SHA256:AES256-SHA256:AES128-SHA:AES256-SHA:AES:CAMELLIA:DES-CBC3-SHA:!aNULL:!eNULL:!EXPORT:!DES:!RC4:!MD5:!PSK:!aECDH:!EDH-DSS-DES-CBC3-SHA:!EDH-RSA-DES-CBC3-SHA:!KRB5-DES-CBC3-SHA'; ssl_prefer_server_ciphers on; ssl_dhparam {path to dhparams.pem}; |
After reloading nginx configuration, I had a grade A with no other problems to solve.
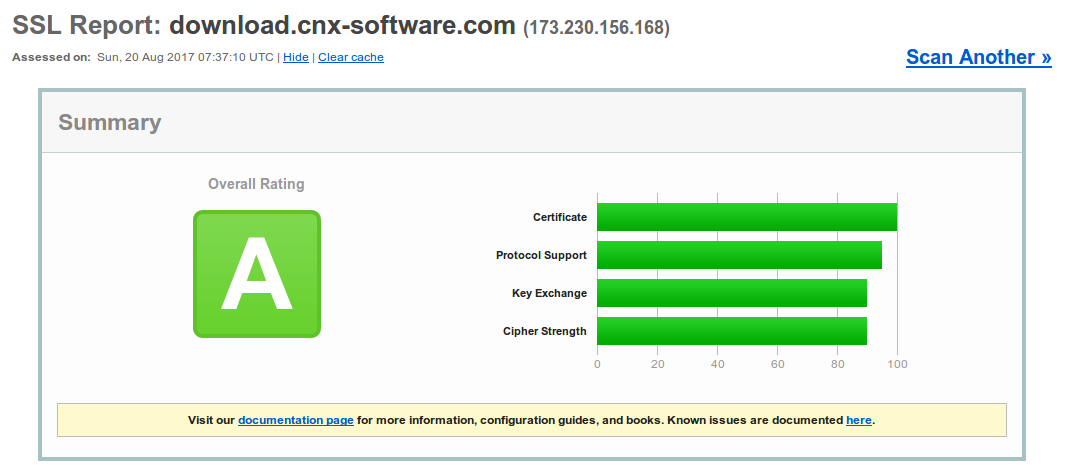 I checked two banking websites, and they got A-, two online shops (GearBest and GeekBuying), and they achieved Grade B, so when you share your credit card info, you are at risk, albeit likely a limited risk. Considering it’s so easy to fix some of the issues, they should do it, and I informed both companies.
Let’s Encrypt certificates expires just after 90 day, so you may want to setup automatic renewal. First check renewal works with a dry run:
|
1 |
sudo certbot renew --dry-run |
If there are no errors, you can setup a cron or systemd job to run the following command regularly:
|
1 |
certbot renew |
I then tried with some other domains, and I got a TLS handshake failure:
|
1 |
Failed authorization procedure. other.domain.com (tls-sni-01): urn:acme:error:tls :: The server experienced a TLS error during domain verification :: remote error: tls: handshake failure |
The reason was Cloudflare intercepting traffic, so I had to pause Cloudflare before running certbot, and installation went just fine, and I could use my website without any problem, until I resumed Cloudflare support, and got “too many redirects”. I started to look for solutions with come fairly complicated instructions for Certbot + Apache + Cloudflare. After a few hours trying to find a solution, I discovered my assumption that if I enable an SSL certificate on my side, I should just disable SSL in Cloudflare… Big mistake! After setting Cloudflare SSL to Full (Strict) it worked again, although I eventually just to set it to Full because Let’s Encrypt wildcard SSL certificate are not yet supported, but will be in January 2018.
So the TLS connection was working, but I tried a dry run to renew the certificate, and every domain managed through Cloudflare would fail… That’s when the “complicated instructions” above came handy… So I first installed Certbot Cloudflare plugin/add-on:
|
1 2 |
sudo apt install python-pip pip install certbot-dns-cloudflare |
Created /etc/letscrypt/cloudflare.ini file with your email, and API key in Cloudflare (Global API Key)
|
1 2 |
dns_cloudflare_email = cloudflare@example.com dns_cloudflare_api_key = 0123456789abcdef0123456789abcdef01234567 |
and generated new certificates using that plugin:
|
1 |
sudo certbot certonly --dns-cloudflare --dns-cloudflare-credentials /etc/letsencrypt/cloudflare.ini -d www.domain.com |
This should overwrite the two files used for the certificates previously created with nginx option: /etc/letsencrypt/live/www.domain.com/fullchain.pem
& /etc/letsencrypt/live/www.domain.com/privkey.pem. So normally, you don’t even need to change your nginx configuration after that, but if for some reasons the path has changed, you should edit your file in /etc/nginx/sites-enabled/ and updated the paths.
Finally, I tried the dry run to update the certificate and it worked, so I created a cron job to renew the certificates every month:
|
1 |
0 4 15 * * /usr/bin/certbot renew |
If your website is also designed to be compatible with https, then your job is done, if not, then you’ll have some work to do to remove all hardcoded http calls from your websites with the help of the developer console in web browsers such as Chrome or Firefox.

Jean-Luc started CNX Software in 2010 as a part-time endeavor, before quitting his job as a software engineering manager, and starting to write daily news, and reviews full time later in 2011.
Support CNX Software! Donate via cryptocurrencies, become a Patron on Patreon, or purchase goods on Amazon or Aliexpress


