
Karl here again for part 2 of my home automation project. We will be looking at how to automate your lights based on time of day and motion. In the first part we setup Home Assistant and uploaded firmware to basic Sonoff Wifi switches. Today we will setup a 433 MHz to MQTT bridge and some sensors.
433 MHz
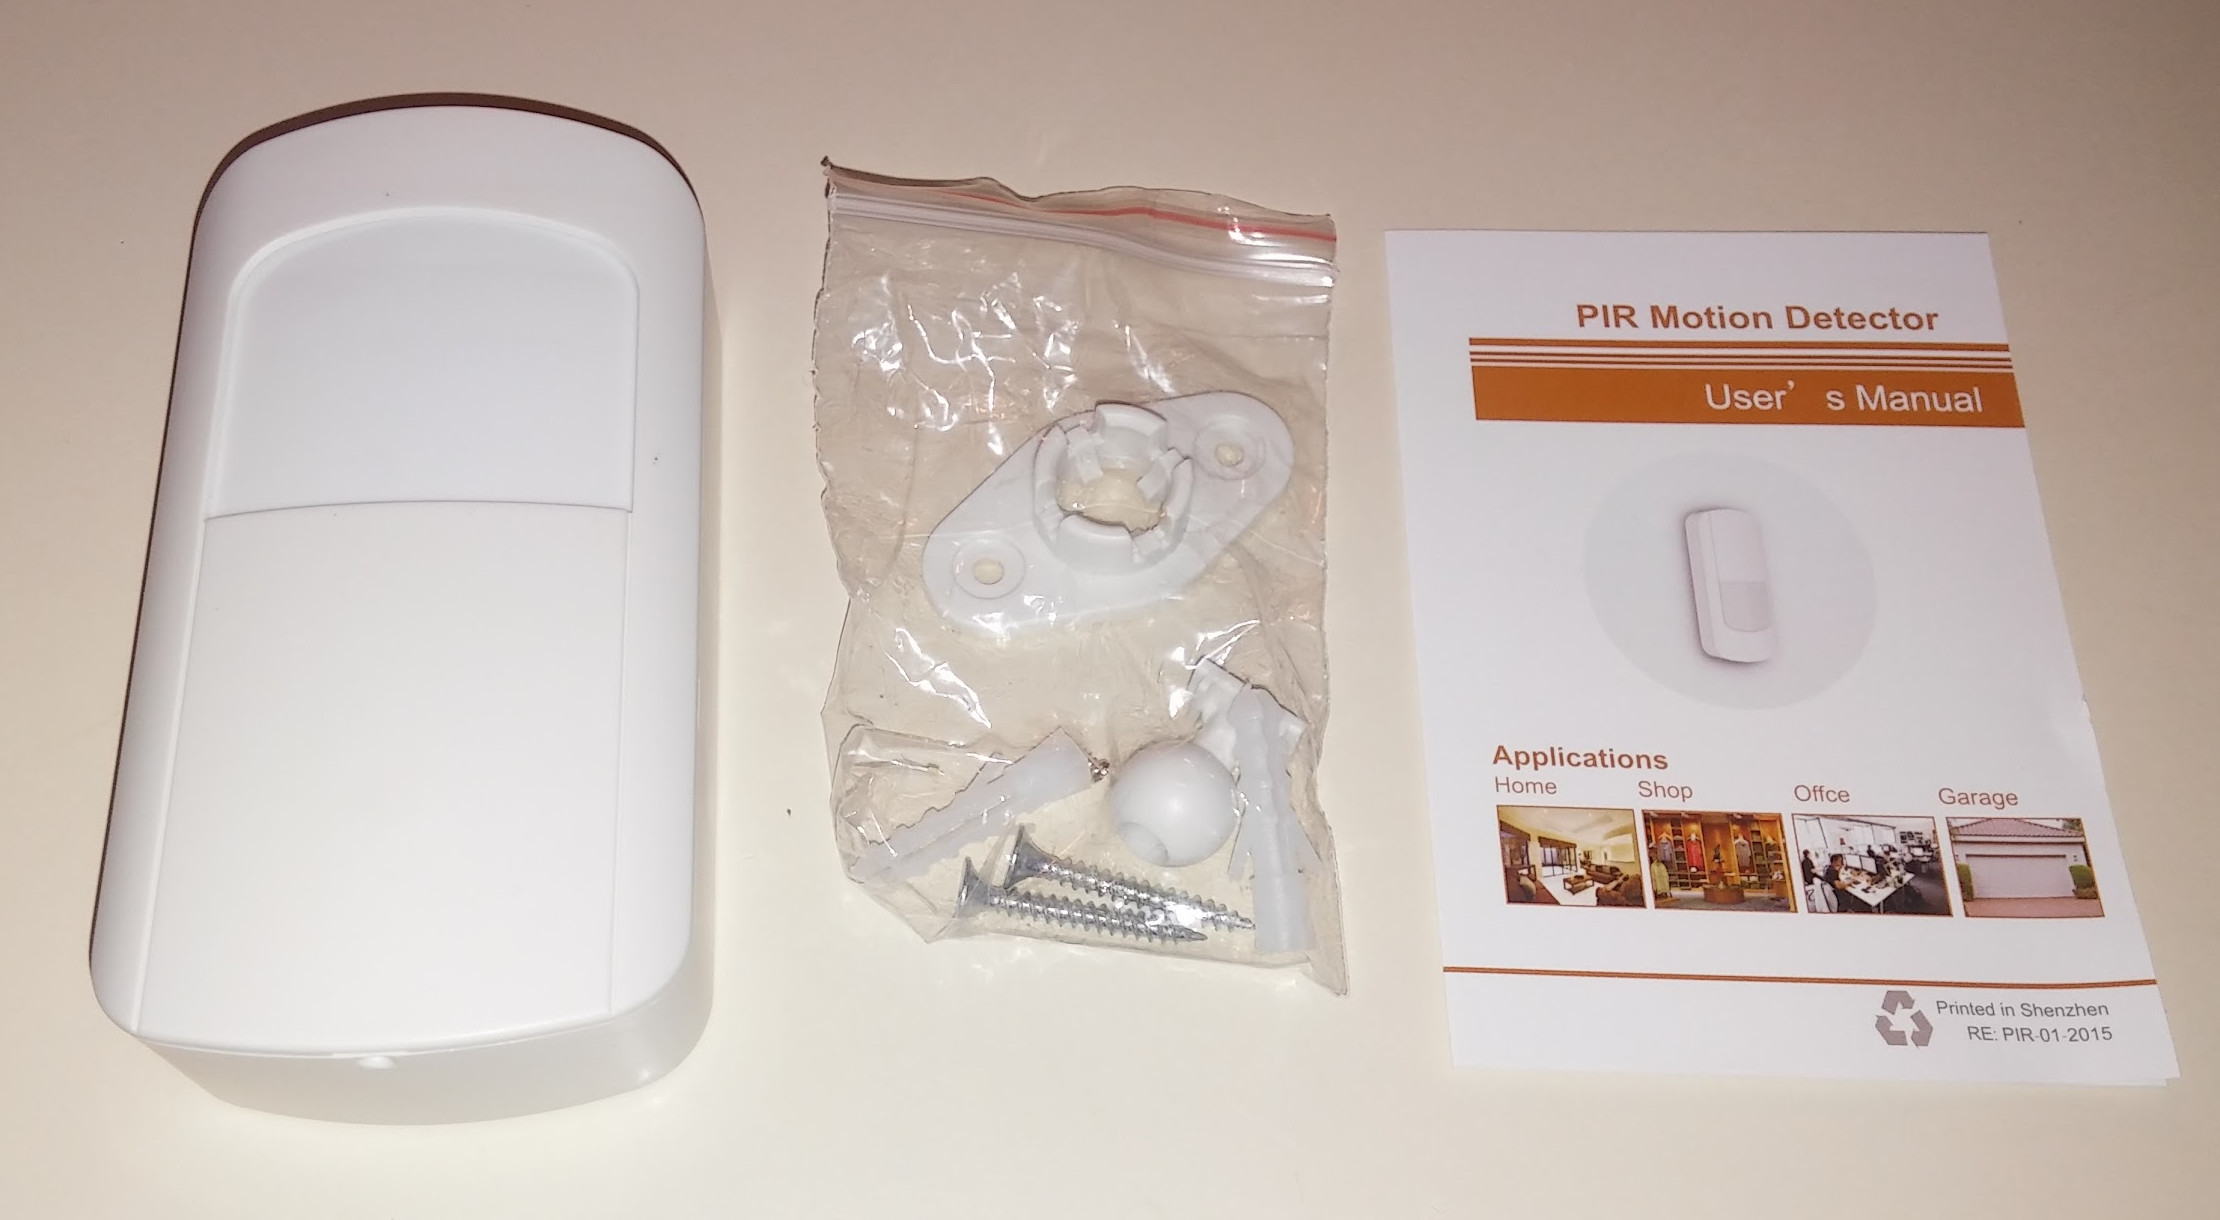
Depending on your country 433 MHz is an open frequency to use to communicate with. There are hundreds of different types of devices that use 433 MHz to communicate information. We will be focusing on 2 today from Gearbest: WMS07 motion sensor (left) and WDS07 door/window sensor (2 parts, right).

I am not taking the door/window sensor apart, since it is super basic, but I’ve included some photos of the PIR motion detector.
433 MHz Bridge
While contemplating how to get presence on a per room basis I ran across this project. It monitors 433 MHz signals and publishes it to the MQTT server. It is a really an easy project. It also has an IR to MQTT feature. I did have an IR receiver and tested it but have not implemented it. He has some good instructions on his page so I won’t go over too much. You can do the bare bones version and just leave off the unused sensors. I also went an extra step and added a light intensity sensor and DHT sensor to the project. It can be found here. I am not going to add those to this write up because trying to keep costs down.
What you will need is
- NodeMCU $5.69
- H3V4F Receiver Module $1.21
- Prototyping board $2.88
That is all that is needed. For about $10 you have an inexpensive 433 MHz bridge. You can put in a box if you want and hide it in a central location away from interference. I would suggest soldering headers to your board just in case something goes bad. I didn’t at first and made my life a pain. There are a ton of 433 MHz receivers. I purchased all the ones on Gearbest and this is by far the best. I did upgrade to a superheterodyne but I am not sure it is any better. I upgraded because I wanted to put the door sensor on my mailbox and get a notification when the mail was delivered. It is about 200’ away and is a little spotty even with a new 433 MHz receiver. I used this antenna design (see picture on right), as it seemed to work the best
Coverage is the biggest concern. I have a brick single story ranch style home about 2000 square feet and it covers the inside with ease and a lot of the area around the house. If you have a multi-story house or would need multiple receivers you would need to change the MQTT topics to avoid getting duplicates. Below is the final project. To be honest temperature is really the only thing that is useful to me, but wanted to see what could be done. I purchase the DHT11 and the readings are not good. If you want to do this go with the DHT22. Below is a mostly loaded bridge. I don’t have an infrared transmitter yet. I have a different one coming that does the encoding/decoding on a chip and will follow up when I receive it. I am hoping it will be easier/better than using the Arduino library.

Motion Sensor
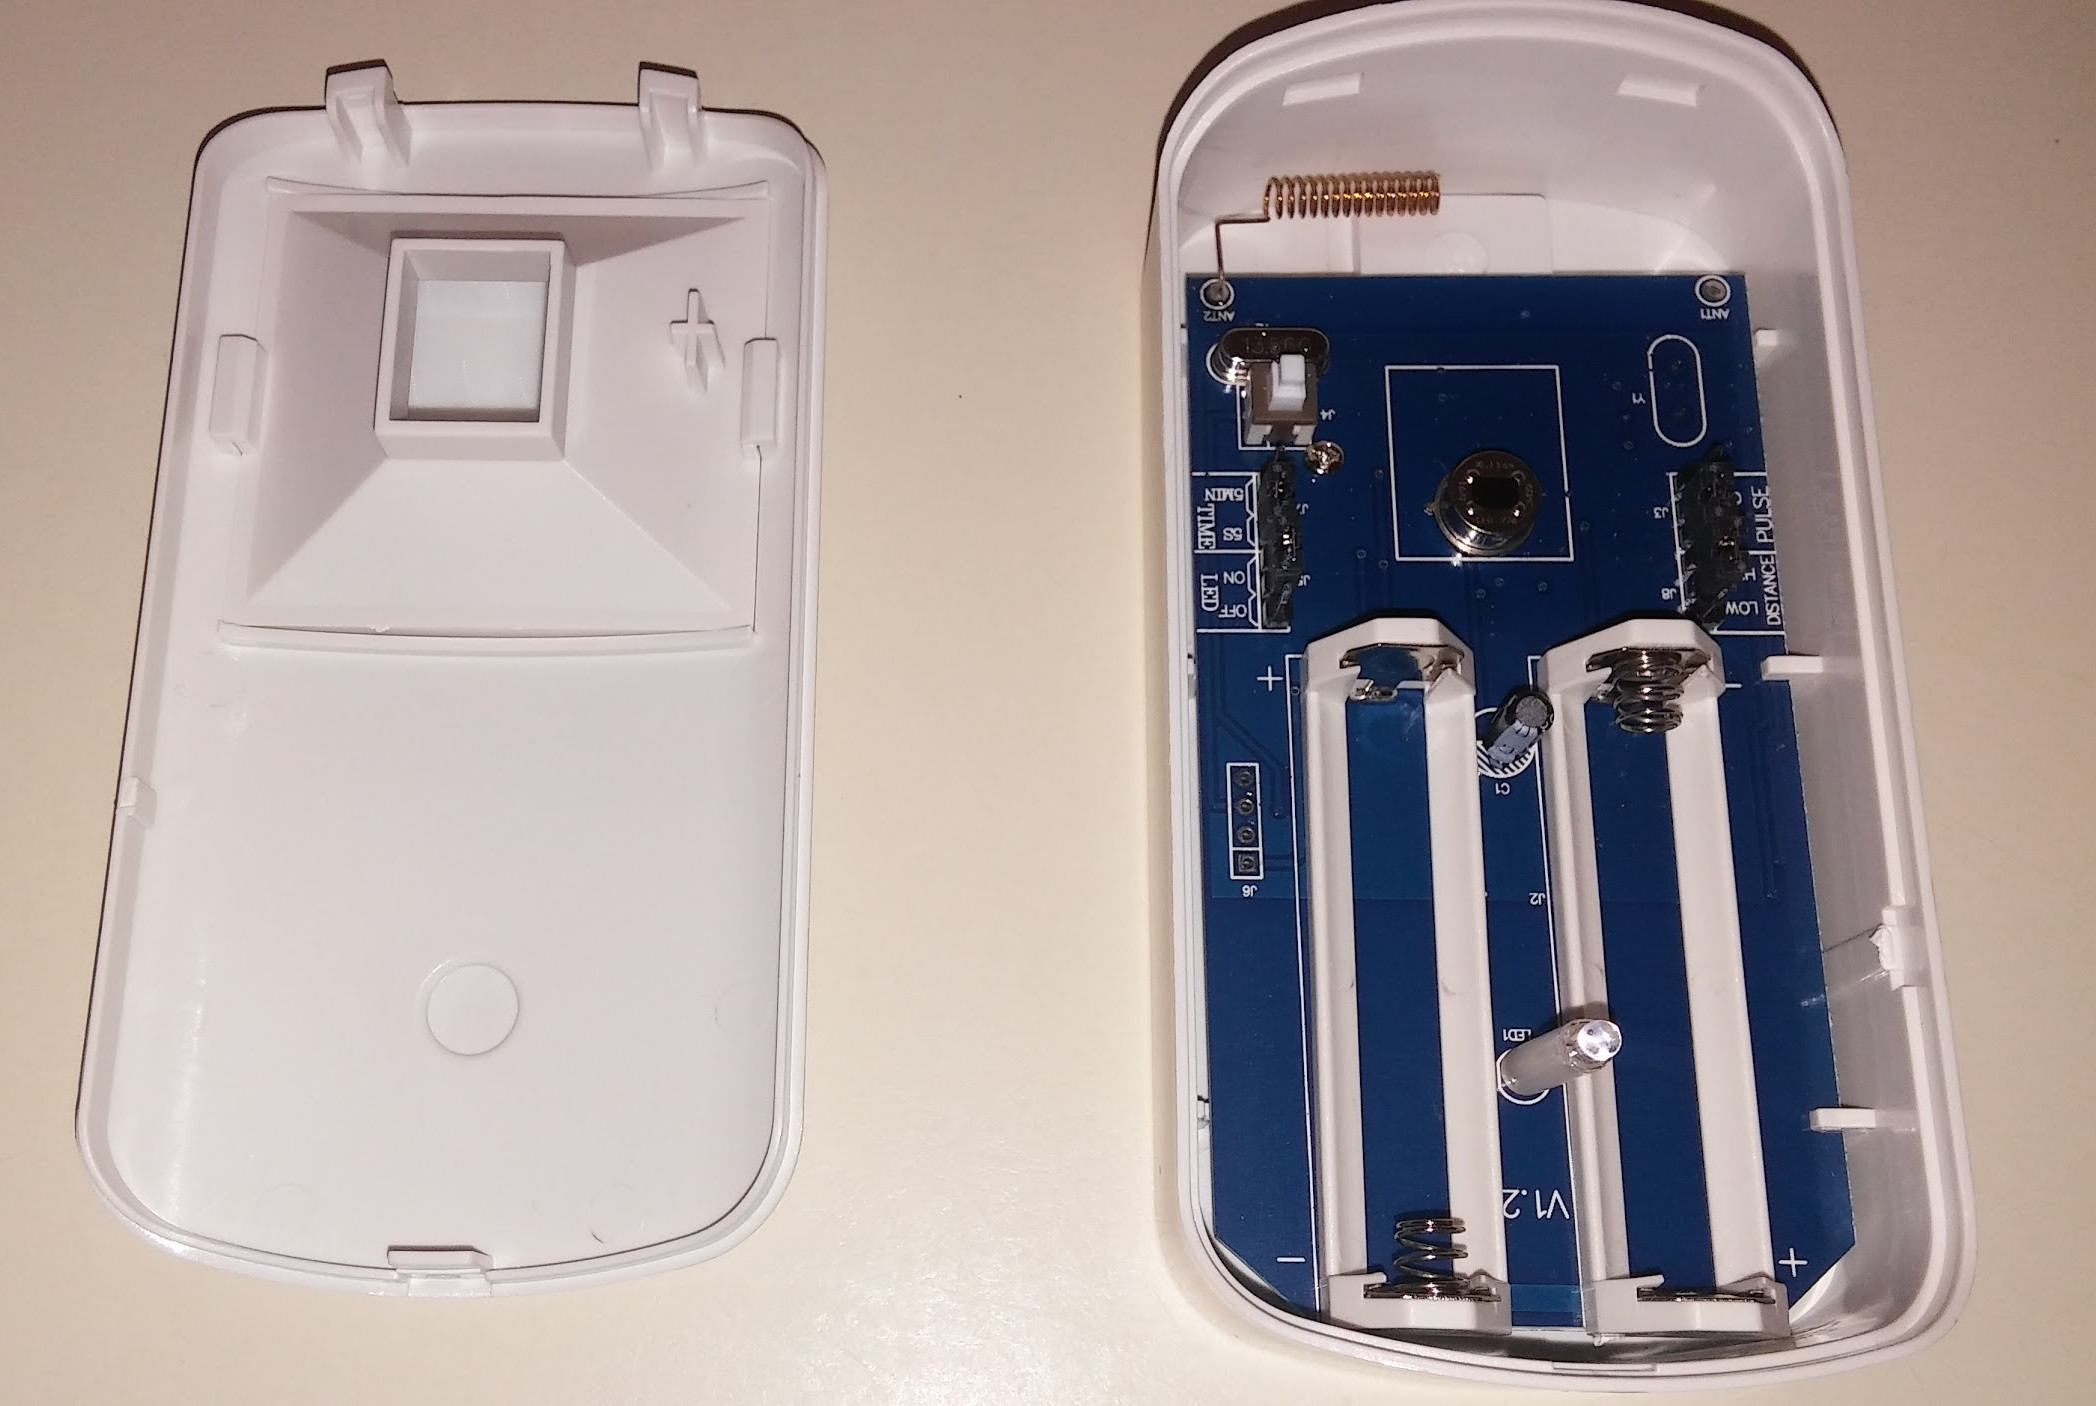
The motion sensor itself is really easy to setup with jumpers. I suggest turning the LED off, and the time to 5 min after finished setting up with the jumpers. If you notice there is a micro switch in the top left of this picture. It is meant to be a tamper switch but I use it as a toggle switch to quickly turn off the lights. The motion sensor is meant to be used for a security system but I just have them sitting on night stands and corner tables. It works really well to override or turn a light on when Home Assistant ignores the motion. A little squeeze of the box and the light will toggle states on or off.

After your bridge is set up and connected take the motion sensor out and put some batteries in it. Run your batch file to see what code is being sent. For this one we need 2: motion and tamper. Write these codes down.
|
1 2 |
"C:\Program Files (x86)\mosquitto\mosquitto_sub" -t stat/# -t tele/# -t cmnd/# -t home/# -v" pause |
Home Assistant
Below is the YAML code that I am using with Home Assistant. I made it find and replace friendly. If you copy and find the 4 items below it should work. I think it is relatively easy to follow. It is the typical timed lamp on motion that is on Home Assistant website with some slight modifications. I had to add the turn off motion script because the motion sensors only sends when it senses motion. I also had to add the tamper toggle switch. When you are adding multiple sensors you can only have one “binary_sensor:” group and one “automation:” group etc.
| Find/Replace | Explanation |
| generic | use livingroom or masterbedroom etc no spaces |
| 5555555 | use the motion number you found earlier |
| 8888888 | make up a number around your tamper/motion number |
| 9999999 | use the tamper number you found earlier. |
|
1 2 3 4 5 6 7 8 9 10 11 12 13 14 15 16 17 18 19 20 21 22 23 24 25 26 27 28 29 30 31 32 33 34 35 36 37 38 39 40 41 42 43 44 45 46 47 48 49 50 51 52 53 54 55 56 57 58 59 60 61 62 63 64 65 66 67 68 69 70 71 72 73 74 75 76 77 78 79 80 81 82 83 84 85 86 87 88 89 90 91 92 93 94 95 96 97 98 99 100 101 102 103 104 105 106 107 108 109 110 111 112 113 114 |
binary_sensor: - platform: mqtt name: "Generic Motion" payload_on: "5555555" payload_off: "8888888" sensor_class: motion state_topic: "home/433toMQTT" automation: - alias: Turn on generic after Sunset hide_entity: true trigger: platform: state entity_id: binary_sensor.generic_motion to: 'on' condition: condition: and conditions: - condition: sun after: sunset after_offset: "-1:00:00" - condition: time before: '20:00:00' action: service: homeassistant.turn_on entity_id: script.generic_timed_lamp - alias: Turn on generic before Sunrise hide_entity: true trigger: platform: state entity_id: binary_sensor.generic_motion to: 'on' condition: condition: and conditions: - condition: sun before: sunrise before_offset: "1:00:00" - condition: time after: '07:00:00' action: service: homeassistant.turn_on entity_id: script.generic_timed_lamp - alias: Turn off generic motion hide_entity: true trigger: platform: state entity_id: binary_sensor.generic_motion to: 'on' action: service: homeassistant.turn_on entity_id: script.generic_pir_timer_off - alias: generic Tamper hide_entity: true trigger: platform: mqtt topic: home/433toMQTT payload: '9999999' action: service: homeassistant.toggle entity_id: light.generic Light: - alias: generic platform: mqtt name: "generic" state_topic: "stat/testbench/POWER" command_topic: "cmnd/testbench/power" payload_on: "ON" payload_off: "OFF" script: generic_timed_lamp: alias: "Turn on generic and set timer" sequence: # Cancel ev. old timers - service: script.turn_on data: entity_id: script.generic_pir_timer_off - service: script.turn_off data: entity_id: script.generic_timer_off - service: light.turn_on data: entity_id: light.generic # Set new timer - service: script.turn_on data: entity_id: script.generic_timer_off generic_timer_off: alias: "Turn off generic after 30 minutes" sequence: - delay: minutes: 30 - service: light.turn_off data: entity_id: light.generic generic_pir_timer_off: alias: "Turn off generic motion" sequence: - delay: minutes: 1 - service: mqtt.publish data: topic: 'home/433toMQTT' payload: '8888888' |
Door Sensor
For the mailbox sensor here is an example. Same thing on this one run the batch file and find the open and closed codes. I have it send me a notification via pushbullet.
|
1 2 3 4 5 6 7 8 9 10 11 12 13 14 15 16 17 18 19 |
binary_sensor: - platform: mqtt name: "Mailbox" payload_on: "11784714" payload_off: "11784718" sensor_class: opening state_topic: "home/433toMQTT" automation: - alias: You've Got Mail hide_entity: true trigger: platform: mqtt topic: home/433toMQTT payload: '11784714' action: service: notify.pushbullet data: message: 'Youve Got Mail' |
Almost there
We are almost there. Lights are turning on and off magically. Life is good. But there is one situation where it’s not so good. The gloomy day. With the automations above we cannot determine if the blinds are pulled or it is gloomy. We still need the lights to come on under those circumstances to make it really cool. In the next installment we are going to take the motion sensors above and add a light intensity sensor to them. We will be able to do this cheap. We still have a pretty good budget. With the bridge above you open yourself to a bunch of battery operated sensors. You can also control devices, as well, with a transmitter. Any of the transmitters should work on GearBest. You can get the one linked and throw away the receiver. It’s only $1.25. If you have any questions or concerns feel free to leave a comment.
| Item | Qty | Price | Total | ||||
| Initial Setup | Sonoff Basic | 5 | $4.85 | $24.25 | |||
| Headers | 1 | $1.50 | $1.50 | ||||
| USB to TTL | 1 | $2.54 | $2.54 | ||||
| $28.29 | |||||||
| Motion Sensors | NodeMCU | 1 | $5.69 | $5.69 | |||
| H3V4F Receiver | 1 | $1.21 | $1.21 | ||||
| Prototyping board | 1 | $2.88 | $2.88 | ||||
| Motion Sensor | 4 | $7.03 | $28.12 | ||||
| $37.90 | |||||||
| Grand Total | $66.19 | ||||||
Continue reading “Part 3: Adding Light Detection to a Motion Sensor“.

Karl is a technology enthusiast that contributes reviews of TV boxes, 3D printers, and other gadgets for makers.
Support CNX Software! Donate via cryptocurrencies, become a Patron on Patreon, or purchase goods on Amazon or Aliexpress


