
Karl here. I am here to write about my home automation project. First thing I want to say is that I am very cost conscious and I don’t mind putting in extra effort into the setup of things to keep costs down. I did invest a lot of time and had to do a lot of reading to get my project going. It took while and I received a lot of groans from my wife while testing. I am still in the process of tweaking things.
I started watching a series of videos on YouTube from Bruh Automation. He introduced me to Home Assistant. It got me really excited. He uses a Raspberry Pi as a server but I already had a Wintel Pro CX-W8 Smart TV Box which I use as a server. I run 3 Minecraft Servers, Emby Server, iSpyConnect DVR (2 IP Cameras), Unifi wifi controller, and now MQTT Server, and Home Assistant. Below is screenshot of mostly idle.
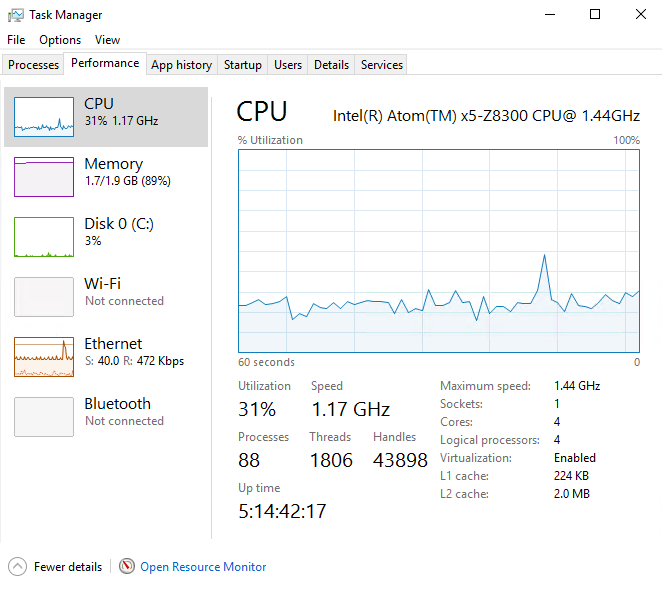 If it weren’t for iSpy it would be around 5-10% most of the time. Emby transcoding is the only thing that is stressful and it is not used much. The reason I mention this is because after purchasing a Raspberry Pi with power supply and case, you are not far off from getting a z8300 box. Only downfall is dreaded Windows update auto reboot. I finally looked into it and disabled it. If you decide to use a Windows box, I would make sure you are running 64bit windows. One advantage to using a Raspberry Pi is there is an image on Home assistant with the basics pre-configured and just need to write it to an SD card.
Server side Setup
I won’t go into too much detail on server side, as I installed Python, Mosquitto, and Home Assitant (I followed the guide on their site for Windows)
Python was a breeze to install and just ran the executable and went with defaults. I already had it installed for something else and I am running 3.5.2 64-bit. There are newer versions now. Mosquitto was the most difficult. I followed this guide but substituted Win32OpenSSL_Light-1_0_2j.exe approx 2MB. A k version is available now. Home assistant was easy and used pip.
Christmas Lights
It was a little before Christmas when I started researching home automation. I had been reading about these inexpensive Sonoff devices here on CNX and I found a project on Github for some custom firmware by arendst that enabled them to be controlled by MQTT. (While getting the link it looks like a new project has started with some additional features here). My wife really likes decorating for Xmas and we have 3 trees and lots of lights. She mentioned getting some timers and boom I had my opportunity and ordered them the same night. After receiving It took me a couple nights and I had a simple automation turning Xmas lights on and off at specific times and life was good. I got an extra one to play with until Xmas was over. I redeployed the rest around the house after Xmas.
MQTT
I really had no idea what this was and it took me a while to grasp. You can use a cloud based MQTT if you would like, but I prefer to run my own. MQTT is a service that relays messages between devices. There are 2 main items topics and payloads. To be able to tell a switch to turn on you send payload “on” to a topic, for example, “cmnd/testbench/power”. The light turns on and it replys back to a topic “stat/testbench/POWER” confirming that the light is on and the message is received. Because we are sending “on” to the topic each device using MQTT will need its own topic. Topics are case sensitive. I made a batch file to subscribe to all topics for troubleshooting so I could monitor the messages. The # indicates all sub topics.
|
1 2 |
"C:\Program Files (x86)\mosquitto\mosquitto_sub" -t stat/# -t tele/# -t cmnd/# -t home/# -v" pause |
Sonoff
I picked the Sonoff basic but there are also different varieties that add additional features which are supported by arendst software.
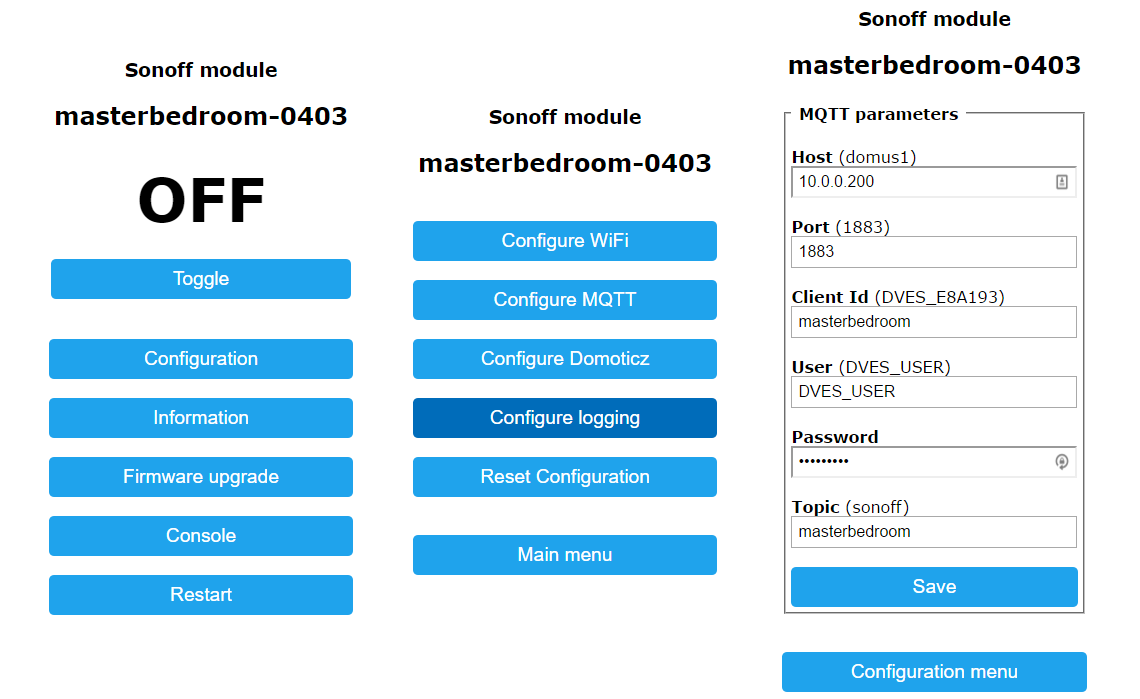
 Arendst has been very active with this project and adding/tweaking daily. When I first flashed the device, I did find a defect and notified him and he had it fixed and uploaded within the hour. He has very detailed instructions on the Wiki. First step before flashing is soldering headers. (I link to bent headers…which I initially thought I made a mistake but turned out it was good. They are easy to straighten) A USB to TTL adapter is also needed to upload from Arduino IDE. I recommend one like this because it provides both 3.3 and 5V. After downloading and setting Arduino up, I only set my WiFi password and SSID in the sketch. After it boots the first time, it connects to your wireless network. Find the IP address in your router, and pop the IP address in your browser to finish the configuration. Set the MQTT server credentials and topic and your done. I never setup credentials on the MQTT server so it accepts any login. Finally after everything is programmed you need to connect it to mains. Beware do not connect mains while TTL is connected. I bought some extension cords locally. Cut them in half and stripped back a ¼ inch of the insulation. Extension cords use stranded wire so I tinned them with solder to avoid any stray strands from shorting out. Then I screwed them down on the terminals making sure polarity was correct.
YAML
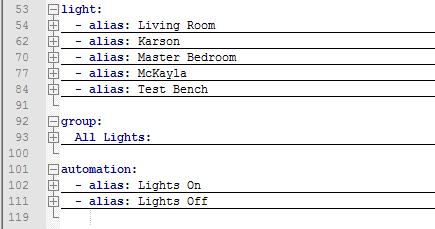
YAML is unforgiving. It is the formatting that you configure Home Assistant in. A single space will stop Home Assistant from starting. Luckily on this last update if you restart Home Assistant through the browser it will test the configuration file before actually restarting. I purposefully put an extra space on line 54 to show it is easy to find any mistakes.

I also recommend Notepad++ for editing in windows. You can break your configuration down into different files but I like one. Notepad ++ allows you to collapse the parts you aren’t currently working on.
I recommend adding one thing at a time and restarting to make it easier to find errors. And making a copy of the last working config before adding more. In the config below there are 5 sonoff’s and an automation to turn the lights on and off at specific times. This is extremely basic. I also recommend setting up one new device and be conscious of naming. When you get your config working properly on your first new device I copy the config to a new blank text window and do a find/replace.
Below is the screen capture of collapsed parts, and and full config (minus personal info).
|
1 2 3 4 5 6 7 8 9 10 11 12 13 14 15 16 17 18 19 20 21 22 23 24 25 26 27 28 29 30 31 32 33 34 35 36 37 38 39 40 41 42 43 44 45 46 47 48 49 50 51 52 53 54 55 56 57 58 59 60 61 62 63 64 65 66 67 68 69 70 71 72 73 74 75 76 77 78 79 80 81 82 83 84 85 86 87 88 89 90 91 92 93 94 95 96 97 98 99 100 101 102 103 104 105 106 107 108 109 110 111 112 113 114 115 116 117 118 119 120 |
homeassistant: # Name of the location where Home Assistant is running name: Home # Location required to calculate the time the sun rises and sets latitude: 36.0 longitude: -80.0 # Impacts weather/sunrise data (altitude above sea level in meters) elevation: 278 # metric for Metric, imperial for Imperial unit_system: imperial # Pick yours from here: http://en.wikipedia.org/wiki/List_of_tz_database_time_zones time_zone: America/New_York # Show links to resources in log and frontend #introduction: # Enables the frontend frontend: #################################################################### http: # Uncomment this to add a password (recommended!) api_password: password # Turn on built in mqtt broker mqtt: broker: 10.0.0.200 port: 1883 client_id: home-assistant-1 ##################################################################### # Checks for available updates updater: # Discover some devices automatically discovery: # Allows you to issue voice commands from the frontend in enabled browsers conversation: # Enables support for tracking state changes over time. history: # View all events in a logbook logbook: # Track the sun sun: # Weather Prediction light: - alias: Living Room platform: mqtt name: "Living Room" state_topic: "stat/livingroom/1/POWER" command_topic: "cmnd/livingroom/1/power" payload_on: "ON" payload_off: "OFF" - alias: Karson platform: mqtt name: "Karson" state_topic: "stat/karson/1/POWER" command_topic: "cmnd/karson/1/power" payload_on: "ON" payload_off: "OFF" - alias: Master Bedroom platform: mqtt name: "Master Bedroom" state_topic: "stat/masterbedroom/1/POWER" command_topic: "cmnd/masterbedroom/1/power" payload_on: "ON" payload_off: "OFF" - alias: McKayla platform: mqtt name: "McKayla" state_topic: "stat/mckayla/1/POWER" command_topic: "cmnd/mckayla/1/power" payload_on: "ON" payload_off: "OFF" - alias: Test Bench platform: mqtt name: "Test Bench" state_topic: "stat/testbench/POWER" command_topic: "cmnd/testbench/power" payload_on: "ON" payload_off: "OFF" group: All_Lights: - light.living_room - light.karson - light.master_bedroom - light.test_bench - light.mckayla automation: - alias: Lights On hide_entity: true trigger: platform: time after: '16:30:00' action: service: light.turn_on entity_id: group.all_lights - alias: Lights Off hide_entity: true trigger: platform: time after: '20:30:00' action: service: light.turn_off entity_id: group.all_lights |
Notice the test bench is on later firmware and the MQTT topic is slightly different
Next Steps
So now I have a smart home, right? Not in my opinion. I can turn lights on and off with a schedule or with my smart phone or at the light by pressing the button on the Sonoff. To me this is not smart. Setting a schedule is OK, but then you have the lights on unnecessarily and wasting electricity. Only real option is to press a button on the Sonoff but what difference is that than flipping a switch. Taking your phone out takes way too long, and I feel like it is going backwards. Below are estimated costs so far. By far the Windows Box will be the most expensive part if you choose to go that way. You can re-purpose just about anything that runs Linux to be a server. One other option is to run Linux on an S905x.
Money Spent
Cost of server not included nor shipping.
| Item | Qty | Price | Total |
| Sonoff Basic | 5 | $4.85 | $24.25 |
| Headers | 1 | $1.50 | $1.50 |
| USB to TTL | 1 | $2.54 | $2.54 |
| Total | $28.29 |
If you find this entertaining or want me to go more in depth on a specific aspect let me know in the comments. I have been finding my time setting it up very satisfying. I am able to do some hardware and software work. I hope this might get your interest in home automation going, and find out it is not hard nor expensive. I would like to state none of the products linked were provided by the sites. I purchased with my own money.
The plan right now is to do a 3 part post. In the next post, we will integrate some inexpensive motion sensors and door sensors using 433mhz, then finally modifying the sensors to include a light intensity sensor.
Continue reading “Part 2: 433 MHz / WiFi MQTT Bridge, Door & PIR Motion Sensors“.

Karl is a technology enthusiast that contributes reviews of TV boxes, 3D printers, and other gadgets for makers.
Support CNX Software! Donate via cryptocurrencies, become a Patron on Patreon, or purchase goods on Amazon or Aliexpress


