
Khadas Vim is the only Amlogic S905X development board I’m aware of. There are 4 or 5 versions of the board, but currently only two models are sold: Khadas Vim with 8GB flash and single band WiFi + BLE 4.0, and Khadas VIM Pro with 16GB flash, and dual band WiFi + BLE 4.2. SZWesion, the company behind the board, has sent Khadas Vim Pro for evaluation. Today, I’ll take a few pictures of the board and its accessories, and report my experience playing with Ubuntu 16.04.2 on the board. They’ve also released Android, LibreELEC, and dual boot Android/Ubuntu (for Vim Pro only) images, which you can find in the firmware resources page.
Khadas Vim Pro Unboxing and Photos
My parcel included Khadas package that looks like a book, an HDMI cable, and the same IR remote control sent with GeekBox, the first board made by the company, and powered by a Rockchip RK3368 processor.
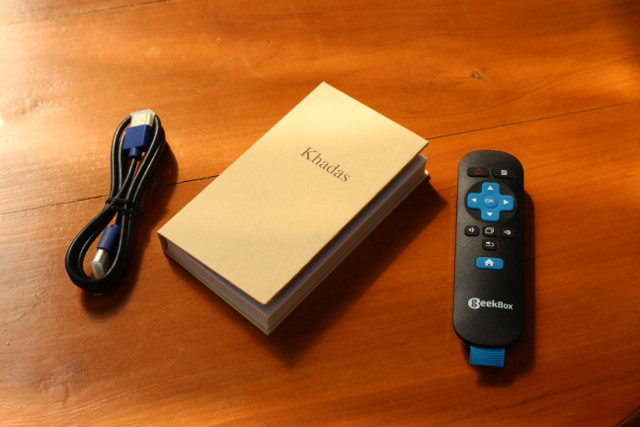
You can indeed open the package like a book, and you’ll find the board and a USB to USB type C cable inside, as well as some basic specifications.
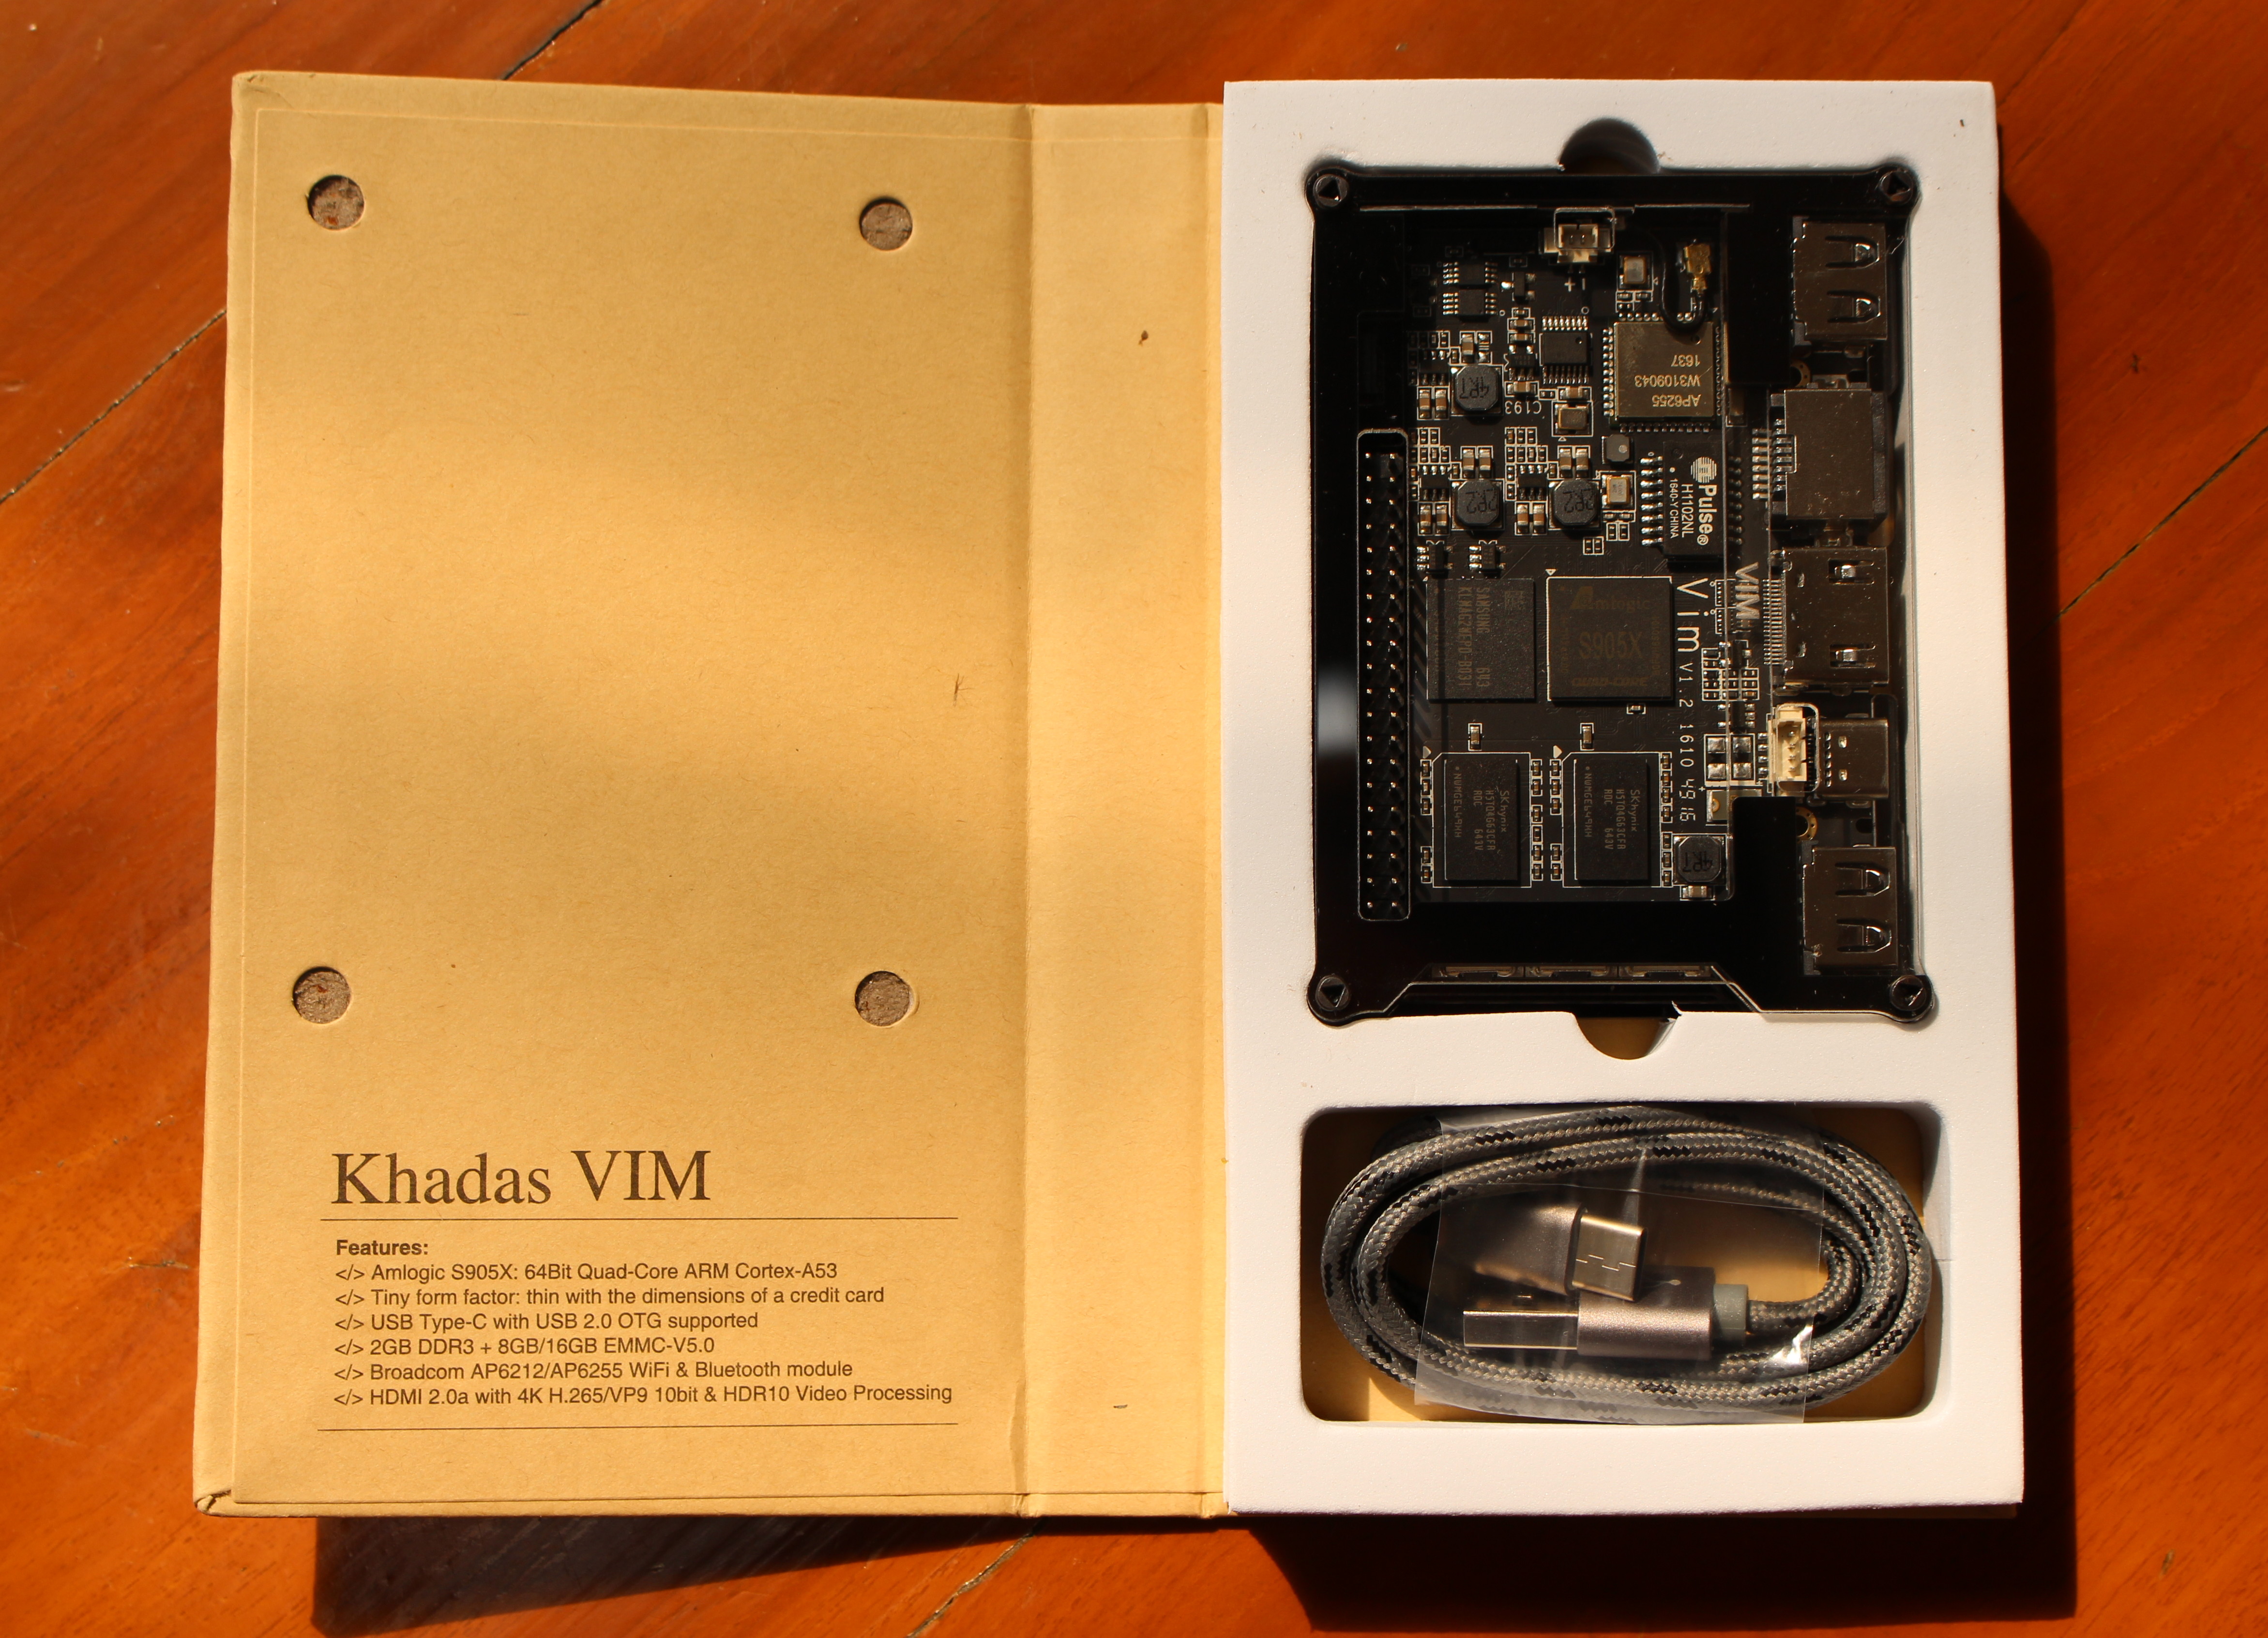
You can verify you’ve got the right model on that back of the package which shows the memory and storage, in my case 2 GB + 16 GB.

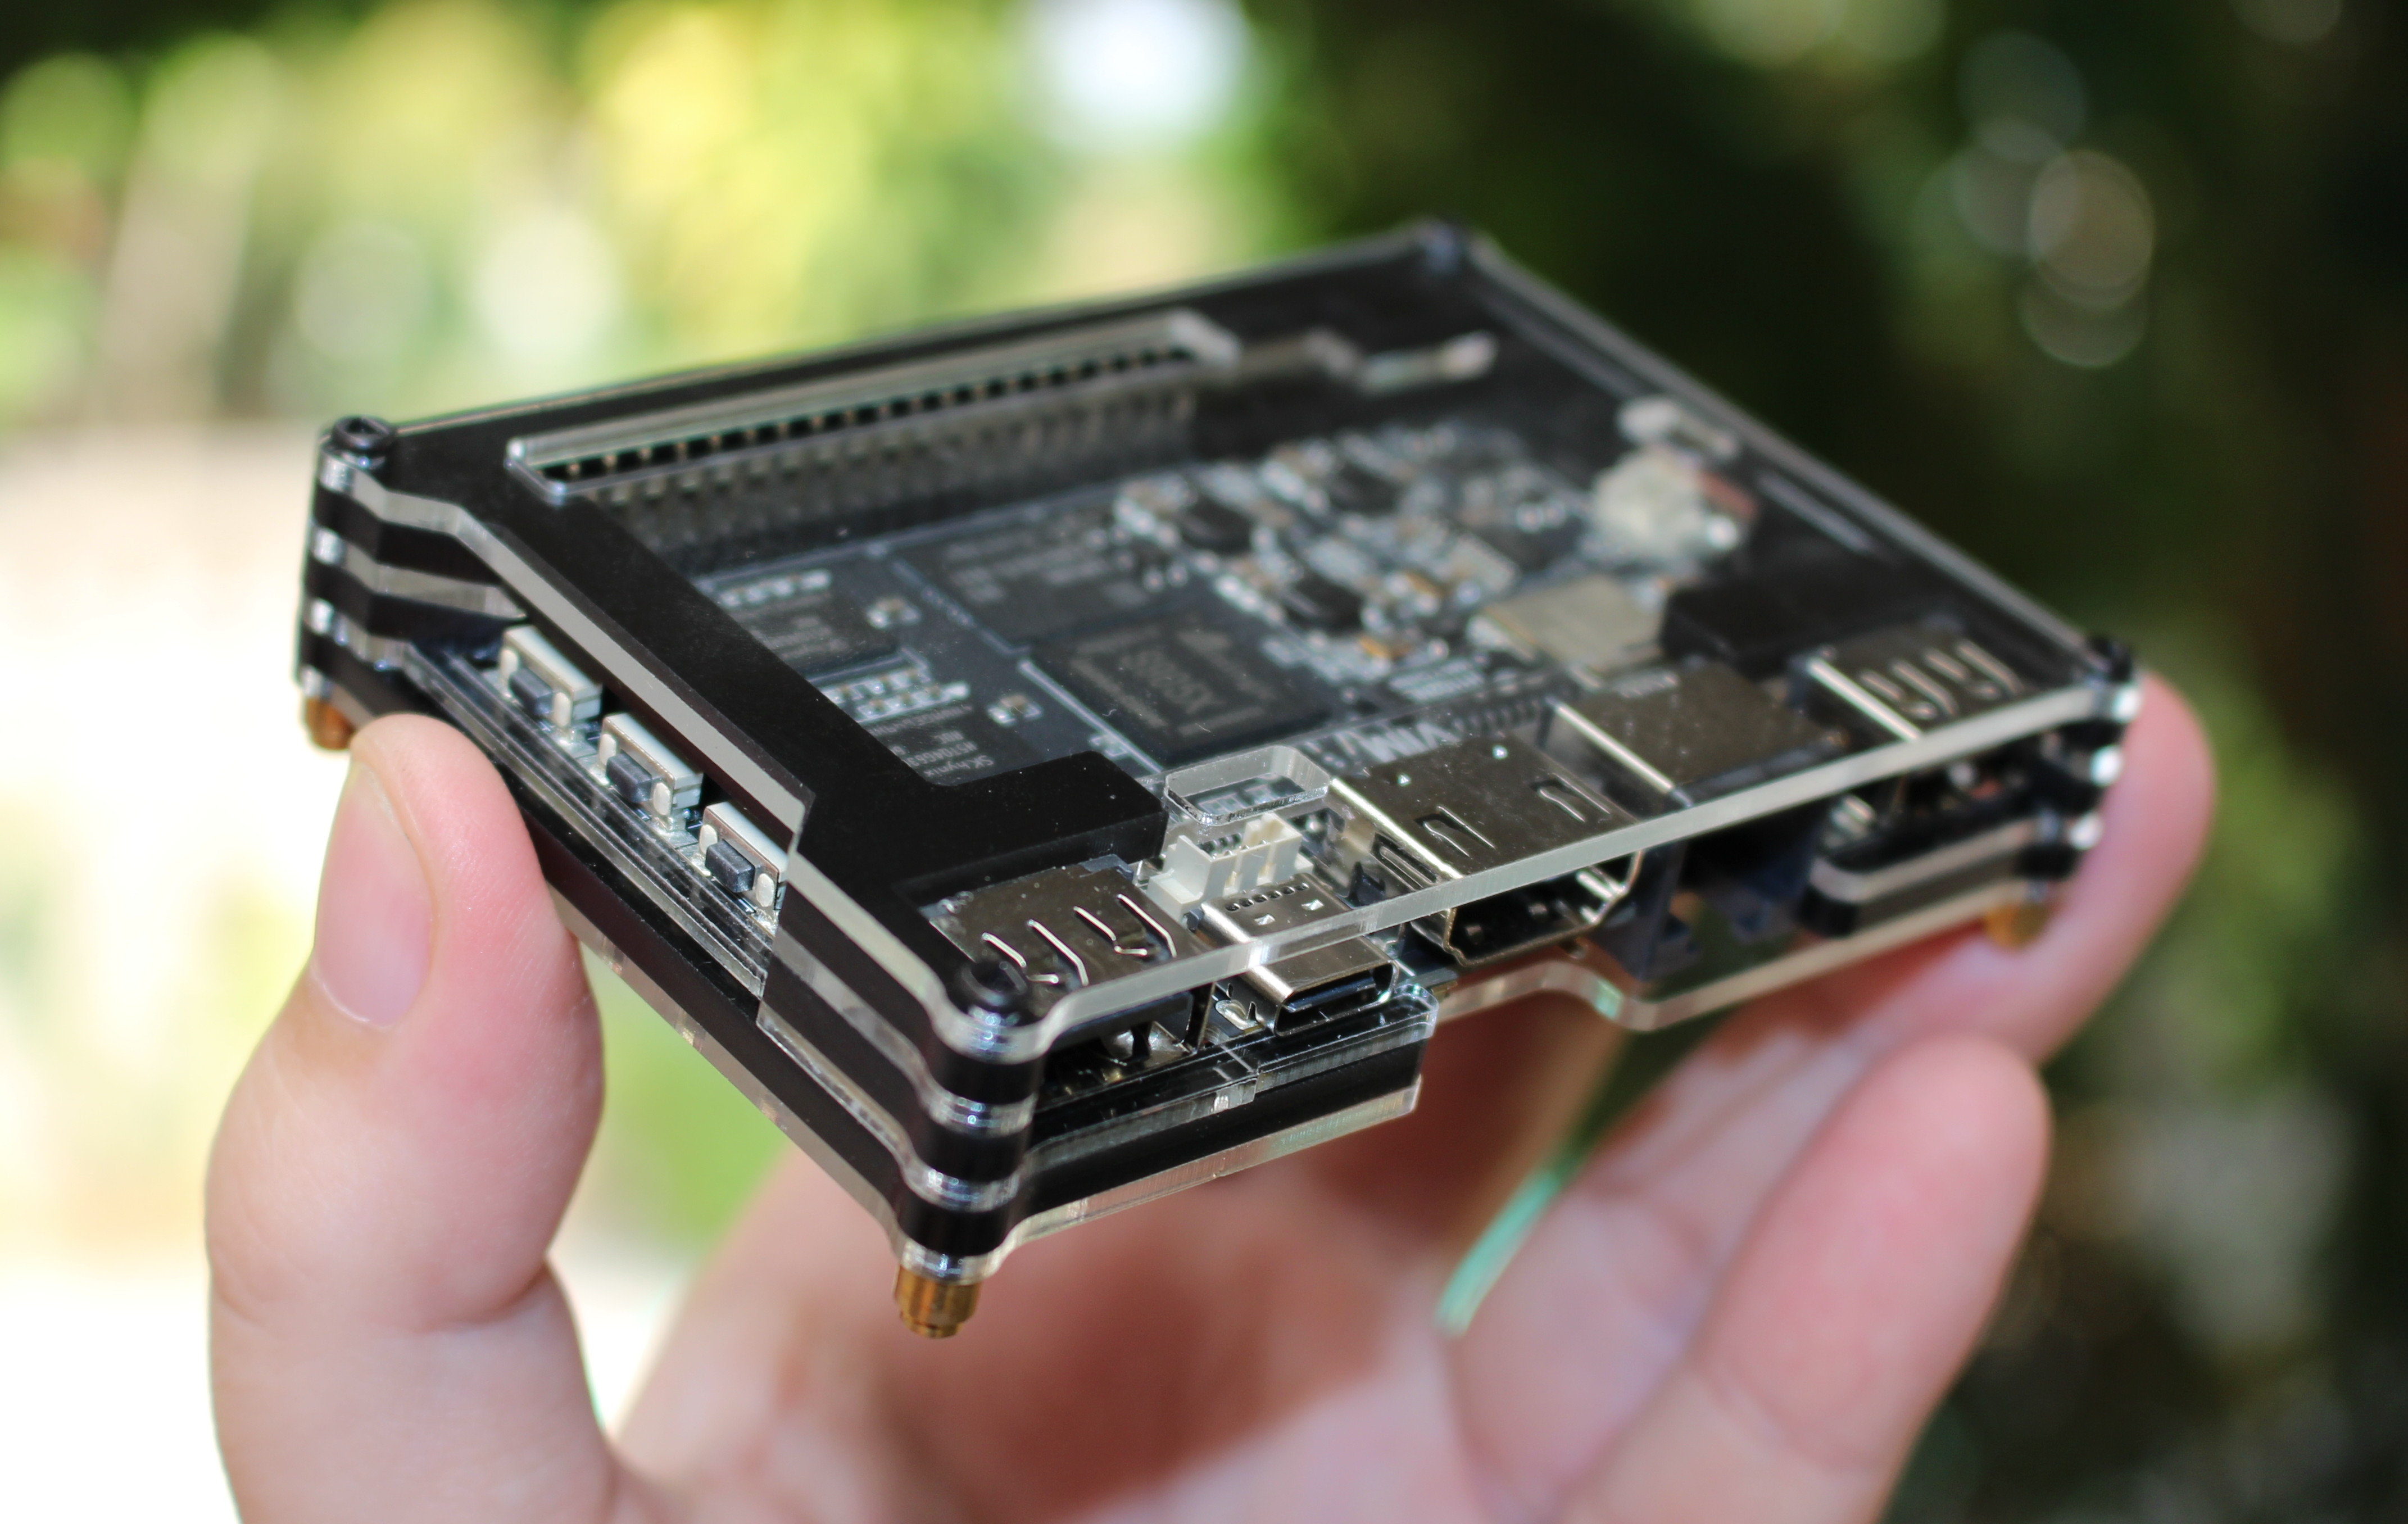
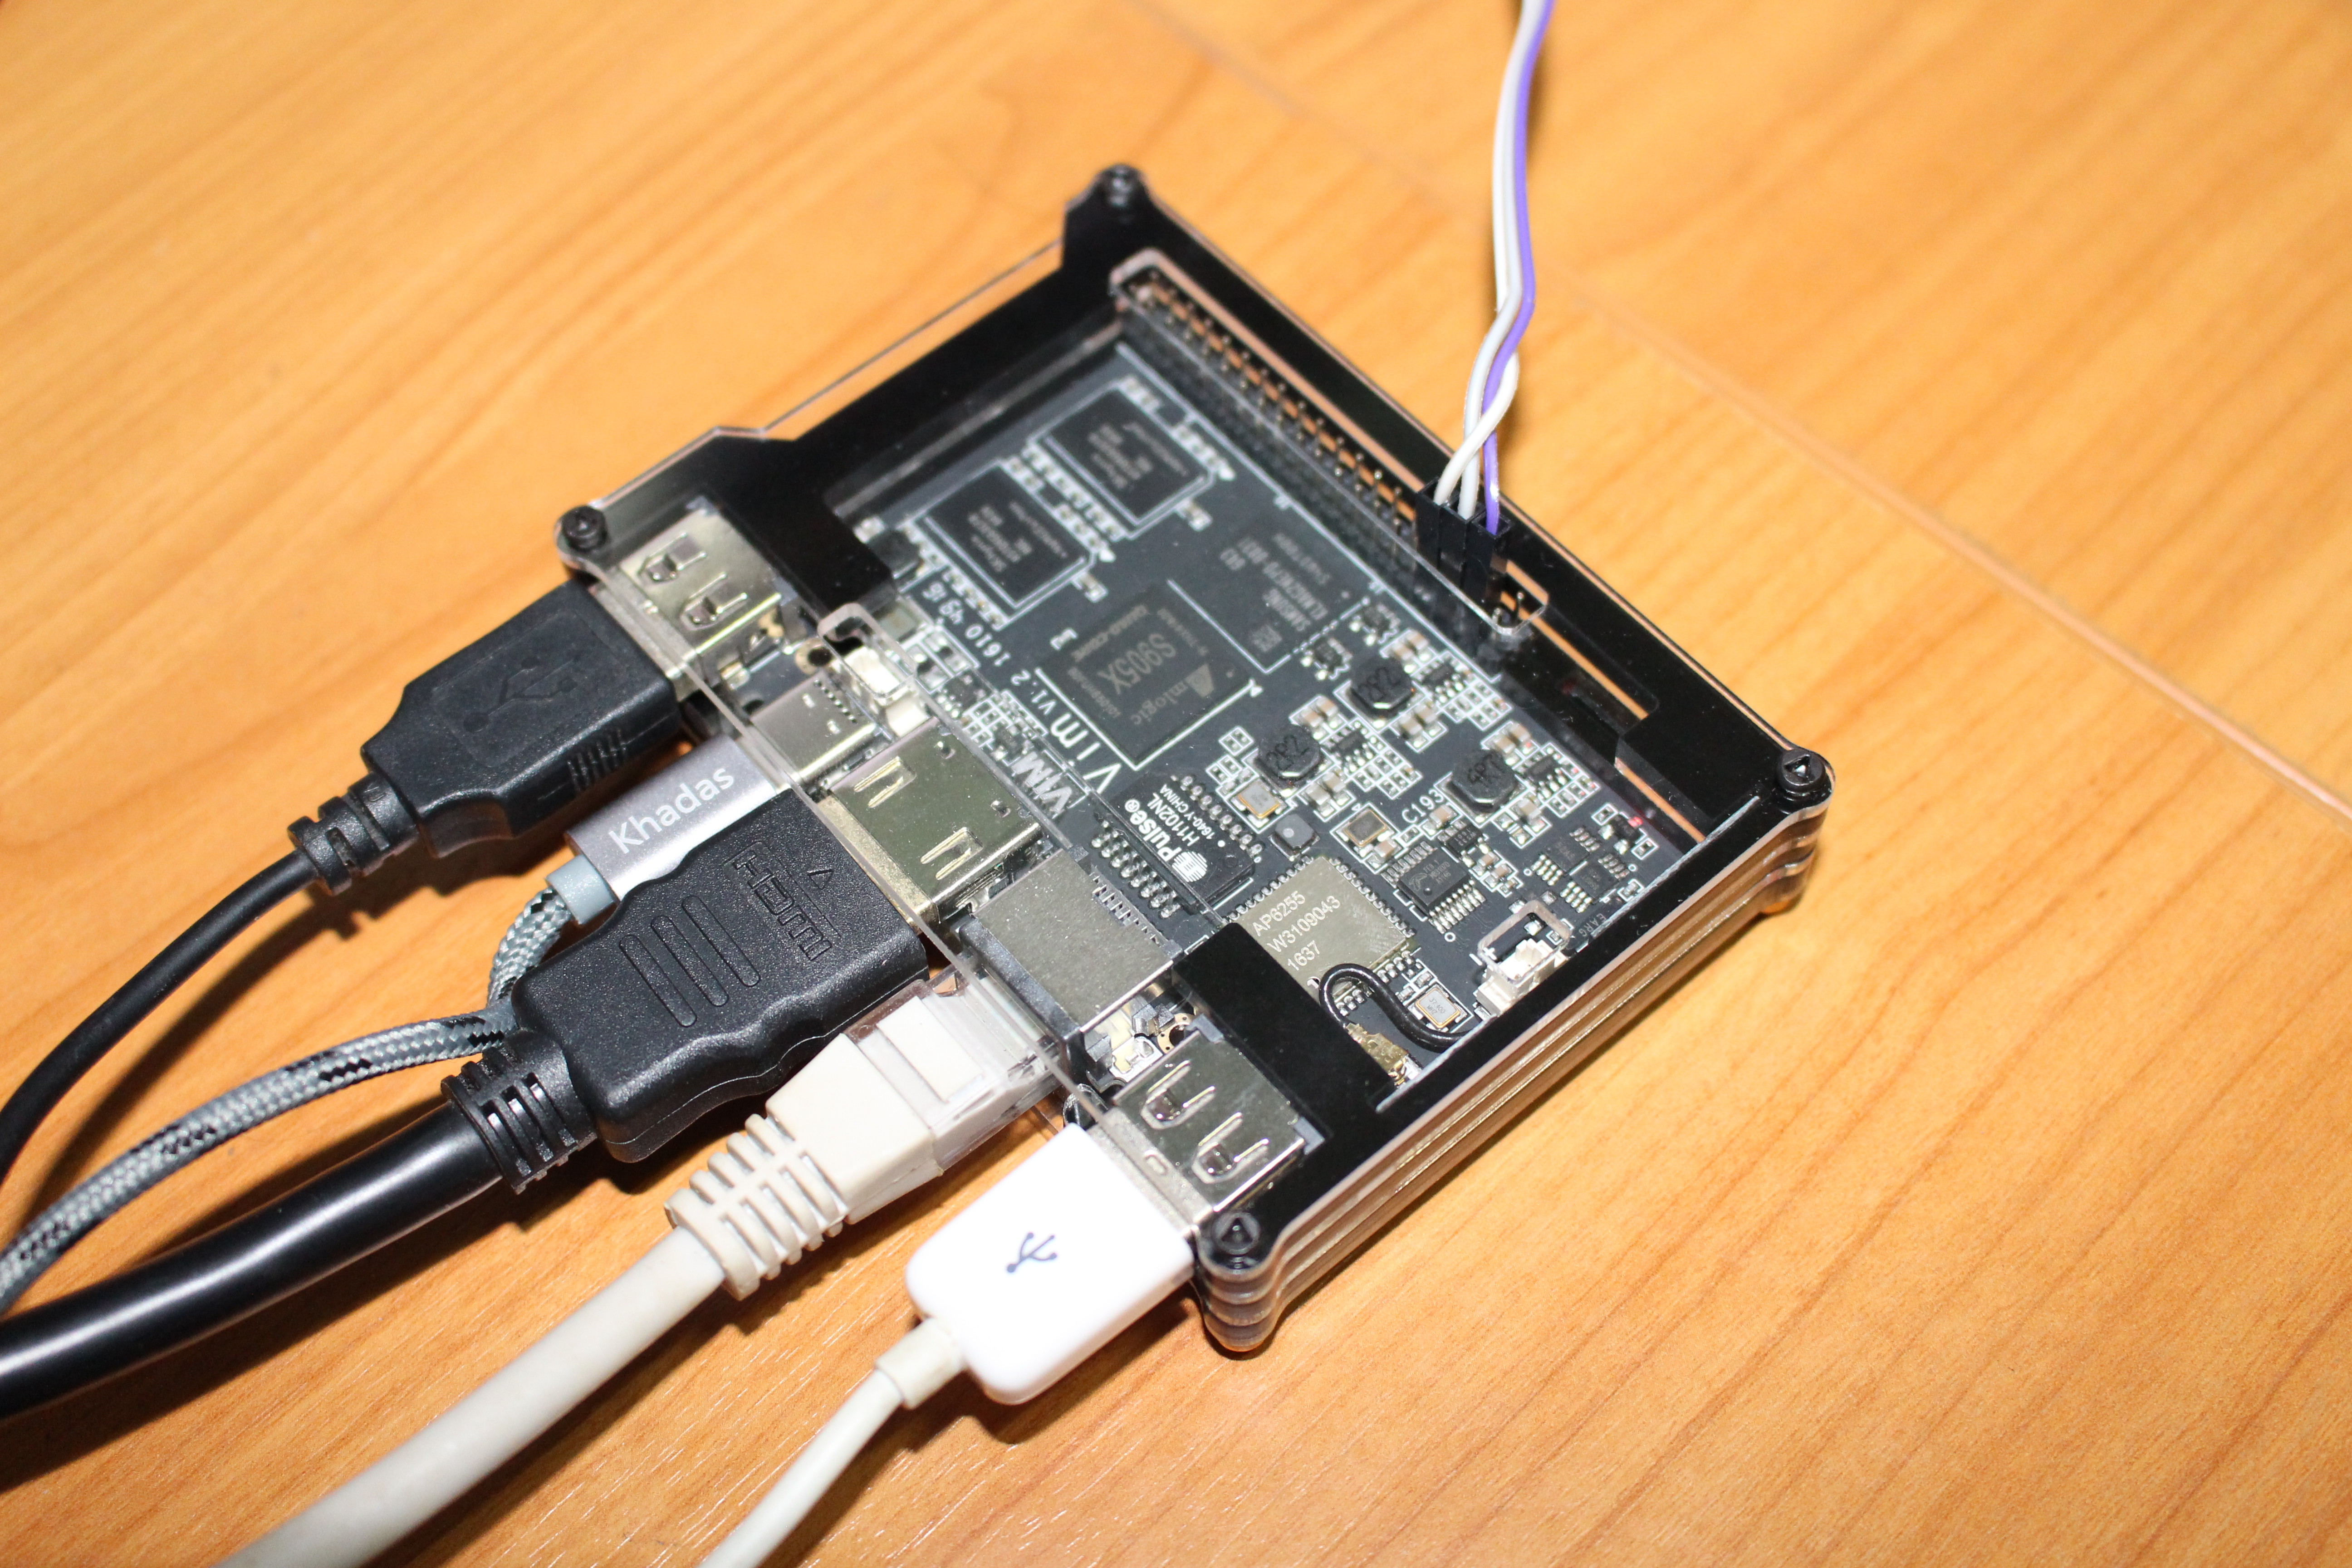
The board comes with a neat acrylic case with openings for headers and ports. The top of the board features a 40-pin header, the Amlogic S905X processor (no heatsink), two RAM chips, the eMMC flash, the wireless module (AP6255), and most ports with two USB 2.0 ports, a USB type C port, HDMI 2.0a, and Fast Ethernet. There’s also a separate header close to the USB-C port giving access to Vin in case you don’t want to power your board through USB.
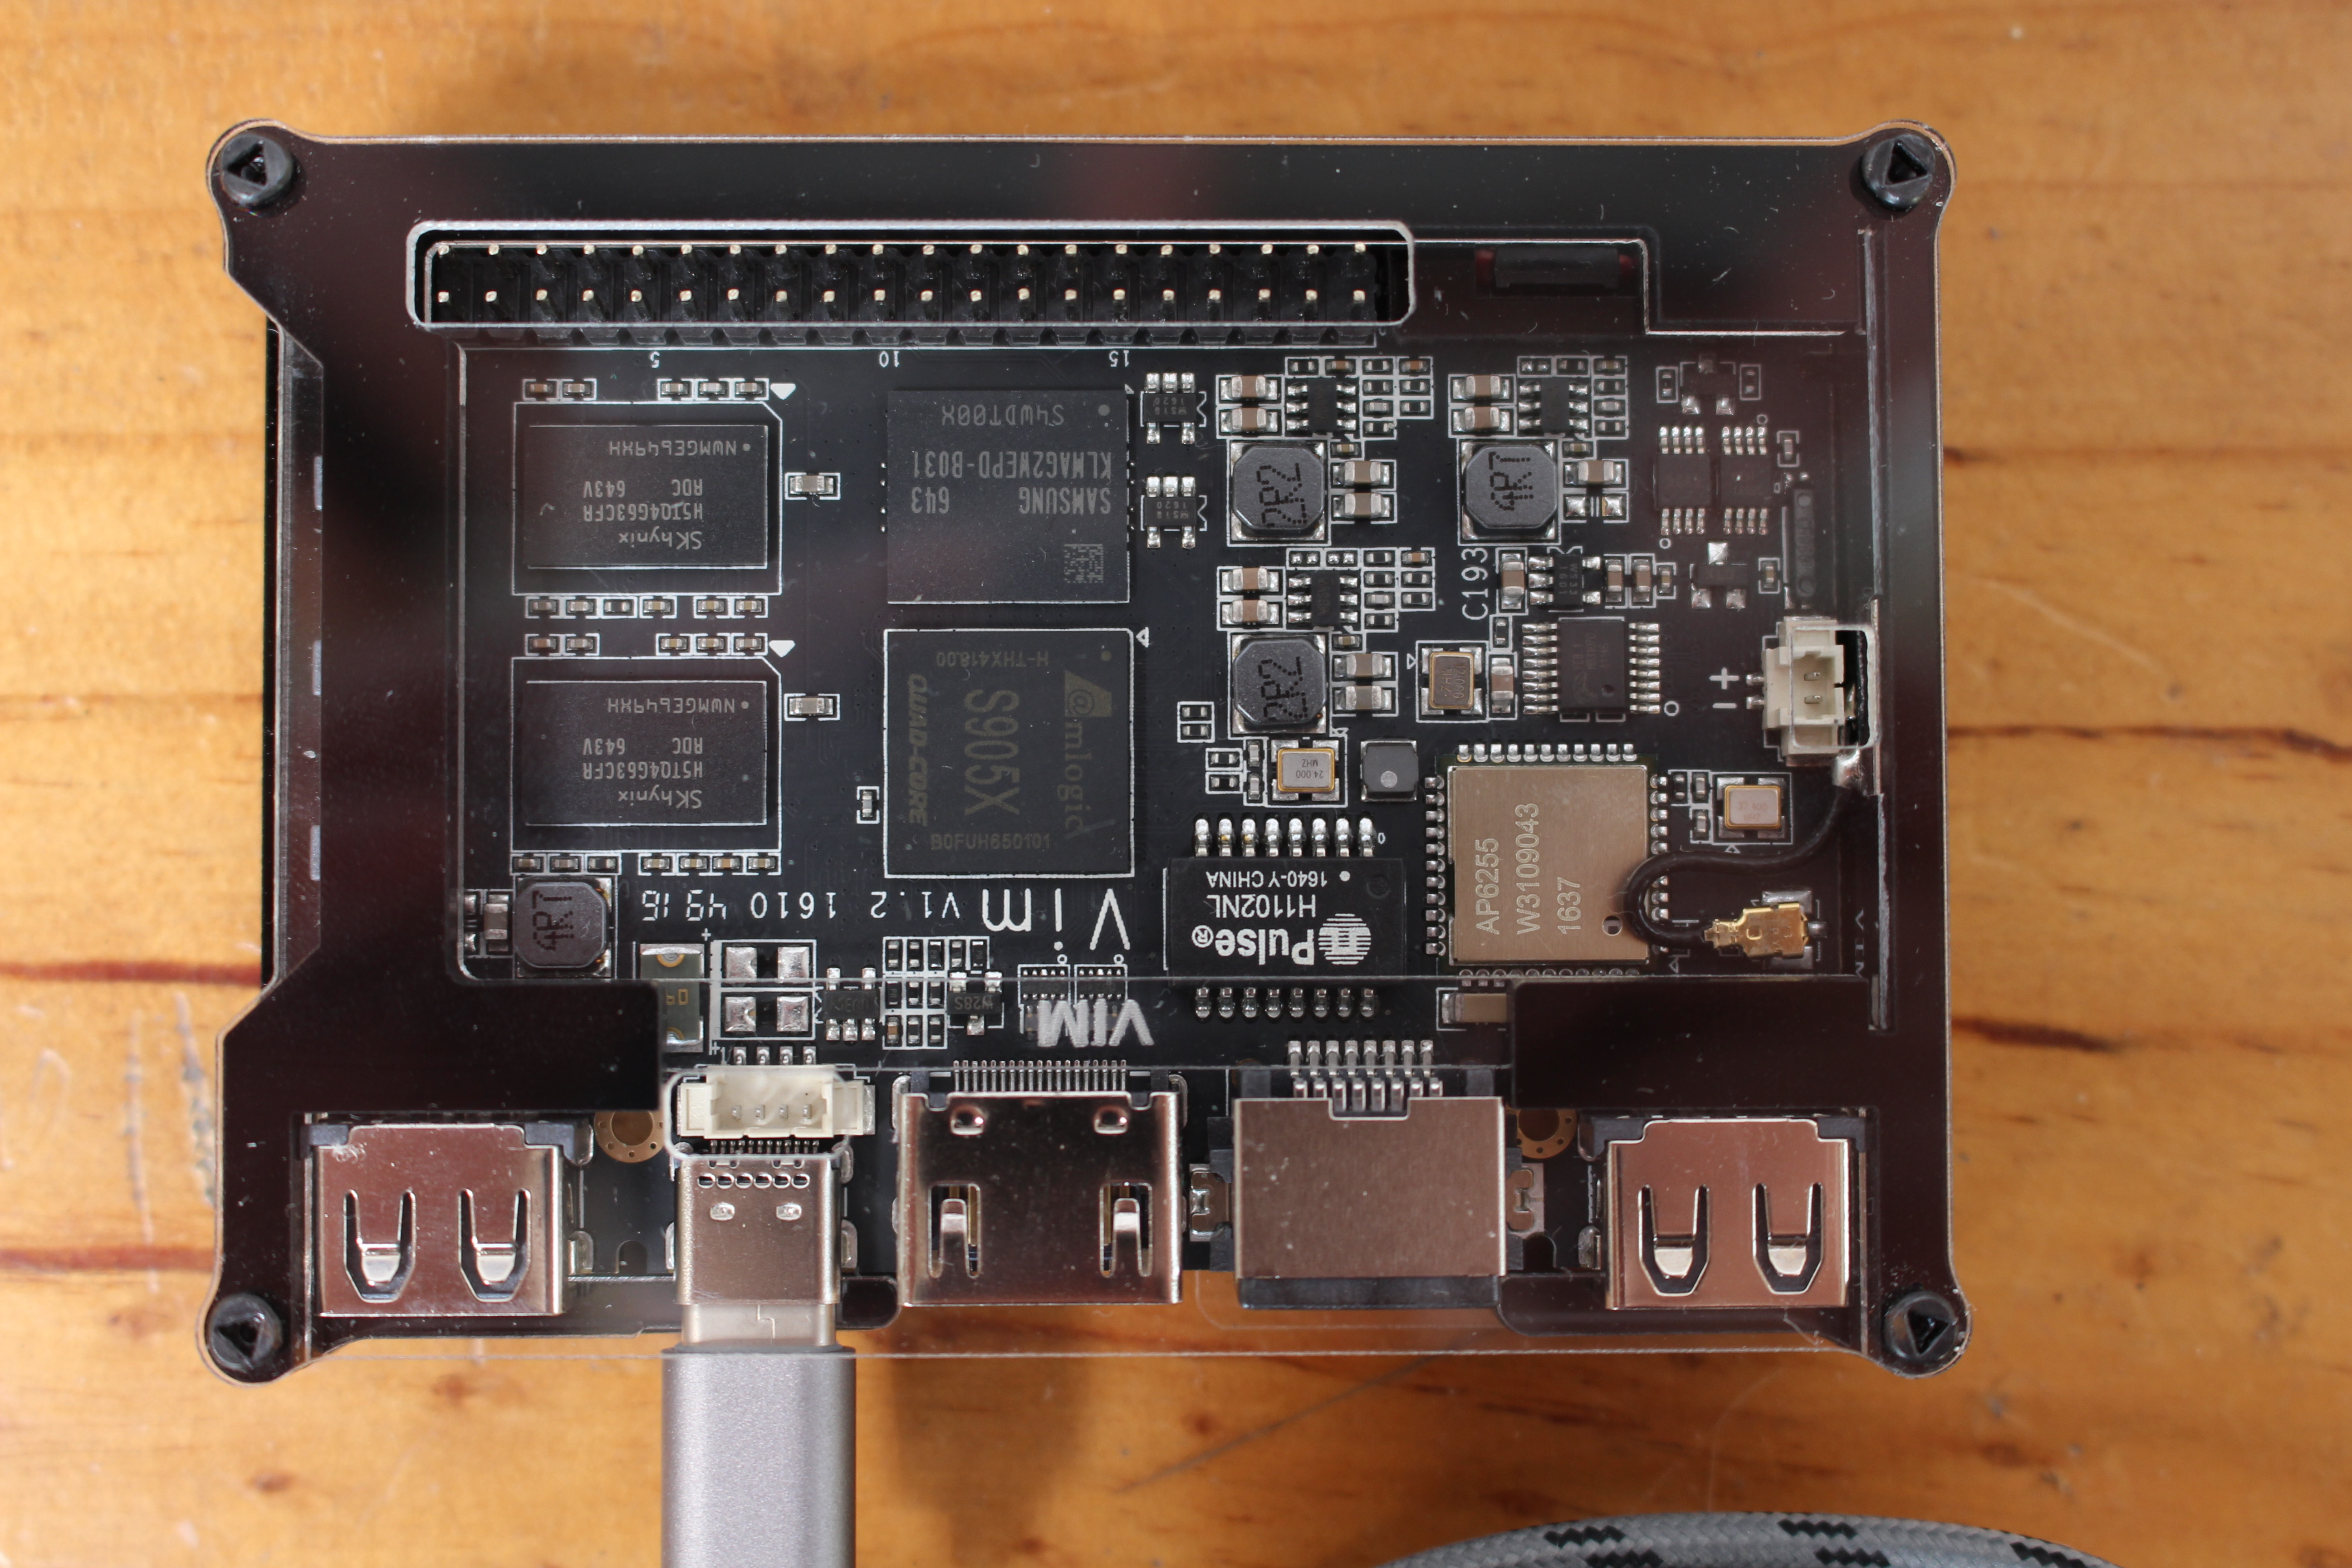
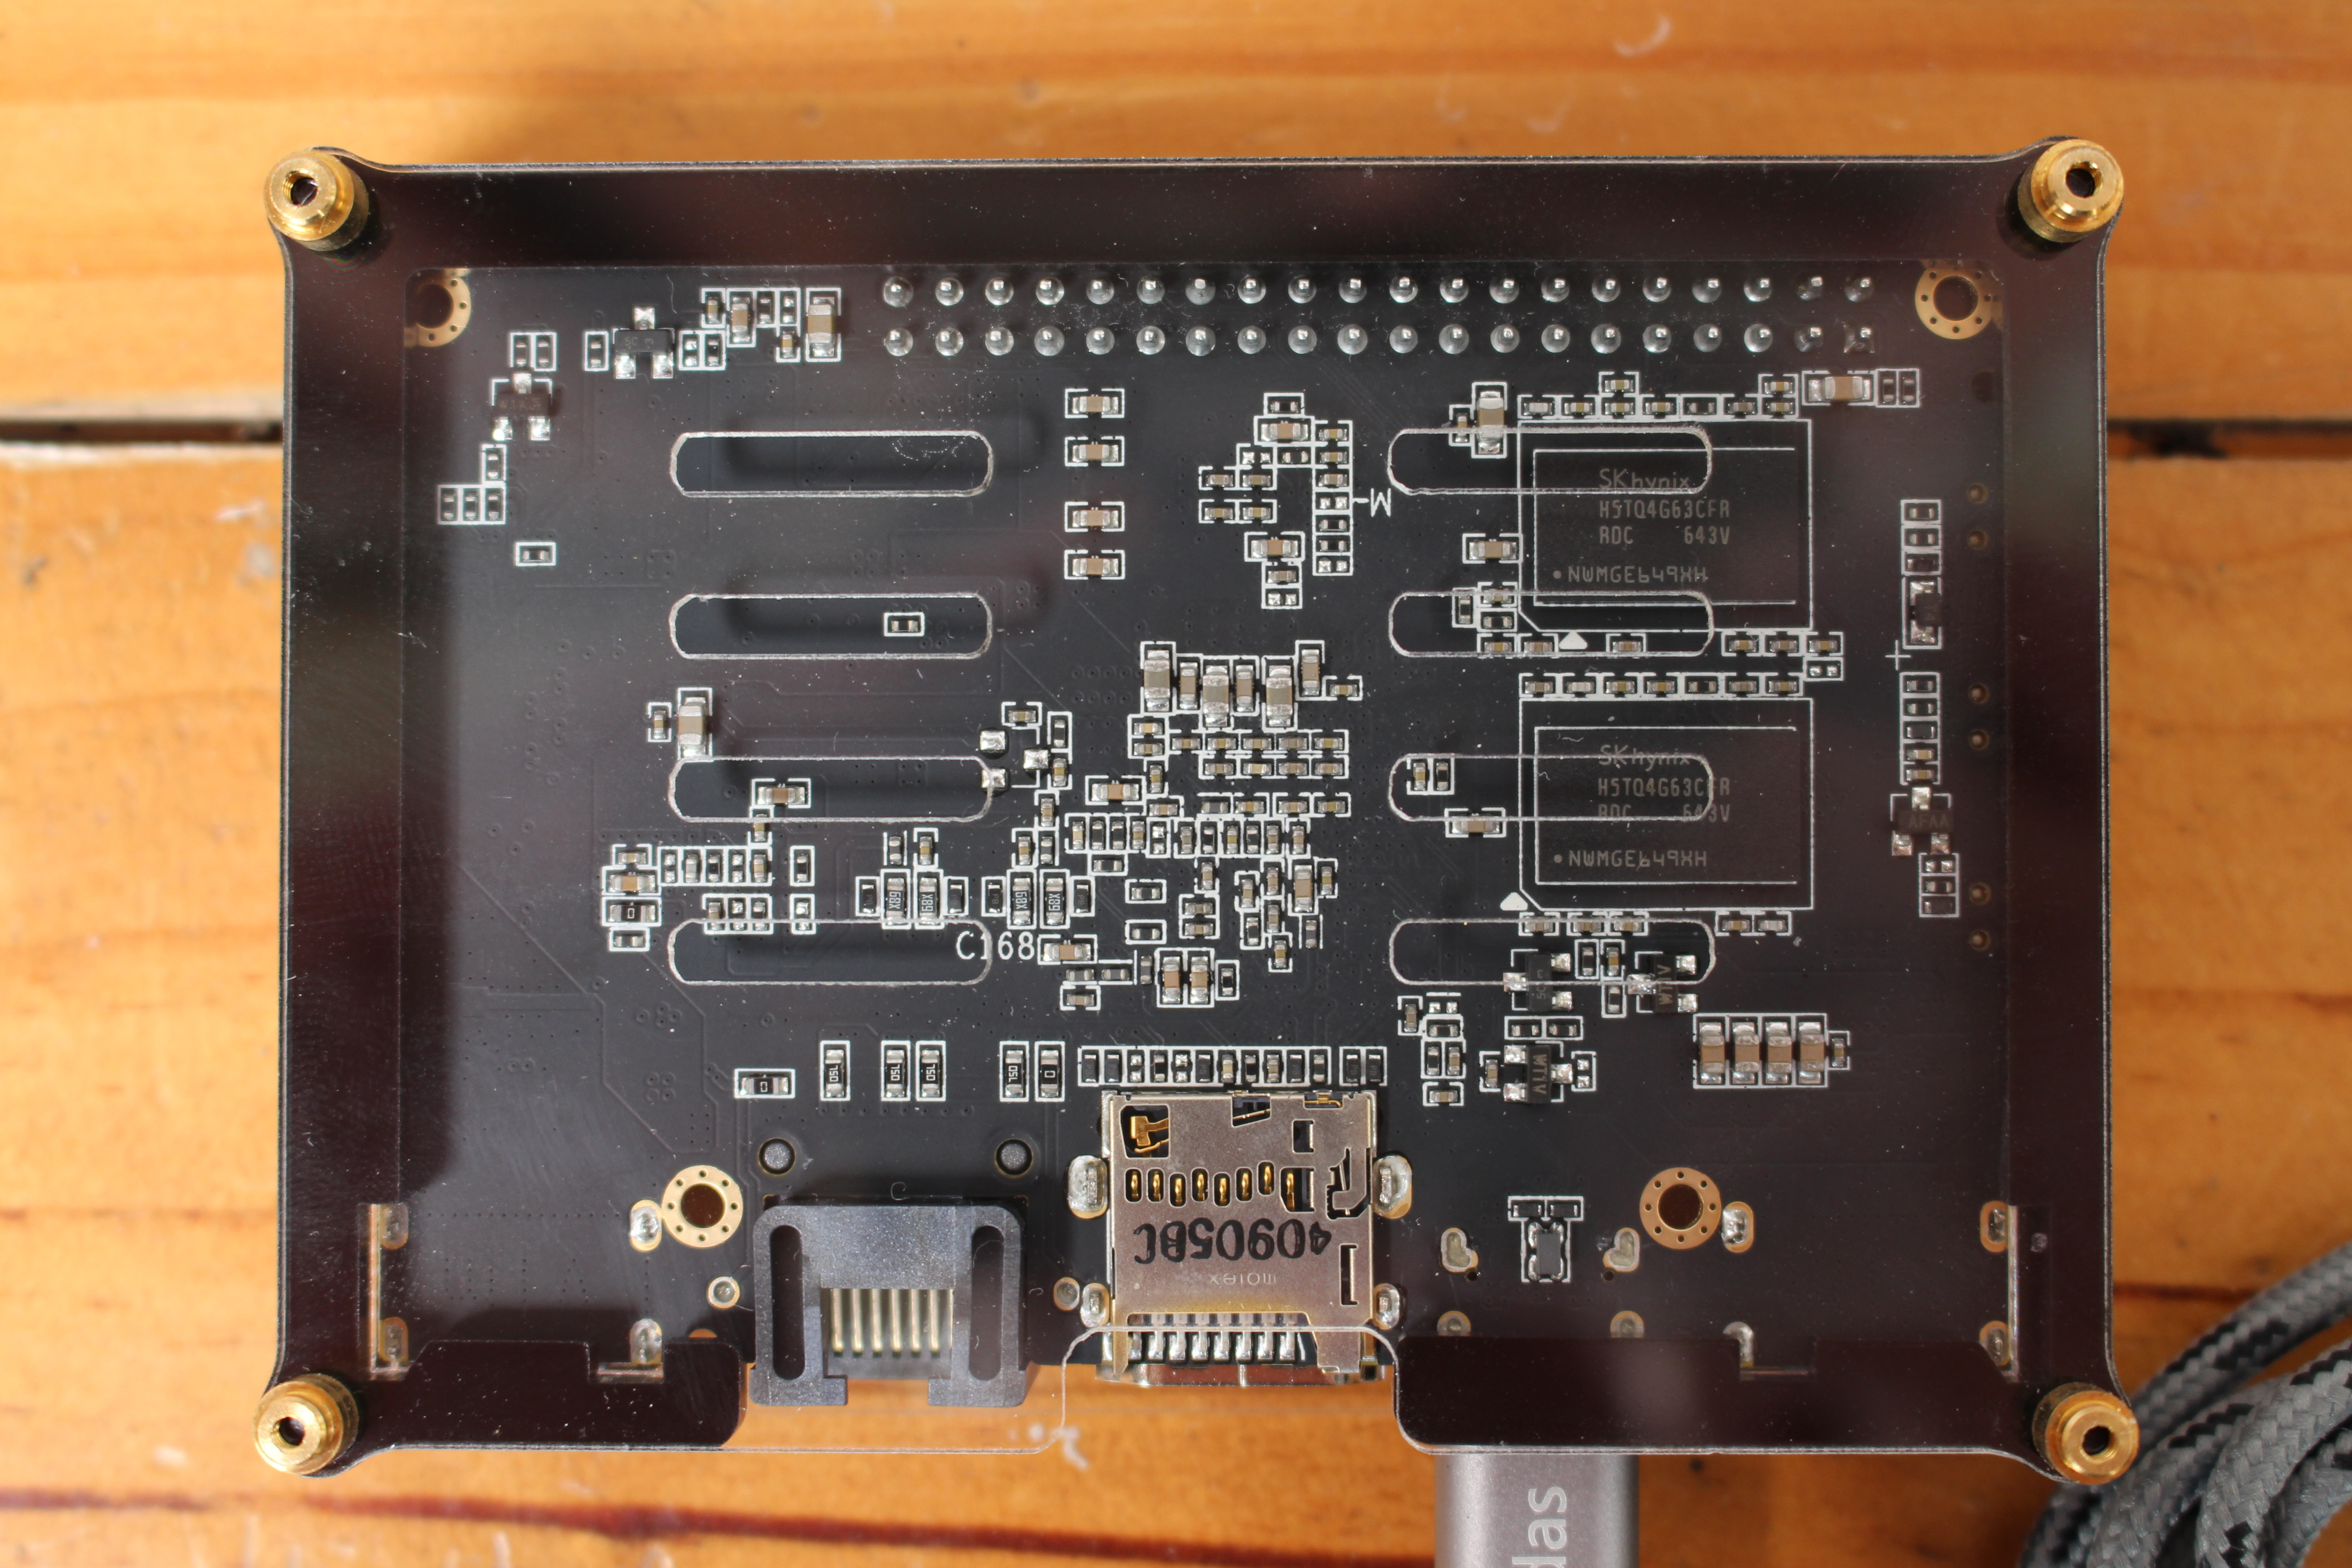
There’s also 2-pin battery connector on the left of the board for the real-time clock (RTC). The bottom side of the board includes two more RAM chips, and the micro SD slot.
Power, “function” and reset buttons can also be found on the side of the board, and there’s an IR receiver on the right of the 40-pin header.
Ubuntu 16.04 on Khadas Vim (Pro)
While you can download the firmware on the “Firmware Resources” page, I recommend you check the Announcements & News section on the forums, as they normally include a changelog and some tips to configure your board. An Ubuntu 16.04 + XFCE image was released last month, but the company uploaded a Ubuntu 16.04.2 server image yesterday, so that’s the one I’m going to use today. A new Ubuntu 16.04 + XFCE image with better graphics support will be released sometimes next week.
My plan is to do the update in my Linux computer. The firmware is distributed through Mediafire, so you’ll have to download it through your web browser. I also downloaded Vim_Uboot_170121.7z on the Firmware Resources pge since it’s needed for the SD card update method. Once we’ve got the firmware and U-boot binaries we can extract them with 7z.
|
1 2 |
7z x Vim_Ubuntu-server-16.04_V170211.7z 7z x Vim_Uboot_170121.7z |
Now insert the micro SD card inside your computer, find the device with lsblk, and check if it has more than one partition. Replace /dev/sdX with your own device.
|
1 2 3 4 5 6 7 8 9 10 |
sudo fdisk -l /dev/sdX Disk /dev/sdd: 7.4 GiB, 7948206080 bytes, 15523840 sectors Units: sectors of 1 * 512 = 512 bytes Sector size (logical/physical): 512 bytes / 512 bytes I/O size (minimum/optimal): 512 bytes / 512 bytes Disklabel type: dos Disk identifier: 0x35e533a8 Device Boot Start End Sectors Size Id Type /dev/sdd1 30380 15508989 15478610 7.4G b W95 FAT32 |
If it has no partition or more than one, you’ll need to change the partition table using tools like fdisk, or gparted. The instructions provided on Khadas website are basically the same as I wrote in the post “How to Create a Bootable Recovery SD Card for Amlogic TV Boxes“.
|
1 2 3 4 5 |
sudo umount /dev/sdX1 sudo mkfs.vfat /dev/sdX1 sudo dd if=Vim_Uboot_170121/u-boot.bin.sd.bin of=/dev/sdX bs=1 count=442 sudo dd if=Vim_Uboot_170121/u-boot.bin.sd.bin of=/dev/sdX seek=1 skip=1 bs=512 sync |
Mount the partition, for example by removing and re-inserting the micro SD card into your computer, and copy two files needed for update:
|
1 |
cp -a Vim_Uboot_170121/aml_sdc_burn.ini Vim_Ubuntu-server-16.04_V170211/update.img [sd_mount_point] |
Eject the micro SD card:
|
1 |
sudo eject /dev/sdd |
Now connect your board with the cables would want to use (e.g. Ethernet, HDMI, etc…), and possibly connect a USB to TTL debug board to access the serial console in case of errors. I also connect a USB hub with my RF dongles for the air mouse and a USB keyboard.
The board comes pre-loaded with Android 6.0.1 with Linux 3.14, so you can connect the power first to make sure the board is working properly. Note that you’ll need to provide your own USB power supply. I used a 5V power supply, and not a fast charger found in some phones and starting at 12V. Now we can insert the micro SD card we’ve just prepared into the board, and boot into Upgrade Mode by keeping pressing on the power button (closest to the 40-pin header), pressing a short time on the reset button (closest to the USB port), and releasing the power button two or three seconds later. At this point, you should get a firmware upgrade interface on the HDMI display with a green progress bar, and once completed you’ll get a “Successful Android” logo.

This is what it looks like in the serial console during the update:
|
1 2 3 4 5 6 7 8 9 10 11 12 13 14 15 16 17 18 19 20 21 22 23 24 25 26 27 28 29 30 31 32 33 34 35 36 37 38 39 40 41 42 43 44 45 46 47 48 49 50 51 52 53 54 55 56 57 58 59 60 61 62 63 64 65 66 67 68 69 70 71 72 73 74 75 76 77 78 79 80 81 82 83 84 85 86 87 88 89 90 91 92 93 94 95 96 97 |
Following is the partition table stored in eMMC/TSD: name offset size flag ================================================================================ 0: bootloader 0 400000 0 1: reserved 2400000 4000000 0 2: cache 6c00000 20000000 2 3: env 27400000 800000 0 4: logo 28400000 2000000 1 5: recovery 2ac00000 2000000 1 6: rsv 2d400000 800000 1 7: tee 2e400000 800000 1 8: crypt 2f400000 2000000 1 9: misc 31c00000 2000000 1 10: instaboot 34400000 20000000 1 11: boot 54c00000 2000000 1 12: system 57400000 40000000 1 13: data 97c00000 30c200000 4 mmc write lba=0x12000, blocks=0x2 mmc write lba=0x12002, blocks=0x2 mmc_write_partition_tbl: mmc write partition OK! partition table success [burn_parts] burn_num = 3 burn_part0 = logo burn_part1 = ramdisk burn_part2 = rootfs [MSG]=====>To burn part [logo] [MSG]itemSizeNotAligned 0xbc0 [MSG]flash LOGIC partCap 0x2000000B [MSG]Down(store) part(logo) sz(0x11b5b0) fmt(normal) [MSG]totalSlotNum = 0, nextWriteBackSlot 18 [MSG]itemSizeNotAligned 0xbc0 [fat]0x:leftSz 9f0 < BPS 1000, gotSz a9f0 [MSG]Burn Start... [MSG]Burn complete [MSG]Verify Start... [MSG]To verify part logo in fmt normal [MSG]Verify End [MSG]VERIFY OK [MSG]=====>To burn part [ramdisk] [fat]Seek 0x3c6bb0 from 0x3bda20 [MSG]itemSizeNotAligned 0x450 [MSG]flash LOGIC partCap 0x2000000B [MSG]Down(store) part(ramdisk) sz(0x12ef800) fmt(normal) [MSG]totalSlotNum = 0, nextWriteBackSlot 303 [MSG]itemSizeNotAligned 0x450 [fat]0x:leftSz 3b0 < BPS 1000, gotSz f3b0 [MSG]Burn Start... [MSG]Burn complete [MSG]Verify Start... [MSG]To verify part ramdisk in fmt normal [MSG]Verify End [MSG]VERIFY OK [MSG]=====>To burn part [rootfs] [MSG]itemSizeNotAligned 0xc20 [MSG]flash LOGIC partCap 0x376a00000B [MSG]Down(store) part(rootfs) sz(0x18000000) fmt(normal) [MSG]totalSlotNum = 0, nextWriteBackSlot 1024 [MSG]itemSizeNotAligned 0xc20 [MSG]Burn Start... [fat]0x:leftSz 3e0 < BPS 1000, gotSz f3e0 [MSG]Burn complete [MSG]Verify Start... [MSG]To verify part rootfs in fmt normal [MSG]Verify End [MSG]VERIFY OK [MSG]=====>To burn part [bootloader] [MSG]itemSizeNotAligned 0xbf0 [MSG]Down(store) part(bootloader) sz(0xe0000) fmt(normal) [MSG]totalSlotNum = 0, nextWriteBackSlot 14 [MSG]itemSizeNotAligned 0xbf0 [fat]0x:leftSz 410 < BPS 1000, gotSz f410 [MSG]Burn Start... mmc switch to boot0 success mmc switch to boot1 success mmc switch to user success [MSG]align bootloader sz from 0xe0000 to 0x100000 [MSG]Burn complete mmc switch to boot0 success mmc switch to boot1 success mmc switch to user success [MSG]VERIFY OK ## save_setting ## [MSG]Set upgrade_step to 2 Saving Environment to aml-storage... mmc env offset: 0x27400000 Writing to MMC(1)... done [MSG]to close image [MSG]Reload bmps env. [MSG]======sdc burn SUCCESS. [MSG]stop here as poweroff and powerkey not supported in platform! [MSG]You can <Ctrl-c> to reboot |
So I pressed Control-C in the serial console (if you have not set it up just reboot the board), and it failed to boot with the multiple error messages:
|
1 2 3 4 5 6 7 8 9 10 11 12 13 14 15 16 17 18 19 20 21 22 |
[OSD]check dts: FDT_ERR_BADMAGIC, load default fb_addr parameters [OSD]fb_addr for logo: 0x3d800000 [OSD]check dts: FDT_ERR_BADMAGIC, load default fb_addr parameters [OSD]fb_addr for logo: 0x3d800000 [CANVAS]canvas init [CANVAS]addr=0x3d800000 width=3840, height=2160 Err imgread(L340):Logo header err. There is no valid bmp file at the given address [store]To run cmd[emmc dtb_read 0x1000000 0x40000] read emmc dtb gpio: pin GPIOAO_2 (gpio 102) value is 1 get_cpu_id flag_12bit=1 Product checking: Khadas VIM. Net: dwmac.c9410000 Hit Enter or space or Ctrl+C key to stop autoboot -- : 0 Err imgread(L139):Fmt unsupported!genFmt 0x0 != 0x3 ee_gate_off ... Wrong Image Format for bootm command ERROR: can't get kernel image! ERROR: booting os 'Invalid OS' (0) is not supported ee_gate_on ... kvim# |
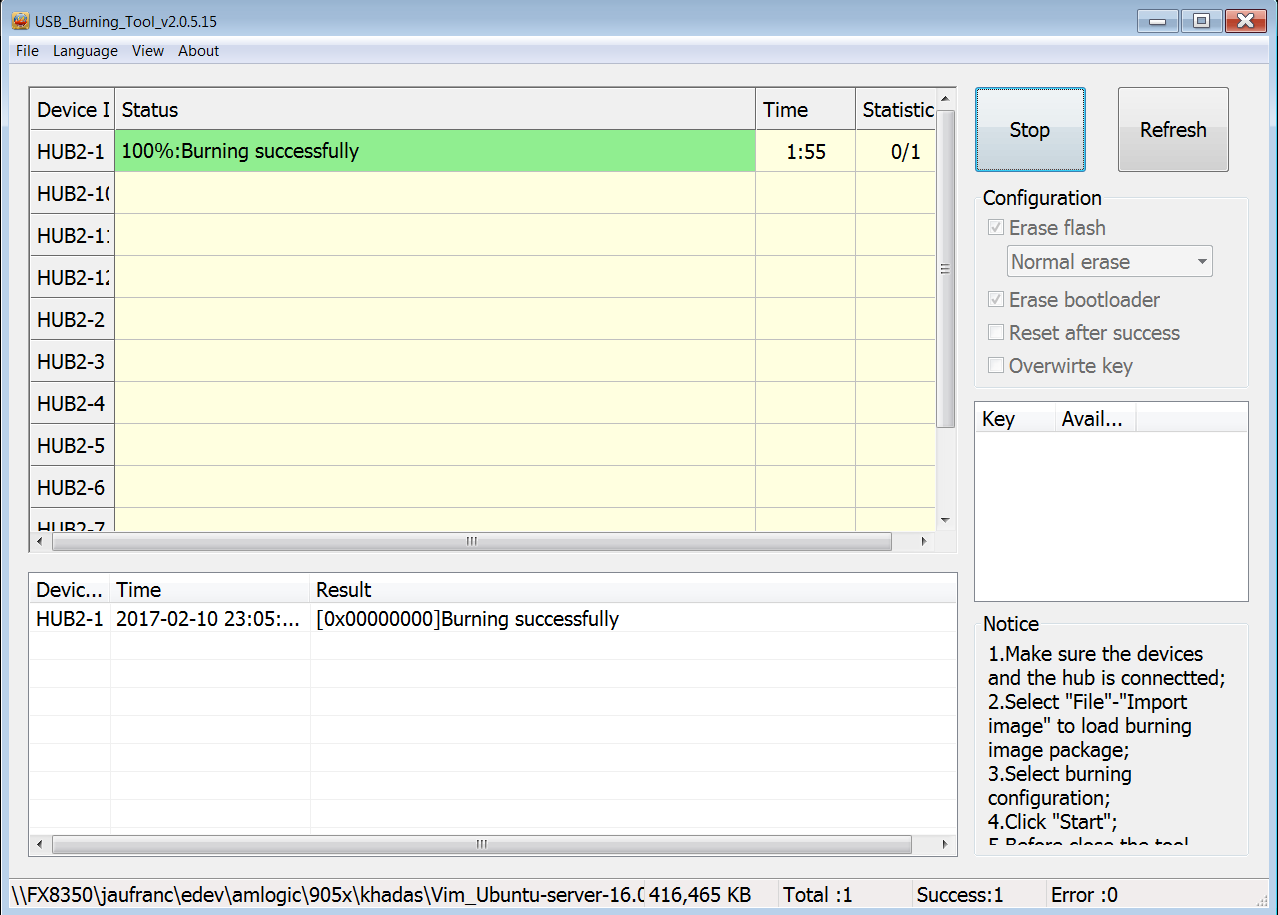
I contacted SZWesion about the issue, and they told me the SD card method did not work despite being documented on their website, and I had to use Amlogic USB Burning Tool in Windows instead. So I fired up a Windows 7 virtual machine, and I had no problem (for once) flashing the “update.img” file extract from Vim_Ubuntu-server-16.04_V170211.7z to the board.
This time it works and the board booted properly. Here’s the complete boot log for reference.
Once the boot is complete, you’ll be presented with a boot prompt on the HDMI monitor and the serial console:
|
1 2 3 |
Ubuntu 16.04.2 LTS Khadas ttyS0 Khadas login: |
After login with root / khadas crendentials, we can check some of the system details:
|
1 2 3 4 5 6 7 8 9 10 11 12 13 14 15 16 17 18 19 20 21 22 23 24 25 26 27 28 29 30 31 32 33 34 |
root@Khadas:~# cat /proc/cpuinfo Processor : AArch64 Processor rev 4 (aarch64) processor : 0 processor : 1 processor : 2 processor : 3 Features : fp asimd evtstrm aes pmull sha1 sha2 crc32 CPU implementer : 0x41 CPU architecture: AArch64 CPU variant : 0x0 CPU part : 0xd03 CPU revision : 4 Hardware : Amlogic Serial : 210a8200031a011f177810abc712a251 root@Khadas:~# df -h Filesystem Size Used Avail Use% Mounted on udev 802M 0 802M 0% /dev tmpfs 181M 5.3M 176M 3% /run /dev/rootfs 14G 229M 14G 2% / tmpfs 905M 0 905M 0% /dev/shm tmpfs 5.0M 0 5.0M 0% /run/lock tmpfs 905M 0 905M 0% /sys/fs/cgroup root@Khadas:~# free -h total used free shared buff/cache available Mem: 1.8G 28M 1.7G 5.2M 48M 1.7G Swap: 0B 0B 0B root@Khadas:~# uname -a Linux Khadas 3.14.29 #126 SMP PREEMPT Sat Feb 11 00:33:23 CST 2017 aarch64 aarcx root@Khadas:~# cat /etc/lsb-release DISTRIB_ID=Ubuntu DISTRIB_RELEASE=16.04 DISTRIB_CODENAME=xenial DISTRIB_DESCRIPTION="Ubuntu 16.04.2 LTS" |
As expected we have a quad core Cortex A53 processor, about 14GB storage available fromthe 16 GB eMMC flash, 1.7 GB free for Linux, a Linux 3.14 kernel, and Ubuntu 16.04.2 LTS.
Normally, you don’t really want to login as root for all your tasks, so we’re being asked to create a new khadas user manually:
|
1 2 |
adduser khadas usermod -aG sudo,adm khadas |
I would have expected this to be done by default in the image… I’ll keep using root in the rest of the instructions below.
The link status LED is on on my Ethernet switch, but let’s see if the network is up:
|
1 2 3 4 5 6 7 8 9 |
ifconfig lo Link encap:Local Loopback inet addr:127.0.0.1 Mask:255.0.0.0 inet6 addr: ::1/128 Scope:Host UP LOOPBACK RUNNING MTU:4096 Metric:1 RX packets:8048 errors:0 dropped:0 overruns:0 frame:0 TX packets:8048 errors:0 dropped:0 overruns:0 carrier:0 collisions:0 txqueuelen:0 RX bytes:595648 (595.6 KB) TX bytes:595648 (595.6 KB) |
Again, I would have expected the network to start automatically, so we’d have to set that up ourselves as instructed in the release notes:
|
1 2 3 |
echo "auto eth0" >> /etc/network/interfaces echo "iface eth0 inet dhcp" >> /etc/network/interfaces /etc/init.d/networking restart |
I could get an IP from my router:
|
1 2 3 4 5 6 7 8 9 10 |
ifconfig eth0 eth0 Link encap:Ethernet HWaddr 00:15:18:01:81:31 inet addr:192.168.0.111 Bcast:192.168.0.255 Mask:255.255.255.0 inet6 addr: fe80::215:18ff:fe01:8131/64 Scope:Link UP BROADCAST RUNNING MULTICAST MTU:1500 Metric:1 RX packets:31 errors:0 dropped:0 overruns:0 frame:0 TX packets:16 errors:0 dropped:0 overruns:0 carrier:0 collisions:0 txqueuelen:1000 RX bytes:4915 (4.9 KB) TX bytes:1996 (1.9 KB) Interrupt:40 |
Good. Now let’s check loaded modules and GPIO:
|
1 2 3 4 5 6 7 8 9 10 11 12 13 14 15 16 17 |
root@Khadas:~# lsmod Module Size Used by btsdio 3154 0 joydev 10320 0 dwc_otg 281444 0 dhd 705587 0 autofs4 24685 2 mali 226700 0 root@Khadas:~# ls /sys/class/gpio* /sys/class/gpio: export gpiochip145 gpiochip155 unexport /sys/class/gpio_keyboard: gpio_keyboard /sys/class/gpio_pwm: gpio_pwm |
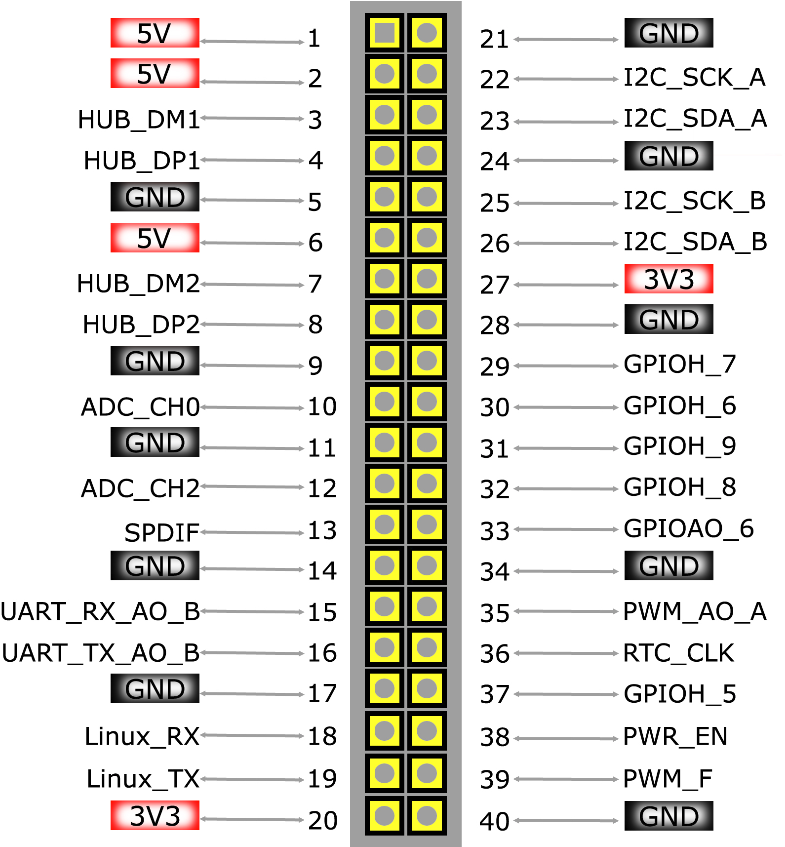
GPIOs are enabled, but we’d have to export the pin to use them, and I could not find specific documentation yet, except the GPIO pinout.
We can however control the LED on the board using one the states listed below
|
1 2 |
cat /sys/class/leds/red/trigger none nand-disk timer oneshot heartbeat backlight gpio cpu0 cpu1 cpu2 cpu3 default-on sd emmc sdio [breathe] scpi scpistop rfkill0 rfkill1 rfkill2 rfkill3 |
So we can want to turn off the red LED:
|
1 |
echo none > /sys/class/leds/red/trigger |
or make it blink depending on activity on the eMMC flash:
|
1 |
echo emmc > /sys/class/leds/red/trigger |
The Mali driver is loaded, but I’ve been told the drivers in the server image only works with non-X programs. I tried to install mesa-utils-extra for es2gears, and glmark-es2, but neither packages are available. That’s because several repositories are not enabled by default (e.g. multiverse and universe), but it’s easy to change:
|
1 2 |
sed -i "s/^# deb/deb/g" /etc/apt/sources.list apt update |
Now I use install both packages:
|
1 |
apt install mesa-utils-extra glmark2-es2 |
But to test those we need grphics support. An easy way to enable support is to install a desktop environment such as Ubuntu MATE (2.4GB extra used on disk):
|
1 |
apt install mate-desktop-environment ubuntu-mate-core |
I could run both sample, but the message “LibEGL warning: DRI2: authentication failed” probably means we are using software rendering instead.
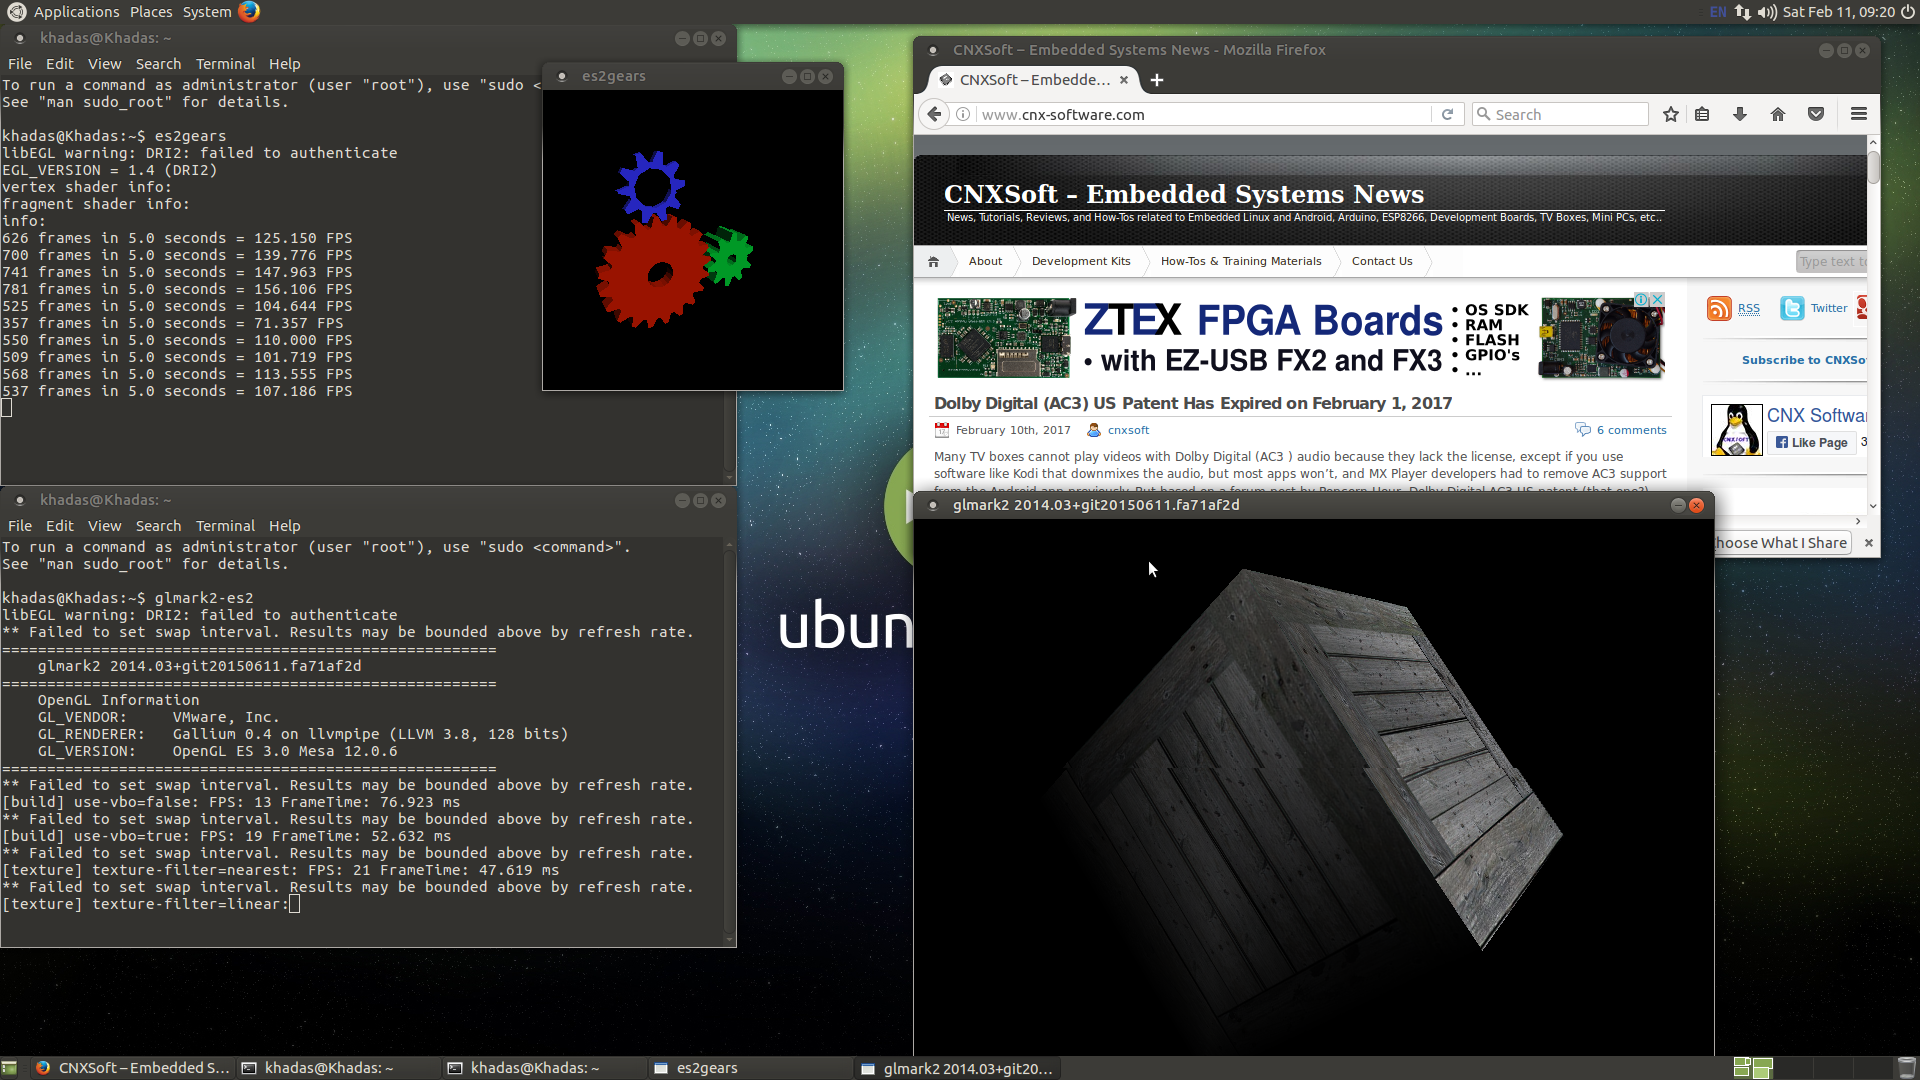
This was expected as I’ve been old that the “current server built-in the Mali & DRM Linux driver, but the user-space binary driver is for non-X version(Desktop with Xorg should with X version)”, so next week, we may get an image with working 3D graphics acceleration. Note that for most applications it’s not that important to have OpenGL ES support, as most 3D desktop apps require OpenGL.
The release notes also mentions we can install Gnome mplayer to play some videos, so that’s what I did:
|
1 |
sudo apt install gnome-mplayer |
I played a Big Buck Bunny 1080p60 H.264 video from a SAMBA share, and then copy the video to the internal storage to try again. The results were the same: audio playing fine but the video is playing in slow motion, with a low frame rate (1 second video takes about 5 seconds to play). So if you plan on using the platform as a media player, you’d better install the LibreELEC image, while the platform is just not ready for applications like digital signage, where you may need text, photos and videos playing at the same time.
I also installed iozone3 in order to test the eMMC flash performance after updating /etc/apt/sources.list with more multiverse lines.
|
1 2 |
sudo apt update sudo apt install iozone3 |
Results:
|
1 2 3 4 5 6 7 8 9 10 11 12 13 14 15 16 17 |
Iozone: Performance Test of File I/O Version $Revision: 3.429 $ Compiled for 64 bit mode. Build: linux Command line used: iozone -e -I -a -s 100M -r 4k -r 16k -r 512k -r 10242 Output is in kBytes/sec Time Resolution = 0.000001 seconds. Processor cache size set to 1024 kBytes. Processor cache line size set to 32 bytes. File stride size set to 17 * record size. random random bkwd record stride kB reclen write rewrite read reread read write read rewrite read fwrite frewrite fread freread 102400 4 2863 3912 13299 13758 12572 2213 16099 4150 17810 33477 36606 940728 1085229 102400 16 8663 10696 56941 54284 43033 9740 43555 23555 44865 37080 37730 978049 1363621 102400 512 30153 33614 84240 98576 97282 32289 74359 38866 99474 35070 36329 950338 1206309 102400 10242 36775 37001 121446 119560 116837 37402 113470 37191 121022 35958 36631 1194168 1228973 |
Read performance @ 121 MB/s is pretty good, and write performance is more limited at up to 36 MB/s. Random IO performance looks OK.
Khadas developers have made a working Ubuntu image, but as you can see from my experience, there’s still work to do to make it a “flash and play” Linux board… It’s quite possible the Android image works better, but then you have a lot of other choices with Amlogic S905X TV boxes. Both boards can be purchased on GearBest with Khadas Vim board with 8GB flash going for $49.99, and Khadas Vim Pro board, reviewed here, selling for $64.99. Note that the remote control and HDMI cable I received with the board are sold separately for respectively $4.59 and $2.68.

Jean-Luc started CNX Software in 2010 as a part-time endeavor, before quitting his job as a software engineering manager, and starting to write daily news, and reviews full time later in 2011.
Support CNX Software! Donate via cryptocurrencies, become a Patron on Patreon, or purchase goods on Amazon or Aliexpress


