
Sonoff POW is an ESP8266 based wireless switch with a power meter that comes pre-loaded with a closed-source firmware that works with eWelink app for Android or iOS by default. But we’ve also seen Sonoff POW, and other Sonoff wireless switches from the same family, can be flash with open source firmware supporting MQTT (Message Queuing Telemetry Transport) lightweight messaging protocol such as ESPurna, and I initially sent data from Sonoff POW to ThingSpeak via an MQTT broker (mosquitto) to draw some pretty charts. I did that with the switch connected to a lightbulb, but I’ve since installed Sonoff POW in my office to measure the room’s power consumption minus the ceiling light and aircon as shown below.
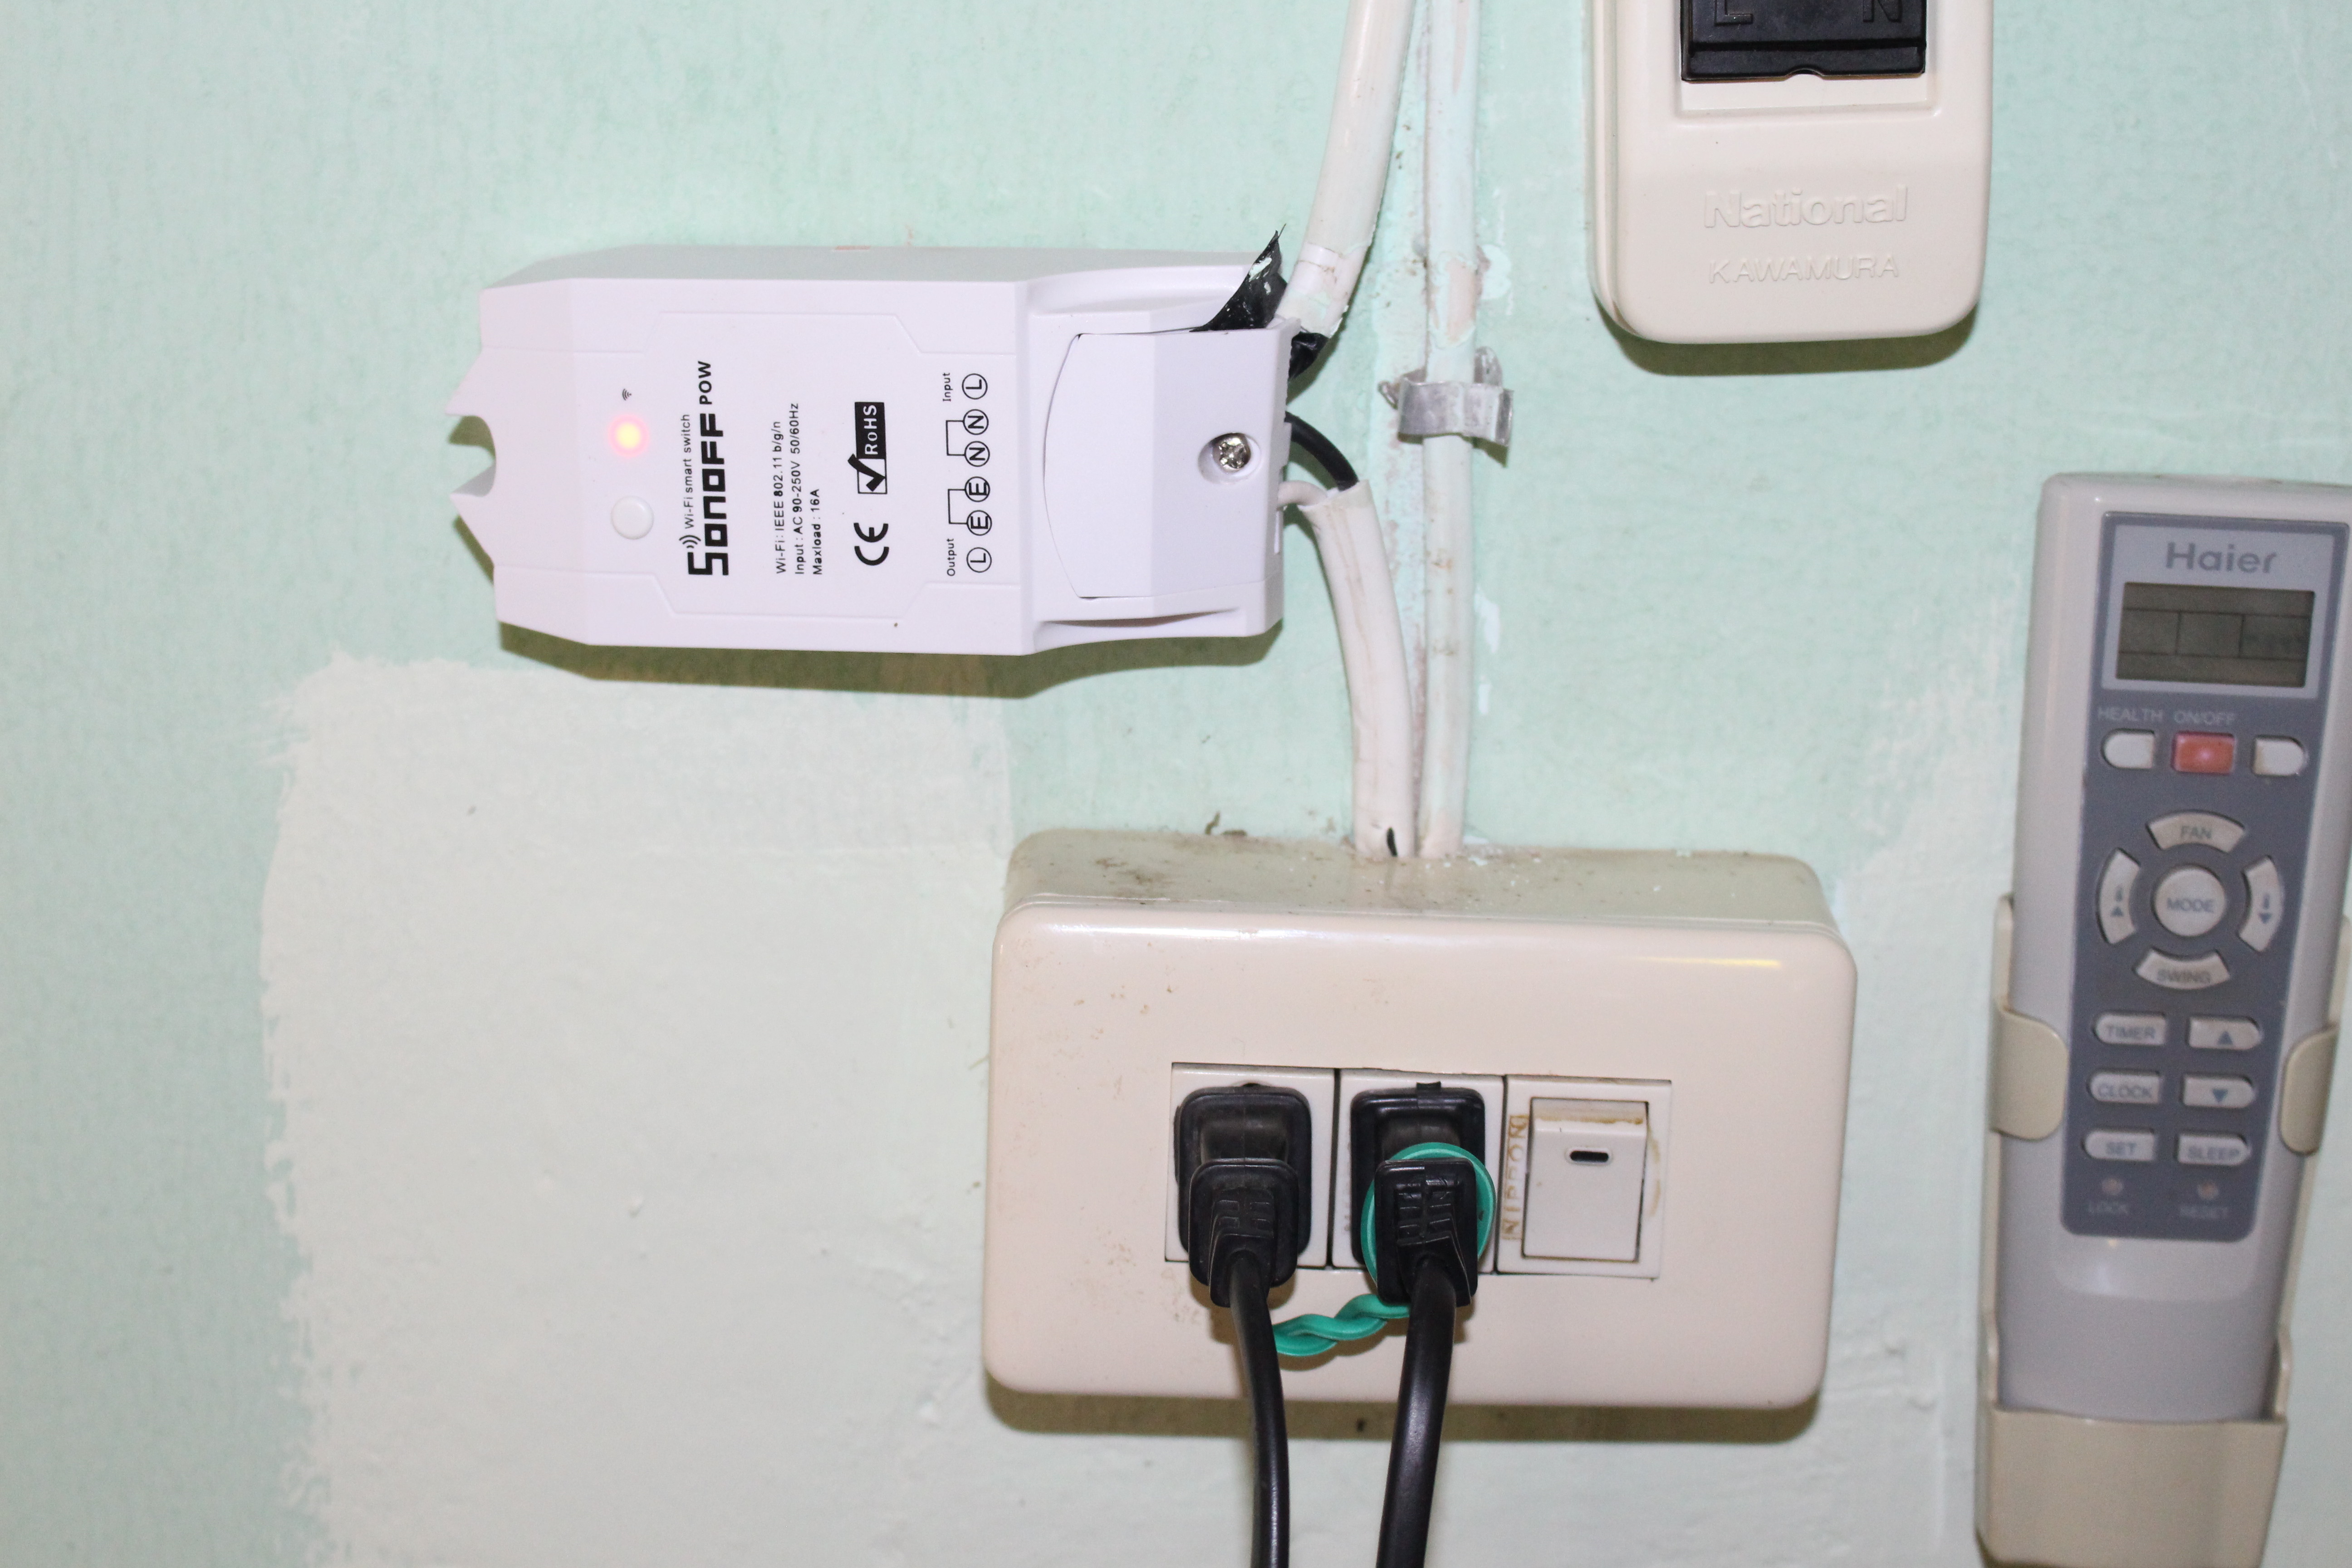
Sonoff cable mechanism is really a pain for hard copper wires, as they are hard to push inside the mechanism, and something come out. I finally managed by it took longer than expected to install. I had to cut the mains cable, and rewire the gang box too. The good thing is that I did not need to drill a hole in my wall, as the device is very light.
I could see the power value updated in ESPurna web interface, depending on the load on my computer, and whether I turned on or off other devices. That’s all good, but instead of using ThingSpeak, whose open source implementation is not updated, I decided to try Domoticz, and already wrote a short guide showing how install Domoticz in NanoPi NEO ARM Linux development board. I had not gone through the setup yet, as I had to study a little more, and upgrade Sonoff POW firmware first. I also planned to use vThings CO2 monitor with Domoticz, but canceled since it can’t be configured remotely, and a USB connection is needed.
ESPurna OTA Firmware Update
So I’ll focus only on Sonoff POW in this post, and first we need to update the firmware since Domoticz support is only recent. I’ll assume you have already followed the post entitled How to Build and Flash ESPurna Open Source Firmware to Sonoff POW Wireless Switch.
First we need to update platformio and ESP8266 development platform to the latest version otherwise we’ll get some build issues:
|
1 2 |
platformio upgrade platformio platform update |
I updated the source code with git pull, but for whatever reasons the build failed, even after cleaning the code. So I did what any developer with enough experience would do in that case: start with a fresh check out ;), and rebuild the OTA firmware from there:
|
1 2 3 |
git clone https://bitbucket.org/xoseperez/espurna cd espurna/code pio run -e sonoff-pow-debug-ota |
In order to update the firmware over the network, you’ll need to change sonoff-pow-debug-ota section in platformio.ini with your own IP address (upload_port) and password (in upload_flags) used in ESPurna web interface:
|
1 2 3 4 5 6 7 8 9 10 11 |
[env:sonoff-pow-debug-ota] platform = espressif8266 framework = arduino board = esp01_1m lib_deps = ${common.lib_deps} lib_ignore = ${common.lib_ignore} extra_script = pio_hooks.py build_flags = -g -Wl,-Tesp8266.flash.1m128.ld -DDEBUG_PORT=Serial -DSONOFF_POW upload_speed = 115200 upload_port = "192.168.4.1" upload_flags = --auth=yourpassword --port 8266 |
Once it’s done, you can upgrade the firmware, and then the file system as follows:
|
1 2 |
pio run -t upload -e sonoff-pow-debug-ota pio run -t uploadfs -e sonoff-pow-debug-ota |
The Sonoff POW will reboot, and cut the power for about 2 seconds after both updates. My Sonoff POW is controlling my computer power, but that’s OK since I’m behind a UPS. Now I can access the web interface, and one of the improvement is that you’re being asked to setup a new password right after the update.

I was then redirected to the Status page showing power, voltage (a bit low?), current, and power factor.

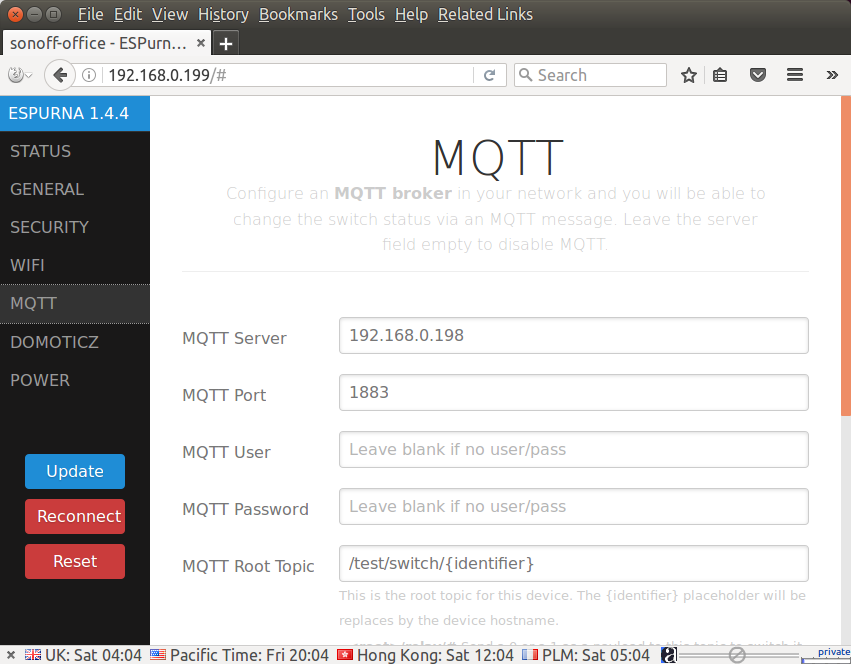
I then jumped to MQTT menu to set the IP address to my NanoPi NEO board, and clicked Update.
There’s a new DOMOTICZ menu which we’ll check out a little later.
Installing and Configuring MQTT in Domoticz
ESPurna communicates with Domoticz via MQTT, so the first task was to follow and adapt Domoticz MQTT wiki.
First login to your Domoticz server (NanoPi NEO) and access a terminal window to update the packages, install npm, node.js, Node RED, and mosquitto:
|
1 2 3 4 5 6 7 8 9 |
sudo apt update sudo apt dist-upgrade sudo apt install npm sudo npm install npm@latest -g curl -sL https://deb.nodesource.com/setup_6.x | sudo -E bash - sudo apt install-y nodejs sudo npm install -g mqtt url request nodemon sudo npm install -g --unsafe-perm node-red sudo apt install mosquitto mosquitto-clients |
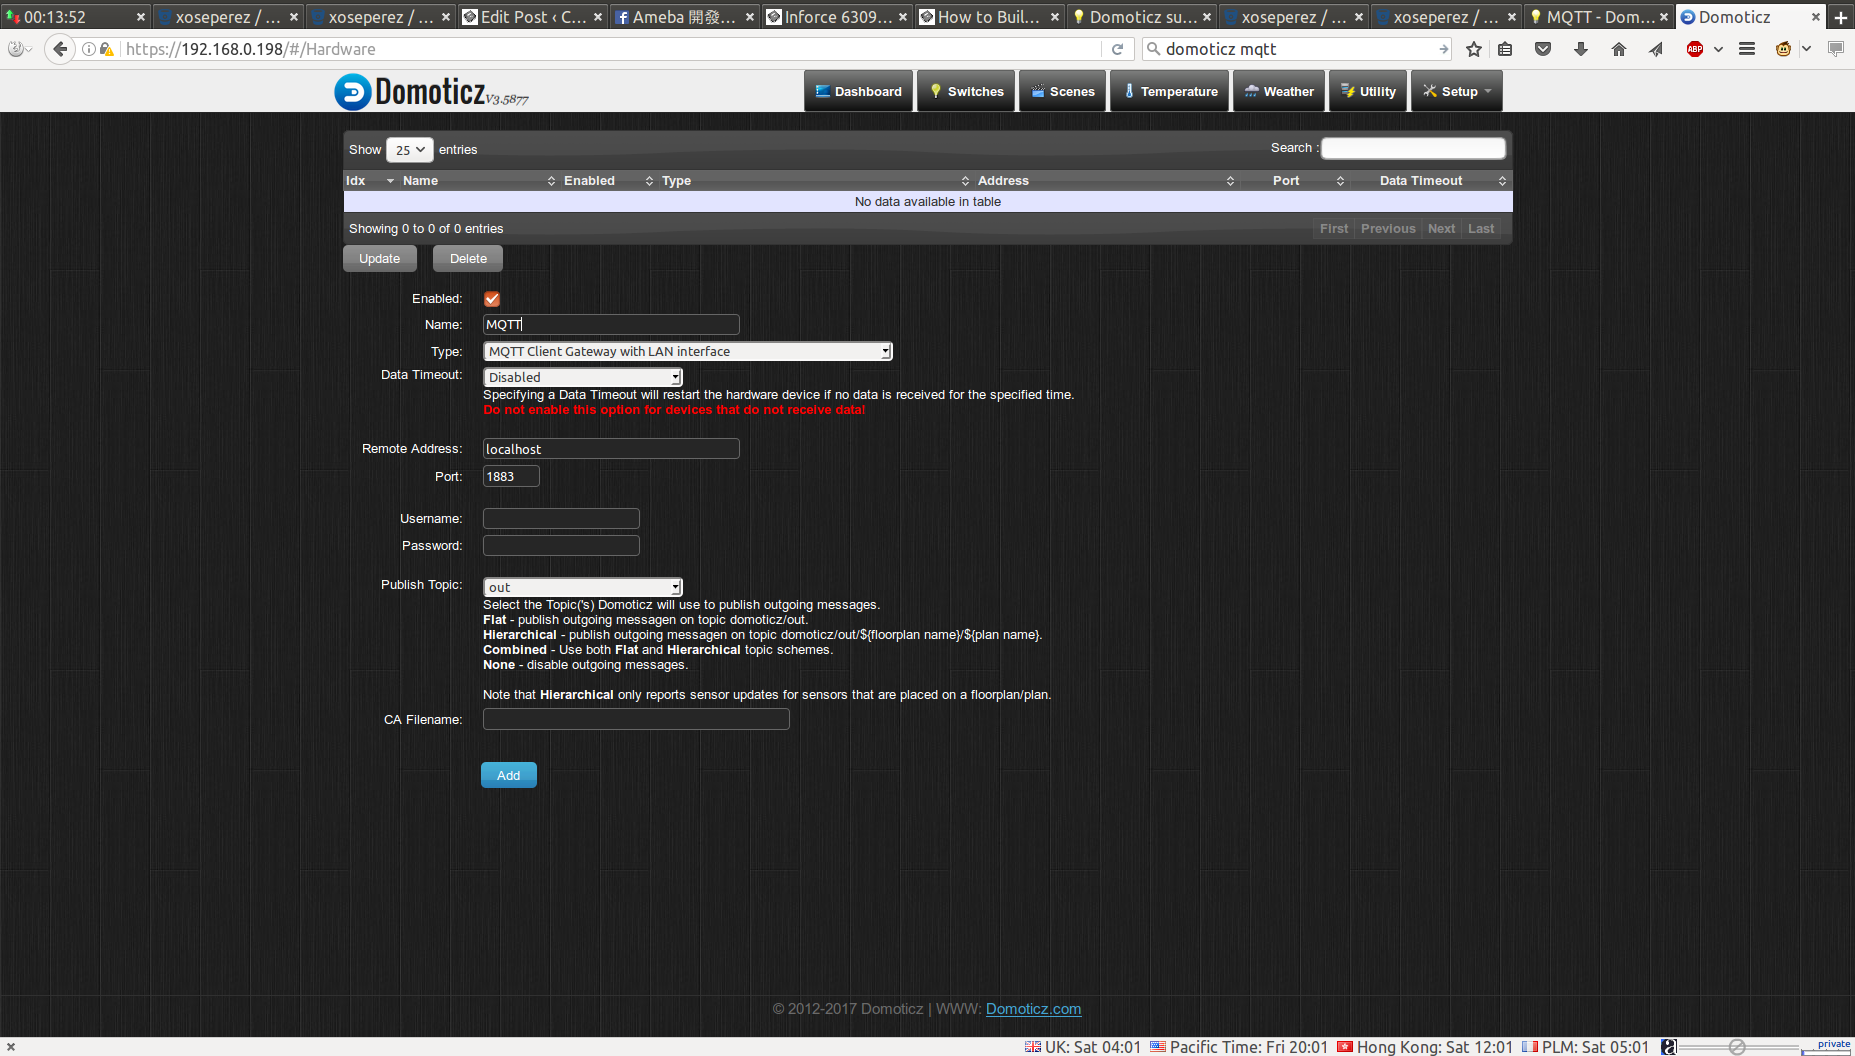
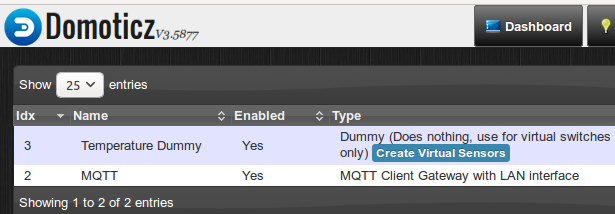
We then need to go to the Hardware page in Domoticz and configure a new “MQTT Client Gateway with LAN Interface” as shown in the screenshot below.
We can test whether it works or not by creating a new Dummy device in the same Hardware section
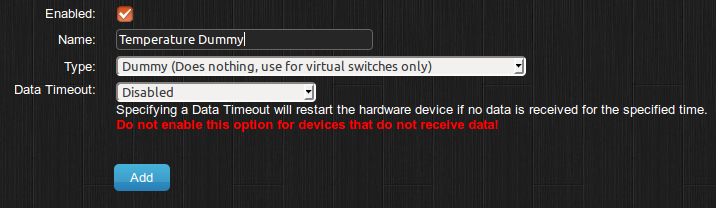
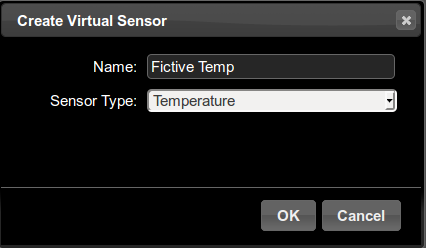
Then click on Create Virtual Sensors, to add a new Temperature sensor which we’ll call Fictive Temp.
Now go to the list of Devices (Setup->Devices) to check the idx value (1 in our case), and a publish a MQTT message to update the temperature value of our virtual sensor:
|
1 |
mosquitto_pub -h localhost -m '{ "idx" : 1, "nvalue" : 0, "svalue" : "25.0" }' -t 'domoticz/in' |
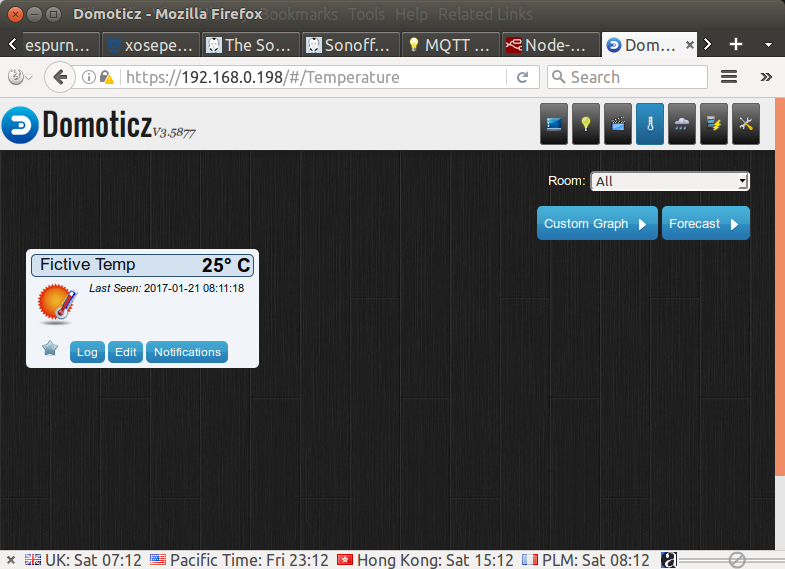 The temperature switch from 0 to 25°C. Our installation is working. Great!
Using Sonoff POW with Domoticz
In theory, we should be able to get two type of data for Sonoff POW: relay status and power levels. However, after looking at ESPurna source code, domoticz.ino only seems to handle the relay status that can be changed from Domoticz web interface, but the power values are only send in pow.ino to the MQTT server, with data not directly compatible with Domoticz. Maybe I missed something as Tinkerman – ESPurna developer – can use Sonoff SC to send temperature data to Domoticz. Alternatively, it might be possible to convert that data somehow with Node RED, but that’s something I’ll try later. So today, I’ll only try to control the switch from Domoticz.
To do so, I created another Dummy device called Sonoff POW Switch, and from there, another Virtual Sensor of Switch type.

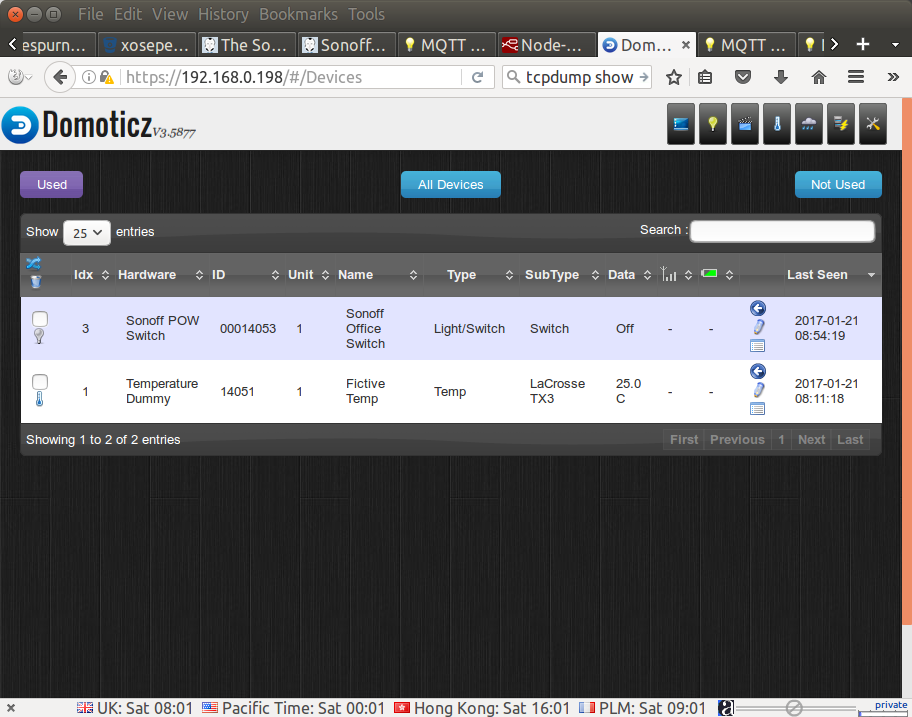
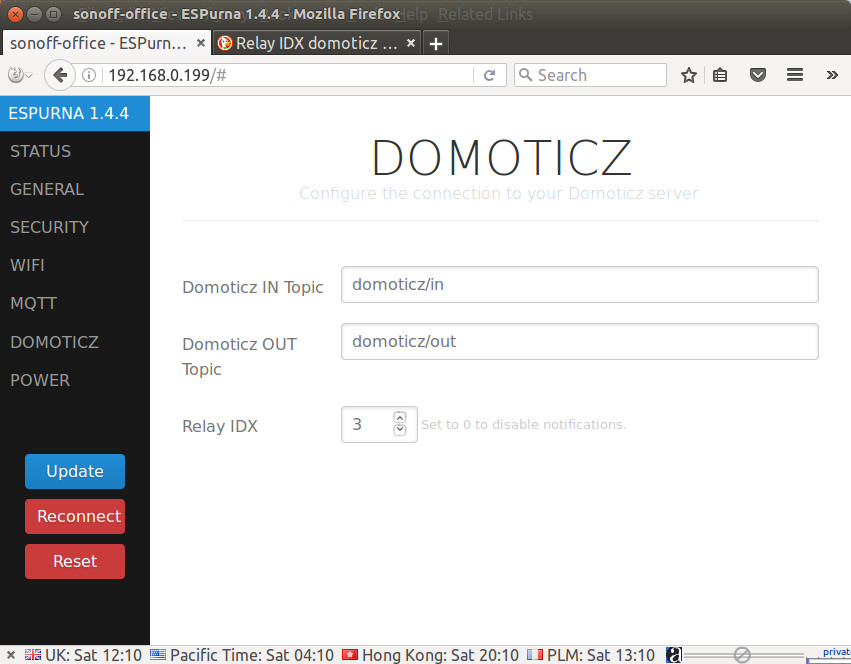
We’ve already configured MQTT in ESPurna web interface, and from the screenshot above,we can see that “Sonoff POW Switch” Idx is 3, a value we need to update in the DOMOTICZ section of ESPurna web interface.
 Now I can go Domoticz interface in my phone, and not my computer since my office’s Ethernet switch will be turned off, click on the Switch tab, and turn on and off Sonoff POW by clicking on the lightbulb as shown below.
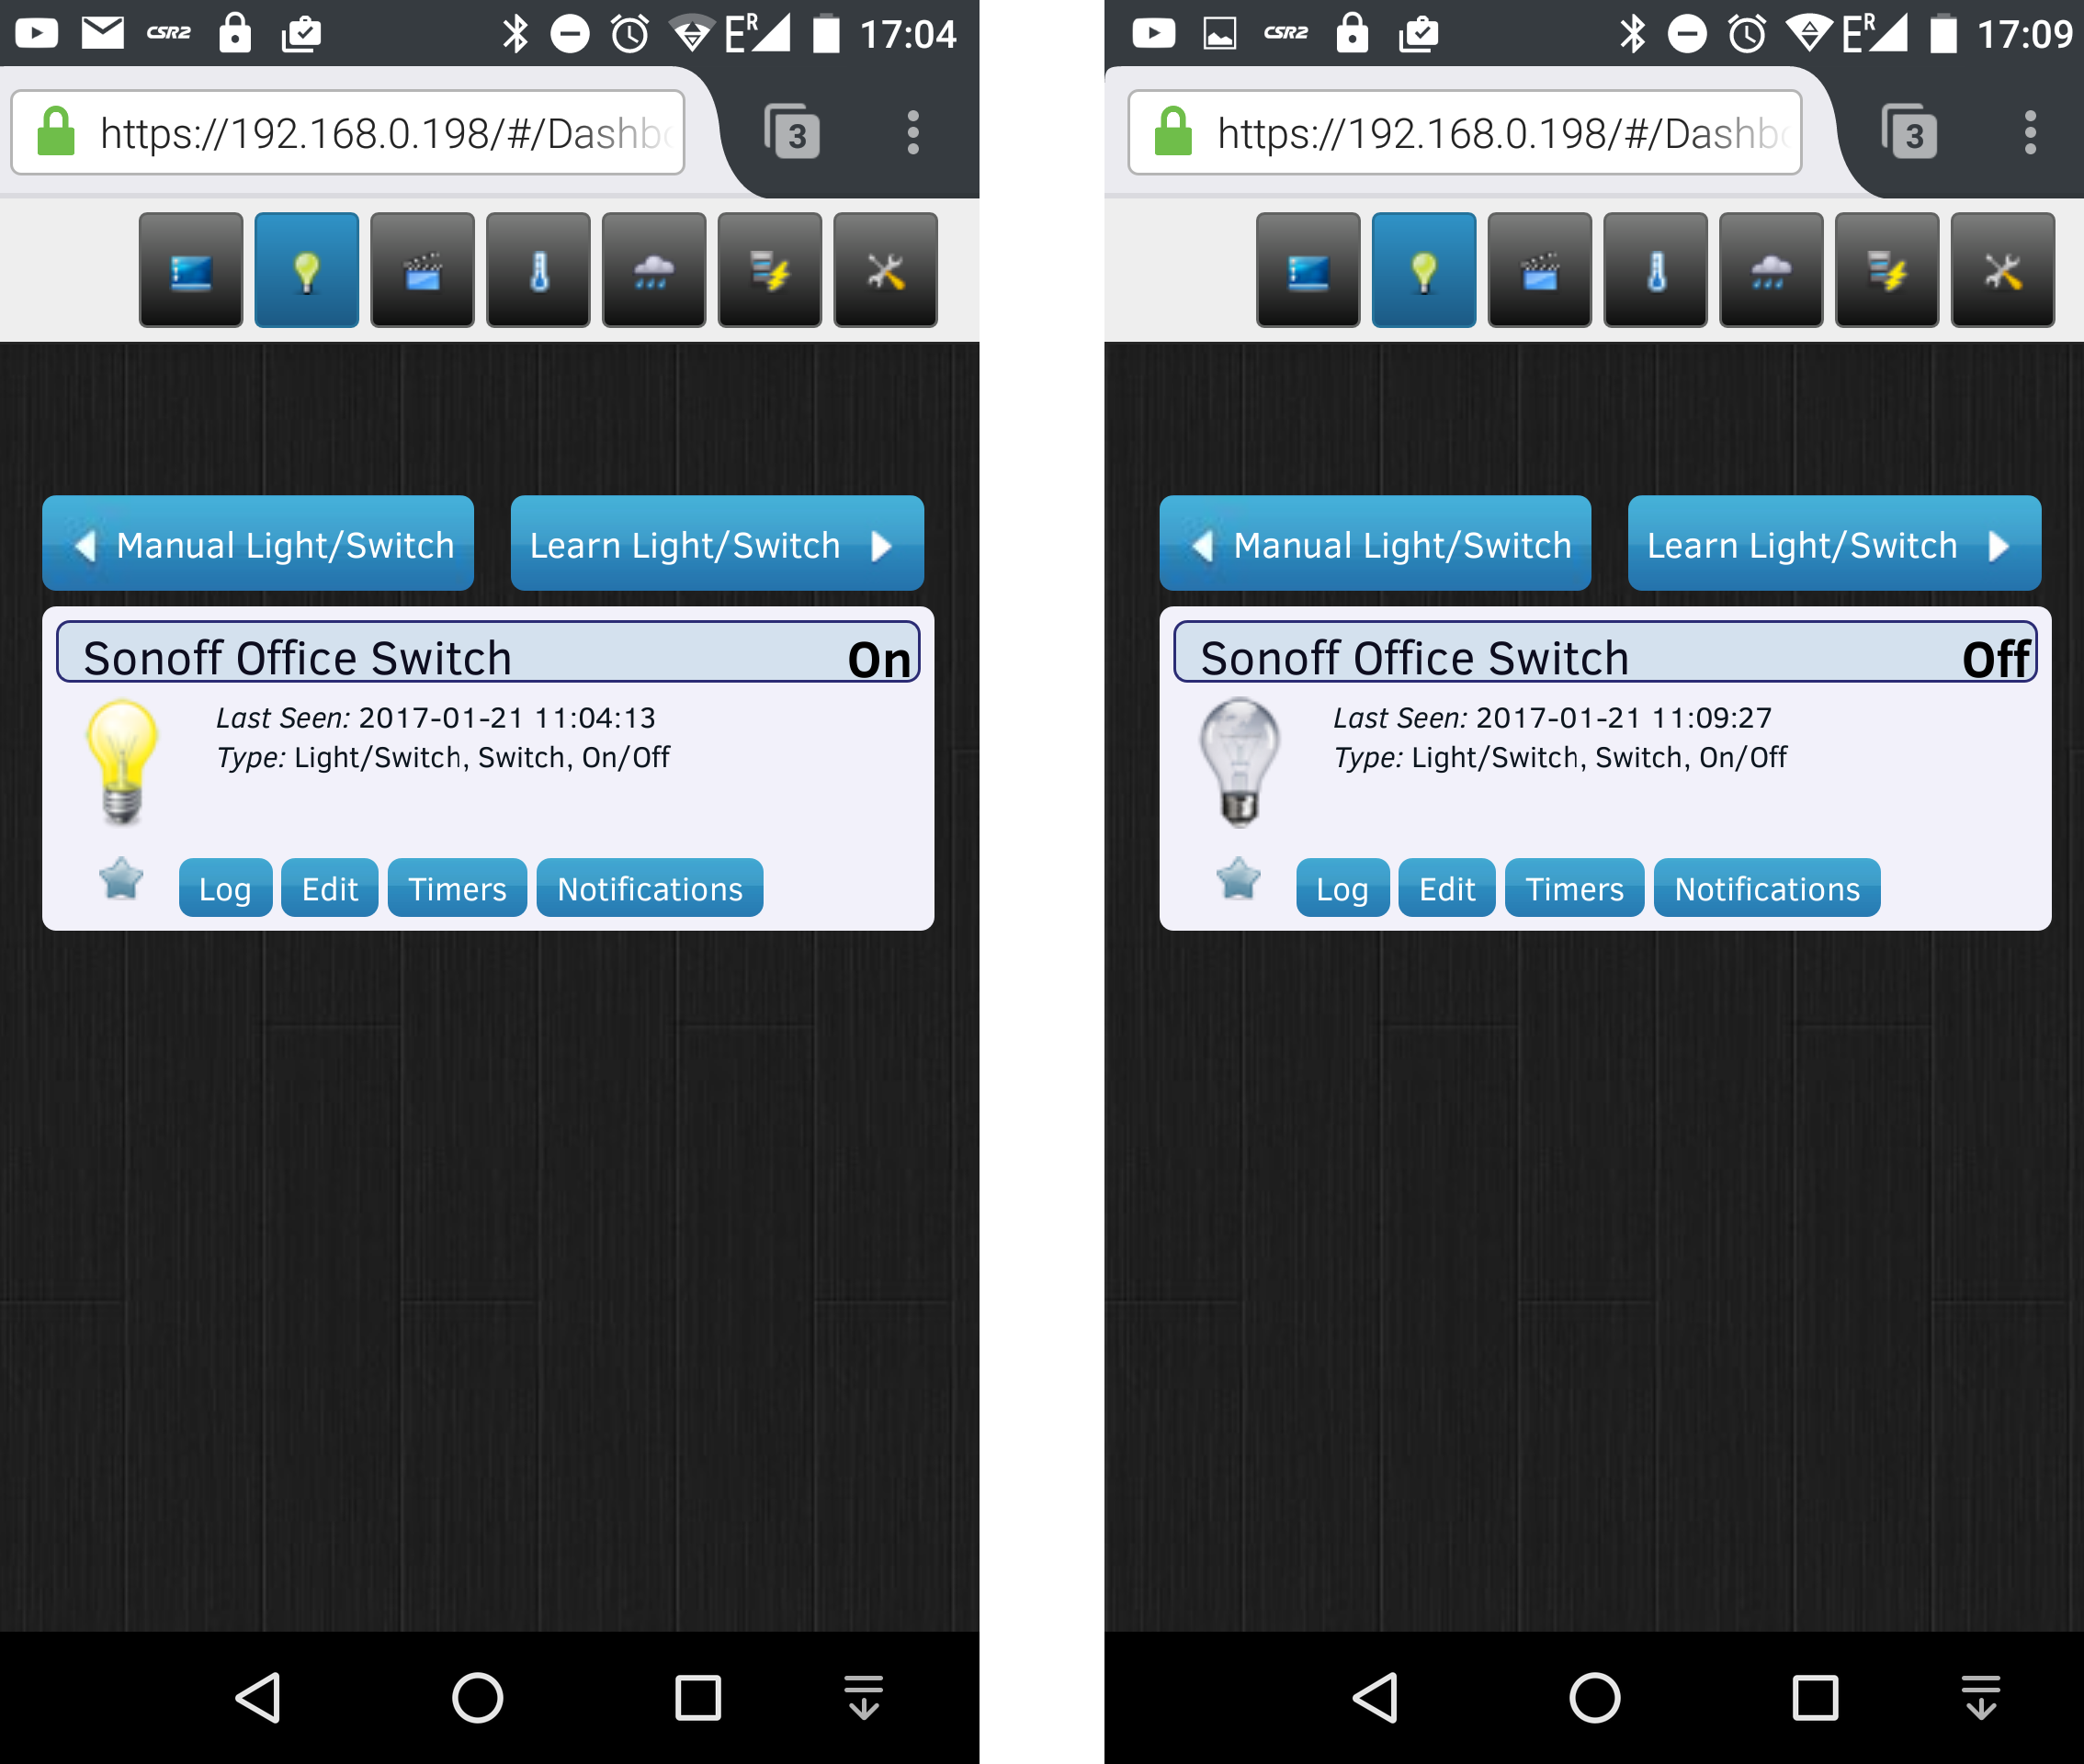
It works fine, however note that the initial switch status was wrong (off instead on on), despite the switch sending regular updates to the MQTT server.
NanoPi NEO Power Adjustments and Installation
Normally, at this stage, it should be easy simply install NanoPi NEO outside the office close to my router in the living room. But I’ve come across a few issues doing so, which I’m going to report.
 First I decided to make a very short Ethernet cable to connect NanoPi NEO directly to my router. I have done a couple of Ethernet cables in the past a few meters long, and they all work. I tested my ultra short straight Ethernet cable connections with a multimeter, and the 8 wires were properly connected, however, when I connected NanoPi NEO to the router with that cable it failed to get a link. Maybe there was aonther issue with the cable, so I made another one just as short… Another fail. It turns out very short Ethernet cables may cause issues, which are normally solved by twister pairs, but with such short cables the length of the twisted pairs is also extremely short, maybe 2 to 3 cm which may not be sufficient. So I ended up using a “normal” 1.5 meter cable, not as neat but it works.
The power strip close to my router was full, and since I did not want to add another, I decided to use the spare USB port on my modem router in order to power NanoPi NEO board. A USB 2.0 port can only deliver 2.5W max, so I was clearly looking for problems here. In order to avoid an issues, I made use of h3consumption script to adjust the behavior of CPU cores and disable unused peripherals.
Let’s check NanoPi NEO current settings in a terminal:
|
1 2 3 4 5 6 7 8 9 10 11 12 |
sudo h3consumption -p Active settings: cpu 912 mhz allowed, 1200 mhz possible, 4 cores active dram 408 mhz hdmi/gpu off usb ports active eth0 100Mb/s/Full, Link: yes |
h3consumption allows us to change the following settings:
|
1 2 3 4 5 6 7 8 9 10 11 12 13 14 15 16 17 18 19 20 21 |
sudo h3consumption Usage: h3consumption [-h/-H] [-p] [-g on|off] [-m max_cpufreq] [-c 1|2|3|4] [-d dram_freq] [-D dram_freq] [-u on|off] [-e on|off|fast] ############################################################################ This tool allows to adjust a few consumption relevant settings of your H3 device. Use the following switches -h|-H displays help or verbose help text -p print currently active settings -g on|off disables GPU/HDMI for headless use -m max_cpufreq adjusts maximum allowed cpu clockspeed (mhz) -c 1|2|3|4 activate only this count of CPU cores -d dram_freq adjusts dram clockspeed (408 - 624 mhz) -D dram_freq like -d but as low as 132 mhz possible (experimental!) -u on|off enables/disabled all USB ports -e on|off|fast enables/disables Ethernet, the fast switch forces 100 mbits/sec negotiation on gigabit devices -w on|off enables/disables Wi-Fi powermanagement when interface supports this and is controlled by network-manager |
So I decided to disable USB, and use two CPU cores at most in order to limit the board’s power consumption, and avoid random reboots:
|
1 2 3 4 5 |
sudo h3consumption -m 912 -c 2 -u off Settings changed. Please reboot for changes to take effect and verify settings after the reboot using "h3consumption -p" sudo reboot |
The changes were properly applied after a reboot.
|
1 2 3 4 5 6 7 8 9 10 11 12 |
sudo h3consumption -p Active settings: cpu 912 mhz allowed, 1200 mhz possible, 2 cores active dram 408 mhz hdmi/gpu off usb ports off eth0 100Mb/s/Full, Link: yes |
I powered the board with my modem router, and could use it without issue. I’ll monitor NanoPi NEO’s uptime to check if this works.

Jean-Luc started CNX Software in 2010 as a part-time endeavor, before quitting his job as a software engineering manager, and starting to write daily news, and reviews full time later in 2011.
Support CNX Software! Donate via cryptocurrencies, become a Patron on Patreon, or purchase goods on Amazon or Aliexpress


