
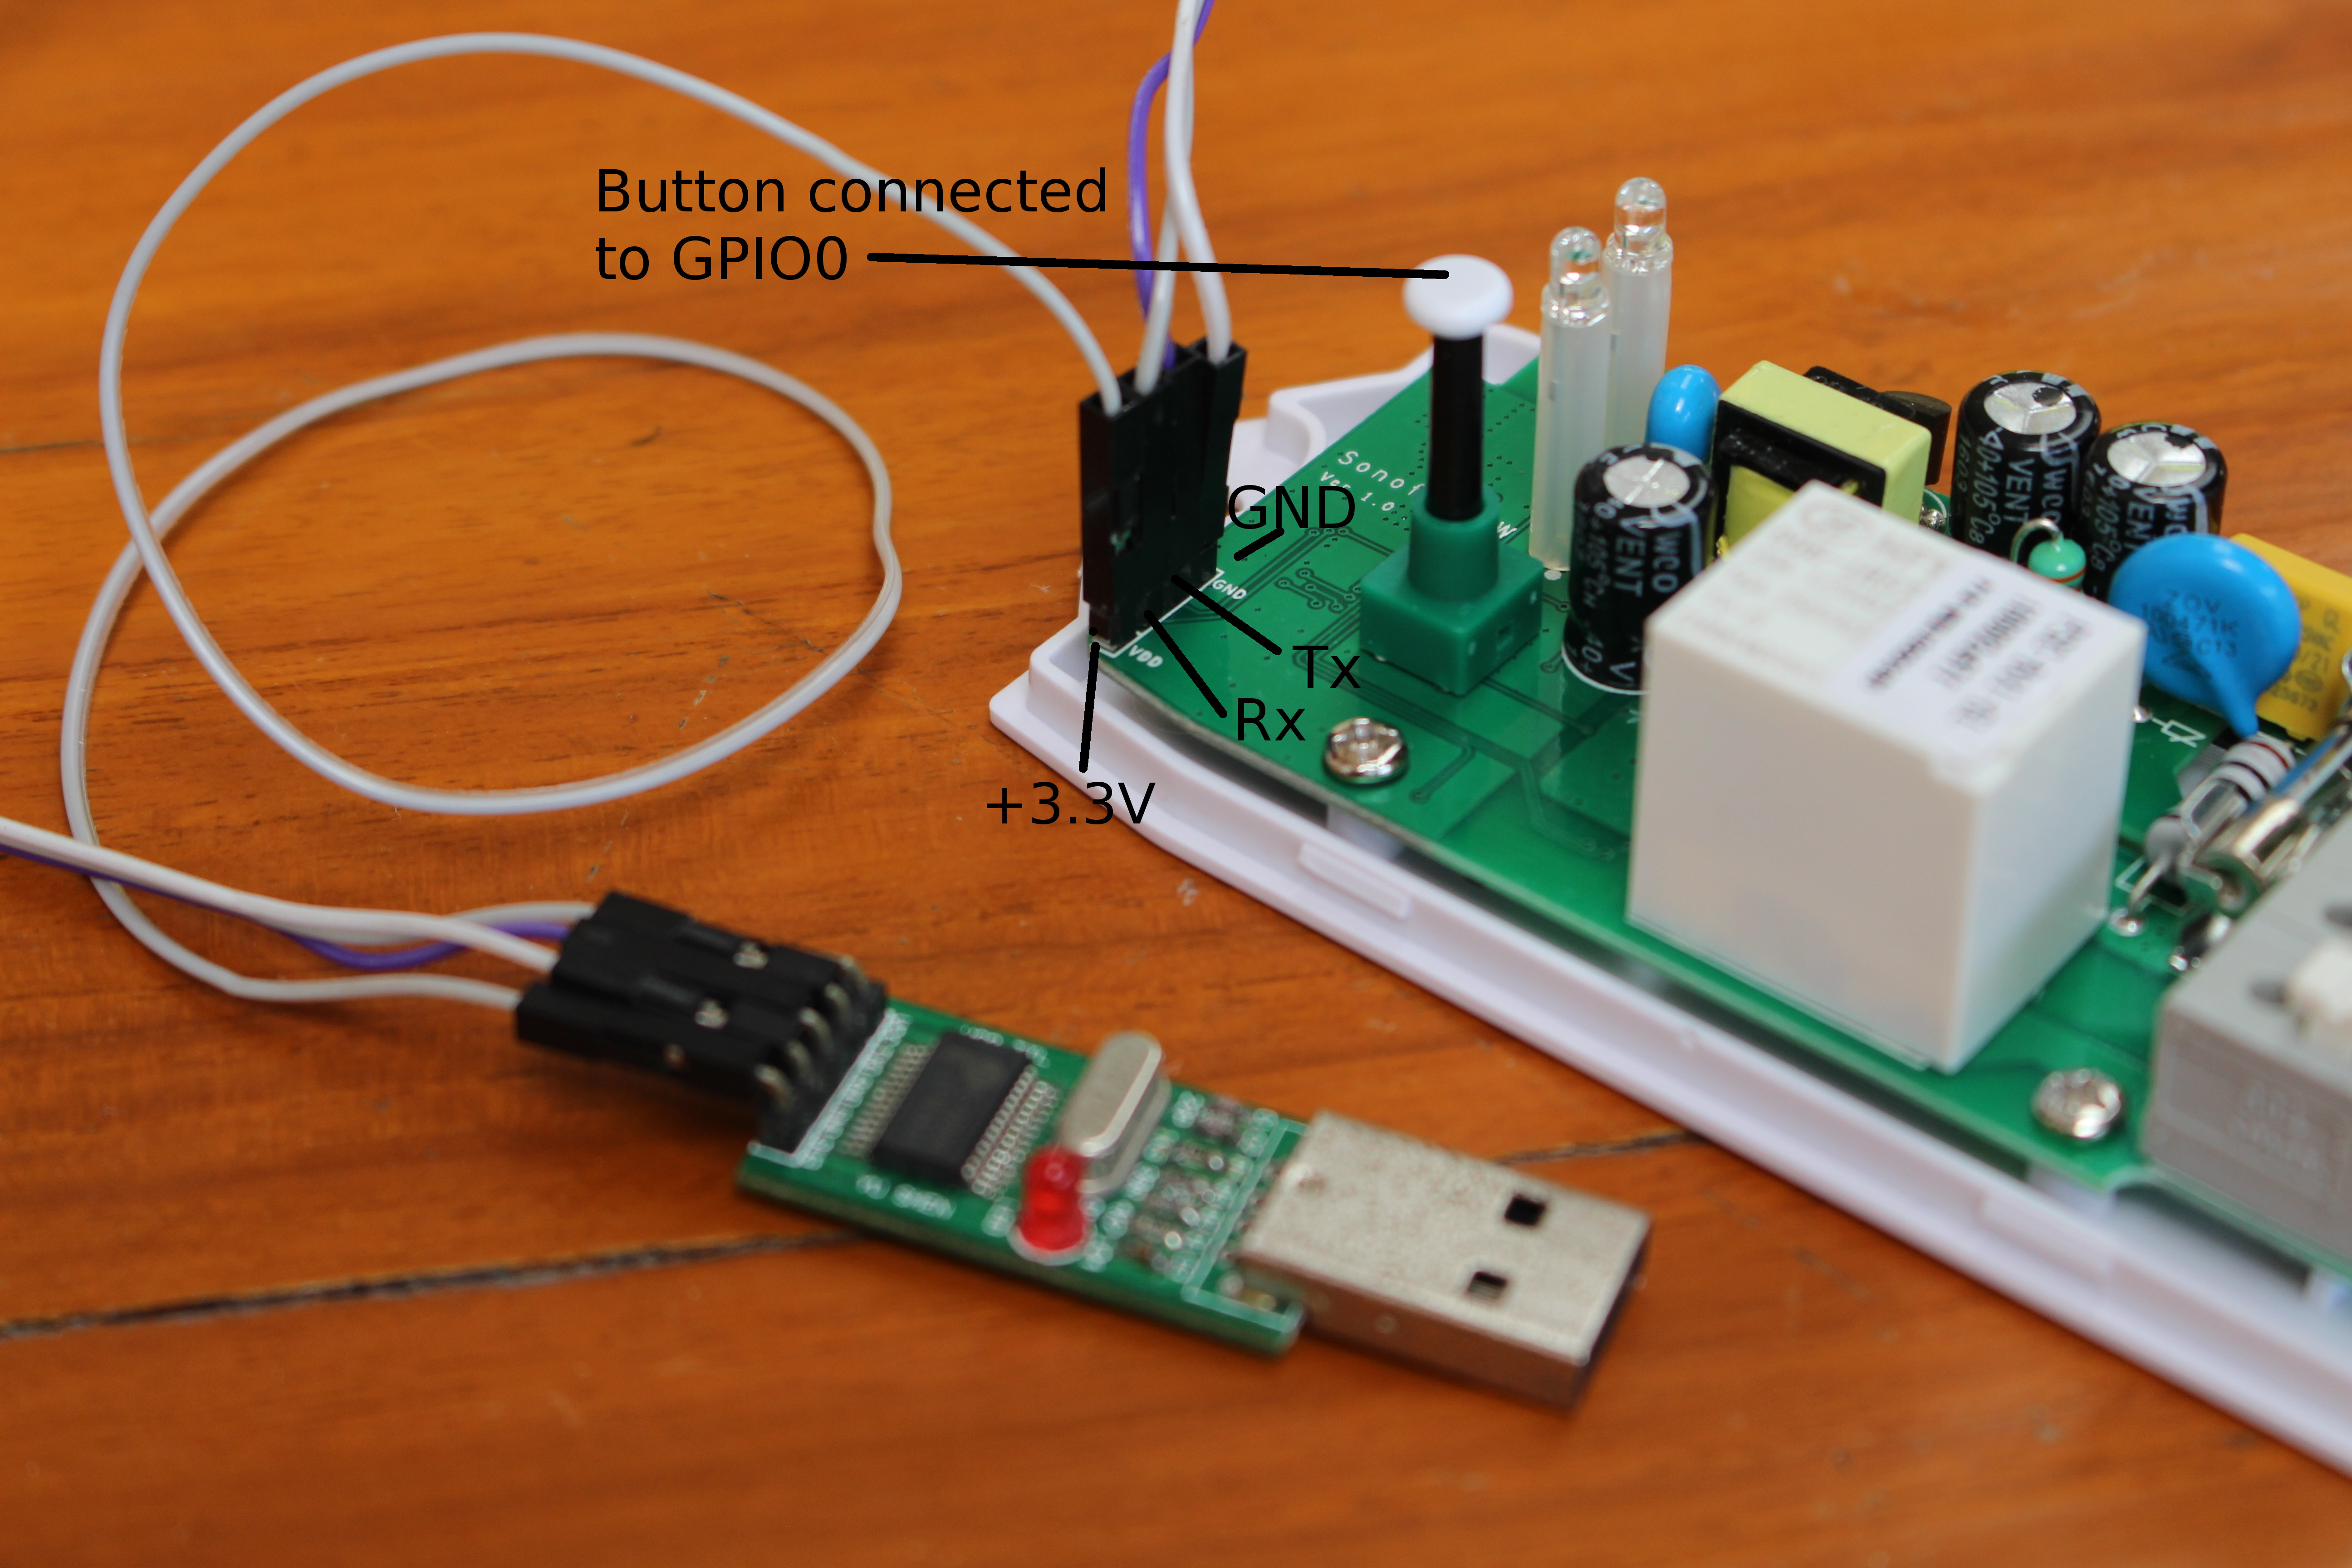
ITEAD Studio Sonoff family is comprised of various inexpensive ESP8266 WiFi power switch, and the company sent me two of their latest CE certified models with Sonoff TH16 + external temperature & humidity probe, and Sonoff POW to measure power consumption. I checked the hardware is the first part of the review, and used Sonoff TH16 to control a water pump with the stock firmware and Ewelink Android app in the second part. It works reasonably well, but it relies on the cloud, so if you lose your Internet connection or the service closed, you can’t control the relay manually anymore. Luckily, the UART pins are exposed on Sonoff switches so you can solder a 4-pin header and connect a USB to TTL to flash your own firmware.
Please don’t connect Sonoff devices to the mains when programming them, it’s very dangerous, instead the USB to TTL board will power the system, and will allow you to program the board safely. Later you’ll be able to update the firmware, if needed, over the network.
The next step is to select the firmware you want to use, and I’ve been advised two firmware for ESP8266, namely ESPurna specifically designed for Sonoff devices, and ESPEasy with a larger community of users. The latter may be usable to control the relay, but it has yet to support HLW8012 chip used to measure power consumption in Sonoff POW, so I decided to go with ESPurna.
That’s the description of the firmware from its bitbucket page:
ESPurna (“spark” in Catalan) is a custom C firmware for ESP8266 based smart switches. It was originally developed with the ITead Sonoff in mind. Features:
- Asynchronous WebServer for configuration and simple relay toggle with basic authentication
- Communication between webserver and webclient via websockets with secure ticket check
- Flashing firmware Over-The-Air (OTA)
- Up to 3 configurable WIFI networks, connects to the strongest signal
- MQTT support with configurable host and topic
- Manual switch ON/OFF with button (single click the button)
- AP mode backup (double click the button)
- Manual reeset the board (long click the button)
- Visual status of the connection via the LED
- Alexa integration (Amazon Echo or Dot) by emulating a Belkin WeMo switch
- Support for automatic over-the-air updates through the NoFUSS Library
- Support for DHT22 sensors
- Support for the HLW8012 power sensor present in the Sonoff POW
- Support for current monitoring through the EmonLiteESP Library using a non-intrusive current sensor (requires some hacking)
- Command line configuration
I could not find firmware release for ESPurna, but Xose Pérez – the developer – has provided some basic instructions to build and flash the firmware to Sonoff. Those are not really detailed however, and it took me nearly a full day to successfully build and flash the firmware to Sonoff POW, mostly because I was not quite familiar with most of the tools used. So I’ve reproduced the step I went through in Ubuntu 16.04, and hopefully this can help people getting things done more quickly.
Let’s retrieve the source code, and enter the code directory first:
|
1 2 3 |
sudo apt install git git clone https://bitbucket.org/xoseperez/espurna cd espurna/code |
You can build the project with PlatformIO or the Arduino IDE. The instructions are for PlatformIO so that’s what I used. There are two ways to build the code with the project wither using Platform IDE for Atom and the command line, or simply using the command line. With insights, I ended up using the command line, but I’ll show both methods.
Setup PlatformIO IDE for Atom to build ESPurna
First, you’ll need to download PlatformIO IDE for Atom for your operating systems, and install it. For Ubuntu 16.04, I selected “Download .deb” for Linux and installed it through through Ubuntu Software program. Alternatively, after download, you can install it from the command line:
|
1 |
sudo dpkg -i platformio-atom-linux-x86_64.deb |
You can now start Atom program in Ubuntu dash, select Open Project, and browse for espurna/code directory to load the project we’ve just gotten from Bitbucket.
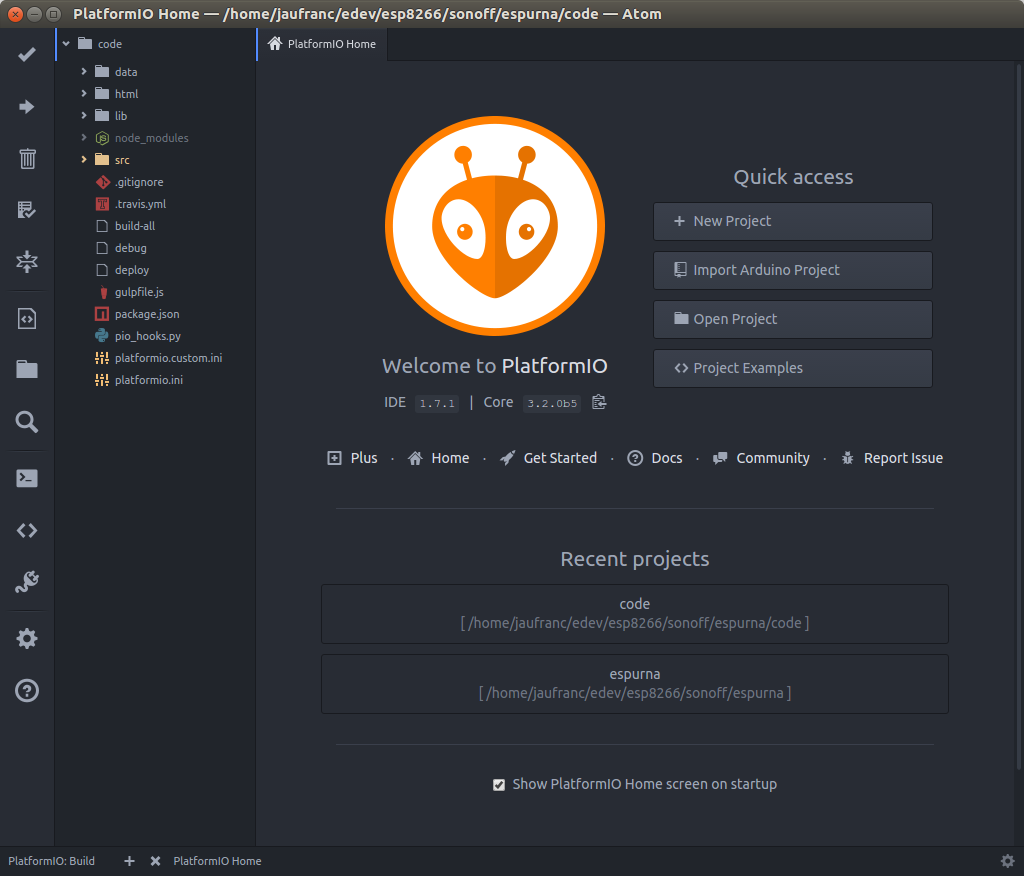
The tick button on the top left corner is to build the project, and the right button just under is to upload the firmware to the target board. But if we try to build the firmware now it will fail with an error about “espressif8266_stage”. That’s because we need to install Espressif 8266 (Stage) development platform. First we need to enable Developer mode in the IDE by going to the top menu to select PlatformIO->Settings->PlatformIO IDE, and checking “Use development version of PlatformIO“.

Now install PlatformIO shell commands from either a system Terminal, or PlatformIO IDE terminal (PlatformIO->Terminal->New Terminal):
|
1 2 |
sudo ln -s /home/jaufranc/.atom/packages/platformio-ide/penv/bin/platformio /usr/local/bin/platformio sudo ln -s /home/jaufranc/.atom/packages/platformio-ide/penv/bin/pio /usr/local/bin/pio |
and finally install ESP8266 development platform:
|
1 |
platformio platform install https://github.com/platformio/platform-espressif8266.git#feature/stage |
At this point you can click on the tick icon to build the default “node-debug” environment, a build output window will show in the IDE, and quickly disappear if the build is successful.
Setup PlatformIO via Command Line to Build ESPurna
If instead we want to use the command line we can install the latest pip version, the developer version of PlatformIO, and the staging version of ESP8266 development platform:
|
1 2 3 4 |
sudo apt install python-pip sudo pip install --upgrade pip sudo pip install -U https://github.com/platformio/platformio/archive/develop.zip platformio platform install https://github.com/platformio/platform-espressif8266.git#feature/stage |
You can check the build environment is set properly by running the following command in espurna/code directory:
|
1 |
pio run -e node-debug |
It will automatically download, build and install all dependencies and build for “node-debug” firmware for NodeMCU board. If it is successful, it will end as follows:
|
1 2 3 4 5 6 7 8 9 10 11 12 13 14 15 16 17 18 19 20 21 22 23 |
Linking .pioenvs/node-debug/firmware.elf Calculating size .pioenvs/node-debug/firmware.elf text data bss dec hex filename 377725 12108 31520 421353 66de9 .pioenvs/node-debug/firmware.elf Building .pioenvs/node-debug/firmware.bin ========================= [SUCCESS] Took 91.20 seconds ========================= ================================== [SUMMARY] ================================== Environment node-debug [SUCCESS] Environment node-debug-ota [SKIP] Environment sonoff-debug [SKIP] Environment sonoff-debug-ota [SKIP] Environment sonoff-pow-debug [SKIP] Environment sonoff-pow-debug-ota [SKIP] Environment slampher-debug [SKIP] Environment slampher-debug-ota [SKIP] Environment s20-debug [SKIP] Environment s20-debug-ota [SKIP] Environment ac-device [SKIP] Environment washer-device [SKIP] Environment studio-lamp-device [SKIP] Environment living-lamp-device [SKIP] ========================= [SUCCESS] Took 91.21 seconds ========================= |
So I find the command line option much more easy and straightforward.
Build ESPurna for Sonoff POW
However, we are not using NodeMCU board here, but Sonoff POW, and there are two environments defined just for that:
- sonoff-pow-debug – Build firmware to flash over serial
- sonoff-pow-debug-ota – Build OTA firmware to upgrade the firmware over the network
The parameters for each environment are all defined in platformio.ini. First we need to build sonoff-pow-debug environment:
|
1 |
pio run -e sonoff-power-debug |
But it failed with an error message related to hlw8012 library:
|
1 2 3 4 5 |
Compiling .pioenvs/sonoff-pow-debug/FrameworkArduino/Stream.o /media/hdd/edev/esp8266/sonoff/espurna/code/src/pow.ino:13:21: fatal error: HLW8012.h: No such file or directory #include <HLW8012.h> ^ compilation terminated. |
I reported the issue on Bitbucket, but the main developer could not reproduce the issue. Eventually I found out that it could be a PlatformIO bug, as the system does not recursively checking for includes outside of main.ino. So I added <hlw8012.h> in the main.ino as follows:
|
1 2 3 4 5 |
#include <Arduino.h> #include "config/all.h" #ifdef SONOFF_POW #include <HLW8012.h> #endif |
and the build could complete:
|
1 2 3 4 5 6 7 8 9 10 11 12 13 14 15 16 17 18 19 20 21 22 23 24 25 26 27 28 |
pio run -e sonoff-power-debug [Sat Dec 3 10:27:22 2016] Processing sonoff-pow-debug (build_flags: -g -Wl,-Tesp8266.flash.1m256.ld -DDEBUG_PORT=Serial -DSONOFF_POW, lib_deps: DHT sensor library, Adafruit Unified Sensor, Time, ArduinoJson, ESPAsyncTCP, ESPAsyncWebServer, AsyncMqttClient, ESPAsyncUDP, Embedis, NtpClientLib, OneWire, DallasTemperature, https://bitbucket.org/xoseperez/justwifi.git, https://bitbucket.org/xoseperez/nofuss.git, https://bitbucket.org/xoseperez/hlw8012.git, https://bitbucket.org/xoseperez/emonliteesp.git, https://bitbucket.org/xoseperez/fauxmoESP.git, https://github.com/jccprj/RemoteSwitch-arduino-library, lib_ignore: FauxmoESP, ESPAsyncUDP, platform: espressif8266, board: esp01_1m, framework: arduino, extra_script: pio_hooks.py) .... Linking .pioenvs/sonoff-pow-debug/firmware.elf Calculating size .pioenvs/sonoff-pow-debug/firmware.elf text data bss dec hex filename 347600 10284 31296 389180 5f03c .pioenvs/sonoff-pow-debug/firmware.elf Building .pioenvs/sonoff-pow-debug/firmware.bin ========================= [SUCCESS] Took 3.49 seconds ========================= ================================== [SUMMARY] ================================== Environment node-debug [SKIP] Environment node-debug-ota [SKIP] Environment sonoff-debug [SKIP] Environment sonoff-debug-ota [SKIP] Environment sonoff-pow-debug [SUCCESS] Environment sonoff-pow-debug-ota [SKIP] Environment slampher-debug [SKIP] Environment slampher-debug-ota [SKIP] Environment s20-debug [SKIP] Environment s20-debug-ota [SKIP] Environment ac-device [SKIP] Environment washer-device [SKIP] Environment studio-lamp-device [SKIP] Environment living-lamp-device [SKIP] ========================= [SUCCESS] Took 3.49 seconds ========================= |
Since we’ve already changed the code, you may also consider changing “#define ADMIN_PASS fibonacci” in code/src/config/general.h to use a different default password. The password can also be changed in the web interface, but this makes sure you won’t have a device somewhere with the default password common to most users.
Flashing Firmware to Sonoff POW
Now that we’ve made sure the firmware could build, it’s time to flash it to the device.
First we need to setup some udev rules to allow flashing over serial:
|
1 2 |
sudo wget https://raw.githubusercontent.com/platformio/platformio/develop/scripts/99-platformio-udev.rules -O /etc/udev/rules.d/99-platformio-udev.rules sudo service udev restart |
Now connect the USB to TTL to a USB port on your computer, press the button (connected to GPIO0) on Sonoff POW for several seconds until both LEDs are off to make sure you are in bootloader mode, and start flashing with:
|
1 2 3 4 5 6 7 8 9 10 11 12 13 14 15 16 17 18 19 20 21 22 23 24 25 26 27 28 29 30 31 32 33 34 35 36 37 38 39 40 41 42 43 44 45 46 47 48 49 50 51 52 53 54 55 56 57 58 59 60 61 62 63 64 65 66 67 68 69 70 71 72 73 74 75 76 77 78 |
pio run -t upload -e sonoff-pow-debug [Sat Dec 3 11:42:13 2016] Processing sonoff-pow-debug (build_flags: -g -Wl,-Tesp8266.flash.1m256.ld -DDEBUG_PORT=Serial -DSONOFF_POW, lib_deps: DHT sensor library, Adafruit Unified Sensor, Time, ArduinoJson, ESPAsyncTCP, ESPAsyncWebServer, AsyncMqttClient, ESPAsyncUDP, Embedis, NtpClientLib, OneWire, DallasTemperature, https://bitbucket.org/xoseperez/justwifi.git, https://bitbucket.org/xoseperez/nofuss.git, https://bitbucket.org/xoseperez/hlw8012.git, https://bitbucket.org/xoseperez/emonliteesp.git, https://bitbucket.org/xoseperez/fauxmoESP.git, https://github.com/jccprj/RemoteSwitch-arduino-library, lib_ignore: FauxmoESP, ESPAsyncUDP, platform: espressif8266, board: esp01_1m, framework: arduino, extra_script: pio_hooks.py) -------------------------------------------------------------------------------- Verbose mode can be enabled via `-v, --verbose` option Converting main.ino Collected 41 compatible libraries Looking for dependencies... Library Dependency Graph |-- <DHT sensor library> v1.3.0 | |-- <Adafruit Unified Sensor> v1.0.2 | | |-- <WProgram> | |-- <WProgram> |-- <Adafruit Unified Sensor> v1.0.2 | |-- <WProgram> |-- <Time> v1.5 | |-- <WProgram> |-- <ArduinoJson> v5.7.2 |-- <ESPAsyncTCP> v1.0.0 |-- <ESPAsyncWebServer> | |-- <ESPAsyncTCP> v1.0.0 | |-- <ArduinoJson> v5.7.2 | |-- <ESP8266WiFi> v1.0 | |-- <Hash> v1.0 |-- <AsyncMqttClient> v0.5.0 | |-- <ESPAsyncTCP> v1.0.0 |-- <Embedis> v1.2.0 |-- <NtpClientLib> | |-- <WProgram> | |-- <Time> v1.5 | | |-- <WProgram> | |-- <ESP8266WiFi> v1.0 |-- <OneWire> v2.3.2 | |-- <WProgram> |-- <DallasTemperature> v3.7.7 | |-- <OneWire> v2.3.2 | | |-- <WProgram> |-- <Hash> v1.0 |-- <JustWifi> v1.1.0 | |-- <ESP8266WiFi> v1.0 |-- <ESP8266WiFi> v1.0 |-- <ESP8266mDNS> | |-- <ESP8266WiFi> v1.0 |-- <HLW8012> v0.1.0 |-- <DebounceEvent> |-- <EEPROM> v1.0 |-- <ArduinoOTA> v1.0 | |-- <ESP8266WiFi> v1.0 | |-- <ESP8266mDNS> | | |-- <ESP8266WiFi> v1.0 Compiling .pioenvs/sonoff-pow-debug/src/main.ino.o Looking for upload port... Auto-detected: /dev/ttyUSB0 Uploading .pioenvs/sonoff-pow-debug/firmware.bin Uploading 362032 bytes from .pioenvs/sonoff-pow-debug/firmware.bin to flash at 0x00000000 ................................................................................ [ 22% ] ................................................................................ [ 45% ] ................................................................................ [ 67% ] ................................................................................ [ 90% ] .................................. [ 100% ] ========================= [SUCCESS] Took 41.19 seconds ========================= ================================== [SUMMARY] ================================== Environment node-debug [SKIP] Environment node-debug-ota [SKIP] Environment sonoff-debug [SKIP] Environment sonoff-debug-ota [SKIP] Environment sonoff-pow-debug [SUCCESS] Environment sonoff-pow-debug-ota [SKIP] Environment slampher-debug [SKIP] Environment slampher-debug-ota [SKIP] Environment s20-debug [SKIP] Environment s20-debug-ota [SKIP] Environment ac-device [SKIP] Environment washer-device [SKIP] Environment studio-lamp-device [SKIP] Environment living-lamp-device [SKIP] ========================= [SUCCESS] Took 41.19 seconds ========================= |
Success! Great. If you have your own firmware to flash it may be useful to know the actual command used to flash the firmware was:
|
1 |
esptool -vv -cd ck -cb 115200 -cp "/dev/ttyUSB0" -cf .pioenvs/sonoff-pow-debug/firmware.bin |
Building and Flashing the ESPurna filesystem
Wait! We’ve just flashed the firmware, isn’t it all? Nope, as the webserver files are stored in another partitions, and compressed in a single index.html.gz file for better performance. The exact reasons why are further explained here.
We’ll need Node.js and gulp command line client:
|
1 2 3 |
sudo apt install npm nodejs nodejs-legacy sudo npm install npm@latest -g sudo npm install --global gulp-cli |
Now inside espurna/code folder , we can check if building the file systems works with two commands:
|
1 2 |
npm install gulp |
Here my successful gulp attempt:
|
1 2 3 4 5 6 7 8 9 10 11 |
[17:18:02] Using gulpfile ~/edev/espurna/code/gulpfile.js [17:18:02] Starting 'clean'... [17:18:02] Finished 'clean' after 4.83 ms [17:18:02] Starting 'files'... [17:18:02] Starting 'inline'... [17:18:06] Finished 'files' after 3.59 s [17:18:06] Finished 'inline' after 3.59 s [17:18:06] Starting 'buildfs'... [17:18:06] Finished 'buildfs' after 151 μs [17:18:06] Starting 'default'... [17:18:06] Finished 'default' after 22 μs |
Finally, we can run the following (which also runs the two commands above) to flash the file system to the board, after entering bootloader mode by pressing the button:
|
1 2 3 4 5 6 7 8 9 10 11 12 13 14 15 16 17 18 19 20 21 22 23 24 25 26 27 28 29 30 31 32 33 34 35 36 37 38 39 40 41 42 43 44 45 46 47 |
pio run -t uploadfs -e sonoff-pow-debug [Sat Dec 3 12:12:07 2016] Processing sonoff-pow-debug (build_flags: -g -Wl,-Tesp8266.flash.1m256.ld -DDEBUG_PORT=Serial -DSONOFF_POW, lib_deps: DHT sensor library, Adafruit Unified Sensor, Time, ArduinoJson, ESPAsyncTCP, ESPAsyncWebServer, AsyncMqttClient, ESPAsyncUDP, Embedis, NtpClientLib, OneWire, DallasTemperature, https://bitbucket.org/xoseperez/justwifi.git, https://bitbucket.org/xoseperez/nofuss.git, https://bitbucket.org/xoseperez/hlw8012.git, https://bitbucket.org/xoseperez/emonliteesp.git, https://bitbucket.org/xoseperez/fauxmoESP.git, https://github.com/jccprj/RemoteSwitch-arduino-library, lib_ignore: FauxmoESP, ESPAsyncUDP, platform: espressif8266, board: esp01_1m, framework: arduino, extra_script: pio_hooks.py) -------------------------------------------------------------------------------- Verbose mode can be enabled via `-v, --verbose` option before_build_spiffs([".pioenvs/sonoff-pow-debug/spiffs.bin"], ["data"]) gulp buildfs [12:12:07] Using gulpfile /media/hdd/edev/esp8266/sonoff/espurna/code/gulpfile.js [12:12:07] Starting 'clean'... [12:12:08] Finished 'clean' after 4.5 ms [12:12:08] Starting 'files'... [12:12:08] Starting 'inline'... [12:12:10] Finished 'files' after 2.98 s [12:12:10] Finished 'inline' after 2.98 s [12:12:10] Starting 'buildfs'... [12:12:10] Finished 'buildfs' after 94 μs Building SPIFFS image from 'data' directory to .pioenvs/sonoff-pow-debug/spiffs.bin /index.html.gz /images/check.png /favicon.ico /fsversion Looking for upload port... Auto-detected: /dev/ttyUSB0 Uploading .pioenvs/sonoff-pow-debug/spiffs.bin Uploading 262144 bytes from .pioenvs/sonoff-pow-debug/spiffs.bin to flash at 0x000BB000 ................................................................................ [ 31% ] ................................................................................ [ 62% ] ................................................................................ [ 93% ] ................ [ 100% ] ========================= [SUCCESS] Took 31.08 seconds ========================= ================================== [SUMMARY] ================================== Environment node-debug [SKIP] Environment node-debug-ota [SKIP] Environment sonoff-debug [SKIP] Environment sonoff-debug-ota [SKIP] Environment sonoff-pow-debug [SUCCESS] Environment sonoff-pow-debug-ota [SKIP] Environment slampher-debug [SKIP] Environment slampher-debug-ota [SKIP] Environment s20-debug [SKIP] Environment s20-debug-ota [SKIP] Environment ac-device [SKIP] Environment washer-device [SKIP] Environment studio-lamp-device [SKIP] Environment living-lamp-device [SKIP] ========================= [SUCCESS] Took 31.08 seconds ========================= |
Now that’s done.
A Quick look at ESPurna Web Interface
ESPurna firmware and filesystem has now been flashed to Sonoff POW. But does it work?
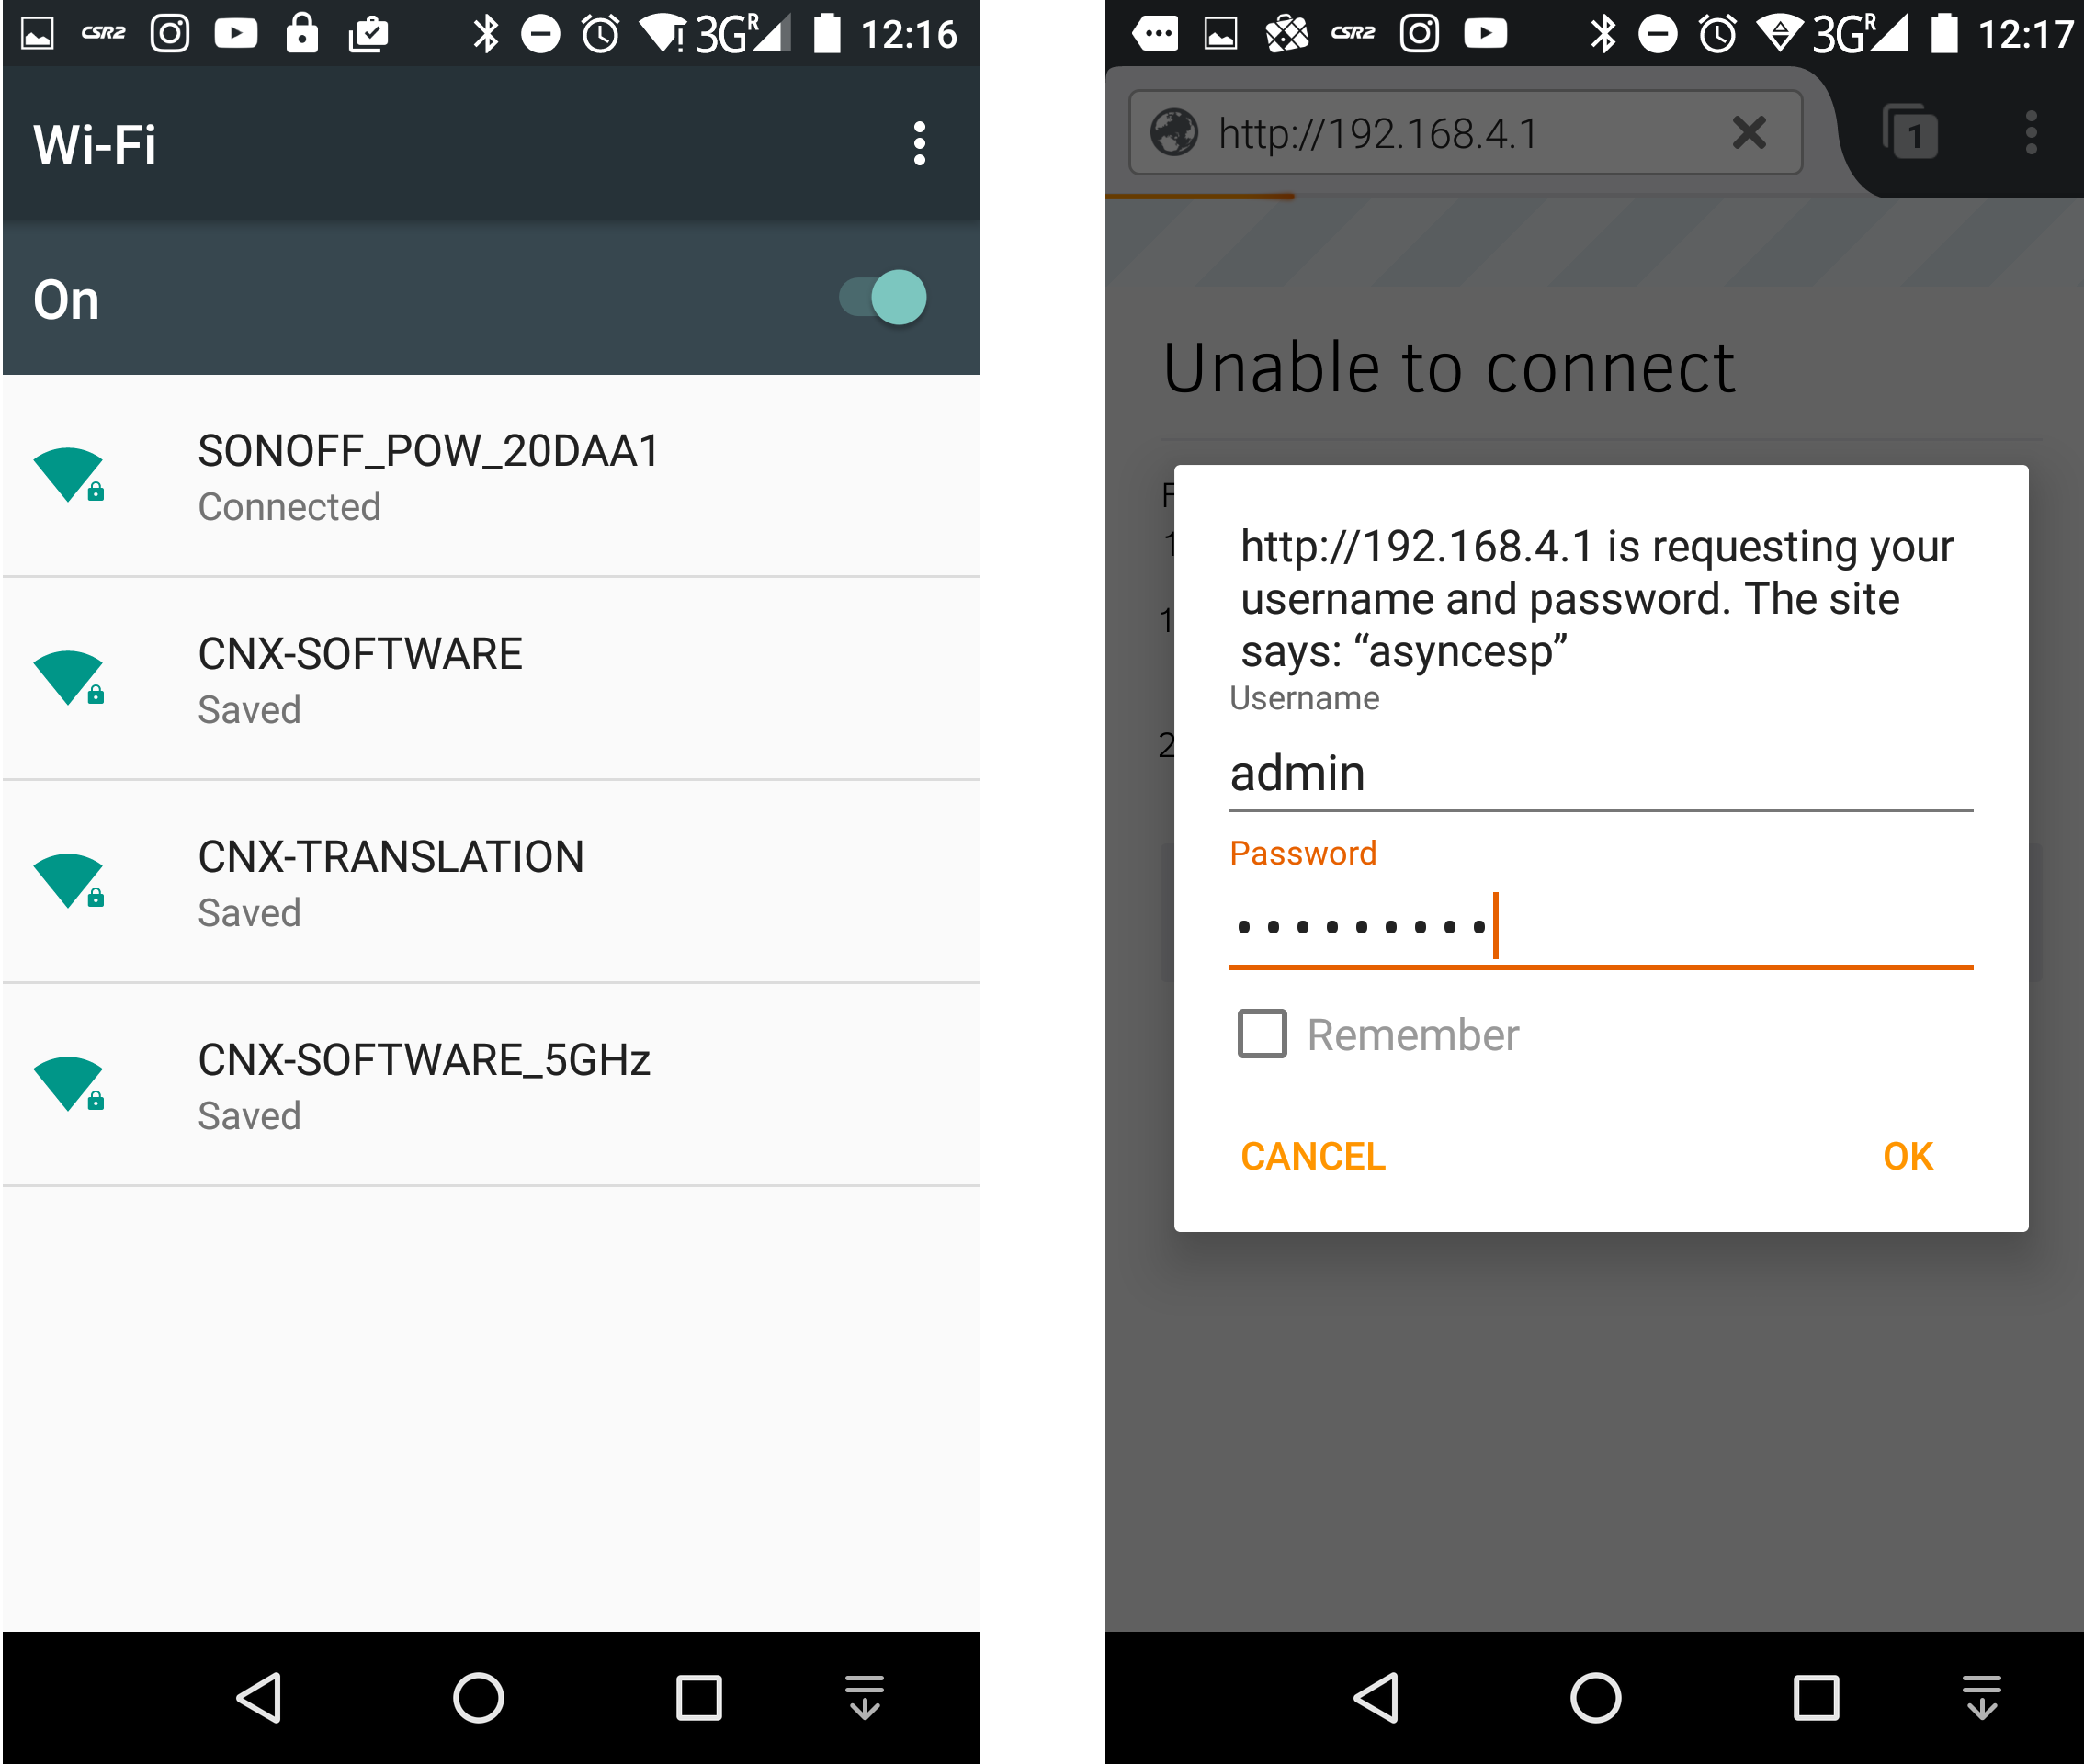
I can see a new SONOFF_POW_XXXXX access point, so that does look good. I can connect using the default password “fibonacci”, then go to my web browser to access http://192.168.4.1, and login again with admin/fibonacci credentials.
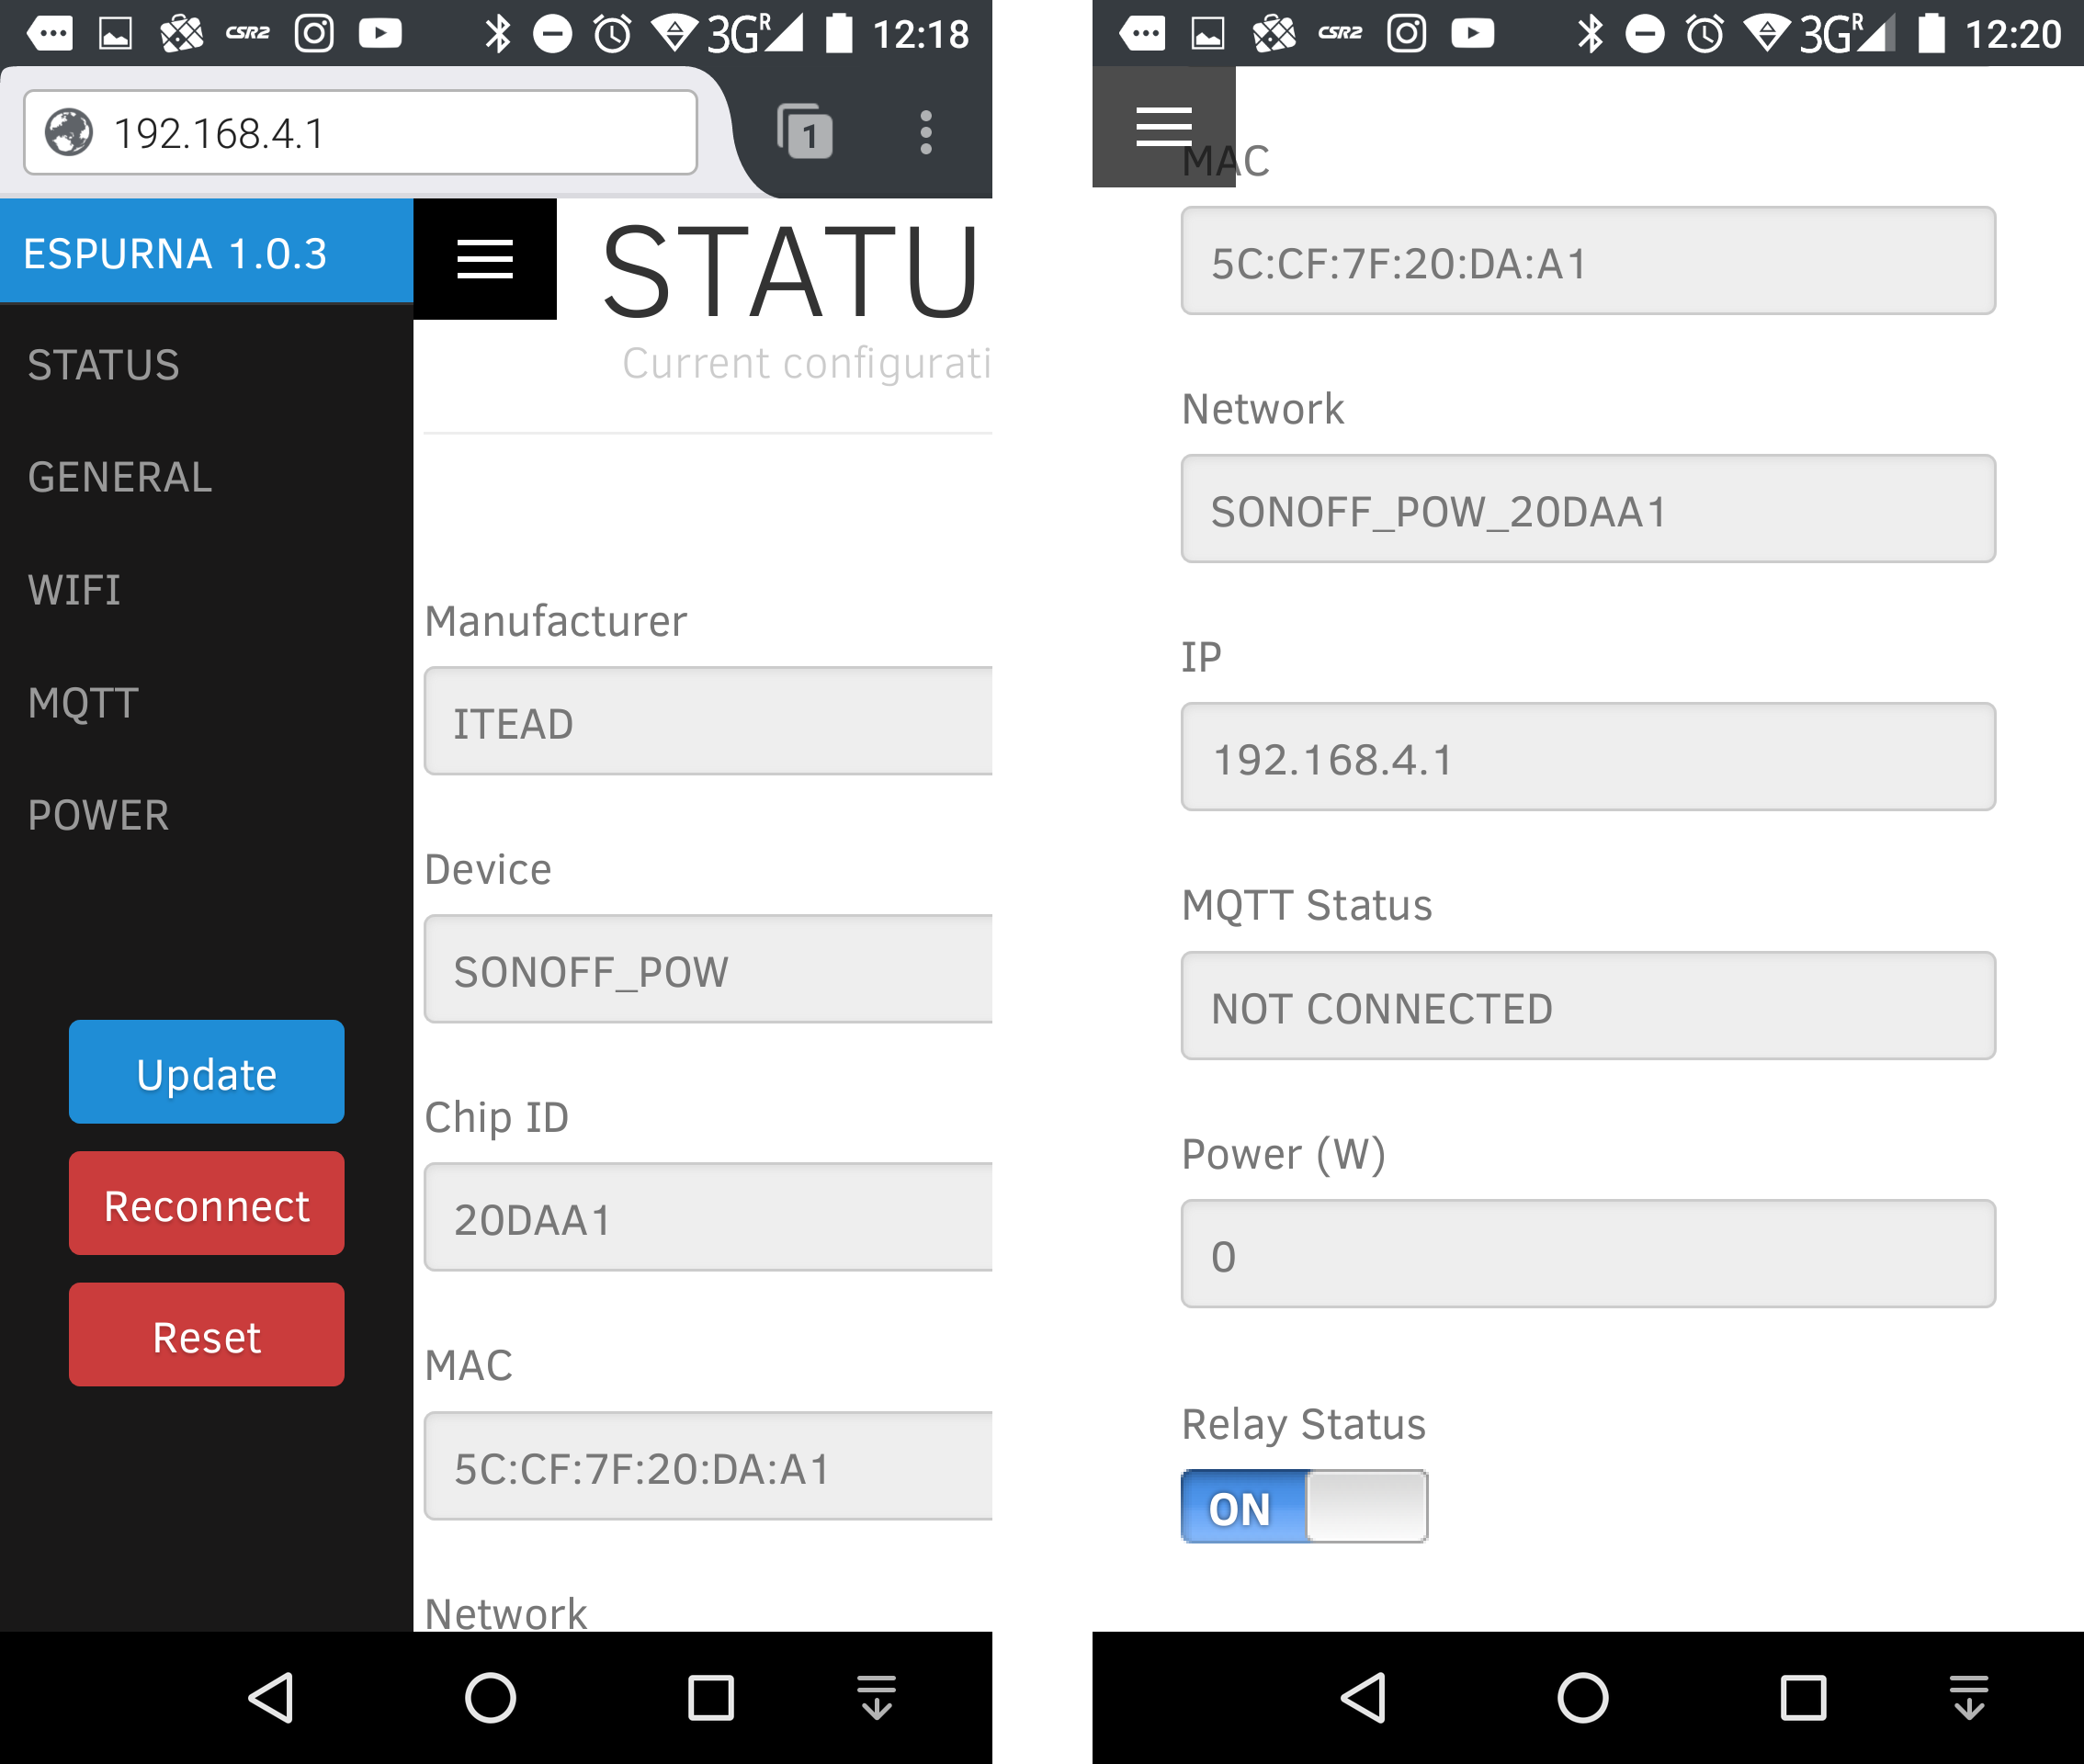
ESPURNA 1.03 interface goes to the status menu first, and there I can turn on and off the relay remotely, and check the power consumption in watts, which remains at 0 watt since I have not connected it to the mains yet. It’s also possible to turn the relay on and off with the button, and there an option to select whether to turn on or off the relay at boot time, which is great since I need it on at all times.
The web interface also allows you to change general parameters including the hostname and password, as well as enable or disable the HTTP API (disabled by default). The WiFi section is used to connect to up to 3 wireless routers, the MQTT section lets you configure an MQTT (Mosquito) broker, and the power section is used to calibrate the power monitoring device.
If you just intend to check the current power consumption and turn on and off the switch with your phone, you don’t have to do anything else. But I’d like to find some ways to draw daily, weekly, monthly charts of my office power consumption using either MQTT or the HTTP API. I’ll have to study how to do that, and that will hopefully be the topic of my next post about Sonoff POW.
Sonoff POW can be purchased on ITEAD Studio for $10.50 plus shipping, but is currently out of stock with the company manufacturing a third batch soon.

Jean-Luc started CNX Software in 2010 as a part-time endeavor, before quitting his job as a software engineering manager, and starting to write daily news, and reviews full time later in 2011.
Support CNX Software! Donate via cryptocurrencies, become a Patron on Patreon, or purchase goods on Amazon or Aliexpress


