Mediatek Labs has announced LinkIt Smart 7688 development boards powered by Mediatek MT7688 WiSoC earlier today, but I was selected for a close beta several weeks before the launch, and I’ve had time to play a little with the boards, so today I’ll report my experience getting started with LinkIt Smart 7688 amd 7688 Duo by writing a Quick Start Guide showing how to setup the boards, upgrade firmware, access the serial console, run “Blink LED” sample applications with Python and JavaScript, as well as the Arduino IDE, and connect to the Internet.
Initial Setup
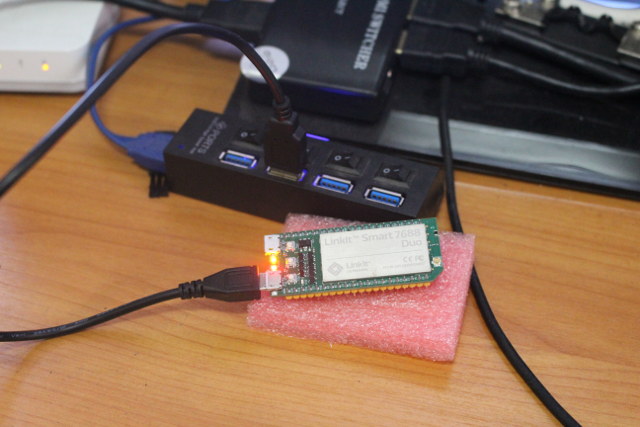
You’ll only need a micro USB cable and a computer with WiFi and USB ports to get started with the board. The green LED (top) for the MCU will turn on immediately, while the red LED (bottom) for WiFI will blink once, and only turn on continuously after 5 seconds, and within 30 seconds after that you should get WiFi connectivity.
Since you just need a web browser any operating system will do, and at first I used a desktop computer running Ubuntu 14.04 without WiFi (and not working WiFi dongle left), so I wondered if I could access the serial console via the USB connection, and ran dmesg:
|
1 2 3 4 5 6 7 8 9 10 |
[ 6352.423823] usb 5-2.2: New USB device found, idVendor=0e8d, idProduct=ab01 [ 6352.423831] usb 5-2.2: New USB device strings: Mfr=1, Product=2, SerialNumber=0 [ 6352.423836] usb 5-2.2: Product: LinkIt Smart 7688 [ 6352.423840] usb 5-2.2: Manufacturer: MediaTek Labs [ 6352.427149] input: MediaTek Labs LinkIt Smart 7688 as /devices/pci0000:00/0000:00:16.2/usb5/5-2/5-2.2/5-2.2:1.2/0003:0E8D:AB01.000A/input/input22 [ 6352.427536] hid-generic 0003:0E8D:AB01.000A: input,hidraw9: USB HID v1.01 Mouse [MediaTek Labs LinkIt Smart 7688] on usb-0000:00:16.2-2.2/input2 [ 6352.455093] cdc_acm 5-2.2:1.0: This device cannot do calls on its own. It is not a modem. [ 6352.455141] cdc_acm 5-2.2:1.0: ttyACM0: USB ACM device [ 6352.455455] usbcore: registered new interface driver cdc_acm [ 6352.455458] cdc_acm: USB Abstract Control Model driver for USB modems and ISDN adapters |
The device is recognized as a USB modem, so it was not an option, and instead I fired up my Ubuntu laptop instead. You can still access the serial console over UART with your own USB to serial debug board by connecting TX and Rx to P8 and P9 pins of Smart Link 7688 (DUO) board. I’ll show that a little later in this guide.
The next step is to connect to LinkIt_Smart_7688_XXXXXX access point with your computer, where XXXXXX is your board’s MAC address suffix. Once you’ve connected to this open WiFi network, simply open a web browser, and type mylinkit.local to access LinkIt Smart 7688 webUI and input a root password of your choice.
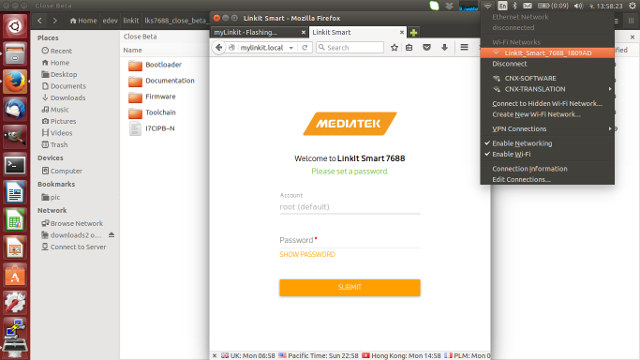
This step will work out of the box with Linux, Windows 8.1/10 and Mac OS X operating systems, but you’ll need to install Bonjour Print Service in Windows 7. If you don’t want mDNS, you can also use the default address: 192.168.100.1.
SDK and Firmware Upgrade
Before upgrading the firmware, you’ll need to download the SDK, which Mediatek calls “LinkIt Smart 7688 SDT” from MediaTek Labs website which will contains the bootloader and firmware directories, documentation including a Getting Stated Guide and a developer’s guide, as well as the toolchain.
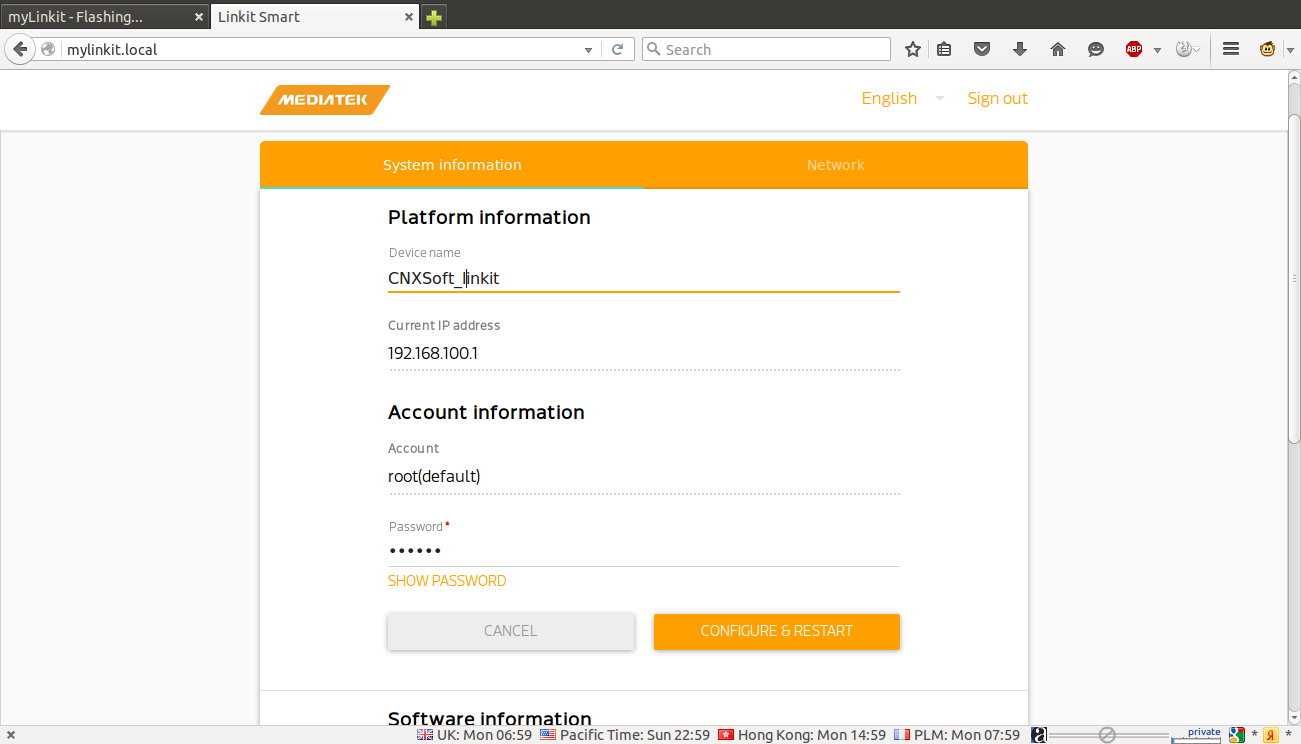
After signing to the web UI, you should find the “Software information” section where you can see the bootloader and firmware version, and an “Upgrade firmware” button.
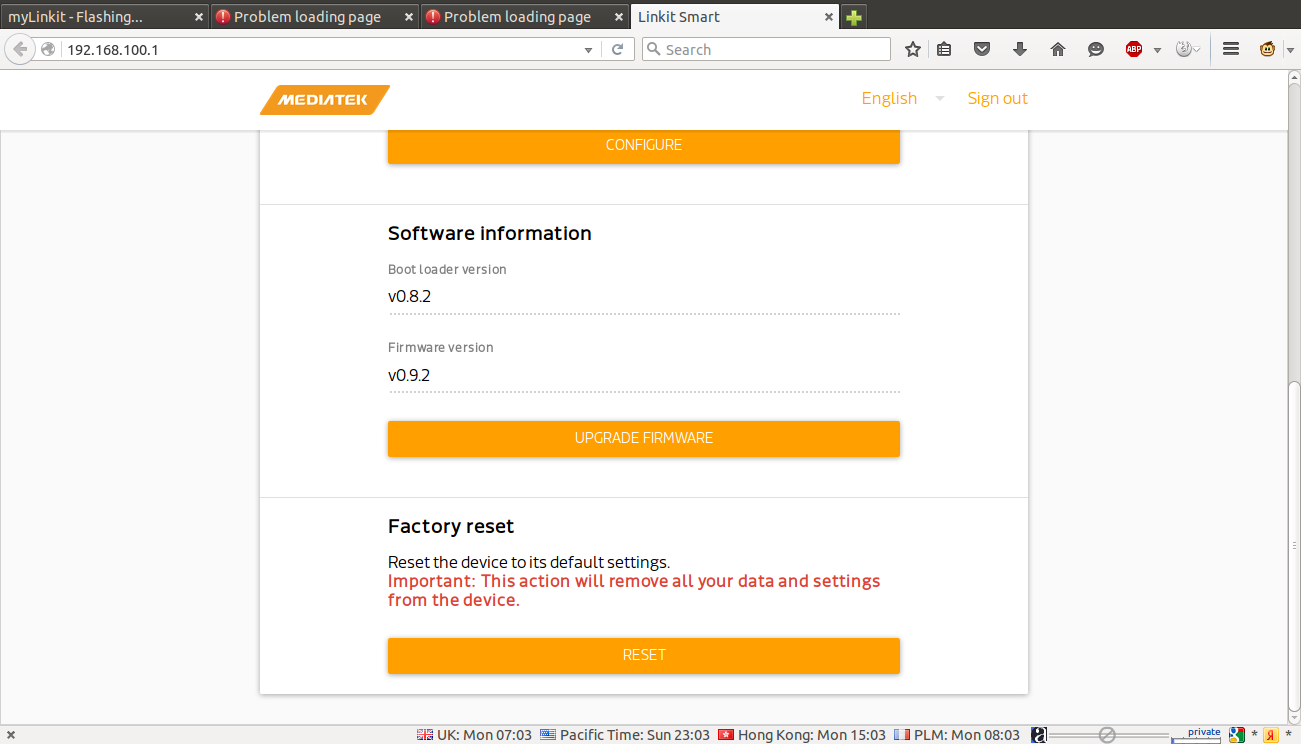
Once you click Upgrade Firmware button, you’ll be able to browse for the lks7688.img file in firmware directory of the SDT, and click on Upgrade & Restart to complete the installation.
If for some reasons you can’t access your board anymore, you can also perform the upgrade by copying lks7688.img file to a USB flash drive and connect it via a USB OTG adapter.
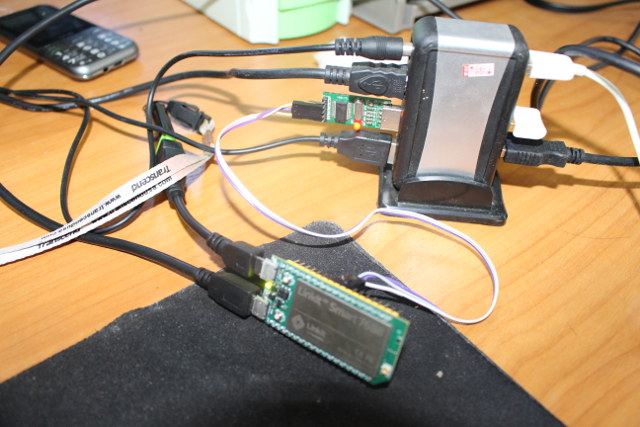
While the board is running, keep pressing the WiFi button, while pressing the MPU button for a short time, and only release the WiFi button after it becomes solid after around 5 seconds, and the firmware update should start with the red WiFi LED blinking slowly until the update is complete (2 to 3 minutes).
Serial Console on LinkIt Smart 7688 (DUO)
If you don’t get any issues, the easiest way to connect to the board is via SSH:
|
1 |
ssh root@mylinkit.local |
or
|
1 |
ssh root@192.168.100.1 |
But in case you encounter some problems with the configuration, and want to find out what’s going on you’ll need to connect a USB to TTL board as shown in the picture above. You’ll need to connect GND, Tx to P9 pin and Tx to P8 pin, and configure you favorite console program be it minicom, screen or putty to 57600 8N1.
Here’s the full boot log in LinkIt Smart 7688 board:
|
1 2 3 4 5 6 7 8 9 10 11 12 13 14 15 16 17 18 19 20 21 22 23 24 25 26 27 28 29 30 31 32 33 34 35 36 37 38 39 40 41 42 43 44 45 46 47 48 49 50 51 52 53 54 55 56 57 58 59 60 61 62 63 64 65 66 67 68 69 70 71 72 73 74 75 76 77 78 79 80 81 82 83 84 85 86 87 88 89 90 91 92 93 94 95 96 97 98 99 100 101 102 103 104 105 106 107 108 109 110 111 112 113 114 115 116 117 118 119 120 121 122 123 124 125 126 127 128 129 130 131 132 133 134 135 136 137 138 139 140 141 142 143 144 145 146 147 148 149 150 151 152 153 154 155 156 157 158 159 160 161 162 163 164 165 166 167 168 169 170 171 172 173 174 175 176 177 178 179 180 181 182 183 184 185 186 187 188 189 190 191 192 193 194 195 196 197 198 199 200 201 202 203 204 205 206 207 208 209 210 211 212 213 214 215 216 217 218 219 220 221 222 223 224 225 226 227 228 229 230 231 232 233 234 235 236 237 238 239 240 241 242 243 244 245 246 |
[05000C0C][05000C09] DDR Calibration DQS reg = 0000888A U-Boot 1.1.3 (Aug 12 2015 - 04:01:01) Board: Ralink APSoC DRAM: 128 MB relocate_code Pointer at: 87f68000 flash manufacture id: c2, device id 20 19 find flash: MX25L25635E ============================================ Ralink UBoot Version: 4.3.0.0 -------------------------------------------- ASIC 7628_MP (Port5<->None) DRAM component: 1024 Mbits DDR, width 16 DRAM bus: 16 bit Total memory: 128 MBytes Flash component: SPI Flash Date:Aug 12 2015 Time:04:01:01 ============================================ icache: sets:512, ways:4, linesz:32 ,total:65536 dcache: sets:256, ways:4, linesz:32 ,total:32768 ##### The CPU freq = 575 MHZ #### estimate memory size =128 Mbytes RESET MT7628 PHY!!!!!! GPIOMODE --> 50054404 GPIOMODE2 --> 5540551 Please choose the operation: 1: Load system code to SDRAM via TFTP. 2: Load system code then write to Flash via TFTP. 3: Boot system code via Flash (default). 4: Entr boot command line interface. 7: Load Boot Loader code then write to Flash via Serial. 9: Load Boot Loader code then write to Flash via TFTP. 0 3: System Boot system code via Flash. ## Booting image at bc050000 ... Image Name: MIPS OpenWrt Linux-3.18.21 Image Type: MIPS Linux Kernel Image (lzma compressed) Data Size: 1118491 Bytes = 1.1 MB Load Address: 80000000 Entry Point: 80000000 Verifying Checksum ... OK Uncompressing Kernel Image ... OK No initrd ## Transferring control to Linux (at address 80000000) ... ## Giving linux memsize in MB, 128 Starting kernel ... [ 0.000000] Linux version 3.18.21 (buildbot@builder1) (gcc version 4.8.3 (Op5 [ 0.000000] Board has DDR2 [ 0.000000] Analog PMU set to hw control [ 0.000000] Digital PMU set to hw control [ 0.000000] SoC Type: MediaTek MT7688 ver:1 eco:2 [ 0.000000] bootconsole [early0] enabled [ 0.000000] CPU0 revision is: 00019655 (MIPS 24KEc) [ 0.000000] MIPS: machine is MediaTek LinkIt Smart 7688 [ 0.000000] Determined physical RAM map: [ 0.000000] memory: 08000000 @ 00000000 (usable) [ 0.000000] Initrd not found or empty - disabling initrd [ 0.000000] Zone ranges: [ 0.000000] Normal [mem 0x00000000-0x07ffffff] [ 0.000000] Movable zone start for each node [ 0.000000] Early memory node ranges [ 0.000000] node 0: [mem 0x00000000-0x07ffffff] [ 0.000000] Initmem setup node 0 [mem 0x00000000-0x07ffffff] [ 0.000000] Primary instruction cache 64kB, VIPT, 4-way, linesize 32 bytes. [ 0.000000] Primary data cache 32kB, 4-way, PIPT, no aliases, linesize 32 bys [ 0.000000] Built 1 zonelists in Zone order, mobility grouping on. Total pa2 [ 0.000000] Kernel command line: console=ttyS2,57600 rootfstype=squashfs,jff2 [ 0.000000] PID hash table entries: 512 (order: -1, 2048 bytes) [ 0.000000] Dentry cache hash table entries: 16384 (order: 4, 65536 bytes) [ 0.000000] Inode-cache hash table entries: 8192 (order: 3, 32768 bytes) [ 0.000000] Writing ErrCtl register=00004fc0 [ 0.000000] Readback ErrCtl register=00004fc0 [ 0.000000] Memory: 126332K/131072K available (2703K kernel code, 129K rwdat) [ 0.000000] SLUB: HWalign=32, Order=0-3, MinObjects=0, CPUs=1, Nodes=1 [ 0.000000] NR_IRQS:256 [ 0.000000] intc: using register map from devicetree [ 0.000000] CPU Clock: 580MHz [ 0.000000] clocksource_of_init: no matching clocksources found [ 0.000000] Calibrating delay loop... 385.84 BogoMIPS (lpj=1929216) [ 0.060000] pid_max: default: 32768 minimum: 301 [ 0.060000] Mount-cache hash table entries: 1024 (order: 0, 4096 bytes) [ 0.070000] Mountpoint-cache hash table entries: 1024 (order: 0, 4096 bytes) [ 0.080000] pinctrl core: initialized pinctrl subsystem [ 0.090000] NET: Registered protocol family 16 [ 0.110000] mt7621_gpio 10000600.gpio: registering 32 gpios [ 0.120000] mt7621_gpio 10000600.gpio: registering 32 gpios [ 0.130000] mt7621_gpio 10000600.gpio: registering 32 gpios [ 0.140000] Switched to clocksource MIPS [ 0.150000] NET: Registered protocol family 2 [ 0.150000] TCP established hash table entries: 1024 (order: 0, 4096 bytes) [ 0.170000] TCP bind hash table entries: 1024 (order: 0, 4096 bytes) [ 0.180000] TCP: Hash tables configured (established 1024 bind 1024) [ 0.190000] TCP: reno registered [ 0.200000] UDP hash table entries: 256 (order: 0, 4096 bytes) [ 0.210000] UDP-Lite hash table entries: 256 (order: 0, 4096 bytes) [ 0.220000] NET: Registered protocol family 1 [ 0.230000] futex hash table entries: 256 (order: -1, 3072 bytes) [ 0.260000] squashfs: version 4.0 (2009/01/31) Phillip Lougher [ 0.280000] jffs2: version 2.2 (NAND) (SUMMARY) (LZMA) (RTIME) (CMODE_PRIORI. [ 0.300000] msgmni has been set to 246 [ 0.310000] io scheduler noop registered [ 0.320000] io scheduler deadline registered (default) [ 0.330000] Serial: 8250/16550 driver, 16 ports, IRQ sharing enabled [ 0.350000] 10000c00.uartlite: ttyS0 at MMIO 0x10000c00 (irq = 28, base_baudA [ 0.360000] 10000d00.uart1: ttyS1 at MMIO 0x10000d00 (irq = 29, base_baud = A [ 0.380000] console [ttyS2] disabled [ 0.390000] 10000e00.uart2: ttyS2 at MMIO 0x10000e00 (irq = 30, base_baud = A [ 0.410000] console [ttyS2] enabled [ 0.410000] console [ttyS2] enabled [ 0.420000] bootconsole [early0] disabled [ 0.420000] bootconsole [early0] disabled [ 0.440000] spi-mt7621 10000b00.spi: sys_freq: 193333333 [ 0.450000] m25p80 spi32766.0: mx25l25635e (32768 Kbytes) [ 0.470000] m25p80 spi32766.0: using chunked io [ 0.470000] 4 ofpart partitions found on MTD device spi32766.0 [ 0.490000] Creating 4 MTD partitions on "spi32766.0": [ 0.500000] 0x000000000000-0x000000030000 : "u-boot" [ 0.510000] 0x000000030000-0x000000040000 : "u-boot-env" [ 0.520000] 0x000000040000-0x000000050000 : "factory" [ 0.530000] 0x000000050000-0x000002000000 : "firmware" [ 0.610000] 2 uimage-fw partitions found on MTD device firmware [ 0.620000] 0x000000050000-0x00000016115b : "kernel" [ 0.630000] 0x00000016115b-0x000002000000 : "rootfs" [ 0.640000] mtd: device 5 (rootfs) set to be root filesystem [ 0.650000] 1 squashfs-split partitions found on MTD device rootfs [ 0.660000] 0x000001500000-0x000002000000 : "rootfs_data" [ 0.690000] ralink_soc_eth 10100000.ethernet eth0: ralink at 0xb0100000, irq5 [ 0.700000] mt7621_wdt 10000120.watchdog: Initialized [ 0.710000] TCP: cubic registered [ 0.720000] NET: Registered protocol family 17 [ 0.730000] bridge: automatic filtering via arp/ip/ip6tables has been deprec. [ 0.760000] Bridge firewalling registered [ 0.760000] 8021q: 802.1Q VLAN Support v1.8 [ 0.770000] mtk-linkit bootstrap: Version : LINKITS7688 [ 0.780000] mtk-linkit bootstrap: Revision : REV3 [ 0.790000] mtk-linkit bootstrap: setting up bootstrap latch [ 0.810000] VFS: Mounted root (squashfs filesystem) readonly on device 31:5. [ 0.830000] Freeing unused kernel memory: 144K (8031c000 - 80340000) [ 2.130000] init: Console is alive [ 2.140000] init: - watchdog - [ 4.170000] usbcore: registered new interface driver usbfs [ 4.180000] usbcore: registered new interface driver hub [ 4.190000] usbcore: registered new device driver usb [ 4.200000] exFAT: Version 1.2.9 [ 4.220000] SCSI subsystem initialized [ 4.230000] ehci_hcd: USB 2.0 'Enhanced' Host Controller (EHCI) Driver [ 4.250000] ehci-platform: EHCI generic platform driver [ 4.460000] phy phy-usbphy.0: remote usb device wakeup disabled [ 4.470000] phy phy-usbphy.0: UTMI 16bit 30MHz [ 4.480000] ehci-platform 101c0000.ehci: EHCI Host Controller [ 4.490000] ehci-platform 101c0000.ehci: new USB bus registered, assigned bu1 [ 4.500000] ehci-platform 101c0000.ehci: irq 26, io mem 0x101c0000 [ 4.540000] ehci-platform 101c0000.ehci: USB 2.0 started, EHCI 1.00 [ 4.550000] hub 1-0:1.0: USB hub found [ 4.560000] hub 1-0:1.0: 1 port detected [ 4.570000] ohci_hcd: USB 1.1 'Open' Host Controller (OHCI) Driver [ 4.580000] ohci-platform: OHCI generic platform driver [ 4.590000] ohci-platform 101c1000.ohci: Generic Platform OHCI controller [ 4.600000] ohci-platform 101c1000.ohci: new USB bus registered, assigned bu2 [ 4.620000] ohci-platform 101c1000.ohci: irq 26, io mem 0x101c1000 [ 4.690000] hub 2-0:1.0: USB hub found [ 4.700000] hub 2-0:1.0: 1 port detected [ 4.710000] platform gpio-leds: Driver leds-gpio requests probe deferral [ 4.730000] MTK MSDC device init. [ 4.780000] mtk-sd: MediaTek MT6575 MSDC Driver [ 4.790000] platform gpio-leds: Driver leds-gpio requests probe deferral [ 4.800000] sdhci: Secure Digital Host Controller Interface driver [ 4.810000] sdhci: Copyright(c) Pierre Ossman [ 4.820000] sdhci-pltfm: SDHCI platform and OF driver helper [ 4.840000] usbcore: registered new interface driver usb-storage [ 5.520000] init: - preinit - [ 6.550000] rt305x-esw 10110000.esw: link changed 0x00 [ 6.720000] random: procd urandom read with 10 bits of entropy available Press the [f] key and hit [enter] to enter failsafe mode Press the [1], [2], [3] or [4] key and hit [enter] to select the debug level [ 10.100000] jffs2: notice: (371) jffs2_build_xattr_subsystem: complete build. [ 10.140000] mount_root: switching to jffs2 overlay [ 10.170000] procd: - early - [ 10.180000] procd: - watchdog - [ 10.990000] procd: - ubus - Command failed: Not found [ 12.000000] procd: - init - Please press Enter to activate this console. [ 13.850000] NET: Registered protocol family 10 [ 13.950000] ip6_tables: (C) 2000-2006 Netfilter Core Team [ 13.970000] i2c /dev entries driver [ 14.630000] <-- RTMPAllocTxRxRingMemory, Status=0, ErrorValue=0x [ 14.650000] <-- RTMPAllocAdapterBlock, Status=0 [ 14.660000] mtk_gpio_wifi gpio-wifi: registering 1 gpio [ 14.700000] i2c-ralink 10000900.i2c: loaded [ 14.720000] Linux video capture interface: v2.00 [ 14.760000] Enable Ralink GDMA Controller Module [ 14.770000] GDMA IP Version=3 [ 14.800000] ******* mt76xx_pcm_init ******* [ 14.810000] *******Enter codec_wm8960_i2c_probe******** [ 14.820000] soc-audio soc-audio: ASoC: machine MTK APSoC I2S should use snd_) [ 14.840000] wm8960 0-001a: No platform data supplied [ 15.350000] soc-audio soc-audio: wm8960-hifi <-> mt76xx-i2s mapping ok [ 15.370000] ip_tables: (C) 2000-2006 Netfilter Core Team [ 15.410000] nf_conntrack version 0.5.0 (1976 buckets, 7904 max) [ 15.460000] usbcore: registered new interface driver uvcvideo [ 15.470000] USB Video Class driver (1.1.1) [ 15.510000] xt_time: kernel timezone is -0000 [ 15.540000] PPP generic driver version 2.4.2 [ 15.550000] NET: Registered protocol family 24 [ 21.400000] device eth0.1 entered promiscuous mode [ 21.410000] device eth0 entered promiscuous mode [ 21.450000] br-lan: port 1(eth0.1) entered forwarding state [ 21.460000] br-lan: port 1(eth0.1) entered forwarding state [ 22.210000] efuse_probe: efuse = 10000012 [ 22.450000] tssi_0_target_pwr_g_band = 26 [ 22.460000] tssi_1_target_pwr_g_band = 35 [ 23.460000] br-lan: port 1(eth0.1) entered forwarding state [ 29.010000] <==== rt28xx_init, Status=0 [ 30.170000] device ra0 entered promiscuous mode [ 30.180000] br-lan: port 2(ra0) entered forwarding state [ 30.190000] br-lan: port 2(ra0) entered forwarding state [ 32.190000] br-lan: port 2(ra0) entered forwarding state BusyBox v1.23.2 (2015-11-18 16:34:33 CET) built-in shell (ash) _______ ________ __ | |.-----.-----.-----.| | | |.----.| |_ | - || _ | -__| || | | || _|| _| |_______|| __|_____|__|__||________||__| |____| |__| W I R E L E S S F R E E D O M ----------------------------------------------------- CHAOS CALMER (15.05+linkit, r47501) ----------------------------------------------------- * 1 1/2 oz Gin Shake with a glassful * 1/4 oz Triple Sec of broken ice and pour * 3/4 oz Lime Juice unstrained into a goblet. * 1 1/2 oz Orange Juice * 1 tsp. Grenadine Syrup ----------------------------------------------------- root@CNXSoft_linkit:/# |
Running Sample Code in LinkIt Smart 7688
So now that you should have access the terminal either via SSH or UART, you can run some pre-loaded JavaScripts or Python sample in /IOT/examples/ directory:
|
1 2 3 4 |
root@CNXSoft_linkit:/# ls -l /IoT/examples/ -rwxr-xr-x 1 root root 1478 Nov 3 13:39 blink-gpio44.js -rwxr-xr-x 1 root root 1323 Nov 3 13:39 blink-gpio44.py -rwxr-xr-x 1 root root 378 Nov 3 13:39 bus-test.js |
Let’s blink the WiFi LED with the Python script:
|
1 |
python /IoT/examples/blink-gpio44.py |
The red LED should blink around twice per second. Press Ctrl+C to interrupt the program. So what’s the code like?
|
1 2 3 4 5 6 7 8 9 10 11 12 |
#!/usr/bin/env python import mraa import time x = mraa.Gpio(44) x.dir(mraa.DIR_OUT) while True: x.write(1) time.sleep(0.2) x.write(0) time.sleep(0.2) |
If Python is not your thing, but you’re quite happy coding with JavaScript (node.js), you can blink the LED too:
|
1 |
node /IoT/examples/blink-gpio44.js |
The program takes a little longer to start, but it works, and the LED blinks once a second. Here’s the code:
|
1 2 3 4 5 6 7 8 9 10 11 12 13 14 15 16 |
#!/usr/bin/node var m = require('mraa'); var ledState = true; var myLed = new m.Gpio(44); console.log('MRAA Version: ' + m.getVersion()); myLed.dir(m.DIR_OUT); function periodicActivity() { myLed.write(ledState ? 1 : 0); ledState = !ledState; setTimeout(periodicActivity, 1000); } periodicActivity(); |
Running Sample Code in LinkIt Smart 7688 DUO
If you have a LinkIt Smart 7688 DUO, you’ll have want to install Arduino IDE. I could not perform this step fully, as I had troubles to connect and upgrade the firmware to the beta board. But here are the main steps:
- Download and install Arduino 1.6.5
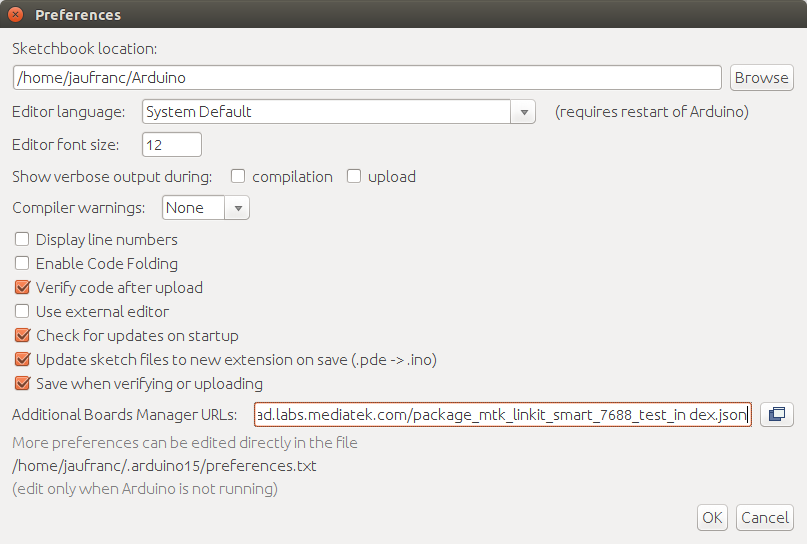
- Start Arduino, and go to File->Preferences and add http://download.labs.mediatek.com/package_mtk_linkit_smart_7688_test_index.json to Additional Boards Manager URLs.

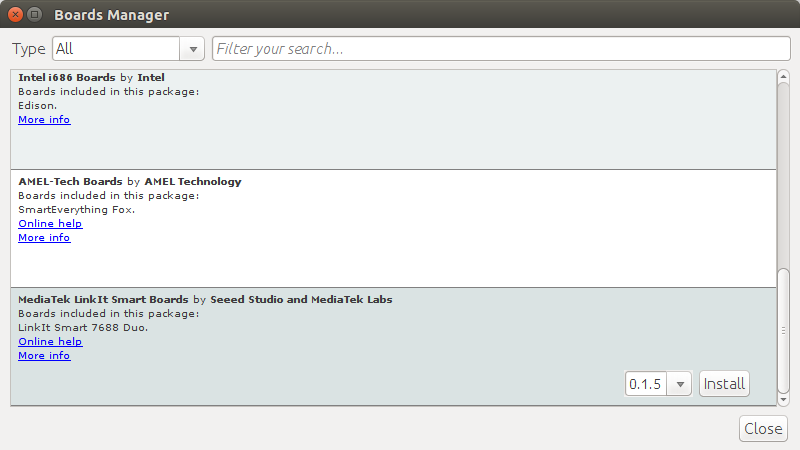
- Click OK, and go to Tools->Boards->Board Manager, and scroll down to install Mediatek LinkIT Smart Boards by Seeed Studio and MediaTek Labs.
- Now select LinkIt Smart 7688 Duo in Tools->Boards, and the serial interface for LinkIt Smart 7688 in Tools->Serial. (It was /dev/ttyACM0 with my old firmware)
- Write a short sketch to blink D13 LED on the board:
123456789101112131415161718192021void setup() {Serial.begin(115200); // open serial connection to USB Serial port (connected to your computer)Serial1.begin(57600); // open internal serial connection to MT7688// in MT7688, this maps to devicepinMode(13, OUTPUT);}void loop() {int c = Serial1.read();// read from MT7688if (c != -1) {switch(c) {case '0': // turn off LEDdigitalWrite(13, 0);break;case '1': //turn on LEDdigitalWrite(13, 1);break;}}} - Click on verify, click on upload, but it’s not done yet as you have to run a python program to send command over the serial interface between MediaTek MT7688 and the Atmel AVR MCU. So connect to the board and write blink_on_duo.py Python script using vi / vim:
123456789101112131415161718192021222324import serialimport times = Nonedef setup():global s# open serial COM port to /dev/ttyS0, which maps to UART0(D0/D1)# the baudrate is set to 57600 and should be the same as the one# specified in the Arduino sketch uploaded to ATMega32U4.s = serial.Serial("/dev/ttyS0", 57600)def loop():# send "1" to the Arduino sketch on ATMega32U4.# the sketch will turn on the LED attached to D13 on the boards.write("1")time.sleep(1)# send "0" to the sketch to turn off the LEDs.write("0")time.sleep(1)if __name__ == '__main__':setup()while True:loop() - And now you can blink the LED with the script:
1python ./blink_on_duo.py
So LinkIt Smart 7688 Duo is more versatile thanks to its MCU, but it takes some efforts to blink a simple LED.
Connecting to the Internet and OpenWRT Configuration
So far we’ve done everything in the local network using the board as an access point, but many application will require some connection to the Internet. To connect your board to your WiFi router login to the webUI again, and select Network.
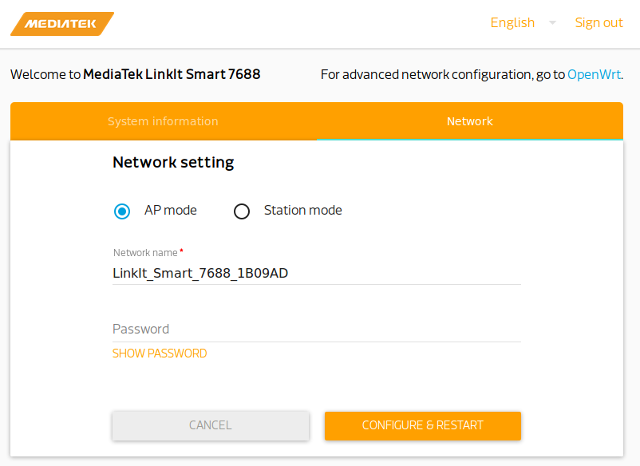
Now switch to Station mode, and click refresh.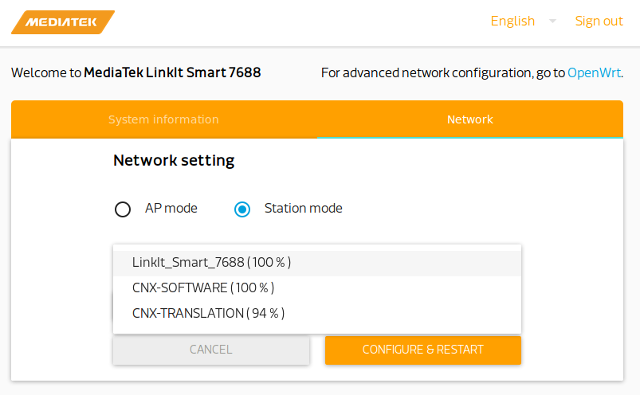 Nothing will happen, but if you click again on the zone right above the Refresh button a list of access point will show up. LinkIt_Smart_7688 is listed here, as I had a LinkIt Smart 7688 DUO running at the same time. Select the access point you want to use, input the password, and click on Configure & Restart.
Now make you sure computer is connected to the same access point or at least is one the same subnet, and go again to linkit.local in your browser to access the webUI, or SSH to the board. In my case I had changed the device name to CNXSoft_linkit and neither mylinkit.local or CNXSoft_linkit.local, or cnxsoft_linkit.local would work, so there may still be a bug here… So instead I check the new IP address via the serial terminal: 192.168.0.105 to make sure the connection was fine, but you can do so with your WiFi router client list too. I also pinged the Internet from the serial console:
|
1 2 3 4 5 |
root@CNXSoft_linkit:/# ping cnx-software.com PING cnx-software.com (104.28.19.95): 56 data bytes 64 bytes from 104.28.19.95: seq=0 ttl=54 time=41.309 ms 64 bytes from 104.28.19.95: seq=1 ttl=54 time=40.612 ms 64 bytes from 104.28.19.95: seq=2 ttl=54 time=40.840 ms |
Success!
If you want more control of your network configuration you can click on OpenWRT in the webUI, or go directly to http://IP_address/cgi-bin/luci to access LuCI’s web interface for OpenWRT.
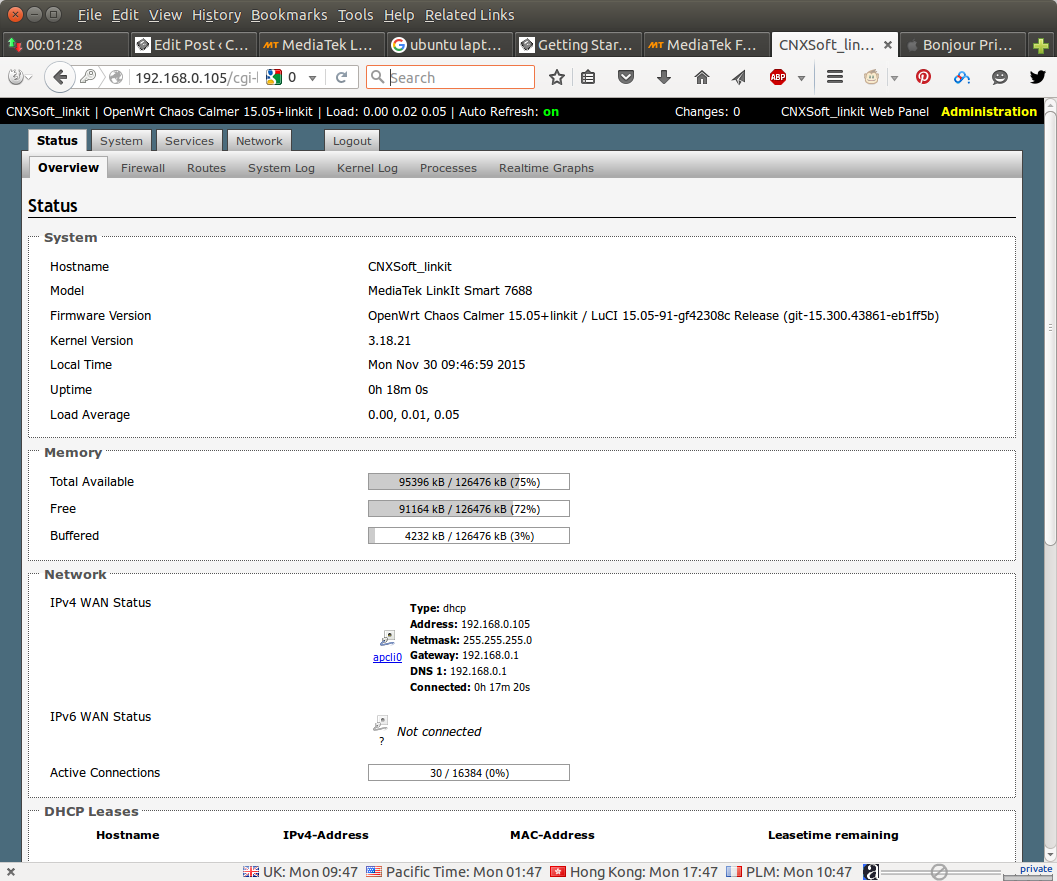
That concludes this getting started guide for LinkIt Smart 7688 and Linkit Smart 7688 Duo boards, to go further you may want to read LinkIt Smart 7688 Developer’s Guide, and tutorials found in the SDT, and build your own OpenWRT image from source code. You can purchase the LinkIt Smart 7688 and 7688 DUO boards for respectively $12.90 and $15.90 on Seeed Studio.

Jean-Luc started CNX Software in 2010 as a part-time endeavor, before quitting his job as a software engineering manager, and starting to write daily news, and reviews full time later in 2011.
Support CNX Software! Donate via cryptocurrencies, become a Patron on Patreon, or purchase goods on Amazon or Aliexpress


