
NodeMCU is a LUA based interactive firmware for Expressif ESP8622 Wi-Fi SoC, as well as an open source hardware board that contrary to the $3 ESP8266 Wi-Fi modules includes a CP2102 TTL to USB chip for programming and debugging, is breadboard-friendly, and can simply be powered via its micro USB port.
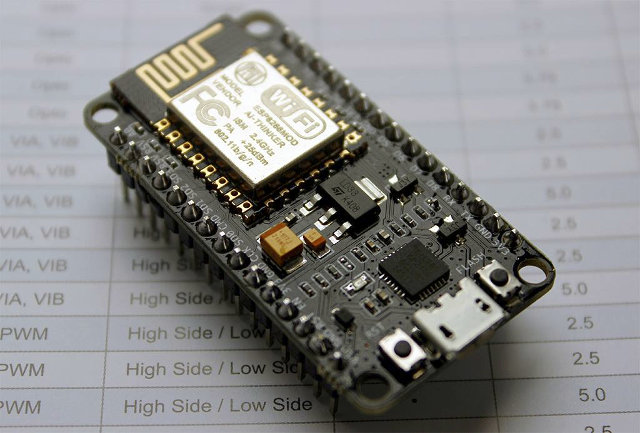 Let’s checkout the hardware first. The latest version of the board (V1.0) has the following specifications and features:
- Wi-Fi Module – ESP-12E module similar to ESP-12 module but with 6 extra GPIOs.
- USB – micro USB port for power, programming and debugging
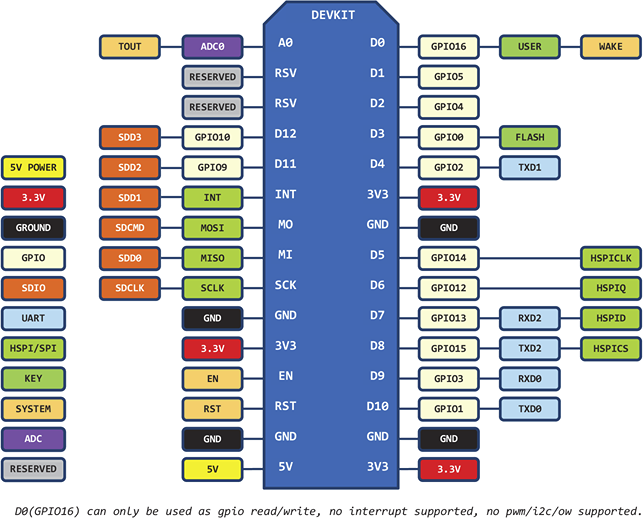
- Headers – 2x 2.54mm 15-pin header with access to GPIOs, SPI, UART, ADC, and power pins
- Misc – Reset and Flash buttons
- Power – 5V via micro USB port
- Dimensions – 49 x 24.5 x 13mm
The hardware documentation for the board can be found on nodemcu-devkit repo, including schematics and PCB layout designed with Altium Designer, but they should also be compatible with the cheaper Altium CircuitStudio. Sadly, the files have not been updated for 3 to 4 months, so they don’t completely match the latest hardware shown above, and some pins were not connected in the earlier version.
NodeMCU can be purchased for $10 and up on Aliexpress or Seeed Studio. However, it’s not entirely clear which version of the board is sold… The Aliexpress shop shows hardware v0.9, but says they will send the latest version, while Seeed Studio mentions NodeMCU “v2”, and shows picture of v1.0 hardware, which should be the one you want. The new board will also be up for sale in Europe on nodemcu.eu for 15 to 18 Euros including VAT.
NodeMCU firmware is build with ESP8266 SDK v.0.9.5, based on Lua 51.4 without debug and os modules, lua-cjson, and relies on spiffs (SPI Flash File System) file system. The quick start guide is written on the bottom of the board:
- Install CP2102 driver (not needed in Linux)
- Use 9600 baud rate
- Connect Wi-Fi and enjoy!
Once you are connected, you can just type the command in the terminal. For example to connecting to your Wi-Fi router:
|
1 2 3 4 |
wifi.setmode(wifi.STATION) wifi.sta.config("SSID","password") print(wifi.sta.getip()) --192.168.18.110 |
You can also toggle or/and read GPIO status in a similar way to what you’d with Arduino:
|
1 2 3 4 5 |
pin = 1 gpio.mode(pin,gpio.OUTPUT) gpio.write(pin,gpio.HIGH) gpio.mode(pin,gpio.INPUT) print(gpio.read(pin)) |
To get the board automatically run a script right after boot is complete, you can edit init.lua as follows:
|
1 2 3 |
file.open("init.lua","w+") file.writeline(print("hello world")) file.close() |
You can find the firmware source code and documentation on Github, as well as nodemcu-flasher, a Windows only tools to flash the firmware to a module. There’s also a separate tool called esptool that will let you flash nodemcu from Linux. In case you find the documentation is all over the place, you might want to checkout NodeMCU video tutorial below.
Nodemcu.com is the official website for the project, but you’ll find more information on Github. You can also get answers to your questions on their BBS or ESP8622 community forums.

Jean-Luc started CNX Software in 2010 as a part-time endeavor, before quitting his job as a software engineering manager, and starting to write daily news, and reviews full time later in 2011.
Support CNX Software! Donate via cryptocurrencies, become a Patron on Patreon, or purchase goods on Amazon or Aliexpress


