
If you have an embedded project that requires some GPIOs, and Ethernet connectivity, you now have a few choices of low cost low boards such as the Raspberry Pi with Broadcom ARM11 SoC for $35 + shipping, Texas Instruments Connected LaunchPad with an ARM Cortex M4 MCU for $20 including shipping, and today I’ve given a try at a solution to run an HTTP server with an Arduino Leonardo clone connected to ENC28J60 Ethernet module that together cost about $15 including shipping. This Ethernet module has been around for a while and is well supported, I just never took the time to give it a try before.
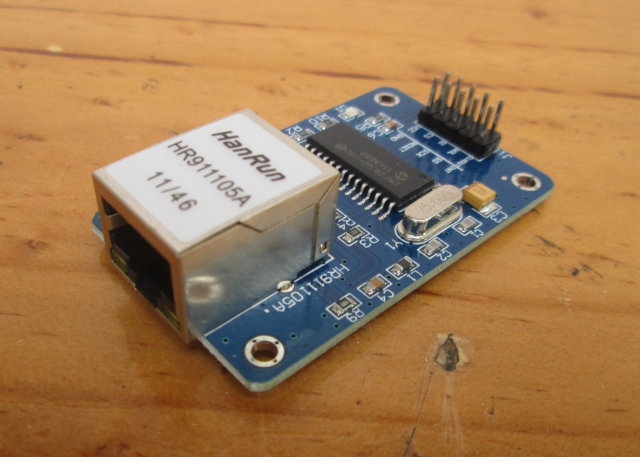
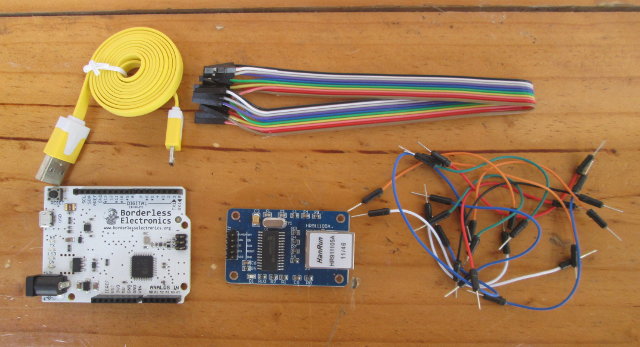
I’ve purchased ENC28J60 module on eBay for $3.46 and connected it via SPI to an Arduino Leonardo clone I acquired as part of a kit via Indiegogo for $12. The kit is not available for purchase outside the crowdfunding campaign, but you can also find Arduino Leonardo clones with a micro USB cable for just under $10 in Aliexpress. Besides the two boards, you’ll need a micro USB cable and a few prototyping cables.
I’ve mostly followed the instructions provided on Nathan Hein’s blog who used an Arduino Uno instead of an Arduino Leonardo.
Connecting ENC28J60 to Arduino
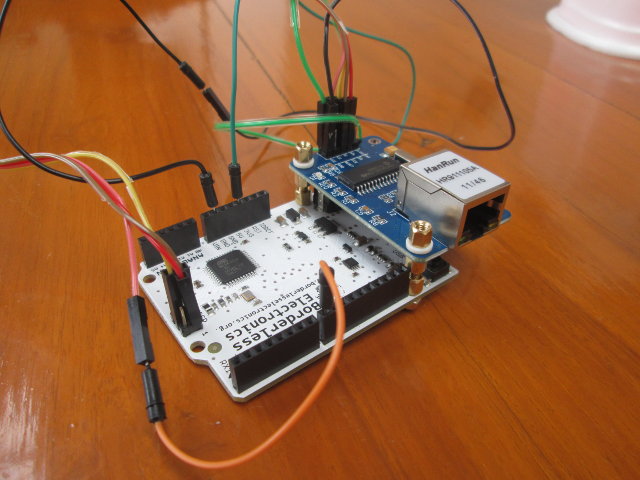
There are 6 out of 10 pins that need to be connected on ENC’s header. I’ve used the following connection table between the two boards. pinout diagram
| EtherCard | Arduino Leonardo |
|---|---|
| VCC | 3.3V |
| GND | GND |
| SCK | SCK – Pin 9 on ICSP header |
| SO | MISO – Pin 11 on ICSP header |
| SI | MOSI – Pin 10 on ICSP header |
| CS | Pin 8 |
The pin numbers on the ICSP header are based on this pin diagram.
Optionally you can also mount the Ethernet module on top or below your Arduino board thanks to the module’s Arduino compatible mounting holes.
Running a Web server in Arduino
Now that we’re done with the connection, it’s time to load a sketch to try it out. You’ll find to run Arduino IDE 1.0.x in Windows, Linux or Mac OS X. I’m using Arduino IDE 1.0.5 in Ubuntu 14.04.
You’ll need to install a library that supports ENC28J60, and there are several, but EtherCard appears to be the most used.
Here’s what I had to to do install it:
- Download EtherCard library
- Uncompress ethercard-master.zip, and rename ethercard-master directory to ethercard or the Arduino IDE will refuse to import the library with the following error: “Library names must contain basic letters and numbers. (ASCII only and no spaces, and it cannot start with a number)“
- In the Arduino IDE, select Sketch->Add file and select the ethercard directory
- You should now see Ethercard in the list of library, contributed section via Sketch->Import Library.
The library comes with 19 samples, that you can access via File->Examples->Ethercard in the Arduino IDE.
Let’s try backSoon sample which should act as a web server and display a “service unavailable” web page. This is the complete source code for this sample:
|
1 2 3 4 5 6 7 8 9 10 11 12 13 14 15 16 17 18 19 20 21 22 23 24 25 26 27 28 29 30 31 32 33 34 35 36 37 38 39 40 41 42 43 44 45 46 47 48 49 50 51 52 53 54 55 56 57 58 59 60 61 62 63 |
// Present a "Will be back soon web page", as stand-in webserver. // 2011-01-30 <[email protected]> http://opensource.org/licenses/mit-license.php #include <EtherCard.h> #define STATIC 0; // set to 1 to disable DHCP (adjust myip/gwip values below) #if STATIC // ethernet interface ip address static byte myip[] = { 192,168,1,200 }; // gateway ip address static byte gwip[] = { 192,168,1,1 }; #endif // ethernet mac address - must be unique on your network static byte mymac[] = { 0x74,0x69,0x69,0x2D,0x30,0x31 }; byte Ethernet::buffer[500]; // tcp/ip send and receive buffer const char page[] PROGMEM = "HTTP/1.0 503 Service Unavailable\r\n" "Content-Type: text/html\r\n" "Retry-After: 600\r\n" "\r\n" "<html>" "<head><title>" "Service Temporarily Unavailable" "</title></head>" "<body>" "<h3>This service is currently unavailable</h3>" "<p><em>" "The main server is currently off-line.<br />" "Please try again later." "</em></p>" "</body>" "</html>" ; void setup(){ Serial.begin(57600); Serial.println("\n[backSoon]"); if (ether.begin(sizeof Ethernet::buffer, mymac) == 0) Serial.println( "Failed to access Ethernet controller"); #if STATIC ether.staticSetup(myip, gwip); #else if (!ether.dhcpSetup()) Serial.println("DHCP failed"); #endif ether.printIp("IP: ", ether.myip); ether.printIp("GW: ", ether.gwip); ether.printIp("DNS: ", ether.dnsip); } void loop(){ // wait for an incoming TCP packet, but ignore its contents if (ether.packetLoop(ether.packetReceive())) { memcpy_P(ether.tcpOffset(), page, sizeof page); ether.httpServerReply(sizeof page - 1); } } |
The code defaults to DHCP, but you can also change this to static IP and define your own board and gateway IP addresses. The MAC address is also hard-coded in the source, and if you plan to have a few you’ll need to store and read the MAC in the EEPROM, but I’ll leave it as it is for this test.
It’s now time to connect the Arduino board to your computer via the micro USB to USB cable in order to power and program the board. Also connect an Ethernet cable to ENC module.
Click on the upload button (or press Ctrl+U) to load and run the program on the board. In theory, you can also run the Serial monitor in the Arduino IDE, and after a few seconds see network parameters similar to:
|
1 2 3 |
IP: 192.168.1.107 GW: 192.168.1.1 DNS: 24.49.173.40 |
But for some reasons, my serial connection is unstable, and I did not manage to get it to work. However, I used Wireshark to check for DHCP messages and find the IP address. You should also be able to find the IP address of the board via your router settings.
The IP address was 192.168.0.111 and I could access the web page via Firefox.
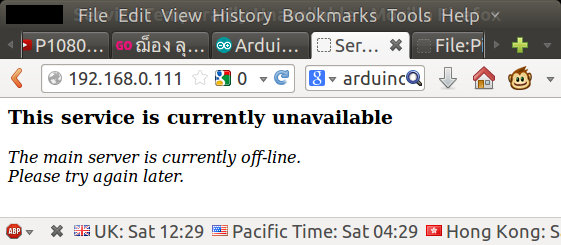 That’s the error message hard-coded in the source, and it means the Ethernet connection and web server are working. Success!
I’ve used charger doctor to have a look at the power consumption. I could measure 0.12 to 0.15A (0.6 to 0.75 Watts) whether the connection was mostly idle or I used ping -f. If I disconnect the ENC28J60 module, the current to power the Arduino board drops to 0.02 to 0.03 mA (0.1 to 0.15 W). Some people have reported ENC28J60 may lose connection after a few hours due to overheating and a small heatsink may be needed.
If you want to learn more about ENC28J60 and Arduino, you may want to visit Luca Dentella’s blog with many related tutorials including one which explains how to control a relay via a web page optimized for smartphones.

Jean-Luc started CNX Software in 2010 as a part-time endeavor, before quitting his job as a software engineering manager, and starting to write daily news, and reviews full time later in 2011.
Support CNX Software! Donate via cryptocurrencies, become a Patron on Patreon, or purchase goods on Amazon or Aliexpress


