
I’ve already written a guide showing how to build and install Android in Radxa Rock. Today I’m going to build the Linux kernel, generate a Ubuntu server images based latest Ubuntu Linaro server release, flash the image to the NAND flash, and show how to install LXDE or XFCE desktop environment. If you are just interested in installing one of the latest supported images, you can download Android, dual boot (Android/Ubuntu), Ubuntu ALIP, and Router images for Radxa Rock @ http://dl.radxa.com/rock/images/, and skip “build” and “generate” instructions, and just follow the flashing instructions below. All steps in this tutorial will be done in Ubuntu 13.10, and lots of the instructions below follow hwswbits blog and Ubuntu Radxa Wiki.
Build the Linux kernel
Let’s start by building the Linux kernel. I’m assuming you’ve already install development tools in Ubuntu (e.g. apt-get install build-essentials). You can refer to the list at the beginning of the Radxa Rock Android post for packages to install with apt-get.
Let’s create a working directory, get the code, and build the kernel.
mkdir radxa_ubuntu
cd radxa_ubuntu
|
1 2 3 4 5 6 |
git clone -b wip/rockchip-3.0-radxa-rock https://github.com/linux-rockchip/rockchip-3.0.git cd rockchip-3.0 export ARCH=arm export CROSS_COMPILE=arm-linux-gnueabihf- make rk3188_radxa_rock_defconfig make -j8 |
At this stage, we’ve build the kernel. However, if we use it as is, DNS and some other network functions will not work because CONFIG_ANDROID_PARANOID is enabled in the default config file. Run make arch=ARM menuconfig, and go to Networking support -> Networking options to disable Only allow certain groups to create sockets. Run make again:
|
1 |
make -j8 |
Let’s complete this section, by building the kernel modules:
|
1 2 3 4 |
mkdir modules export INSTALL_MOD_PATH=./modules make modules && make modules_install cd .. |
Generate Initrd
The initrd is used at boot time to speed up boot among other things.
|
1 2 3 4 |
git clone <a href="https://github.com/radxa/initrd.git" rel="nofollow">https://github.com/radxa/initrd.git</a> cd initrd find . ! -path "./.git*" | cpio -H newc -ov > ../initrd.img cd .. |
Generate Boot.img
In order to create boot.img which will be flashed in the boot partition, we need to download mkbootimg tool, and run the following commands:
|
1 2 3 4 |
wget <a href="http://dl.radxa.com/rock/tools/linux/mkbootimg" rel="nofollow">http://dl.radxa.com/rock/tools/linux/mkbootimg</a> sudo apt-get install lib32stdc++6 chmod +x mkbootimg ./mkbootimg --kernel rockchip-3.0/arch/arm/boot/Image --ramdisk initrd.img -o boot.img |
That’s all good as we should now have a working boot.img. I’ll upload my boot.img soon. You can download boot-radxa-20140127.img.xz.
Generate Ubuntu (Linaro) Server Rootfs
We will first create an empty 1GB file (rock_rootfs.img), format it to EXT-4, and mount it as a loop device:
|
1 2 3 4 |
dd if=/dev/zero of=rock_rootfs.img bs=1M count=1024 mkfs.ext4 -F -L linuxroot rock_rootfs.img mkdir mnt sudo mount -o loop rock_rootfs.img ./mnt |
I’ll download and extract the latest Ubuntu Saucy server image from Linaro available as today:
|
1 2 3 4 5 6 |
wget https://releases.linaro.org/13.12/ubuntu/saucy-images/server/linaro-saucy-server-20131216-586.tar.gz sudo tar zxvf linaro-saucy-server-20131216-586.tar.gz -C ./mnt cd ./mnt sudo mv binary/* . sudo rm binary -fr cd .. |
Now we need to copy the kernel modules and firmware to our rootfs:
|
1 2 3 4 |
sudo mkdir ./mnt/lib/firmware sudo cp -r rockchip-3.0/modules/lib/modules/3.0.36+/ ./mnt/lib/modules sudo mkdir ./mnt/lib/firmware sudo cp -r rockchip-3.0/firmware/* ./mnt/lib/firmware/ |
I’d like Ethernet to work at boot time with DHCP so I edit the relevant file:
|
1 |
sudo vi ./mnt/etc/network/interfaces |
and add the two lines:
|
1 2 |
auto eth0 iface eth0 inet dhcp |
If you’ve already referred to Radxa Rock Ubuntu wiki, at this stage they use qemu and chroot to install extra package, I’ll skip that part, because it can be done inside the board instead, and I came across some error with qemu when accessing the network:
|
1 2 3 4 5 |
apt-get update 0% [Working] qemu: Unsupported syscall: 374 qemu: Unsupported syscall: 374 Err http://ports.ubuntu.com saucy |
We still have one more step to create and enable a script to automatically detect the rootfs partition at boot time.
|
1 |
sudo vi ./mnt/usr/local/bin/mtd-by-name.sh |
And copy the following to the file:
|
1 2 3 4 5 6 7 8 9 10 11 |
#!/bin/sh -e # mtd-by-name link the mtdblock to name # radxa.com, thanks to naobsd rm -rf /dev/block/mtd/by-name/ mkdir -p /dev/block/mtd/by-name for i in `ls -d /sys/class/mtd/mtd*[0-9]`; do name=`cat $i/name` tmp="`echo $i | sed -e 's/mtd/mtdblock/g'`" dev="`echo $tmp |sed -e 's/\/sys\/class\/mtdblock/\/dev/g'`" ln -s $dev /dev/block/mtd/by-name/$name done |
Make sure the script is executable and edit one of the startup script:
|
1 2 |
sudo chmod +x ./mnt/usr/local/bin/mtd-by-name.shsudo sudo vi ./mnt/etc/rc.local |
And add the line below before exit 0:
|
1 |
/usr/local/bin/mtd-by-name.sh |
We are done, let’s umount the rootfs:
|
1 |
sudo umount ./mnt/ |
I’ll upload my Ubuntu Saucy Server rootfs soon. Download link for Ubuntu Saucy server rootfs: radxa_rock_ubuntu_server_saucy_20140127.img.xz (95.4 MB)
Flashing Ubuntu to Radxa Rock
Now that we’ve got boot.img and rock_rootfs.img, we are ready to flash Ubuntu to the board. If you’ve haven’t installed it already, install RKFlashKit, press the recovery button on Radxa Rock, start RkFlashKit, and flash boot.img and rock_rootfs.img respectively to “boot” and “linuxroot” partitions.
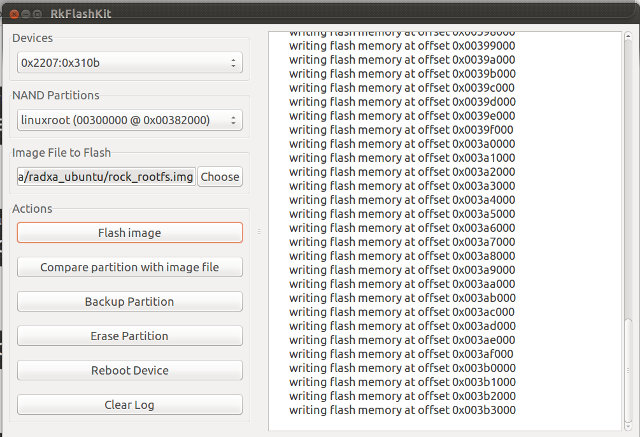 Click on Reboot device, and you should be able to access the console via HDMI or the serial console.
Ubuntu Saucy Server Available RAM and storage
SSH is not installed, but you can call install dropbear or ssh if you want to access the board remotely:
|
1 2 |
apt-get update apt-get install dropbear |
You can now SSH the board with linaro user using the password: linaro.
We’ve got plenty of available RAM:
|
1 2 3 4 5 |
free -mh total used free shared buffers cached Mem: 1.8G 228M 1.6G 0B 7.9M 170M -/+ buffers/cache: 49M 1.8G Swap: 0B 0B 0B |
But there’s only a 1GB flash partition usable with 409MB available.
|
1 2 3 4 5 6 7 8 9 |
df -h Filesystem Size Used Avail Use% Mounted on /dev/mtdblock9 1008M 548M 409M 58% / udev 924M 68K 924M 1% /dev none 4.0K 0 4.0K 0% /sys/fs/cgroup none 186M 264K 185M 1% /run none 5.0M 0 5.0M 0% /run/lock none 927M 0 927M 0% /run/shm none 100M 0 100M 0% /run/user |
However, there’s also a 4GB “user” partition:
|
1 2 3 4 5 6 7 8 9 10 11 12 13 |
cat /proc/mtd dev: size erasesize name mtd0: 00400000 00004000 "misc" mtd1: 00800000 00004000 "kernel" mtd2: 01000000 00004000 "boot" mtd3: 02000000 00004000 "recovery" mtd4: 04000000 00004000 "backup" mtd5: 08000000 00004000 "cache" mtd6: 40000000 00004000 "userdata" mtd7: 00400000 00004000 "kpanic" mtd8: 20000000 00004000 "system" mtd9: 60000000 00004000 "linuxroot" mtd10: 10c000000 00004000 "user" |
We can mount it as follows:
|
1 2 |
sudo mkdir /mnt/user sudo mount /dev/mtdblock10 /mnt/user |
And get some extra space:
|
1 2 3 4 5 |
df -h Filesystem Size Used Avail Use% Mounted on /dev/mtdblock9 1008M 548M 409M 58% / ... /dev/mtdblock10 4.2G 8.0K 4.2G 1% /mnt/user |
But we’d still only get 5GB out of a 8GB NAND flash, and there’s not enough space on the rootfs to install a desktop environment.
Increasing Radxa Rock Ubuntu Rootfs Partition Size
Let’s see what can be done to get rid off useless Android partition, and get a 7GB rootfs.
First we need to modify the Android parameter file to change the MTD layout for linux (parameter-linux). Refer to the Android post to get the parameter files in rockdev directory.
|
1 2 |
cp ../radxa_rock_android/rockdev/parameter parameter-linux vi parameter-linux |
Edit parameter-linux as follow with only 2 partitions for boot.img and rock_rootfs.img (linuxroot):
FIRMWARE_VER:4.2.2

MACHINE_MODEL:radxa_rock

MACHINE_ID:007

MANUFACTURER:RADXA

MAGIC: 0x5041524B

ATAG: 0x60000800

MACHINE: 3066

CHECK_MASK: 0x80

KERNEL_IMG: 0x60408000

#RECOVER_KEY: 1,1,0,20,0

CMDLINE:console=ttyFIQ0 console=tty0 root=/dev/block/mtd/by-name/linuxroot rw rootfstype=ext4 init=/sbin/init initrd=0x62000000,0x00800000 mtdparts=rk29xxnand:0x00008000@0x00002000(boot),0x00E00000@0x00A000(linuxroot)
Now get the upgrade_tool (download link), enter recovery mode and flash the parameter file:
|
1 |
./upgrade_tool di -p parameter-linux |
Start RkFlashKit again to flash boot.img and rock_rootfs.img again. This time, you should only see two partitions in the tools: boot and linuxroot.
However, the first time I tried to flash rock_rootfs.img, I got the following error message in RkFlashKit:
|
1 |
"Flash memory at 0x0000a000 is differnt from file!" |
And after reboot, in the serial console, I got quite a few error message similar to:
|
1 |
FlashReadRetry error!!,row = 0 |
A low level format, before using RkFlashKit, and flashing the parameter file fixed the issue:
|
1 |
./upgrade_tool lf |
You may want to run the command above first in any case, because flashing rock_rootfs.img takes nearly 30 minutes… If you do so, the low level format command must be done before flashing all other files in including the parameter, boot, and rootfs files.
After flashing is completed, reboot the board. You’ll notice the rootfs is still 1GB. Simply resize the EXT-4 partition:
|
1 |
resize2fs /dev/block/mtd/by-name/linuxroot |
Let’s check:
root@linaro-server:~# df -h
Filesystem Size Used Avail Use% Mounted on
/dev/mtdblock1 7.3G 546M 6.4G 8% /
udev 924M 84K 924M 1% /dev
none 4.0K 0 4.0K 0% /sys/fs/cgroup
none 186M 260K 185M 1% /run
none 5.0M 0 5.0M 0% /run/lock
none 927M 0 927M 0% /run/shm
none 100M 0 100M 0% /run/user
Yes! Success! The rootfs partition is 7.3 GB with 6.4GB available.
Installing LXDE or XFCE Desktop Environment
If you just plan to use Radxa Rock as a server, you are done, but if you want to run a desktop environment one more step is needed. Since there are no GPU Linux drivers in RK3188 based devices, installing Unity is probably a very bad idea and would lead to poor performance. Two other lightweight desktop environments are frequently used: LXDE in distributions such as Lubuntu or ALIP, or XFCE in distributions such as Xubuntu.
The good news is that installation is very easy, but it can take a few hours to download and install all required packages. So if you want to skip the part below, you can download the compressed rootfs with Xubuntu-Desktop to flash directly to your board.
Lubuntu (LXDE) requires 378 MB of archives and 1166 MB of additional disk space, and can be installed with the following command:
|
1 |
sudo apt-get install lubuntu-desktop |
Xubuntu (XFCE) requires 452 MB of archives and 1370 MB of additional disk space, and can be installed with the following command :
|
1 |
sudo apt-get install xubuntu-desktop |
I decided to install Xubuntu desktop, and it took 2 to 3 hours. I’ll upload my Ubuntu Saucy XFCE rootfs soon if you want to skip that part.
Once installation is complete we still have 4.5GB free, but somehow it used nearly 2GB additional space, instead of the 1370 MB promised.
|
1 2 3 4 5 6 7 8 9 |
df -h Filesystem Size Used Avail Use% Mounted on /dev/mtdblock1 7.3G 2.5G 4.5G 36% / udev 924M 84K 924M 1% /dev none 4.0K 0 4.0K 0% /sys/fs/cgroup none 186M 296K 185M 1% /run none 5.0M 0 5.0M 0% /run/lock none 927M 0 927M 0% /run/shm none 100M 0 100M 0% /run/user |
At boot time, you get the the login screen (use “linaro” user with “linaro” password), and the system is very usable. I’ve opened several programs including Gimp, Firefox, Abiword, a terminal window, a game, a music player, and more (See screenshot below), and everything runs pretty smoothly. Stability may need to be improved however, since I’ve got one random reboot as I accessed SAMBA shares. I could not reproduce the issue.


Jean-Luc started CNX Software in 2010 as a part-time endeavor, before quitting his job as a software engineering manager, and starting to write daily news, and reviews full time later in 2011.
Support CNX Software! Donate via cryptocurrencies, become a Patron on Patreon, or purchase goods on Amazon or Aliexpress


