You may have seen the Motorola Atrix 4G at CES 2011 and its ability to run Windows 7 via the Citrix Receiver installed in the smartphone and the laptop dock. This can be interesting for small and large businesses alike since they could do with one (and more) Citrix server and a phone for each employee without the need for an extra laptop or desktop PC.
Citrix does not only support Motorola Atrix 4G and you could install the receiver on your own smartphone or tablet free of charge:
| Windows Mobile | Receiver 11.5 for Windows Mobile |
| BlackBerry | Receiver 2.0 for BlackBerry |
| Android | Receiver 2.0 for Android |
| iPhone | Receiver for iPhone |
| iPad | Receiver for iPad |
Today, I’ll show how to install Citrix XenDesktop (The “server” part of Citrix) in order to run Windows 7 or any other operating systems supported by Citrix.
First download Citrix XenDesktop – Express Edition. The file (XD5_Express.zip) is quite large (1.8GB) so the download may take a while. This version is valid for 30 days only after you’d have to purchase the full version.
There are 5 files inside the zip file:
- XenDesktop5.iso – XenDesktop Installation DVD Image
- XenServer-5.6.0-install-cd.iso – XenServer Installation CD Image
- XenDesktop_Express_Edition_License.lic – License for up to 10 users
- XenServer-5.6.0-XenCenter-Japanese.msi – Installation file for the Japanese version of XenCenter.
- XenDesktop5_Express_Edition_Tutorial.wmv – Video Tutorial
First you can have a look at XenDesktop5_Express_Edition_Tutorial.wmv, the Tutorial for Citrix XenDesktop 5 Express Edition Tutorial. The video is also available on Youtube (see below), if you don’t want to download XenDesktop for now.
The video tutorial covers:
- Software and hardware requirements
- Installation Process
- Configuration of a Virtual Desktop
- Evaluation of HDX technologies
You may also consult the documentation at http://support.citrix.com/proddocs
If you want to do the full installation it may take a while (plan for half day to one full day).

Here’s the summary of the installation and configuration instructions.
First make sure your server can run XenServer and matches the following requirements:
- 64-bit x86 server-class system
- CPU: 1.5 GHz minimum, 2 GHz or faster multi-core recommended
- Intel® VT or AMD-V™ required for support of Windows guests
- Minimum 4GB (Up to 256GB) physical memory
- 100Mb/s or faster NIC
- Minimum 150 GB locally attached storage (PATA, SATA or SCSI)
If you are ready to go, burn XenServer-5.6.0-install-cd.iso to a CD or mount it via a Virtual CD/DVD manager such as Virtual Clone Drive and install it in your server.
The following step is to install Citrix XenCenter inside your console system using the same CD. After installation click on “Citrix XenCenter” icon to start the configuration.
Click Add Server entering the IP address of your XenServer and its root password.
Then you’ll need to create a Windows Share with the Operating Systems ISO (e.g. Windows 7) and XenDesktop 5 ISO (XenDesktop5.iso).
Back to XenCenter, select Storage->New Storage and select Windows File Sharing (CIFS) enter the path (e.g. //192.168.0.251/citrix) and credentials of your Windows Share and press Finish.
At this point, your VM Hosting infrastructure and console has been fully installed and configured, and you are to move to the installation and configuration of your virtual machines.
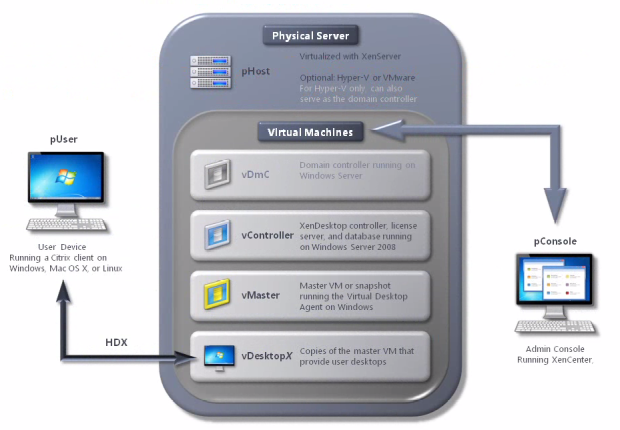
In XenCenter pHost select New VM->Windows 2008 and change the name to VdMc and enter a description in the next dialog box. Then select the Windows 2008 ISO file and accept the default for all remaining settings.
You can now go to the Console tab to install Windows 2008.
Then repeat these steps for the XenDesktop Controller (new VM called vController) and Windows 7 ISO (new VM called vMaster).
You now have 3 virtual machines. Right click on each of then to install XenServer tools.
After that you may to configure your domain to that you can login to all machines.
Inside vMaster (Windows 7) install XenDesktop 5 (XenDesktop5.iso). At the first screen, select Virtual Desktop Agent and choose Quick Deploy. After the installation click “Close” and the virtual desktop will restart.
Finally, install all your applications in the master VM and shut it down.
After that you’ll have to create a Virtual Desktop (vDesktopx).
At that point you’ll be able to access your virtual desktop via a web browser, simply input the IP address of the controller, install the plugins, login and launch the virtual desktop. That’s it. In mobile devices, you may install the Citrix receiver instead of using a web browser.

Jean-Luc started CNX Software in 2010 as a part-time endeavor, before quitting his job as a software engineering manager, and starting to write daily news, and reviews full time later in 2011.
Support CNX Software! Donate via cryptocurrencies, become a Patron on Patreon, or purchase goods on Amazon or Aliexpress


