Cubieboard Unboxing and Quick Start Guide

I’ve received another cool board this week with the Cubieboard development board. As a quick reminder, the Cubieboard is the only proper low cost AllWinner A10 development board available, and comes with 512MB/1GB RAM, 4GB NAND Flash, 10/100 MBit Ethernet, HDMI output, 2x USB Host port, 1x USB OTG port, a microSD socket, a SATA interface, an IR sensor and 2 headers to access extra pins such as GPIOs, I2C, SPI,VGA pins, CVBS pins etc…

CubieTech had a successful Indiegogo campaign where the 1GB board was available for $59 including worldwide shipping (and as low as $19 for early birds), and you can now buy it from resellers. [Update: It’s now available with several cables, USB to TTL debug board, and an enclosure for $80 on dx.com]

Cubieboard Unboxing

The board comes with a SATA cable and a USB cable for power. There’s no power supply so you’ll need you own, either using the USB cable provided, or a standard USB power supply connected to the USB OTG port.
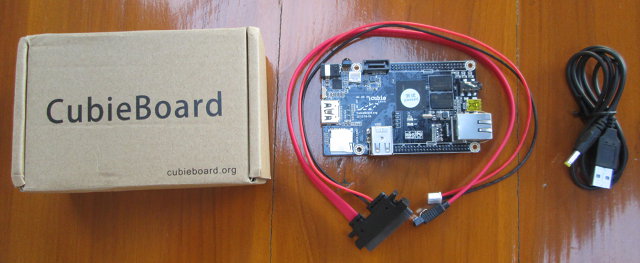
Cubieboard + USB Power Cable + SATA Cables

Most of the components are at the top of the board.
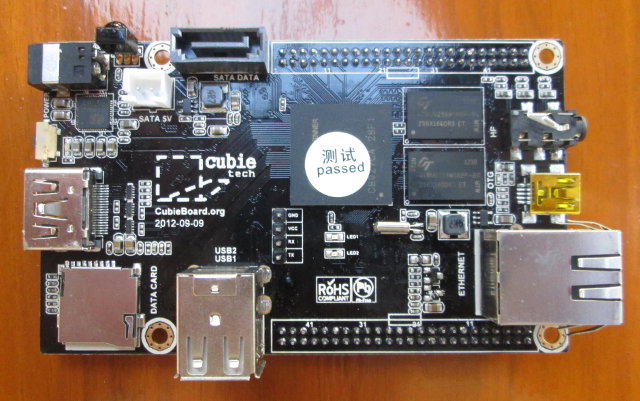
Cubieboard (Top) – Click to Enlarge

But the 2 expansion headers are soldered on the back, as well as the line-in connector, the Ethernet PHY and the 4G NAND flash.
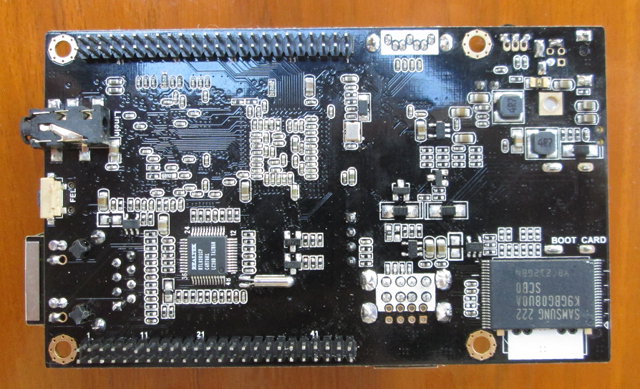
Cubieboard (Bottom) – Click to Enlarge

The board is slightly bigger than the Raspberry Pi, but provides much more features, and the 4 mounting holes may also be convenient if you intend to use a casing. The features of the Cubieboard are very similar to the Mele A1000, and it just lacks the casing, remote control and the Wi-Fi module. Composite, VGA & SPDIF outputs are also missing, but those can also be added via the expansion header.

If you prefer unboxing videos, watch haritot video (8 minutes). His kit also includes a transparent casing.

Getting Started with the Cubieboard

First Boot

First, connect USB keyboard & mouse, an Ethernet cable, an HDMI cable and finally the power supply to boot the board.  I used the USB power supply that came with my Raspberry Pi. My board NAND flash came pre-loaded with CyanogenMod with Android 4.0.4 and Kernel 3.0.42+, so after a few seconds it booted in Android. You then just need to go to Settings->Ethernet to enable Ethernet and get an IP address assuming your LAN has a DHCP server. At this point, you are good to go and do whatever you want with the board in Android.

Installing Linux

However, I assume most people actually plan to run Linux on this board. Maxnet’s BerryBoot makes this very easy, and there are 2 methods.

  • Within Android – If you have Android running in your Cubieboard, install the APK from http://get.berryboot.com/, and follow the instructions in BerryBoot Android to install Linux in a microSD card.
  • From a Windows or Linux PC – See instructions below.

I mainly followed the instructions provided on Cubieboard.org to install Linaro Ubuntu ALIP 12.08 on a microSD card.

  1. Insert a microSD card to your computer (preferrably 4GB or higher).
  2. Download “Berryboot-cubieboard-beta1.zip” from http://www.berryterminal.com/doku.php/berryboot_a10 and extract it.
  3. “Burn” the image in the microSD card
    • In Windows
      1. Download “win32diskimager-binary.zip” from https://launchpad.net/win32-image-writer/+download
      2. Run Win32DiskImager.exe
      3. Select “Berryboot-cubieboard-beta1.ddimg” file
      4. Verify that correct disk drive is selected. This is very important. On my system, Win32DiskImager.exe selects my external USB hard drive by default…
      5. Write the file to the microSD card
    • In Linux
      1. Open a terminal window, and type:

        where /dev/sdX corresponds to your SD card.
      2. You’re done.
  4. Insert the microSD card into the Cubieboard, and power on the board.
  5. Follow the instructions provided in BerryBoot user interface.
  6. Select the media device where to install the Linux distribution. In my case, I had 2 choices: mmcblk0 or networked storage (iSCSI SAN). I’m not sure what the second choice does (NAS Boot, See Max’s comment), and selected the microSD card. (mmcblk0)
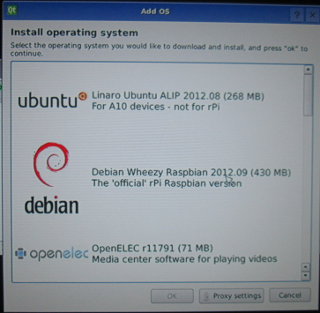
  7. BerryBoot User Interface Showing List of OSes.

    At this stage, it may tell you a new version is available, and ask you to download it. I did just that, but nothing changed after reboot, and asked me again to download the latest version. So you can safely say “No”.

  8. Select a Linux distribution from the list.
    1. Linaro Ubuntu ALIP 2012.08 (268 MB)
    2. Debian Wheezy Raspbian 2012.09 (430 MB)
    3. OpenELEC r11791 (71 MB)
    4. Puppy Linux Alpha (123 MB)
    5. RaspRazor (624 MB) – Distribution with Qt/Razor 0.4.9 desktop
    6. Sugar OS (473 MB) – Education OS as used in OLPC Laptop
    7. LTSP Thinclient Berry Terminal (22 MB) – Thin client OS to connect to LTSP/Edubuntu server
    8. BerryWebServer (5MB) – Distribution with Lightppd, php 5.3 & SQLite
    9. Memtester (<1MB) – Program to test the memory
  9. After selection (I chose Linao ALIP), BerryBoot will download the image, and install it in your chosen storage device.
  10. Once the installation is complete, exit the BerryBoot installer to reboot the board, and start your newly installed Linux operating system.

More Information and Technical Support

If you want to use/test the latest kernel and bootloader, you can get the Cubieboard hardware pack from the “nightly” builds at http://dl.linux-sunxi.org/amery/sunxi-3.0/latest/. You need to use sunxi-media-create.sh, and the instructions are the same as for a1x-media-create.sh. If you want to keep your existing rootfs, and just update the U-Boot, the kernel, kernel modules and binary libraries, simply run something like:


Alternatively, you may also want to build your own kernel (and u-boot) for the Cubieboard, which you can do by following the first steps instructions on sunxi-linux.org.

You can get hardware and software support on Cubieboard Google Group or on #cubieboard IRC channel. However, if you are “playing” around with the kernel or u-boot source code or find bugs, you may prefer to contact sunxi-linux mailing-list which is more geared towards development (most patches go through this list before behind merged).

Share this:

Support CNX Software! Donate via cryptocurrencies, become a Patron on Patreon, or purchase goods on Amazon or Aliexpress

Radxa Orion O6 Armv9 mini-ITX motherboard
Subscribe
Notify of
guest
The comment form collects your name, email and content to allow us keep track of the comments placed on the website. Please read and accept our website Terms and Privacy Policy to post a comment.
31 Comments
oldest
newest
Magio
Magio
12 years ago

Too slow too late too bad … Million user super supported Pi for far less or for me hard kernel odroid U samsung quad core A9 for a few bucks more blows this single Core A8 back to where it came from .. Freescale imx6 quad core what have you to offer as well 😉

cnxsoft
12 years ago

@Magio It all depends what you want to do. Depending on your requirements, the Raspberry Pi is not always the cheapest option. The ODROID-U is very powerful and low cost ($99 inc. shipping), but lacks I/O headers. The Cubieboard is in between in terms of performance and price, it has a small, but active, community behind it, and 2 expansion headers which allow to do everything the Pi does and more. The cheapest devboard for Freescale i.MX6 is the Sabrelite i.MX6 (Elements14) at $179. HI-802 dongle ($89) could also be an option, and although it’s not a devboard, the debug… Read more »

Max
Max
12 years ago

>or networked storage (iSCSI SAN). I’m not sure what the second choice does

The second option is experimental support for storing the files on a NAS device such as those made by Synology and QNAP.

Need to create an iSCSI LUN (“virtual disk”) first on your NAS device, and then connect to it.
It will be presented in Linux as a normal /dev/sda disk.

http://forum.synology.com/wiki/index.php/How_to_use_the_iSCSI_Target_Service_on_the_Synology_DiskStation

mac me
mac me
12 years ago

@Jean-Luc Aufranc (CNXSoft) As someone that uses a mele A1000 24/7 running as a debian headless media server i have experienced just how weak the linux support (and SOC support) for A10 is and just how small the “community” is .. the pi may be slower but has immense support, right from the SOC maker and addons (the really neat Olimex pi board and uext addons) and you know its going to be around for a considerable time I would say in moving my setup from a hacked iconnect to the mele the biggest difference has been the impact of… Read more »

mac me
mac me
12 years ago

MEDIA server .. the squeezebox media scan (big library) is around 3x faster, now the jgeg resizing element of it i know (from when i tried disabling it on the plug on its own makes a huge diff) quite a few of the plugins use some form of transcoding as well .. so all in all well worth the move to armhf 🙂

I will have to give my mele to my nephew i think, just cant resist the U2 for the price 🙂

e8hffff
e8hffff
12 years ago

Tried on Mele 2000 and it seems to work. Yet to test the full install. What’s disappointing is still the lack of using nand memory on-board the motherboard. The serious short coming of all A10 development so far for Linux.

oliverzhang
oliverzhang
11 years ago

why I can’t reboot from miniSD’s Ubuntu Linux OS after shutdown Ubuntu(12.08) that download from Ardroid Berryboot.

Philip
Philip
11 years ago

i’d like to see a revision B to the cubieboard with the allwinner A20 processor. It’s a dual core processor with the same pinouts so I assume you could just put on the same board with little or no changes. Let’s see what people come up with in the next couple of months.

Of course even better would be to have the cortex a7 Allwinner A31 quad core processor, but that would be a new board.

hyojae Kim
hyojae Kim
11 years ago

Hello, I read your guide very interestingly.

May I use your guide on linux-sunxi.org? It’s linked to here and I want to translate into korean users.
(I will copy and paste into new page of wiki after translating)
Thank you.

Happy new year!

Pablo Aliaga
Pablo Aliaga
11 years ago

Hello

First thanks for your usefull guide. I’m a newbie
I just recived a cubieboard with android, and I want to install the raspbian.
But I would like to make a backup of the NAND memory or this memory it’s not affected ?

Pablo Aliaga
Pablo Aliaga
11 years ago

@Pablo Aliaga
By the way, I would like to make a couple of things with the cubieboard, as computer vision (opencv) and connection with arduinos (http://arduino.cc/) or IOIO (http://ytai-mer.blogspot.com.es/2011/04/meet-ioio-io-for-android.html).

I would like to make a blog with every step, and I ask also permision to translate to spanish your page, and give reference to this page.
(althoug I want to make the blog in both languages )

Pablo Aliaga
Pablo Aliaga
11 years ago


Hi, again.

I started to make a blog to put all I’m learning about cubieboard on it, I put a couple of links to your page.

This is the url http://cubieboard.blogspot.com.es/
If you have any comment, don’t hesitate to let me know.

Thanks

Troels Tornmark
Troels Tornmark
11 years ago

Newbie to restrictions analysis of Linux distros, but anyone tried a Chromium OS build on the Cubieboard yet? If so, what method worked?

cocopuff
cocopuff
11 years ago

@oliverzhang
I have this same problem. Can someone direct me to a solution?
I don’t have win 32 bit to image a disk to the sd. I used the android berryboot to install the images. The images run fine, I was able to access both ubunto and debian. However, as soon as I shut down, I can’t boot up from the SD card. I have to boot into android using the mini usb power from my computer. I can’t use the provided usb to 5v adapter. Thanks.

cocopuff
cocopuff
11 years ago

@Troels Tornmark
I have run chromium under ubuntu after initial image flash. After I shutdown. I can’t boot up to any os except for android through mini usb with the sd card ejected. If I keep the card it, android doesn’t even load.

90dfr3y
90dfr3y
11 years ago

Hi, I tried your steps, but when I select Linaro Ubuntu, it only download up to 13%. I kept on trying, but still the download would not complete.
Do you know what could be the problem? Are there other ways to install Ubuntu on Cubieboard?
I appreaciate any of your help/recommendations.
Thanks!

Ruediger Leibrandt
Ruediger Leibrandt
11 years ago

Congrats, @Jean-Luc Aufranc (CNXSoft) ! I like the Cubie board very much for it’s SATA connector, and indeed, and in regards to @magio , the cubieboard is for advanced hardware hackers that feel to limited on the Pi and can’t make much from the ODROID or don’t need the latters power. However I agree with @Philip – the A20 would be a major improvement, permitting a smooth use of a full blown desktop like KDE – at least by pure calculation and comparision to my 1GHz AMD netbook I think it should be usable. For those dedicated to design cases… Read more »

wao
wao
11 years ago

I have installed this image: cb-sdcard-1.1-linaro-quantal-alip-20130227-290.img on a micro SD Card…
It boots with no issues… When I attempt to set up the Wireless Adapter, it asks for a password.
I’ve been looking for days.. where do I find the elusive Administrator’s password????

Sky
Sky
11 years ago

@Magio
And than you want to use SATA drive…
lol

didier
didier
11 years ago

@wao
le password est cubie

Alvin
Alvin
11 years ago

I had written berryboot-cubieboard-beta6.zip and inserted the microSD card into my Cubieboard A20, and power on the board. However it just unable to boot up.

My A20 boot up to Android only when I had removed the microSD.

Please advice why my A20 unable to boot up from my microSD.

Frank
Frank
11 years ago

@Alvin
Hi I have the same problem.
Do you have a solution in the meanwhile?
Regards
Frank

Boardcon Rockchip RK3588S SBC with 8K, WiFI 6, 4G LTE, NVME SSD, HDMI 2.1...